background image


Ⅲ、

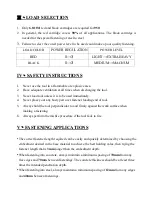
LOAD SELECTION 


1.


Only 

6.8/11M

 red and black cartridges are required for 

950

2.


In  general,  the  red  cartridge  covers 

90%

  of  all  applications.  The  black  cartridge  is 

needed for the special fastening of steel to steel. 

3.


Failure to select the corect power level to be used could make a poor quality fastening

LOAD COLOR


POWER REGULATION 

POWER LEVEL


RED 

1→3


LIGHT

EXTRA HEAVY 

BLACK


1→3


MEDIUM

MAGNUM 


IV

SAFETY INSTRUCTIONS 


1.


Never use the tool in a flammable or explosive area. 

2.


Have adequate ventilation at all times when discharging the tool. 

3.


Never load tool unless it is to be used immediately. 

4.


Never place your any body part over fastener loading end of tool. 

5.


Always hold the tool perpendicular to and firmly against the work surface when 
making a fastening. 

6.


Always perform the misfire procedure if the tool fails to fire.


V

FASTENING APPLICATIONS 


The correct fastener length required can be easily and quickly determined by choosing the 
embedment desired in the base material to achieve the best holding value, then trying the 
fastener length that is 

3mm

 longer than the embedment depth. 


When fastening into concrete, always maintain a minimum spacing of 

70mm

 from any 

free edges and 

70mm

 between fastenings. The concrete thickness should be at least three 

times the intended penetration depth. 


When fastening into steel, always maintain a minimum spacing of 

12mm

 from any edges 

and 

40mm

 between fastenings. 


Содержание EXP951

Страница 1: ...EXP951 SEMIAUTOMATIC POWDER ACTUATED TOOL WITH POWER GRADINGAND SILENCER OPERATORS MANUAL WARNING SEVERE INJURY CAN RESULT FROM FAILURE TOOBEY ALL INSTRUCTIONS IN THIS MANUAL ...

Страница 2: ......

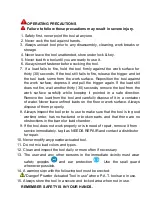
Страница 3: ...irection Remove the load from the tool and carefully dispose of it in a container of water Never leave unfired loads on the floor or work surface Always dispose of them properly 8 Always inspect the tool prior to use to make sure that the tool is in good working order has no fractured or broken parts and that there are no obstructions in the barrel or load chamber 9 If the tool does not work prope...

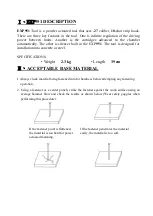
Страница 4: ...into concrete or steel SPECIFICATIONS Weight 2 3 kg Length 39 cm Ⅱ ACCEPTABLE BASE MATERIAL I Always check material being fastened into for hardness before attempting any fastening operation 2 Using a fastener as a center punch strike the fastener against the work surface using an average hammer blow and check the results as shown below Wear safety goggles when performing this procedure If the fas...

Страница 5: ...If the fastener cracks or shatters the material is too brittle If the fastener makes a small Indentation into the material the material is suitable for fastening ...

Страница 6: ...lace your any body part over fastener loading end of tool 5 Always hold the tool perpendicular to and firmly against the work surface when making a fastening 6 Always perform the misfire procedure if the tool fails to fire V FASTENING APPLICATIONS The correct fastener length required can be easily and quickly determined by choosing the embedment desired in the base material to achieve the best hol...

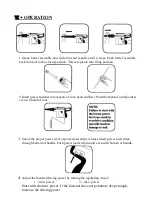
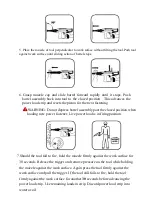
Страница 7: ... end first Push the fastener until point is even with end of tool 3 Select the proper power level of power load strips Always insert power load strips through bottom of handle Push power load strip in until even with bottom of handle 4 Adjust the fastener driving power by turning the regulating wheel 1 min power 3 max power Start with the min power If the fastener does not penetrate deep enough in...

Страница 8: ... assembly past the closed position when loading new power fastener Live power load is in firing position 7 Should the tool fail to fire hold the muzzle firmly against the work surface for 30 seconds Release the trigger and remove pressure on the tool while holding the muzzle against the work surface Again press the tool firmly against the work surface and pull the trigger If the tool still fails t...

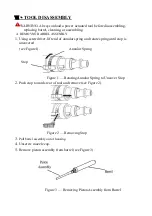
Страница 9: ...d of annular spring and rotate spring until stop is uncovered see Figure l Annular Spring Figure 1 Rotating Annular Spring to Uncover Stop 2 Push stop towards rear of tool and remove see Figure 2 Figure 2 Removing Stop 3 Pull barrel assembly out of housing 4 Unscrew muzzle cap 5 Remove piston assembly from barrel see Figure 3 Figure 3 Removing Piston Assembly from Barrel Stop ...

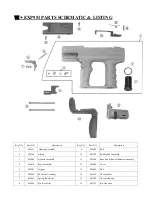
Страница 10: ... 450108 O Ring 10 901700 Rubber Pad Assembly 3 901800 Silencer Assembly 11 903600 Rear Pad Power Indicator Assembly 4 901010 Pawl Assembly 12 901002 Cover 5 901007 Trigger 13 901005 Bolt 6 902000 Rock Arm Assembly 14 901301 Advance Bar 7 455041 Spring Rock Arm 15 901302 Advance Spring 8 455042 Pin Rock Arm 16 901303 Pin Advance ...

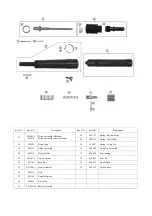
Страница 11: ... Holder 18 452220 Piston Ring 30 454037 Spring Firing Pin 19 902310 Guide Assembly 31 454100 Firing Pin Assembly 20 901210 Plastic Buffer 32 454034 Sear Spring 21 901105 A Pin Connector 33 454033 Sear Pin 22 901104 Push Pin 34 454035 Sear Holder 23 901100 A Liner Assembly 35 902312 Guide Sleeve 24 600313 Ball 25 901106 Annular Spring 26 306012 Key Stop 27 901200 B Barrel Assembly ...

Страница 12: ...DURE If the tool does not fire after squeezing trigger continue to hold the depressed tool firmly against the work surface for at least 30 seconds This will protect the operator and bystanders from injury in the event of a delayed firing Then carefully open the tool remove the load strip and put it into a container of water or other nonflammable liquid Never carelessly discard or throw into a tras...

Страница 13: ......

Отзывы: