background image

09

Problem

Cause

Solution

Motor does


not turn

1

.

Battery is not fully charged

2

.

Transmitter battery low

3

.

Motors not connected


4

.

The motor is damaged

5

.

Reciever is not bound to Tx

6

.

ESC in set-up mode

Control Surfaces 

are not responding 

to stick input

Model is flying 
erratically

1.The control surfaces are not centered
2.The control surfaces are severely off 
   center
3.Center of Gravity (CG) is not in the 
   correct position.

Model does not 
climb well

1.The battery is not fully charged
2.Elevator surface response is 
   reversed
3.CG is too far back causing a tail 
   heavy airframe

Limited Radio 
Range

1

.

Transmitter or receiver 

    (if applicable) power is low


 1. Charge or replace any batteries used 
     on the transmitter and receiver (if 
     applicable)

Model moves 

backwards

1

.

Locate the three (3) connections between 

    the motor and ESC, disconnect two (2) of
    the three (3) and swap their places for 
    proper response

2

.

Install a full charged battery

3

.

Check for connection 

    ESC and   

between the 


 4

.

Replace motor

5

.

Consult Radio manual and 

    through bind procedure again 


go 

6

.

Hold


model


and


move 

   postion then back down to idle 


throttle to full 

1

 .

Both ESC and motor are not 

   establishing a proper response 
   range

1.The servo lead may be connected 

   to the receiver incorrectly


2

.

The servo is damaged

1.Make sure the servo leads are properly 
   connected to the receiver
2.Replace the servo

1.Make trim adjustments as necessary 
   on the transmitter if the issue is not serious
2.Make manual adjustments as necessary
   to the surface control linkages
3.Re-position the Li-Po battery as necessary 
   to achieve a balanced CG.

1.Re-charge the battery within the 
   specified charge time
2.Charge the surface direction via the 
   'reverse' function on the transmitter
3.Re-position the Li-Po battery as 
   necessary to achieve a balanced CG


1. Charge the batteries

Содержание A1

Страница 1: ...A 1 ...

Страница 2: ...be operated with caution and common sense and requires some basic mechanical ability Failure to opera te this Product in a safe and responsible manner could result in injury or damage to the product or other property This product is not intended for use by children without direct adult supervision Do not use with incompatible components or alter this product in any way outside of the instructions ...

Страница 3: ...etting CG Location Accessories Model Flying Precautions Box Contents 01 01 02 03 Control Horn and Servo Arm Settings 04 Control Direction Test 05 Clevis Installation 06 Control Surface Centering 06 06 07 08 Trouble Shooting 09 10 Pre Flight Checks 10 ...

Страница 4: ...ng for increased safety and optimal performance We recommend using Li Po batteries with a minimum of 40C or above 16X6 Propeller Brushless Outrunner Motor 5060 6S 270Kv 80A Pro Brushless ESC 6S Servos metal shell and digtial servos 9 8PCS Battery 22 2V 5000 6000mAh 40C Li Po Radio System 2 4Ghz 7Ch Transmitter and Receiver ...

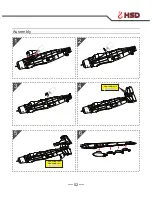
Страница 5: ...02 Assembly 1 2 3 4 5 6 PM 3 35MM 2pcs PM 3 60MM 1pcs PM 3 45MM 1pcs ...

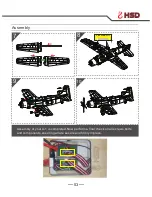
Страница 6: ...03 Assembly Assembly of your A 1 is completed Now perform a final check on all screws bolts and components ensuring all are secure and firmly in place 7 8 9 10 PM 3 60MM 2pcs ...

Страница 7: ...control response See the lower table The table to the right shows the factory settings for the control horns and servo arms Fly the aircraft at factory settings before making changes Horns Arms Elevator Rudder More control throw Less control throw Ailerons Flaps The Rudder Th whee The Rudder The front wheel steering ...

Страница 8: ... your transmitter to the receiver before performing this test Small Big Transmitter Command Aircraft Reaction Elevator Up Elevator Command Down Elevator Command Aileron Stick Right Stick Left Rudder Stick Right Stick Left Half the Throttle Flaps the Landing gear According to everyone s operating habit the position of swich can be chosen on the premise of optional remote control swich According to ...

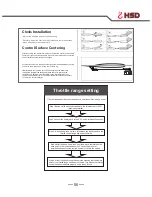
Страница 9: ...been initialized properly and is ready for use Control Surface Centering centered If the control surfaces are not centered mechanically center the control surfaces by adjusting the linkages Clevis Installation After assembly and transmitter setup verify that the control surfaces are 1 2 3 4 5 6 With the flaps switch in the up position flaps should be adjusted so they are even with the ailerons and...

Страница 10: ...07 CG LOCATION 15mm 15mm 15mm 15mm 20mm 20mm Flaps 35mm CG 80 85mm ...

Страница 11: ...08 Accessories HSD A1 T01 HSD A1 T02 HSD A1 T03 HSD A1 T06 HSD A1 T07 HSD A1 T04 HSD A1 T05 HSD A1 T08 HSD A1 T16 HSD A1 T09 HSD A1 T10 HSD A1 T13 HSD A1 T17 HSD A1 T14 HSD A1 T15 HSD A1 T11 HSD A1 T12 ...

Страница 12: ... motor and ESC disconnect two 2 of the three 3 and swap their places for proper response 2 Install a full charged battery 3 Check for connection ESC and between the 4 Replace motor 5 Consult Radio manual and through bind procedure again go 6 Hold model and move postion then back down to idle throttle to full 1 Both ESC and motor are not establishing a proper response range 1 The servo lead may be ...

Страница 13: ... with roads electric telephone poles wires and water near by orwithin close proximity to full size air traffic MODEL FLYING PRECAUTIONS PRE FLIGHT CHECKS 1 Always range check your model before any flight especially when flying a new model for the first time Follow your radio manufacturers guidelines for performing this check 2 Check all screw bolts and mounting points are firmly secured including ...

Страница 14: ...A 1 ...

Отзывы: