


VDPL3601MHW12
HQPOWER
25
0
7
Ohne Funktion
8
21
Weiß
22
35
Rot
36
49
Grün
50
63
Blau
64
77
Cyan
78
91
Magenta
92
105
Gelb
106
119
Purpur
120
133
Orangefarbig
134
147
Grüngelb
148
161
Rosa
162
175
Braun
176
189
Gold
190
203
Karmesinrot
204
217
Violett
218
231
Dunkelblau violett
232
244
Bewegliches Makro 1
10
LED-Makro
245
255
Bewegliches Makro 2
11
LED-Geschwindigkeit
0
255
Farbveränderung mit abnehmender Geschwindigkeit
0
7
Ohne Funktion
8
22
Automatisches Programm 1
23
37
Automatisches Programm 2
38
52
Automatisches Programm 3
53
67
Automatisches Programm 4
68
82
Automatisches Programm 5
83
97
Automatisches Programm 6
98
112
Automatisches Programm 7
113
127
Automatisches Programm 8
128
142
Musiksteuerung 1
143
157
Musiksteuerung 2
158
172
Musiksteuerung 3
173
187
Musiksteuerung 4
188
202
Musiksteuerung 5
203
217
Musiksteuerung 6
218
232
Musiksteuerung 7
12
Automatisches
Programm
233
255
Musiksteuerung 8
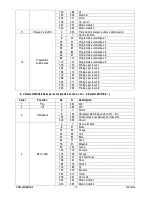
b.
Detaillierte DMX-Werte pro Kanal (4-Kanal-Modus, siehe ‘6. Anwendung, MODUS 6’)
Kanal
Funktion
Von
Bis
Umschreibung
1
Schwenkbewegung
0
255
540°
2
Neigebewegung
0
255
270°
0
7
Geschlossen
8
134
Elektronischer Dimmer von 100% ~ 0%
135
239
Stroboskop mit steigender Geschwindigkeit
3
Shutter
240
255
Offen
0
7
Ohne Funktion
8
21
Weiß
22
35
Rot
36
49
Grün
4
LED-Makro
50
63
Blau
Содержание EXCALIBOR I
Страница 2: ...VDPL3601MHW12 HQPOWER 2...


