


Replacing the battery
Before beginning the replacement process, make sure the thin client is unplugged from the power source.
To replace the battery:
1
.
Remove the side access panel and metal side cover
2
.
Remove and replace the battery
3
.
Replace the metal side cover and side access panel
Removing the side access panel and metal side cover
WARNING!
Before removing the side access panel, ensure that the thin client is turned off and the
power cord is disconnected from the electrical outlet.
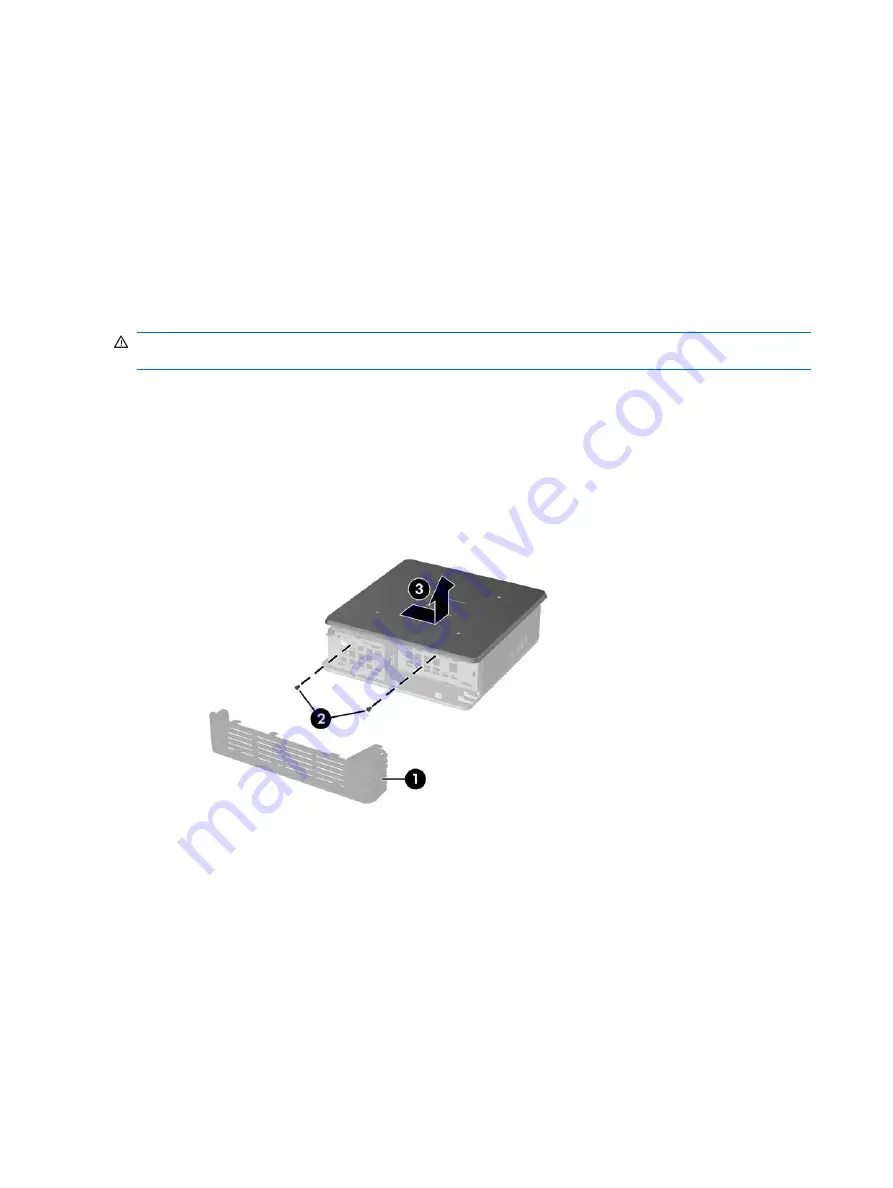
To remove the access panel:
1
.
Remove the secure compartment cover (1).
2
.
Remove the two back panel screws that secure the access panel to the chassis (2).
3
.
Slide the access panel about 6.4–mm (1/4–inch) toward the front of the unit, and then lift the access
panel up and off the unit (3).
Figure
E
-
1
Removing the side access panel
To remove the metal side cover:
1
.
Remove the three screws that secure the metal side cover to the chassis (1).
72 Appendix
E
Replacing the Battery
ENWW
Содержание T5135 - Compaq Thin Client
Страница 1: ...Troubleshooting Guide HP t5135 and t5530 Thin Client ...
Страница 4: ...iv About This Book ENWW ...
Страница 10: ...4 Chapter 1 Product Description ENWW ...
Страница 18: ...12 Chapter 2 BIOS Settings F10 Utility ENWW ...
Страница 26: ...Figure 3 2 Initial Troubleshooting Part 2 20 Chapter 3 Diagnostics and Troubleshooting ENWW ...
Страница 27: ...Figure 3 3 No Power Part 1 ENWW Troubleshooting Flow Charts 21 ...
Страница 28: ...Figure 3 4 No Power Part 2 22 Chapter 3 Diagnostics and Troubleshooting ENWW ...
Страница 29: ...Figure 3 5 No Power Part 3 ENWW Troubleshooting Flow Charts 23 ...
Страница 30: ...Figure 3 6 No Video Part 1 24 Chapter 3 Diagnostics and Troubleshooting ENWW ...
Страница 31: ...Figure 3 7 No Video Part 2 ENWW Troubleshooting Flow Charts 25 ...
Страница 32: ...Figure 3 8 No Video Part 3 26 Chapter 3 Diagnostics and Troubleshooting ENWW ...
Страница 33: ...Figure 3 9 No Video Part 4 ENWW Troubleshooting Flow Charts 27 ...
Страница 34: ...Figure 3 10 Error Messages 28 Chapter 3 Diagnostics and Troubleshooting ENWW ...
Страница 35: ...Figure 3 11 No O S Loading ENWW Troubleshooting Flow Charts 29 ...
Страница 36: ...Figure 3 12 O S Not loading from Flash 30 Chapter 3 Diagnostics and Troubleshooting ENWW ...
Страница 37: ...Figure 3 13 Non Functioning Pointing Device or Keyboard ENWW Troubleshooting Flow Charts 31 ...
Страница 38: ...Figure 3 14 No Internal Network Connection 32 Chapter 3 Diagnostics and Troubleshooting ENWW ...
Страница 39: ...Figure 3 15 No Audio ENWW Troubleshooting Flow Charts 33 ...
Страница 40: ...Figure 3 16 No IP Address 34 Chapter 3 Diagnostics and Troubleshooting ENWW ...
Страница 41: ...Figure 3 17 Booting in Continuous Loop ENWW Troubleshooting Flow Charts 35 ...
Страница 42: ...36 Chapter 3 Diagnostics and Troubleshooting ENWW ...
Страница 43: ...4 Restoring the Flash Image ENWW 37 ...
Страница 46: ...Creating an ISO Image 1 Click ISO Image 40 Chapter 4 Restoring the Flash Image ENWW ...
Страница 53: ...5 Citrix Metaframe ENWW 47 ...
Страница 56: ...50 Chapter 5 Citrix Metaframe ENWW ...
Страница 58: ...52 Chapter 6 Microsoft Remote Desktop Protocol ENWW ...
Страница 59: ...A Specifications This appendix contains the specifications for some t5xxx series thin clients ENWW 53 ...
Страница 62: ...56 Appendix B Adding an Image Restore Tool ENWW ...
Страница 63: ...C Configuring a PXE Server ENWW 57 ...
Страница 72: ...66 Appendix C Configuring a PXE Server ENWW ...
Страница 73: ...D System BIOS ENWW 67 ...
Страница 76: ...70 Appendix D System BIOS ENWW ...
Страница 77: ...E Replacing the Battery ENWW 71 ...
Страница 82: ...76 Index ENWW ...


