background image

1.

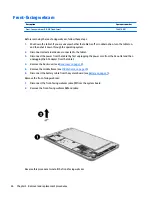
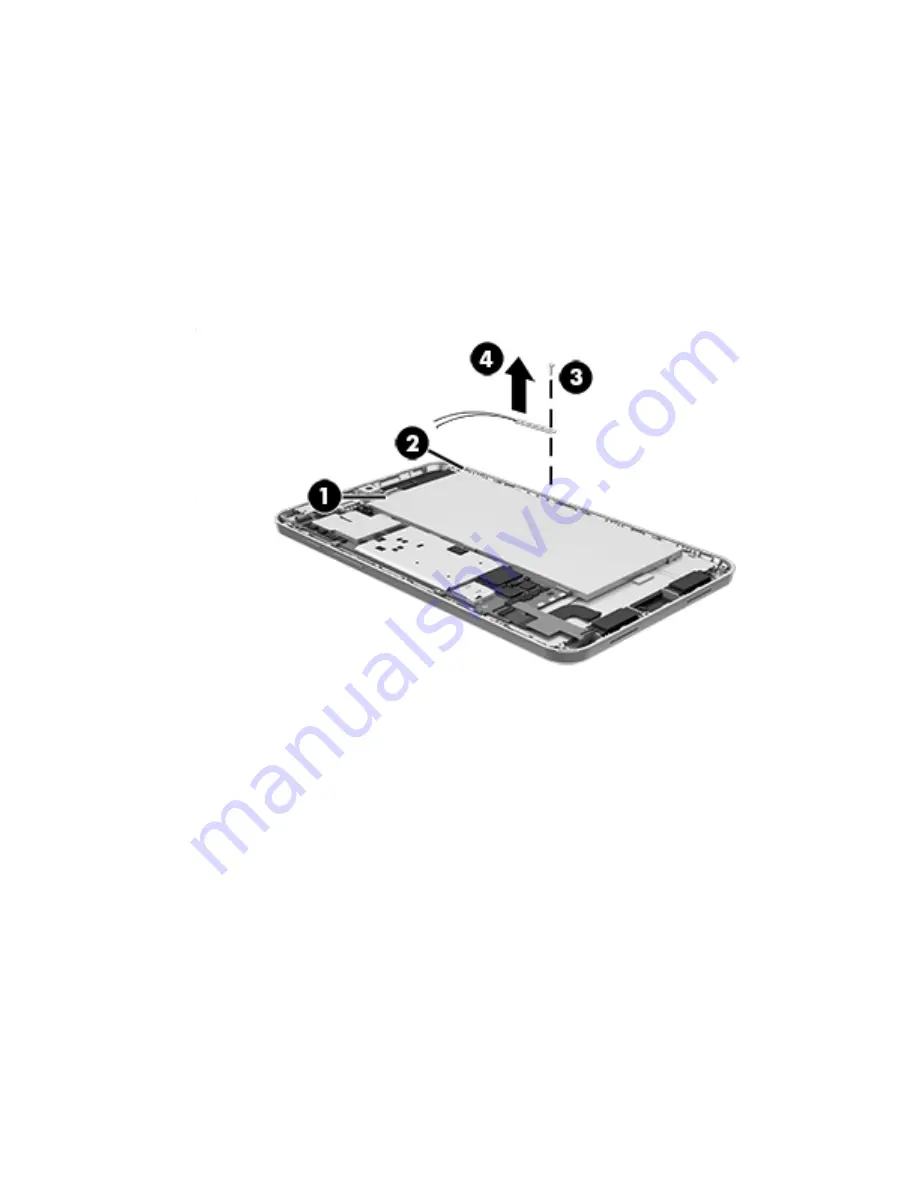
Disconnect the 3G antenna cables (1) from the system board 3G terminals.

2.

Release the 3G antenna cable from the retention clip (2) built into the display panel assembly.

3.

Remove the Phillips PM1.3×2.4 screw (3) that secures the 3G antenna board to the 
display panel assembly.

4.

Detach the 3G antenna board (4) from the display panel assembly. (The 3G antenna board is attached to 
the display panel assembly with double-sided adhesive.)

5.

Remove the 3G antenna board and cables.

Reverse this procedure to install the 3G antenna board.

3G antenna board

23

Содержание Stream 8 Tablet

Страница 1: ...HP Stream 8 Tablet model numbers 58xx and 59xx Maintenance and Service Guide IMPORTANT This document is intended for HP authorized service providers only ...

Страница 2: ...al warranty HP shall not be liable for technical or editorial errors or omissions contained herein First Edition October 2014 Document Part Number 791739 001 Product notice This guide describes features that are common to most models Some features may not be available on your tablet Software terms By installing copying downloading or otherwise using any software product preinstalled on this tablet...

Страница 3: ...w another hard surface such as an adjoining optional printer or a soft surface such as pillows or rugs or clothing to block airflow Also do not allow the AC adapter to contact the skin or a soft surface such as pillows or rugs or clothing during operation The device and the AC adapter comply with the user accessible surface temperature limits defined by the International Standard for Safety of Inf...

Страница 4: ...iv Safety warning notice ...

Страница 5: ... 14 Tools required 14 Service considerations 14 Plastic parts 14 Cables and connectors 14 Grounding guidelines 15 Electrostatic discharge damage 15 Packaging and transporting guidelines 16 Workstation guidelines 16 5 Removal and replacement procedures 18 Tablet component replacement procedures 18 Back cover 18 Middle frame 20 Battery 21 3G antenna board 22 Rear facing webcam 24 Front facing webcam...

Страница 6: ...tions 37 8 Backup and recovery 38 Backing up your information 38 Performing a system recovery 38 Changing the boot device order 39 Using Windows Refresh or Windows Reset 39 9 Power cord set requirements 40 Requirements for all countries 40 Requirements for specific countries and regions 40 10 Recycling 42 Index 43 vi ...

Страница 7: ...rts MP3 OGG Flac AAC and AMR 2 0 MP fixed focus front facing webcam 5 0 MP auto focus rear facing webcam Supports MPEG1 MPEG2 MPEG4 XVID H264 H263 WMV7 8 9 VC 1 VP8 AVS MJPEG VP6 WMV1 2 DIVX Supports JPG BMP GIF and PNG photos Sensor Accelerometer G sensor GPS HP Stream 8 Tablet model numbers 59xx only SAR HP Stream 8 Tablet model numbers 59xx only Wireless networking Integrated wireless options W...

Страница 8: ...upports a 5 V 2 A AC adapter with DC plug and localized cable plug support Operating system Preinstalled Microsoft Windows 8 1 Serviceability End user replaceable part AC adapter and USB cable 2 Chapter 1 Product description ...

Страница 9: ...2 External component identification 3 ...

Страница 10: ...cam 6 Volume up button 2 Micro USB 2 0 port 7 Volume down button 3 Audio out headphone Audio in microphone jack 8 Micro SD Card Reader slot 4 Front facing webcam 9 Windows button 5 Power button 10 Speakers 2 4 Chapter 2 External component identification ...

Страница 11: ...m select your country or region and then follow the on screen instructions Locating the model number product number and serial number The tablet model number 1 product number 2 and serial number 3 are located on the tablet back cover This information may be needed when travelling internationally or when contacting support Locating the model number product number and serial number 5 ...

Страница 12: ...rging includes cable and double sided adhesive 795066 001 5a Rear facing webcam 5 0 MP auto focus includes cable and double sided adhesive 796815 001 5b Rear facing webcam bracket 796816 001 6 Front facing webcam 2 0 MP fixed focus includes cable 796814 001 Front facing webcam shield not illustrated 796817 001 7 Button board includes cable power button actuator and volume button actuators 800024 0...

Страница 13: ... s Republic of China includes Wi Fi connectivity 799858 AA1 12 WWAN antenna includes cable transceiver and double sided adhesive 796823 001 13 Display panel assembly 8 0 in 1280 800 AG IPS LED multi touch wide viewing angle 5 point capacitive auto rotate selectable tempered glass backlit TouchScreen includes bezel and TouchScreen cable 796811 001 Miscellaneous parts Component Spare part number 5 V...

Страница 14: ...al 794636 131 For use in Romania 794636 271 For use in Russia 794636 251 For use in Saudi Arabia 794636 DL1 For use in Singapore 794636 AF1 For use in South Korea 794636 AD1 For use in Spain 794636 071 For use in Switzerland 794636 BG1 For use in the United Kingdom 794636 031 HP Stream 8 Tablet 58xx model equipped with a 8 0 in 1280 800 AG IPS LED multi touch wide viewing angle 5 point capacitive ...

Страница 15: ... core processor a graphics subsystem with UMA memory 1 0 GB of system memory 32 GB eMMC storage Wi Fi connectivity and the Microsoft Windows 8 1 operating system for use in the People s Republic of China 794635 DB1 HP Stream 8 Tablet 58xx model equipped with a 8 0 in 1280 800 AG IPS LED multi touch wide viewing angle 5 point capacitive auto rotate selectable tempered glass backlit TouchScreen disp...

Страница 16: ...essor a graphics subsystem with UMA memory 1 0 GB of system memory 32 GB eMMC storage 3G connectivity and the Microsoft Windows 8 1 operating system for use in Portugal 794636 151 HP Stream 8 Tablet 59xx model equipped with a 8 0 in 1280 800 AG IPS LED multi touch wide viewing angle 5 point capacitive auto rotate selectable tempered glass backlit TouchScreen display panel an Intel Z3735G 1 30 GHz ...

Страница 17: ...ped with a 8 0 in 1280 800 AG IPS LED multi touch wide viewing angle 5 point capacitive auto rotate selectable tempered glass backlit TouchScreen display panel an Intel Z3735G 1 30 GHz 1 80 GHz burst mode quad core processor a graphics subsystem with UMA memory 1 0 GB of system memory 32 GB eMMC storage 3G connectivity and the Microsoft Windows 8 1 operating system for use in the People s Republic...

Страница 18: ...mpered glass backlit TouchScreen display panel an Intel Z3735G 1 30 GHz 1 80 GHz burst mode quad core processor a graphics subsystem with UMA memory 1 0 GB of system memory 32 GB eMMC storage 3G connectivity and the Microsoft Windows 8 1 operating system for use in the Baltics region English with multiple local languages 794636 F81 HP Stream 8 Tablet 59xx model equipped with a 8 0 in 1280 800 AG I...

Страница 19: ...ebcam bracket 796817 001 Front facing webcam shield 796818 001 Speakers includes left and right speakers and cables 796819 001 Display panel cable 796820 001 Side key cable 796821 001 3G antenna cable 796822 001 WLAN antenna includes cable and transceiver 796823 001 WWAN antenna includes cable transceiver and double sided adhesive 796824 001 Screw Kit 799858 001 System board equipped with an Intel...

Страница 20: ...astic parts Use care when handling the plastic parts Apply pressure only at the points designated in the maintenance instructions Cables and connectors CAUTION When servicing the tablet be sure that cables are placed in their proper locations during the reassembly process Improper cable placement can damage the tablet Cables must be handled with extreme care to avoid damage Apply only the tension ...

Страница 21: ...e these precautions Keep components in their electrostatic safe containers until you are ready to install them Before touching an electronic component discharge static electricity by using the guidelines described in this section Avoid touching pins leads and circuitry Handle electronic components as little as possible If you remove a component place it in an electrostatic safe container The follo...

Страница 22: ... proper materials are selected to avoid static charging When grounding is not possible use an ionizer to dissipate electric charges Workstation guidelines Follow these grounding workstation guidelines Cover the workstation with approved static shielding material Use a wrist strap connected to a properly grounded work surface and use properly grounded tools and equipment Use conductive field servic...

Страница 23: ...m resistance between the operator and ground To be effective the conductive must be worn in contact with the skin The following grounding equipment is recommended to prevent electrostatic damage Antistatic tape Antistatic smocks aprons and sleeve protectors Conductive bins and other assembly or soldering aids Nonconductive foam Conductive tabletop workstations with ground cords of one megohm resis...

Страница 24: ...ly 8 0 in 1280 800 AG IPS LED multi touch wide viewing angle 5 point capacitive auto rotate selectable tempered glass backlit TouchScreen includes bezel and TouchScreen cable 796811 001 Before disassembling the tablet follow these steps 1 Turn off the tablet If you are unsure whether the tablet is off or in Hibernation turn the tablet on and then shut it down through the operating system 2 Disconn...

Страница 25: ...3 Remove the back cover 3 Reverse this procedure to install the back cover Back cover 19 ...

Страница 26: ...blet on and then shut it down through the operating system 2 Disconnect the power from the tablet by unplugging the power cord from the tablet 3 Disconnect all external devices from the tablet 4 Remove the back cover see Back cover on page 18 Remove the middle frame 1 Remove the ten Phillips PM1 3 4 5 screws 1 that secure the middle frame to the display panel assembly 2 Remove the middle frame 2 R...

Страница 27: ... Back cover on page 18 WARNING To reduce potential safety issues use only the battery provided with the tablet a replacement battery provided by HP or a compatible battery purchased from HP CAUTION Removing a battery that is the sole power source for the tablet can cause loss of information To prevent loss of information save your work or shut down the tablet through Windows before removing the ba...

Страница 28: ...Hibernation turn the tablet on and then shut it down through the operating system 2 Disconnect all external devices connected to the tablet 3 Disconnect the power from the tablet by first unplugging the power cord from the AC outlet and then unplugging the AC adapter from the tablet 4 Remove the back cover see Back cover on page 18 5 Remove the middle frame see Middle frame on page 20 6 Disconnect...

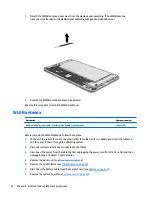
Страница 29: ...Remove the Phillips PM1 3 2 4 screw 3 that secures the 3G antenna board to the display panel assembly 4 Detach the 3G antenna board 4 from the display panel assembly The 3G antenna board is attached to the display panel assembly with double sided adhesive 5 Remove the 3G antenna board and cables Reverse this procedure to install the 3G antenna board 3G antenna board 23 ...
Страница 30: ...the tablet by first unplugging the power cord from the AC outlet and then unplugging the AC adapter from the tablet 4 Remove the back cover see Back cover on page 18 5 Remove the middle frame see Middle frame on page 20 6 Disconnect the battery cable from the system board see Battery on page 21 Remove the rear facing webcam 1 Disconnect the rear facing webcam cable 1 from the system board 2 Detach...

Страница 31: ... webcam bracket 3 The rear facing webcam bracket is available using spare part number 796816 001 4 Remove the rear facing webcam bracket and cable Reverse this procedure to install the rear facing webcam Rear facing webcam 25 ...

Страница 32: ...3 Disconnect the power from the tablet by first unplugging the power cord from the AC outlet and then unplugging the AC adapter from the tablet 4 Remove the back cover see Back cover on page 18 5 Remove the middle frame see Middle frame on page 20 6 Disconnect the battery cable from the system board see Battery on page 21 Remove the front facing webcam 1 Disconnect the front facing webcam cable 1 ...

Страница 33: ...let 3 Disconnect the power from the tablet by first unplugging the power cord from the AC outlet and then unplugging the AC adapter from the tablet 4 Remove the back cover see Back cover on page 18 5 Remove the middle frame see Middle frame on page 20 6 Disconnect the battery cable from the system board see Battery on page 21 Remove the button board 1 Release the ZIF connector 1 to which the butto...

Страница 34: ...outlet and then unplugging the AC adapter from the tablet 4 Remove the back cover see Back cover on page 18 5 Remove the middle frame see Middle frame on page 20 6 Disconnect the battery cable from the system board see Battery on page 21 Remove the display panel cable 1 Release the ZIF connector 1 to which the display panel cable is attached and then disconnect the button board cable from the syst...

Страница 35: ...the power from the tablet by first unplugging the power cord from the AC outlet and then unplugging the AC adapter from the tablet 4 Remove the back cover see Back cover on page 18 5 Remove the middle frame see Middle frame on page 20 6 Disconnect the battery cable from the system board see Battery on page 21 Remove the speakers 1 Unsolder the red and black speaker cables 1 from the system board s...

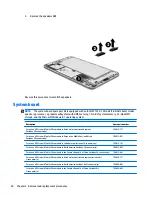
Страница 36: ...dle East and Africa includes 3G connectivity 796812 021 For use on HP Stream 8 Tablet 59xx models in Latin America includes 3G connectivity 796812 161 For use on HP Stream 8 Tablet 59xx models in North America includes 3G connectivity 796812 001 For use on HP Stream 8 Tablet 59xx models in the People s Republic of China includes 3G connectivity 796812 AA1 For use on HP Stream 8 Tablet 58xx models ...

Страница 37: ...a cables 1 from the system board 3G terminals 2 Disconnect the WWAN antenna cable 2 from the system board WWAN terminal 3 Disconnect the WLAN antenna cable 3 from the system board WLAN terminal 4 Disconnect the rear facing webcam cable 4 from the system board 5 Disconnect the front facing webcam cable 5 from the system board 6 Release the ZIF connector 1 to which the button board cable is attached...

Страница 38: ...ables 4 from the system board speaker contact points see Front facing webcam on page 26 10 Remove the two Phillips PM1 3 1 6 screws 1 that secure the system board to the display panel assembly 32 Chapter 5 Removal and replacement procedures ...

Страница 39: ...n the tablet on and then shut it down through the operating system 2 Disconnect all external devices connected to the tablet 3 Disconnect the power from the tablet by first unplugging the power cord from the AC outlet and then unplugging the AC adapter from the tablet 4 Remove the back cover see Back cover on page 18 5 Remove the middle frame see Middle frame on page 20 6 Disconnect the battery ca...

Страница 40: ... 1 Shut down the tablet If you are unsure whether the tablet is off or in Hibernation turn the tablet on and then shut it down through the operating system 2 Disconnect all external devices connected to the tablet 3 Disconnect the power from the tablet by first unplugging the power cord from the AC outlet and then unplugging the AC adapter from the tablet 4 Remove the back cover see Back cover on ...

Страница 41: ...play panel assembly 2 Detach the WLAN antenna transceiver 2 from the display panel assembly The WLAN antenna transceiver is attached to the display panel assembly with double sided adhesive 3 Remove the WLAN antenna cable and transceiver Reverse this procedure to install the WLAN antenna WLAN antenna 35 ...

Страница 42: ...the on screen instructions NOTE If you need to stop a diagnostic test press esc Downloading HP PC Hardware Diagnostics UEFI to a USB device NOTE Instructions for downloading HP PC Hardware Diagnostics UEFI are provided in English only There are two options to download HP PC Hardware Diagnostics to a USB device Option 1 HP PC Diagnostics homepage Provides access to the latest UEFI version 1 Go to h...

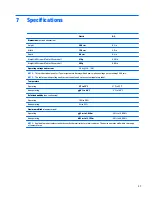
Страница 43: ...voltage not exceeding 240 V rms NOTE The tablet operating voltage and current can be found on the system regulatory label Temperature Operating 5 C to 35 C 41 F to 95 F Nonoperating 20 C to 60 C 4 F to 140 F Relative humidity non condensing Operating 10 to 90 Nonoperating 5 to 95 Maximum altitude unpressurized Operating 15 m to 3 048 m 50 ft to 10 000 ft Nonoperating 15 m to 12 192 m 50 ft to 40 0...

Страница 44: ... your permission or password for tasks such as installing software running utilities or changing Windows settings For more information see Windows Help and Support Backing up your information Recovery after a system failure is as good as your most recent backup You should create system repair media and your initial backup immediately after initial system setup As you add new software and data file...

Страница 45: ...rn on the tablet The Startup menu is displayed 7 Tap F9 Boot Options 8 Select the external flash drive as the boot device 9 Restart the tablet Using Windows Refresh or Windows Reset When your tablet is not working properly and you need to regain system stability the Windows Refresh option allows you to start fresh and keep what is important to you The Windows Reset option allows you to perform det...

Страница 46: ...ntries The following requirements are applicable to all countries and regions The length of the power cord set must be at least 1 0 m 3 3 ft and no more than 2 0 m 6 5 ft All power cord sets must be approved by an acceptable accredited agency responsible for evaluation in the country or region where the power cord set will be used Requirements for specific countries and regions Country region Accr...

Страница 47: ...e People s Republic of China CCC Saudi Arabia SASO Singapore PSB South Africa SABS South Korea KTL Sweden SEMKO Switzerland SEV Taiwan BSMI Thailand TISI The United Kingdom ASTA The United States UL Requirements for specific countries and regions 41 ...

Страница 48: ...in general household waste Follow the local laws and regulations in your area for battery disposal HP encourages customers to recycle used electronic hardware HP original print cartridges and rechargeable batteries For more information about recycling programs see the HP Web site at http www hp com recycle 42 Chapter 10 Recycling ...

Страница 49: ...art number 6 13 26 front facing webcam shield spare part number 6 13 G grounding guidelines 15 guidelines equipment 17 grounding 15 packaging 16 transporting 16 workstation 16 H headphone audio out jack 4 J jacks audio in microphone 4 audio out headphone 4 M mass storage device product description 1 memory module product description 1 microphone audio in jack location 4 microphone product descript...

Страница 50: ...t numbers 7 12 13 30 T tablet major components 6 spare part numbers 7 8 9 10 11 12 specifications 37 tools required 14 transporting guidelines 16 U USB extension cable spare part number 9 USB port 4 V video product description 1 volume button board spare part number 13 volume down button 4 volume up button 4 W webcam removal 24 26 spare part numbers 6 13 24 26 Windows button 4 wireless antenna rem...

Отзывы: