background image


Removal and replacement procedures  42 

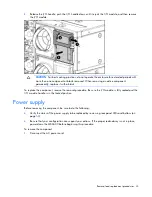
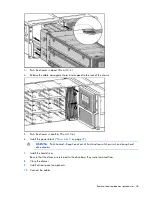
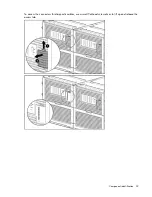
12.


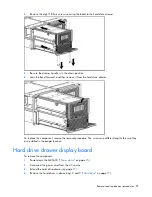
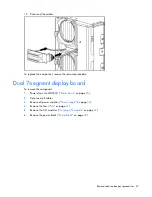
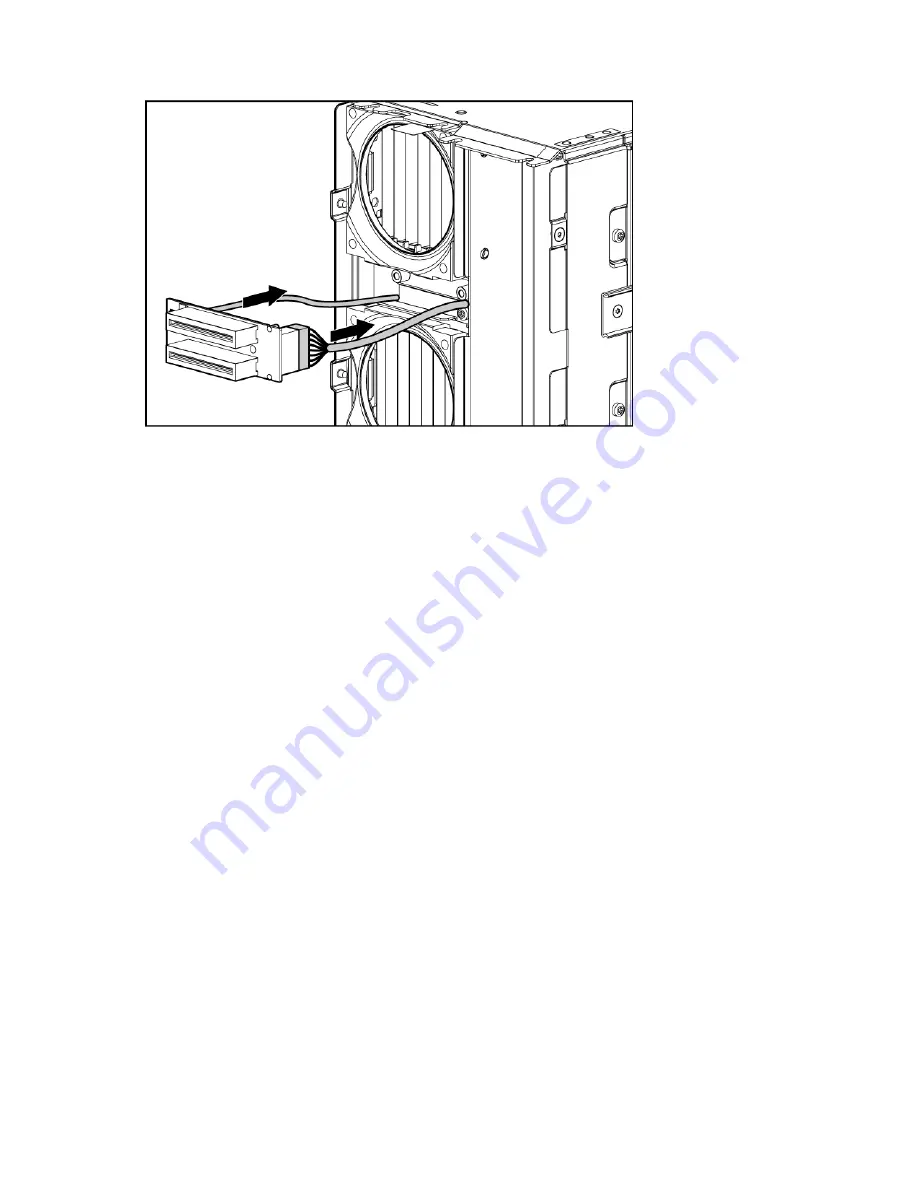
Disconnect the cables. 


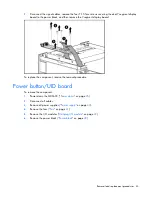
To replace the component, reverse the removal procedure. 


Dual 7-segment display board 

To remove the component: 

1.


Power down the MDS600 ("

Power down

" on page 

25

). 

2.


Disconnect all cables. 

3.


Remove all power supplies ("

Power supply

" on page 

33

). 

4.


Remove the fans ("

Fan

" on page 

31

). 

5.


Remove the I/O modules ("

Hot-plug I/O module

" on page 

32

). 

6.


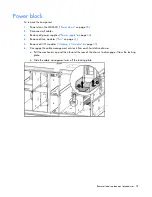
Remove the power block ("

Power block

" on page 

39

). 

Содержание StorageWorks 600 - Modular Disk System

Страница 1: ...HP StorageWorks 600 Modular Disk System Maintenance and Service Guide Part Number 495106 005 December 2009 Fifth Edition ...

Страница 2: ...rein should be construed as constituting an additional warranty HP shall not be liable for technical or editorial errors or omissions contained herein Windows is a U S registered trademarks of Microsoft Corporation Intended audience This document is for the person who installs administers and troubleshoots servers and storage systems HP assumes you are qualified in the servicing of computer equipm...

Страница 3: ... O module 32 Power supply 33 Hard drive drawer 34 Power block 39 Fan board 40 Dual 7 segment display board 42 Power button UID board 43 Cable management arm 44 Diagnostic tools 49 Integrated Management Log 49 Array Diagnostic Utility 49 Array Configuration Utility 49 Component identification 51 Front panel components 51 Diagnostic cable access 51 Front panel LEDs and button 53 Rear panel component...

Страница 4: ...Index 62 ...

Страница 5: ...n will help you over the telephone HP specifies in the materials shipped with a replacement CSR part whether a defective part must be returned to HP In cases where it is required to return the defective part to HP you must ship the defective part back to HP within a defined period of time normally five 5 business days The defective part must be returned with the associated documentation in the pro...

Страница 6: ...e vous facturer les coûts de remplacement Dans le cas d une pièce CSR HP supporte l ensemble des frais d expédition et de retour et détermine la société de courses ou le transporteur à utiliser Pour plus d informations sur le programme CSR de HP contactez votre Mainteneur Agrée local Pour plus d informations sur ce programme en Amérique du Nord consultez le site Web HP http www hp com go selfrepai...

Страница 7: ...l servizio per i soli componenti HP fornirà gratuitamente le parti di ricambio Per il servizio di garanzia per i soli componenti è obbligatoria la formula CSR che prevede la riparazione da parte del cliente Se il cliente invece richiede la sostituzione ad HP dovrà sostenere le spese di spedizione e di manodopera per il servizio Customer Self Repair HP Produkte enthalten viele CSR Teile Customer Se...

Страница 8: ...n muchos componentes que el propio usuario puede reemplazar Customer Self Repair CSR para minimizar el tiempo de reparación y ofrecer una mayor flexibilidad a la hora de realizar sustituciones de componentes defectuosos Si durante la fase de diagnóstico HP o los proveedores o socios de servicio de HP identifica que una reparación puede llevarse a cabo mediante el uso de un componente CSR HP le env...

Страница 9: ...reren waardoor de reparatieduur tot een minimum beperkt kan blijven en de flexibiliteit in het vervangen van defecte onderdelen groter is Deze onderdelen worden CSR onderdelen Customer Self Repair genoemd Als HP of een HP Service Partner bij de diagnose vaststelt dat de reparatie kan worden uitgevoerd met een CSR onderdeel verzendt HP dat onderdeel rechtstreeks naar u zodat u het defecte onderdeel...

Страница 10: ...a HP substitua essas peças serão cobradas as despesas de transporte e mão de obra do serviço Opcional Peças cujo reparo feito pelo cliente é opcional Essas peças também são projetadas para o reparo feito pelo cliente No entanto se desejar que a HP as substitua pode haver ou não a cobrança de taxa adicional dependendo do tipo de serviço de garantia destinado ao produto OBSERVAÇÃO Algumas peças da H...

Страница 11: ...garantia apenas para peças Segundo os termos do serviço de garantia apenas para peças a HP fornece as peças de reposição sem cobrar nenhuma taxa No caso desse serviço a substituição de peças CSR é obrigatória Se desejar que a HP substitua essas peças serão cobradas as despesas de transporte e mão de obra do serviço ...

Страница 12: ...Customer self repair 12 ...

Страница 13: ...Customer self repair 13 ...

Страница 14: ...Customer self repair 14 ...

Страница 15: ...Customer self repair 15 ...

Страница 16: ...o in the Illustrated Parts Catalog 1 Mandatory Obligatoire Pièces pour lesquelles la réparation par le client est obligatoire Si vous demandez à HP de remplacer ces pièces les coûts de déplacement et main d œuvre du service vous seront facturés 2 Optional Facultatif Pièces pour lesquelles la réparation par le client est facultative Ces pièces sont également conçues pour permettre au client d effec...

Страница 17: ...os por el usuario Sin embargo si precisa que HP realice su sustitución puede o no conllevar costes adicionales dependiendo del tipo de servicio de garantía correspondiente al producto 3 No No Algunos componentes no están diseñados para que puedan ser reparados por el usuario Para que el usuario haga valer su garantía HP pone como condición que un proveedor de servicios autorizado realice la sustit...

Страница 18: ...Illustrated parts catalog 18 ...

Страница 19: ...ir on page 5 4 I O module with tray and cable 498472 001 Mandatory1 5 Fan 413996 001 Mandatory1 6 Power supply 441830 001 Mandatory1 7 Power block board kit 455975 001 Optional2 a UID power switch board with cables b Dual 7 segment display board with cables 8 Power block assembly 455974 001 Optional2 ...

Страница 20: ...SAS SFF 15 000 rpm dual port 488060 001 c 450 GB SAS SFF 15 000 rpm dual port 454274 001 d 750 GB SAS SFF 15 000 rpm dual port MDL 461288 001 e 1 TB SAS SFF 7 200 rpm dual port MDL 461289 001 f 300 GB 6G SAS 15 000 rpm 517350 001 g 450GB 6G SAS 15 000 rpm 517352 001 h 600GB 6G SAS 15 000 rpm 517354 001 i 500 GB 3G SATA 7 200 rpm 459319 001 j 750 GB 3G SATA 7 200 rpm 459320 001 k 1 TB 3G SATA 7 200...

Страница 21: ...iese Teile sind auch für Customer Self Repair ausgelegt Wenn Sie jedoch den Austausch dieser Teile von HP vornehmen lassen möchten können bei diesem Service je nach den für Ihr Produkt vorgesehenen Garantiebedingungen zusätzliche Kosten anfallen 3 No Kein Einige Teile sind nicht für Customer Self Repair ausgelegt Um den Garantieanspruch des Kunden zu erfüllen muss das Teil von einem HP Servicepart...

Страница 22: ...e a HP as substitua pode haver ou não a cobrança de taxa adicional dependendo do tipo de serviço de garantia destinado ao produto 3 No Nenhuma Algumas peças da HP não são projetadas para o reparo feito pelo cliente A fim de cumprir a garantia do cliente a HP exige que um técnico autorizado substitua a peça Essas peças estão identificadas com a marca No Não no catálogo de peças ilustrado ...

Страница 23: ...ucts in static safe containers Keep electrostatic sensitive parts in their containers until they arrive at static free workstations Place parts on a grounded surface before removing them from their containers Avoid touching pins leads or circuitry Always be properly grounded when touching a static sensitive component or assembly Warning and caution messages WARNING To reduce the risk of personal i...

Страница 24: ...he equipment you must adequately support enclosures during installation and removal WARNING Always use at least two people to lift an enclosure into the rack If the enclosure is being loaded into the rack above chest level a third person must assist with aligning the enclosure with the rails while the other two people support the weight of the enclosure WARNING Be sure to install enclosures starti...

Страница 25: ...surges and voltage spikes and keeps the system in operation during a power failure Power down Be sure that the partner server blades are the first units to be powered down and the last to be powered back up Taking this precaution ensures that the system and the OS are shut down in an orderly manner IMPORTANT If installing a hot plug device it is not necessary to power down the MDS600 To power down...

Страница 26: ... front and rear of chassis when closing hard drive drawers CAUTION To prevent improper cooling and thermal damage do not operate the MDS600 for an extended period of time with the drawer open Hard drive blank CAUTION To prevent improper cooling and thermal damage do not operate the MDS600 unless all bays are populated with either a component or a blank Remove a blank only when there is a drive rea...

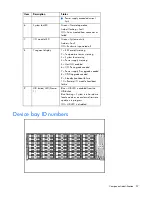
Страница 27: ...ng Verify the status of the drive to be replaced by reviewing the SAS and SATA hard drive LEDs on page 58 and SAS and SATA hard drive LED combinations on page 58 Check the RAID status and configuration to be sure data loss will not occur if the drive is removed For more information see the HP Array Configuration Utility User Guide on the HP website http www hp com Be sure that the replacement hard...

Страница 28: ... Power down on page 25 2 Extend the hard drive drawer on page 25 3 To access the screws securing the bezel to the hard drive drawer remove the hard drives in device bays 2 and 7 For the location of these device bays see Device bay ID numbers on page 57 CAUTION To avoid data loss be sure that the drives are labeled and returned to the same bays they were removed from IMPORTANT The screws are differ...

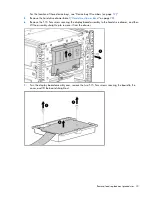
Страница 29: ...the hard drive drawer To replace the component reverse the removal procedure The screws are different lengths Be sure they are installed in the proper location Hard drive drawer display board To remove the component 1 Power down the MDS600 Power down on page 25 2 Disconnect the power cord from the AC source 3 Extend the hard drive drawer on page 25 4 Remove the hard drives in device bays 2 and 7 H...

Страница 30: ...rawer bezel Hard drive drawer bezel on page 28 6 Remove the T 15 Torx screw securing the display board assembly to the hard drive drawer and then lift the assembly straight up to remove it from the drawer 7 Turn the display board assembly over remove the two T 15 Torx screws securing the board to the cover and lift the board straight out ...

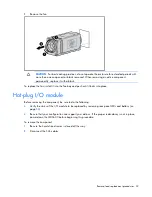
Страница 31: ... cord label require that the power cord be removed before removing a fan Before removing a fan do the following Verify the status of the fan to be replaced by reviewing rear panel LEDs and buttons on page 56 Be sure that your configuration can support your actions If the proper redundancy is not in place power down the MDS600 before beginning this procedure To remove the component 1 Be sure that t...

Страница 32: ...nto the fan bay and push until it locks into place Hot plug I O module Before removing the component be sure to do the following Verify the status of the I O module to be replaced by reviewing rear panel LEDs and buttons on page 56 Be sure that your configuration can support your actions If the proper redundancy is not in place power down the MDS600 before beginning this procedure To remove the co...

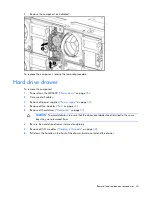
Страница 33: ...ith a blank To replace the component reverse the removal procedure Be sure the I O module is fully seated and the I O module handle is in the locked position Power supply Before removing the component be sure to do the following Verify the status of the power supply to be replaced by reviewing rear panel LEDs and buttons on page 56 Be sure that your configuration can support your actions If the pr...

Страница 34: ...3 Remove all power supplies Power supply on page 33 4 Remove all fan modules Fan on page 31 5 Remove all hard drives Hard drive on page 27 CAUTION To avoid data loss be sure that the drives are labeled and returned to the same bays they were removed from 6 Be sure the hard drive drawer is closed completely 7 Remove all I O modules Hot plug I O module on page 32 8 Pull down the handle on the front ...

Страница 35: ...s beyond the supporting surface when the unit is not installed in a rack WARNING To reduce the risk of personal injury or damage to the equipment ensure that only one hard drive drawer is extended at a time WARNING To reduce the risk of electric shock or damage to the equipment Never reach inside the chassis while the system is powered up Perform service on system components only as instructed in ...

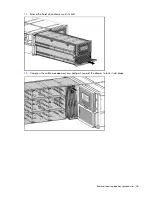
Страница 36: ...Removal and replacement procedures 36 11 Extend the hard drive drawer until it clicks 12 Compress the cable management arm and push toward the drawer to lock it into place ...

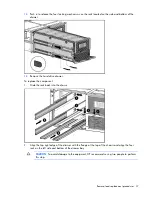
Страница 37: ...r 14 Remove the hard drive drawer To replace the component 1 Slide the rails back into the chassis 2 Align the top right edge of the drawer with the flange at the top of the chassis and align the four rails on the left side and bottom of the drawer bay CAUTION To avoid damage to the equipment HP recommends using two people to perform this step ...

Страница 38: ...he drawer in another 25 cm 10 in 6 Install the power block Power block on page 39 WARNING Pinch hazard Keep hands out of front and rear of chassis when closing hard drive drawers 7 Install the hard drives Be sure that the drives are returned to the drive bays they were removed from 8 Close the drawer 9 Install all rear panel components 10 Connect the cables ...

Страница 39: ...wer supplies Power supply on page 33 4 Remove all fan modules Fan on page 31 5 Remove all I O modules Hot plug I O module on page 32 6 Disengage the cable management arm lock from each hard drive drawer a Pull the mechanism up and then toward the rear of the chassis to disengage it from the locking plate b Slide the cable management arm off the locking plate ...

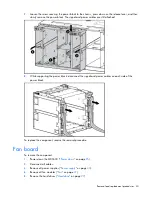
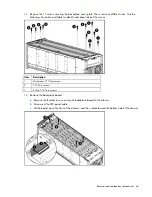
Страница 40: ...tached 8 While supporting the power block disconnect the signal and power cables on each side of the power block To replace the component reverse the removal procedure Fan board To remove the component 1 Power down the MDS600 Power down on page 25 2 Disconnect all cables 3 Remove all power supplies Power supply on page 33 4 Remove all fan modules Fan on page 31 5 Remove the hard drives Hard drive ...

Страница 41: ... modules Hot plug I O module on page 32 8 Remove the power block Power block on page 39 9 Remove the hard drive drawer Hard drive drawer on page 34 10 Remove the four T 10 Torx screws securing the fan cage to the hard drive drawer and then remove the fan cage 11 Remove the two T 15 Torx screws securing the fan board to the hard drive drawer and then remove the fan board being careful not to discon...

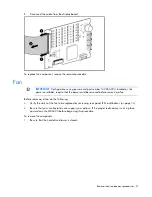
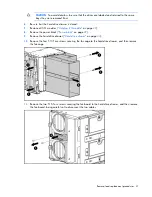
Страница 42: ...ure Dual 7 segment display board To remove the component 1 Power down the MDS600 Power down on page 25 2 Disconnect all cables 3 Remove all power supplies Power supply on page 33 4 Remove the fans Fan on page 31 5 Remove the I O modules Hot plug I O module on page 32 6 Remove the power block Power block on page 39 ...

Страница 43: ...7 segment display board To replace the component reverse the removal procedure Power button UID board To remove the component 1 Power down the MDS600 Power down on page 25 2 Disconnect all cables 3 Remove all power supplies Power supply on page 33 4 Remove the fans Fan on page 31 5 Remove the I O modules Hot plug I O module on page 32 6 Remove the power block Power block on page 39 ...

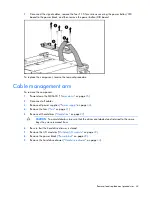
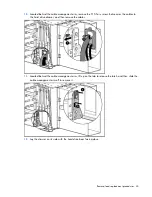
Страница 44: ...the MDS600 Power down on page 25 2 Disconnect all cables 3 Remove all power supplies Power supply on page 33 4 Remove the fans Fan on page 31 5 Remove all hard drives Hard drive on page 27 CAUTION To avoid data loss be sure that the drives are labeled and returned to the same bays they were removed from 6 Be sure that the hard drive drawer is closed 7 Remove the I O modules Hot plug I O module on ...

Страница 45: ...15 Torx screw that secures the cables to the hard drive drawer and then remove the cables 11 Located behind the cable management arm lift up on the tab to release the latch and then slide the cable management arm off to remove it 12 Lay the drawer on its side with the hard drive bays facing down ...

Страница 46: ...ble to identify and keep track of the screws Item Description 1 Flushmount T 10 Torx screws 2 T 15 Torx screws 3 5 8 in T 15 Torx screws 14 Remove the backplane board a Remove the thumbscrews securing the backplane board to the drawer b Disconnect the LED panel cable c Lift the board up at the front of the drawer and then rotate toward the bottom side of the drawer ...

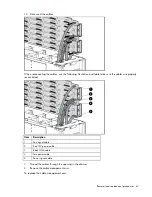
Страница 47: ...g illustration and table to be sure the cables are properly reconnected Item Description 1 Fan signal cable 2 Red 12V power cable 3 Black GND cable 4 Fan power cable 5 Power signal cable 1 Thread the cables through the opening in the drawer 2 Remove the cable management arm To replace the cable management arm ...

Страница 48: ...es are properly connected The red cable is 12V The black cable is GND 2 Install the backplane board a Be sure the board is lined up on the standoffs b Install the screws 3 Connect the LED panel cable 4 Install the cover 5 Install the cable management arm 6 Install the hard drive drawer 7 Install the hard drives 8 Close the hard drive drawer 9 Install all rear panel components 10 Connect the cables...

Страница 49: ...s Utility is a web based application that creates a report of all HP storage controllers and disk drives This report provides vital information to assist in identifying faults or conditions that may require attention ADU can be accessed from the SmartStart CD or downloaded from the HP website http www hp com Array Configuration Utility ACU is a browser based utility with the following features Run...

Страница 50: ...osoft operating systems require Internet Explorer 5 5 with Service Pack 1 or later For Linux servers refer to the README TXT file for additional browser and support information For more information refer to the Configuring Arrays on HP Smart Array Controllers Reference Guide on the Documentation CD or the HP website http www hp com ...

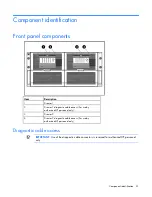
Страница 51: ...on 1 Drawer 1 2 Drawer 1 diagnostic cable access For use by authorized HP personnel only 3 Drawer 2 4 Drawer 2 diagnostic cable access For use by authorized HP personnel only Diagnostic cable access IMPORTANT Use of the diagnostic cable connectors is reserved for authorized HP personnel only ...

Страница 52: ...Component identification 52 To access the connectors for diagnostic cables use a small flat head screwdriver to lift up and release the access tab ...

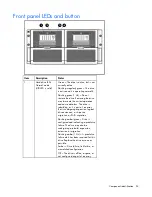
Страница 53: ...ause data loss The drive is rebuilding or it is part of an array that is undergoing expansion logical drive extension a stripe size migration or RAID migration Flashing amber green Drive is configured and indicating a predictive failure The drive may also be undergoing a rebuild expansion extension or migration Flashing amber 1 Hz A predictive failure alert has been received for this drive Replace...

Страница 54: ...t application and is indicating a predictive failure Amber The drive might or might not be selected and is indicating drive failure link failure or mismatched configuration Off The drive is not selected 2 UID button LED Blue UID LED is enabled from the UID button Blue flashing Item 1 is in locate mode Off UID LED is disabled 3 Internal Health LED Green System health is good Off System is off 4 GSI...

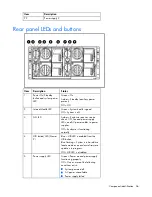
Страница 55: ... 2 status panel 3 Fan module 1 Drawer 2 4 Primary I O module Drawer 2 5 SAS port 1 connector 6 SAS port 2 connector 7 Power supply 3 8 UID 1 status panel 9 Fan module 1 Drawer 1 10 Primary I O module Drawer 1 11 SAS port 1 connector 12 SAS port 2 connector 13 SAS port 1 connector 14 SAS port 2 connector 15 Secondary I O module Drawer 1 16 Fan module 2 Drawer 1 17 Power supply 4 18 SAS port 1 conne...

Страница 56: ...sure requires service check I O fan and power supply LEDs and AC power cables to power supplies Off Enclosure is functioning normally 4 UID button LED Drawer 2 Blue UID LED is enabled from the UID button Blue flashing System is in hard drive locate mode or an enclosure firmware update is in progress Off UID LED is disabled 5 Power supply LED Green Power on and power supply functioning properly Off...

Страница 57: ... display 1 SES overall warning 2 Temperature sensor warning 3 System fan warning 4 Power supply warning 5 Host GSI enabled 6 I O Pic upgrade needed 7 Power supply Pic upgrade needed 8 CPLD upgrade needed 9 Standby heartbeat failure 10 Remote I O module heartbeat failure 9 UID button LED Drawer 1 Blue UID LED is enabled from the UID button Blue flashing System is in hard drive locate mode or an enc...

Страница 58: ...ert has been received for this drive Replace the drive as soon as possible On Off The drive is online but it is not currently active Flashing regularly 1 Hz Amber flashing regularly 1 Hz Do not remove the drive Removing a drive may terminate the current operation and cause data loss The drive is part of an array that is undergoing capacity expansion or a stripe size migration but a predictive fail...

Страница 59: ...n as possible Flashing irregularly Off The drive is active and it is operating normally Off Steadily amber A critical fault condition has been identified for this drive and the controller has placed it offline Replace the drive as soon as possible Off Amber flashing regularly 1 Hz A predictive failure alert has been received for this drive Replace the drive as soon as possible Off Off The drive is...

Страница 60: ...ted by the type and number of options installed Non operating 9144 m 30 000 ft Temperature ratings shown are for sea level An altitude derating of 1 C per 300 m 1 8 F per 1 000 ft to 3048 m 10 000 ft is applicable No direct sunlight allowed The upper limit may be limited by the type and number of options installed Storage maximum humidity of 95 is based on a maximum temperature of 45 C 113 F Altit...

Страница 61: ... Utility CPLD complex programmable logic device GSI global service indicator I O input output IML Integrated Management Log PIC peripheral interface controller SAS serial attached SCSI SATA serial ATA SES SCSI Enclosure Services SIM Systems Insight Manager UID unit identification ...

Страница 62: ...zel removing 28 hard drive drawer display board removing 29 hard drive drawer extending 25 hard drive drawer removing 34 hard drive LEDs 58 hard drives 27 I I O module 32 IML Integrated Management Log 49 L LED heartbeat 53 56 LED system fault 53 56 LED system power 56 LED UID 53 LEDs 51 56 58 LEDs fan 56 LEDs front panel 53 LEDs hard drive 58 LEDs I O module 56 LEDs power supply 56 LEDs rear panel...

Страница 63: ...Index 63 specifications 60 static electricity 23 system components 19 51 U utilities 49 W warnings 23 ...

Отзывы: