


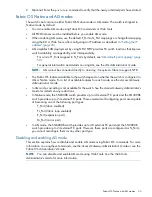

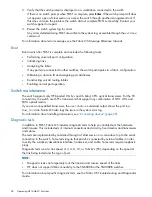
Figure 13 Port side status LEDs
1. System power LED
2. System status LED
Installing a standalone switch
1.
Unpack the switch and verify the contents, as described in
Shipping carton contents
.
2.
Apply the adhesive rubber feet to prevent the switch from sliding off the supporting surface.
a.
Clean the indentations at each corner on the bottom of the switch to ensure that they are
free of dust or other debris.
b.
With the adhesive side against the chassis, place one rubber foot in each indentation
and press into place.
3.
Place the switch on a flat, sturdy surface.
4.
Connect the power cords to each power supply present.
•
For the SN6000B switch, connect the power cords to both power supplies and then to
power sources on separate circuits to protect against AC failure.
•
For the SN3000B switch, connect a power cord to either the single power supply present
or to both power supplies, if an optional second power supply is present. Then connect
the power cords to power sources on separate circuits to protect against AC failure.
NOTE:
If you are configuring the second (optional) power supply on the SN3000B
switch, it will also have two power cords.
Ensure that the cords have a minimum service loop of 6 inches available and are routed to
avoid stress.
5.
Power on the power supplies by setting both AC switches to the on (
|
) position .
The power supply LEDs are amber until POST is complete, and then change to green. See
Figure 12 (page 23)
. The switch takes several minutes to boot and complete POST.
NOTE:
Power is supplied to the switch as soon as the first power supply is connected and
turned on.
6.
After POST is complete, verify that the switch power and status LEDs on the port side of the
switch are green. See
Figure 13 (page 24)
.
Setting up the switch
To set up the switch, you will need the following:
•
Standard screwdriver
•
WWN, located on the switch ID pull-out tab
•
Ethernet connection (hub or switch)
24
Installing and configuring HP 16Gb FC Switches
Содержание SN3000B
Страница 6: ...Grounding methods 66 Glossary 67 Index 69 6 Contents ...
Страница 54: ...Japanese notices Japanese VCCI A notice 54 Regulatory compliance notices ...
Страница 57: ...Dutch laser notice French laser notice German laser notice Laser compliance notices 57 ...
Страница 58: ...Italian laser notice Japanese laser notice Spanish laser notice 58 Regulatory compliance notices ...
Страница 63: ...Battery replacement notices Dutch battery notice French battery notice Battery replacement notices 63 ...
Страница 64: ...German battery notice Italian battery notice 64 Regulatory compliance notices ...
Страница 65: ...Japanese battery notice Spanish battery notice Battery replacement notices 65 ...
Страница 68: ...UTC Coordinated Universal Time VF Virtual Fabric WWN World Wide Name 68 Glossary ...


