background image


Diagnostic Tools and Setup Utilities  95  


Components, Switches, and Indicators  

This chapter contains illustrations and tables identifying and describing the key components (including 
connectors), switches, and LED indicators located on the front and rear panels, the system board, and 

hard drives of the HP ProLiant ML150 G6 Server. 

Front and Rear Panel Components, Switches, 

and Indicators 

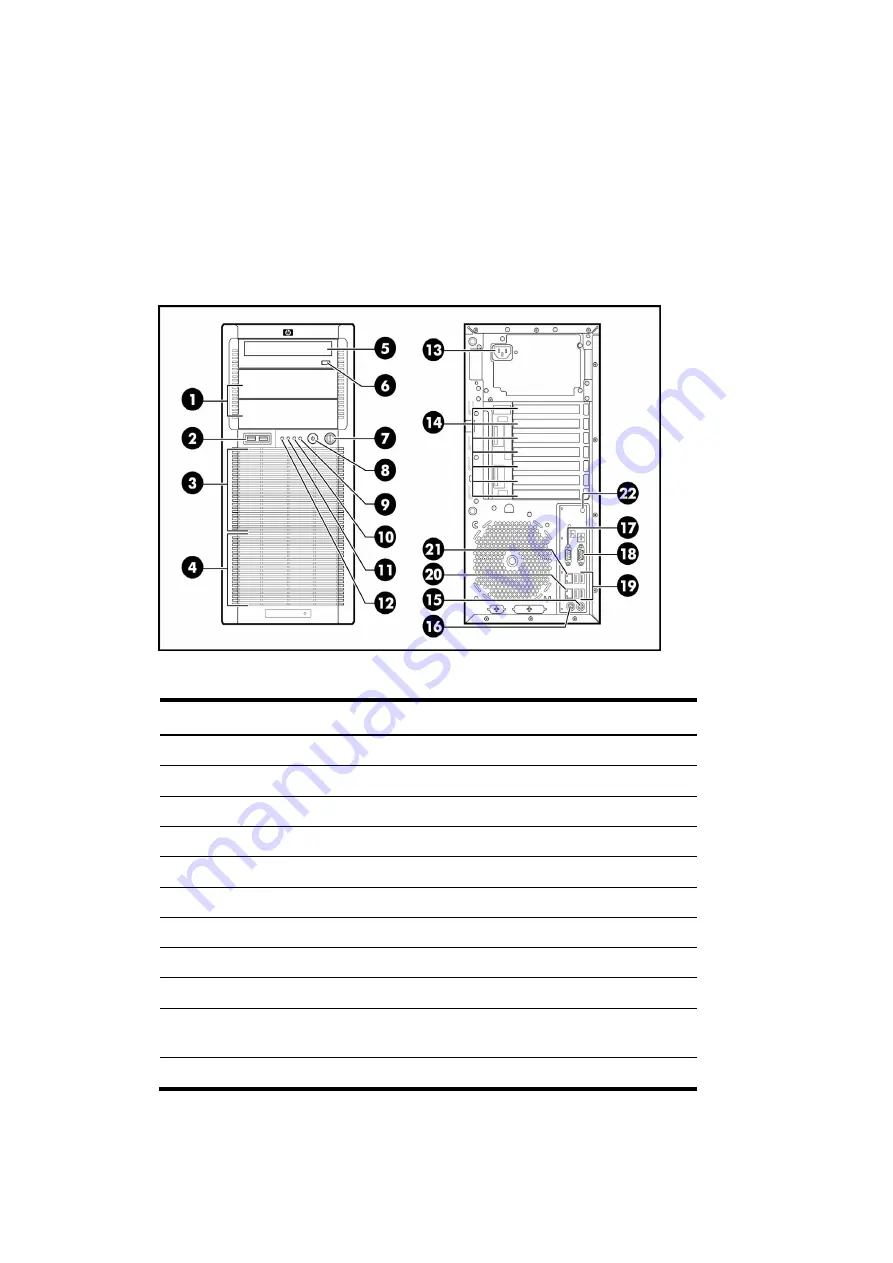
Figure 5-20 

Front and Rear Panel Components, Switches, and Indicators


Table 5-3 

Front and Rear Panel Components 

Item 

Description 

Item 

Description 

Media bays 

12 

System Health LED 

USB 2.0 ports (2) 

13 

AC input connector 

HDD bays 1-4 

14 

Expansion slots 

HDD bays 5-8 

15 

Keyboard connector  

Optical drive bay  

16 

Mouse connector 

Media eject button 

17 

Serial port connector 

Front key lock 

18 

VGA connector 

System power button/LED 

19 

USB 2.0 ports (4) 

HDD activity LED 

20 

NIC connector 

10 

NIC2 LED 

21 

Dedicate LO100 Management 
port 

11 

NIC1 LED 

22 

UID 


All manuals and user guides at all-guides.com

Содержание ProLiant ML150 G6

Страница 1: ...HP ProLiant ML150 G6 Server Maintenance and Service Guide Part number 501530 005 Fourth edition June 2013 All manuals and user guides at all guides com a l l g u i d e s c o m ...

Страница 2: ...arranty statements accompanying such products and services Nothing herein should be construed as constituting an additional warranty HP shall not be liable for technical or editorial errors or omissions contained herein Microsoft and Windows are U S registered trademarks of Microsoft Corporation Intel and Xeon are trademarks of Intel Corporation in the U S and other countries All manuals and user ...

Страница 3: ...ement 31 Cabling guidelines 31 Cable connections 32 Mass storage devices drives 33 Optical and tape drives 34 Hard drives 36 HDD cage 40 System board components replaceable 42 Processor 42 Memory 52 Expansion cards 56 System battery 60 System fans 62 Fan holder assembly removal and replacement 62 Rear fan assembly removal and replacement 63 System board removal and replacement procedure 66 Removin...

Страница 4: ...ar Panel Components Switches and Indicators 95 System Board Components Switches and Indicators 97 System board switches and jumpers 99 SAS SATA Hot Plug Hard Drive LEDs 100 Physical and Operating Specifications 101 System Unit 101 Memory 106 Processor 106 SATA DVD ROM Drive 108 SAS Hard Drive 109 SATA Hard Drive 110 Documentation feedback 111 Index 112 All manuals and user guides at all guides com...

Страница 5: ...siness day delivery Same day or four hour delivery may be offered at an additional charge where geography permits If assistance is required you can call the HP Technical Support Center and a technician will help you over the telephone HP specifies in the materials shipped with a replacement CSR part whether a defective part must be returned to HP In cases where it is required to return the defecti...

Страница 6: ... suivant dans la limite des stocks disponibles et selon votre situation géographique Si votre situation géographique le permet et que vous demandez une livraison le jour même ou dans les 4 heures celle ci vous sera facturée Pour bénéficier d une assistance téléphonique appelez le Centre d assistance technique HP Dans les documents envoyés avec la pièce de rechange CSR HP précise s il est nécessair...

Страница 7: ...giorno lavorativo seguente La consegna nel giorno stesso o entro quattro ore è offerta con un supplemento di costo solo in alcune zone In caso di necessità si può richiedere l assistenza telefonica di un addetto del centro di supporto tecnico HP Nel materiale fornito con una parte di ricambio CSR HP specifica se il cliente deve restituire dei componenti Qualora sia richiesta la resa ad HP del comp...

Страница 8: ...den gegen einen Aufpreis verfügbar Wenn Sie Hilfe benötigen können Sie das HP technische Support Center anrufen und sich von einem Mitarbeiter per Telefon helfen lassen Den Materialien die mit einem CSR Ersatzteil geliefert werden können Sie entnehmen ob das defekte Teil an HP zurückgeschickt werden muss Wenn es erforderlich ist das defekte Teil an HP zurückzuschicken müssen Sie dies innerhalb ein...

Страница 9: ...laborable Si la situación geográfica lo permite se puede solicitar la entrega en el mismo día o en cuatro horas con un coste adicional Si precisa asistencia técnica puede llamar al Centro de asistencia técnica de HP y recibirá ayuda telefónica por parte de un técnico Con el envío de materiales para la sustitución de componentes CSR HP especificará si los componentes defectuosos deberán devolverse ...

Страница 10: ...g op de eerstvolgende werkdag Levering op dezelfde dag of binnen vier uur kan tegen meerkosten worden aangeboden indien dit mogelijk is gezien de locatie Indien assistentie gewenst is belt u een HP Service Partner om via de telefoon technische ondersteuning te ontvangen HP vermeldt in de documentatie bij het vervangende CSR onderdeel of het defecte onderdeel aan HP moet worden geretourneerd Als he...

Страница 11: ... as condições geográficas permitirem a entrega no mesmo dia ou em quatro horas pode ser feita mediante uma taxa adicional Se precisar de auxílio entre em contato com o Centro de suporte técnico da HP para que um técnico o ajude por telefone A HP especifica nos materiais fornecidos com a peça CSR de reposição se a peça com defeito deve ser devolvida à HP Nos casos em que isso for necessário é preci...

Страница 12: ...Customer self repair 12 All manuals and user guides at all guides com ...

Страница 13: ...Customer self repair 13 All manuals and user guides at all guides com ...

Страница 14: ...Customer self repair 14 All manuals and user guides at all guides com ...

Страница 15: ...Customer self repair 15 All manuals and user guides at all guides com ...

Страница 16: ...est HP to replace these parts you will be charged for the travel and labor costs of this service 2 Optional Parts for which customer self repair is optional These parts are also designed for customer self repair If however you require that HP replace them for you there may or may not be additional charges depending on the type of warranty service designated for your product 3 No Some HP parts are ...

Страница 17: ... 3 No Kein Einige Teile sind nicht für Customer Self Repair ausgelegt Um den Garantieanspruch des Kunden zu erfüllen muss das Teil von einem HP Servicepartner ersetzt werden Im illustrierten Teilekatalog sind diese Teile mit No bzw Nein gekennzeichnet 1 Mandatory Obligatorio componentes para los que la reparación por parte del usuario es obligatoria Si solicita a HP que realice la sustitución de e...

Страница 18: ...e haver ou não a cobrança de taxa adicional dependendo do tipo de serviço de garantia destinado ao produto 3 No Nenhuma Algumas peças da HP não são projetadas para o reparo feito pelo cliente A fim de cumprir a garantia do cliente a HP exige que um técnico autorizado substitua a peça Essas peças estão identificadas com a marca No Não no catálogo de peças ilustrado All manuals and user guides at al...

Страница 19: ... 256Mx4 RoHS SPS DIMM 4 GB PC3 8500R 128Mx8 RoHS SPS DIMM 4 GB PC3 10600E 256Mx8 RoHS 501534 001 501535 001 501541 001 Mandatory1 SPS DIMM 1 GB PC3 10600E 128Mx8 RoHS 501539 001 Mandatory1 SPS DIMM 2 GB PC3 10600E 128Mx8 RoHS 501540 001 Mandatory1 5 SPS HEATSINK 509505 001 Optional2 6 SPS PROC Nehalem EP 1 86 GHz 4 M 80 W DC 490075 001 Optional2 SPS PROC Nehalem EP 2 00 GHz 4 M 80 W QC 490074 001 ...

Страница 20: ...us seront facturés 2 Optional Facultatif Pièces pour lesquelles la réparation par le client est facultative Ces pièces sont également conçues pour permettre au client d effectuer lui même la réparation Toutefois si vous demandez à HP de remplacer ces pièces l intervention peut ou non vous être facturée selon le type de garantie applicable à votre produit 3 No Non Certaines pièces HP ne sont pas co...

Страница 21: ...s componentes se identifican con la palabra No en el catálogo ilustrado de componentes 1 Mandatory Verplicht Onderdelen waarvoor Customer Self Repair verplicht is Als u HP verzoekt deze onderdelen te vervangen komen de reiskosten en het arbeidsloon voor uw rekening 2 Optional Optioneel Onderdelen waarvoor reparatie door de klant optioneel is Ook deze onderdelen zijn ontworpen voor reparatie door d...

Страница 22: ...74 6836 This service is available 24 hours a day 7 days a week For continuous quality improvement calls may be recorded or monitored If you have purchased a Care Pack service upgrade call 1 800 633 3600 For more information about Care Packs refer to the HP website at http www hp com Outside North America call the nearest HP Technical Support Phone Center For telephone numbers for worldwide Technic...

Страница 23: ...able before you call HP Technical support registration number if applicable Product serial number Product model name and number Applicable error messages Add on boards or hardware Third party hardware or software Operating system type and revision level All manuals and user guides at all guides com ...
Страница 24: ...labels on the related figure i e Label 1 corresponds to step a label 2 corresponds to step b etc Hardware configuration information WARNING Only authorized technicians trained by HP should attempt to repair this equipment Because of the complexity of the individual boards and subassemblies no one should attempt to make repairs at the component level or to make modifications to any printed wiring b...

Страница 25: ...ns This symbol indicates the presence of hazardous energy circuits or electric shock hazards Refer all servicing to qualified personnel WARNING To reduce the risk of injury from electric shock hazards do not open this enclosure Refer all maintenance upgrades and servicing to qualified personnel This symbol indicates the presence of electric shock hazards The area contains no user or field servicea...

Страница 26: ...e ESD precautions listed previously in this chapter when handling a server component WARNING Failure to properly turn off the server before you open it or before you start installing removing components may cause serious damage as well as bodily harm Post installation instructions Observe the following items after installing or removing a server component 1 Make sure that you install all component...

Страница 27: ...m CAUTION Protect the server from power fluctuations and temporary interruptions with a regulating uninterruptible power supply UPS This device protects the hardware from damage caused by power surges and voltage spikes and keeps the system in operation during a power failure CAUTION The server must always be operated with the system covers on Proper cooling is not achieved when the system covers ...

Страница 28: ...Removal and replacement procedures 28 Figure 3 1 Removing the access panel All manuals and user guides at all guides com ...
Страница 29: ...h the holes on the edges of the chassis 2 Slide the panel toward the front of the chassis to position it into place 3 Tighten the captive thumbscrews to secure the panel Figure 3 2 Reinstalling the access panel End of procedure Front bezel To open or remove the front bezel 1 If necessary unlock the front bezel door using the supplied key 2 Open the bezel door to the right and lift up to remove it ...

Страница 30: ... hooks on the right side of the bezel into the rectangular holes on the chassis 2 Rotate the bezel to the left so that the three tabs on the left side of the bezel snap into the slots on the chassis Figure 3 4 Closing the front bezel End of procedure All manuals and user guides at all guides com ...
Страница 31: ...he drive cage power supply or computer cover to push cables down into the chassis Use supplied cable management straps to secure cables NOTE Always follow good cable management practices when working inside the computer To remove power supply power cables and RPS from system board connectors respectively use the following steps 1 Squeeze on the top of the retaining latch attached to the cable end ...

Страница 32: ...Power supply P4 7 10 13 SATA drives 15 System Fan 1 System board J54 6 System Fan 2 System board J44 6 System Fan 3 System board J38 6 System Fan 4 System board J4 6 Front USB 2 0 ports System board J30 10 System board SATA1 SATA hard drive 1 1 J40 7 System board SATA2 SATA hard drive 2 1 J51 7 System board SATA3 SATA hard drive 3 1 J52 7 System board SATA4 SATA hard drive 4 1 J41 7 System board S...

Страница 33: ... hot plug HDD cage in the upper drive bay area can support an additional hot plug HDD cage in the lower drive bay area providing bays 5 through 8 Servers shipped with a non hot plug HDD cage in the upper bay area can be upgraded to a hot plug HDD system by replacing the non hot plug HDD cage with an optional hot plug HDD cage The server supports SATA or SAS drives Figure 3 6 Drive bay configuratio...

Страница 34: ... cord s 3 Remove the access panel and front bezel as described in the section titled System covers 4 Remove the EMI shield from the drive bay by placing the thumb and forefinger into the large holes of the shield and pulling the shield straight out of the chassis Figure 3 7 Removing the EMI shield CAUTION Do not discard the EMI shield If the drive is removed in the future the shield must be re ins...

Страница 35: ...into the bay until it stops Figure 3 8 2 Figure 3 8 Installing an optical drive 9 Connect the power and data cables to the connectors on the rear of the new drive 10 Replace the front bezel and access panel 11 Reconnect the power cord s End of procedure To remove an optical or tape drive reverse the procedure above All manuals and user guides at all guides com ...
Страница 36: ...t plug drive configuration include a non hot plug HDD cage installed in the upper bay area bays 1 through 4 Removing replacing a non hot plug hard drive To remove and replace a non hot plug hard drive 1 Power down the server 2 Disconnect the power cord s 3 Remove the access panel and front bezel as described in the section titled System covers 4 Disconnect the power and data cables from all hard d...

Страница 37: ...ard drive into the HDD cage Figure 3 11 1 b Using the provided surplus screws if necessary Figure 3 11 2 install four retaining screws Figure 3 11 3 Figure 3 11 Replacing a non hot plug hard drive 8 Re install the non hot plug HDD cage into the server and re install the six mounting screws 9 Connect the power and data cables to all hard drives 10 Replace the access panel and the front bezel 11 Rec...

Страница 38: ...t plug hard drive NOTE The server does not need to be powered down for this procedure To remove and replace a hot plug hard drive 1 Remove the front bezel as described in the section titled System covers 2 If adding a hot plug drive first remove the hot plug drive blanking panel a Press the release latches toward each other Figure 3 12 1 b Pull the blanking panel out of the bay Figure 3 12 2 Figur...

Страница 39: ... 3 13 Removing a hot plug hard drive 4 Slide the hot plug HDD drive into the drive bay until resistance is felt Figure 3 14 1 5 Verify that the hooks behind the pivot end of the cam latch will engage the hole on the edge of the hard drive cage 6 Rotate the cam latch down to fully seat the drive carrier into the backplane and press in until it clicks into place Figure 3 14 2 Figure 3 14 Installing ...

Страница 40: ...rd Drive subsection titled Removing replacing a non hot plug hard drive Removing and replacing a hot plug HDD cage and backplane To remove and replace the hot plug HDD cage 1 Power down the server 2 Disconnect the power cord s 3 Remove the access panel and front bezel as described in the section titled System covers 4 Remove all hard drives from the HDD cage as described in the section titled Remo...

Страница 41: ... the two screws securing the backplane to the HDD cage Figure 3 17 1 b Slide the backplane up slightly to clear the four cage hooks and securing post and then lift the backplane away from the cage Figure 3 17 2 Figure 3 17 Removing the backplane from the HDD cage c To replace the backplane reverse steps a and b End of procedure To replace the hot plug HDD cage reverse steps 1 through 6 All manuals...

Страница 42: ...in processor socket 1 However if processor 1 fails the system automatically boots from the processor installed in processor socket 2 and provides a processor failure message The two LGA1366 processor sockets support the following processor types Intel Xeon Dual Core E5502 series processors Intel Xeon Quad Core E5504 E5506 E5510 E5530 E5540 series processors CAUTION To prevent possible server malfu...

Страница 43: ...affle away from the chassis Figure 3 19 Removing the air baffle 5 Place the server on its side with the open side up 6 Remove the heatsink Figure 3 20 Figure 3 20 Removing the heatsink 7 Loosen the heatsink mounting screws Figure 3 20 1 and lift the heatsink away from the system board Figure 3 20 2 CAUTION If the heatsink is to be reused carefully place the heatsink in a position where the base pr...

Страница 44: ...ent procedures 44 To remove a processor 1 Open the processor locking lever and the processor socket retaining bracket Figure 3 21 Opening the processor socket retaining bracket All manuals and user guides at all guides com ...
Страница 45: ...and then place the tool on the processor c Release the tabs and then carefully lift the processor and tool straight up Figure 3 22 Removing the processor 3 Carefully rotate the tool and then push in and release the tabs to secure the processor in the tool Figure 3 23 Securing the processor CAUTION To avoid damage to the processor do not touch the bottom of the processor especially the contact area...

Страница 46: ...rface CAUTION HP recommends thermal grease of X 23 7783D made by Shin Etsu 3 Use the edge of a razor blade to spread the grease throughout the entire contact surface and lightly scrape off any excess grease Make sure that you only apply a very thin layer so that the contact surface is still visible CAUTION Never touch the contact area of the processor Any contaminant could prevent the mounting pad...

Страница 47: ...or 1 Carefully insert the processor into the processor installation tool Handle the processor by the edges only and do not touch the bottom of the processor especially the contact area Figure 3 24 Inserting the processor All manuals and user guides at all guides com ...
Страница 48: ...ON THE PINS ON THE SYSTEM BOARD ARE VERY FRAGILE AND EASILY DAMAGED To avoid damage to the system board Never install or remove a processor without using the processor installation tool Do not touch the processor socket contacts Do not tilt or slide the processor when lowering the processor into the socket 3 Press and hold the tabs on the processor installation tool to separate it from the process...

Страница 49: ... The lever should close without resistance Forcing the lever closed can damage the processor and socket requiring system board replacement Figure 3 27 Closing the processor socket retaining bracket CAUTION To allow the heatsink to draw as much heat as possible from the processor base there must be good contact between the heatsink base and the top of the processor To ensure good contact you must a...

Страница 50: ...oward the rear of the chassis Figure 3 29 1 and tighten with a screwdriver Figure 3 29 2 CAUTION Do not overtighten heatsink mounting screws Figure 3 29 Installing the heatsink assembly 7 Install the heatsink CAUTION Failure to connect the processor fan cable to the system board may result in damage to the processor and could cause the server to shut down without displaying messages 8 Align the ai...

Страница 51: ...Removal and replacement procedures 51 Figure 3 30 Installing the air baffle End of procedure All manuals and user guides at all guides com a l l g u i d e s c o m ...

Страница 52: ...e following guidelines when adding or replacing memory modules Use registered and un buffered DDR3 ECC DIMM Item Description 1 CPU1_DIMM slot 1D 2 CPU1_DIMM slot 2A 3 CPU1_DIMM slot 3E 4 CPU1_DIMM slot 4B 5 CPU1_DIMM slot 5F 6 CPU1_DIMM slot 6C 7 CPU2_DIMM slot 6C 8 CPU2_DIMM slot 5F 9 CPU2_DIMM slot 4B 10 CPU2_DIMM slot 3E 11 CPU2_DIMM slot 2A 12 CPU2_DIMM slot 1D All manuals and user guides at a...

Страница 53: ...ty DIMM installed To remove a memory module 1 Power down the server 2 Disconnect the power cord s 3 Unlock the server if necessary and remove the access panel as described in the section System covers 4 Remove the air baffle by pulling up slightly on the four tabs and lifting the baffle away from the chassis 5 Remove the hard drive fan holder if needed 6 Completely open the holding clips securing ...

Страница 54: ...Removal and replacement procedures 54 CAUTION Place the memory module on a static dissipating work surface or inside an anti static bag All manuals and user guides at all guides com ...
Страница 55: ... press the holding clips inward to secure the memory module in place Figure 3 33 2 Figure 3 33 Installing a memory module DIMM CAUTION The memory slots are structured to ensure proper installation If a memory module does not fit easily into the slot it may be inserted incorrectly Double check the orientation of the module and reinsert If the holding clips do not close completely the module is not ...

Страница 56: ... Slot 2 3 Expansion Slot 3 4 Expansion Slot 4 5 Expansion Slot 5 Expansion slot definitions Expansion Slot Technology Bus Width Connector Width Form factor 1 Standard PCI 2 3 3 3 V 32 bits Full length Full height slot 2 Standard PCI E Gen1 x4 x8 Full length Full height slot 3 Standard PCI E Gen2 x4 x8 Full length Full height slot 4 Standard PCI E Gen2 x16 x16 Full length Full height slot 5 Standar...

Страница 57: ...the server 2 Disconnect the power cord s 3 Unlock the server if necessary and remove the access panel as described in the section System covers 4 Press and hold the latches Figure 3 35 and turn the card holder upward Figure 3 35 Releasing the expansion card holder All manuals and user guides at all guides com ...
Страница 58: ... then move the card toward the rear of the chassis so that the bracket on the card is aligned with the open slot on the rear of the chassis 7 Press down the card holder until the latches snap into position in the rear panel securing the expansion card into the slot Figure 3 37 2 Figure 3 37 Installing an expansion card 8 Connect any interior cables associated with the installed expansion card 9 Re...

Страница 59: ...gh 10 of Installing an expansion card CAUTION If replacing an expansion card store the old card in the anti static packaging that contained the new card CAUTION If removing an expansion card slot covers must be installed in empty slots to maintain proper system cooling All manuals and user guides at all guides com ...
Страница 60: ...sassemble crush puncture or short external contacts or expose the battery to temperatures higher than 60 C 140 F Do not dispose of a used battery in water or fire Dispose of used batteries according to manufacturer s instructions CAUTION Loss of BIOS settings occurs when the battery is removed The BIOS must be reconfigured after replacing the battery NOTE If the server no longer automatically disp...

Страница 61: ...up lift it out Figure 3 39 1 5 To insert the new battery slide one edge of the replacement battery under the holder s lip with the positive side up Push the other edge down until the clamp snaps over the other edge of the battery Figure 3 39 2 Figure 3 39 Replacing the system battery End of procedure All manuals and user guides at all guides com a l l g u i d e s c o m ...

Страница 62: ...the section Removing an expansion card if necessary 5 On the front fan holder assembly press the thumb lever down slightly Figure 3 40 1 and slide the assembly a short distance toward the top of the server chassis Figure 3 40 2 Figure 3 40 Removing the front fan PCI card holder assembly 6 Rotate the fan assembly toward the rear of the chassis and lift away from the mounting slots but not completel...

Страница 63: ...ard holder assembly Figure 3 372 Installing the system fan 3 Reinstall the air baffle 4 Reinstall the access panel and tighten the thumbscrews 5 Return the server to the upright position 6 Connect the power cables to the power supplies End of procedure Rear fan assembly removal and replacement To remove the rear fan assembly proceed as follows 1 Power down the server 2 Disconnect the power cord s ...

Страница 64: ... 1 and take off the rear fan Figure 3 43 2 WARNING Be sure to support the fan with your hands when removing it from the chassis The fan could fall and cause personal injury or equipment damage if not supported 6 Disconnect the fan cable from the system board connector Figure 3 43 3 Figure 3 383 Removing the rear chassis fan assembly 7 Lift the fan assembly away from the rear panel and from the cha...

Страница 65: ... 1 2 Connect the fan cable to the system board connector Figure 3 44 2 3 Slide the fan assembly toward the expansion slots until it snaps into place Figure 3 394 Installing a rear system fan 4 Replace the air baffle 5 Replace the access panel and reconnect the power cord s End of procedure All manuals and user guides at all guides com ...

Страница 66: ...the system board is to be reused only the processor heatsink needs to be removed for this procedure The processor s can be left in the socket s 8 Disconnect all power supply cables from the system board 9 Disconnect all mass storage device data cables from the system board 10 Locate the 11 mounting screws from the system board indicated by arrows in the following figure Figure 3 405 System board m...

Страница 67: ...unting holes on the board are aligned with the screw taps on the chassis 2 Insert and tighten the 11 mounting screws 3 Install the processor heatsink s as described in the section Replacing the processor 4 Install the system fans as described in the section System fans 5 Install any expansion cards as described in the section Installing an expansion card 6 Return the server to an upright position ...

Страница 68: ...ponents HP recommends performing this procedure with the server placed on its side with the open side up Removing a PSU To remove the PSU proceed as follows 1 Power down the server 2 Disconnect the power cord 3 Unlock the server if necessary and remove the access panel refer to the section System covers 4 Remove the air baffle as described in the section Removing a processor 5 Place the server on ...

Страница 69: ...Removal and replacement procedures 69 Figure 3 427 Removing the PSU cables not shown All manuals and user guides at all guides com ...
Страница 70: ...assis and slide over the support ledge to the rear of the chassis until it is flush against the rear panel Figure 3 438 Installing a PSU or RPS RPS unit shown 2 Secure the power supply to the rear chassis panel using the six mounting screws Figure 3 449 Installing the rear mounting screws RPS unit shown All manuals and user guides at all guides com ...
Страница 71: ...3 If installing an RPS install the two additional mounting screws at the front of the RPS assembly Figure 3 50 Installing additional RPS mounting screws cables not shown All manuals and user guides at all guides com a l l g u i d e s c o m ...

Страница 72: ...up Utility Using the Setup Utility you can install configure and optimize the hardware devices on the system board In addition you can enable various features such as serial console redirection hyper threading PXE boot and much more Initialize hardware at boot up using POST routines During power on or warm reset the BIOS performs Power On Self Test POST routines to test system components to alloca...

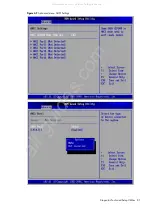
Страница 73: ...er a few moments the Main menu will be displayed Figure 4 1 NOTE If you fail to press F10 before POST is completed you will need to restart the server Figure 4 1 Main menu of the BIOS Setup Utility Navigating through the Setup Utility Table 4 1 lists and describes the keys used for navigating through the Setup Utility menus and selecting and changing parameters Pressing F1 from the Main menu displ...

Страница 74: ...r display a submenu screen Displays more options for selected item marked with Expands all device list Esc When pressed his key performs one of the following From a primary menu screen displays the Exit menu From a submenu screen displays the previous screen From a pop up window closes the pop up window without making a selection Page Up or Page Down When pressed displays the previous next page on...

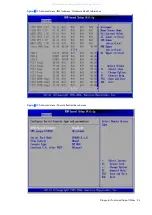
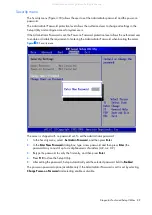
Страница 75: ...nformation View system memory size View MAC address for the embedded NIC View System serial ID Enter server Asset Tag Text The General Help pop up window is always available by pressing the F1 key Figure 4 2 Main menu and General Help screen The screen in Figure 4 2 has the selection arrow set to select the Boot Features sub menu Pressing the Enter key calls up the Boot Features sub menu Figure 4 ...

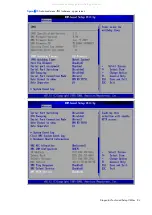
Страница 76: ... 76 The Boot Features submenu Figure 4 3 allows the user to set which type of event s that will occur during the boot process Figure 4 3 Main menu Boot Features submenu All manuals and user guides at all guides com a l l g u i d e s c o m ...

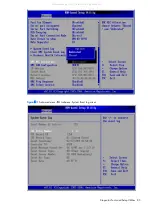
Страница 77: ...iguration Configure the serial port settings of the server AHCI Configuration Hard drives AHCI function settings IPMI Configure the Intelligent Platform Management Interface IPMI settings Console Redirection Configure the settings when redirecting the console to a serial port Trusted Computing Configure TPM settings USB Configuration Configure the USB settings of the server Onboard Device Configur...

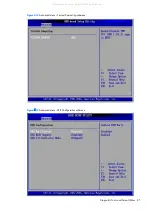
Страница 78: ...Diagnostic Tools and Setup Utilities 78 Figure 4 5 Advanced menu CPU Configuration submenu Figure 4 6 Advanced menu Chipset Settings All manuals and user guides at all guides com ...
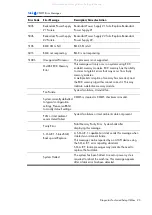
Страница 79: ...Diagnostic Tools and Setup Utilities 79 Figure 4 7 Advanced menu Harddisk Configuration submenu All manuals and user guides at all guides com ...
Страница 80: ...Diagnostic Tools and Setup Utilities 80 Figure 4 8 Advanced menu I O Configuration submenu All manuals and user guides at all guides com ...

Страница 81: ...Diagnostic Tools and Setup Utilities 81 Figure 4 9 Advanced menu AHCI Settings All manuals and user guides at all guides com a l l g u i d e s c o m ...

Страница 82: ...Diagnostic Tools and Setup Utilities 82 Figure 4 10 Advanced menu IPMI submenu upper screen All manuals and user guides at all guides com ...
Страница 83: ...Diagnostic Tools and Setup Utilities 83 Figure 4 11 Advanced menu IPMI submenu System Event Log screen All manuals and user guides at all guides com ...
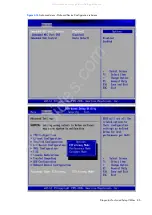
Страница 84: ...agnostic Tools and Setup Utilities 84 Figure 4 12 Advanced menu IPMI submenu Hardware Health Information Figure 4 13 Advanced menu Console Redirection submenu All manuals and user guides at all guides com ...

Страница 85: ...Diagnostic Tools and Setup Utilities 85 Figure 4 14 Advanced menu Trusted Computing submenu Figure 4 15 Advanced menu USB Configuration submenu All manuals and user guides at all guides com ...
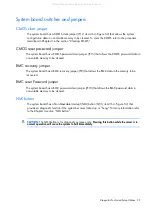
Страница 86: ...Diagnostic Tools and Setup Utilities 86 Figure 4 16 Advanced menu Onboard Device Configuration submenu All manuals and user guides at all guides com a l l g u i d e s c o m ...

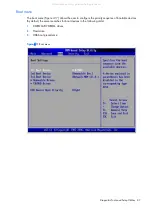
Страница 87: ...4 17 allows the user to configure the priority sequence of bootable devices By default the server searches for boot devices in the following order 1 CD ROM DVD ROM drives 2 Hard drive 3 USB boot precedence Figure 4 17 Boot menu All manuals and user guides at all guides com ...
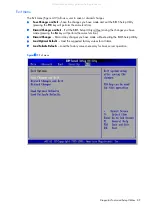
Страница 88: ...4 18 Security menu The server is shipped with no password set To set the administrator password 1 In the Security menu select Set Admin Password and then press Enter 2 In the Enter New Password dialog box type a new password and then press Enter the password may consist of up to six alphanumeric characters A Z a z 0 9 3 Retype the password to verify the first entry and then press Enter 4 Press F10...

Страница 89: ...Discard Changes and Exit Exit the BIOS Setup Utility without saving the changes you have made pressing the Esc key will perform the same function Discard Changes Discard any changes you have made without exiting the BIOS Setup Utility Load Optimal Defaults Load the suggested factory values for all items Load Failsafe Defaults Load the factory values necessary for basic server operation Figure 4 19...

Страница 90: ...that directory 2 From that drive and directory execute the downloaded file 3 On executing the downloaded file the user is prompted to enter the drive letter to be overwritten Enter the drive letter of the USB disk The utility creates a bootable USB disk and copies the files over to the USB disk 4 Reboot the ML150 G6 Server with the USB disk Make sure the BIOS setting allows booting from the USB di...

Страница 91: ... Load setup defaults by pressing F9 13 Set time date and other system values as necessary 14 Press F10 to close the Setup Utility Power On Self Test Before the server can be used all devices must be tested and initialized and the operating system must be bootstrapped to the memory This is referred to as Power On Self Test or POST POST is a series of diagnostic tests that checks firmware and hardwa...

Страница 92: ...iled Replace memory module s 002h Display memory test failed Output device video initialize failed 002h Password check failed Password input error Reset the system and input password again 002h S M A R T Command Failed Hard disks SMART feature initialization failed 005h PMM Allocate error PMM could not or did not allocate the requested amount of memory for driver usage 005h Refresh timer test fail...

Страница 93: ... algorithm cannot correct it This may indicate a defective memory module Fan Failure System fan failure Uninstall fan System currently defaulted to typical configuration settings Please run RBSU to modify default settings CMOS is cleared or CMOS checksum is invalid FAN or Inlet ambient sensor detect failed System fan failure or Inlet ambient cable not present Parity Error Fatal Memory Parity Error...

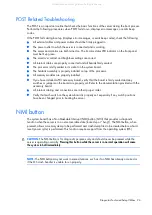
Страница 94: ... board verify that the board is firmly seated and any switches or jumpers on the board are properly set Refer to the documentation provided with the accessory board All internal cabling and connections are in their proper order Verify that each switch on the system board is properly set especially if any switch positions have been changed prior to booting the server NMI button The system board has...

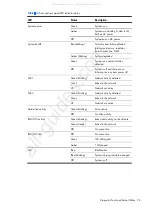
Страница 95: ...0 Front and Rear Panel Components Switches and Indicators Table 5 3 Front and Rear Panel Components Item Description Item Description 1 Media bays 12 System Health LED 2 USB 2 0 ports 2 13 AC input connector 3 HDD bays 1 4 14 Expansion slots 4 HDD bays 5 8 15 Keyboard connector 5 Optical drive bay 16 Mouse connector 6 Media eject button 17 Serial port connector 7 Front key lock 18 VGA connector 8 ...

Страница 96: ...o failures prior to system power off NIC1 Green blinking Network activity detected Green Linked to the network off Network not active NIC2 Green blinking Network activity detected Green Linked to the network off Network not active Hard drive activity Green blinking Drive activity Off No drive activity IPMI NIC activity Green blinking Linked and activity on the network Green steady Linked to the ne...

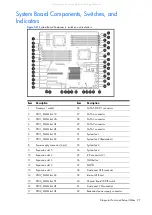
Страница 97: ...TA 1 connector 6 CPU1_DIMM slot 5F 31 System fan 1 7 CPU1_DIMM slot 6C 32 System fan 2 Redundant 8 Power supply connector 4 pin 33 System fan 3 9 Expansion slot 5 34 System fan 4 10 Expansion slot 4 35 I2C connector 2 11 Expansion slot 3 36 NMI button 12 Expansion slot 2 37 SGPIO 13 Expansion slot 1 38 Front panel USB connector 14 CPU2_DIMM slot 6C 39 Internal USB port 15 CPU2_DIMM slot 5F 40 Chas...

Страница 98: ...1D 44 Thermal sensor connector 20 Processor 2 socket 45 TPM 21 Power supply connector 8 pin 46 CMOS Clear jumper 22 Power Supply connector 24 pin 47 BMC Reset password jumper 23 Battery 48 BMC Recovery jumper 24 Internal USB connector 49 CMOS Reset password jumper 25 SATA 6 ODD 2 connector All manuals and user guides at all guides com ...
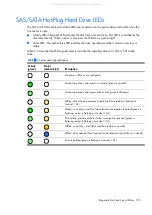
Страница 99: ...y jumper The system board has a BMC recovery jumper JP8 that allows the BMC data in the memory to be recovered BMC reset Password jumper The system board has a BMC password clear jumper JP10 that allows the BMC password data in non volatile memory to be cleared NMI button The system board has a Non Maskable Interrupt NMI button SW3 item 36 in Figure 5 2 that provides a diagnostic function if the s...

Страница 100: ...s light definitions Activity green Status amber blue Description No power offline or not configured Normal operation under power no activity green is on solid Normal operation under power disk activity green is fluttering Offline disk not being accessed predictive failure amber is flashing at constant 1 Hz Online no activity predictive failure further investigation required green is fluttering amb...

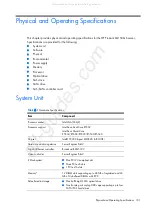
Страница 101: ... Processor support Intel Xeon Dual Core E5502 Intel Xeon Quad Core E5504 E5506 E5520 E5530 E5540 Chipset Intel 5500 Chipset IOH24D ICH10R Hardware monitoring device Server Engines Pilot2 Gigabit Ethernet controller Broadcom BCM5723 Video controller Server Engines Pilot2 I O subsystem One PCI 2 3 compliant slot Three PCIe x8 slots 1 PCIe x16 slots Memory 12 DIMM slots supporting up to 48 GB of regi...

Страница 102: ...ternal connectors on the system board video VGA port serial port and NIC GbE port Dedicate LO100 Management Status LED indicators Front panel System health NIC1 NIC2 Hard drive activity System power Rear panel NIC activity NIC link UID System board 5 V auxiliary power Power Supply unit PSU 460 watts single and 750 watts redundant Thermal solution Four system fans rear system fan two front system f...

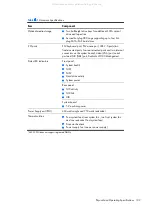
Страница 103: ...X86 X64 Microsoft Windows 2008 Enterprise X86 X64 Microsoft Windows 2008 Data Center X86 X64 Microsoft Windows 2008 Web Edition X86 X64 Microsoft Windows 2008 Embedded Systems Microsoft Windows 2008 Essential Business Server Microsoft Windows 2008 SBS Red Hat Enterprise Linux 4 Edition X86 X64 Red Hat Enterprise Linux 5 Edition X86 X64 SuSE Linux Enterprise Server 10 Edition X86 X64 SuSE Linux Ent...

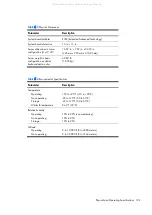
Страница 104: ...in basic configuration excludes keyboard and monitor 40 89 lb 18 55 kg Table 6 4 Environmental Specifications Parameter Description Temperature Operating Non operating Storage Wet bulb temperature 50 to 95 F 10 to 35 C 22 to 140 F 30 to 60 C 22 to 140 F 30 to 60 C 84 2 F 29 C Relative humidity Operating Non operating Storage 10 to 90 non condensing 10 to 95 10 to 95 Altitude Operating Non operatin...

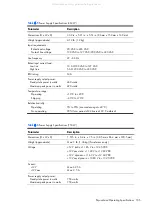
Страница 105: ...tts 460 watts 490 watts Temperature range Operating Shipping 10 C to 45 C 40 C to 70 C Relative humidity Operating Non operating 5 to 95 non condensing at 40 C 90 for a period of 24 hours at 65 C ambient Table 6 6 Power Supply Specifications 750 W Parameter Description Dimensions H x W x D 1 515 in x 3 4 in x 7 5 in 38 5 mm x 86 4 mm x 190 5 mm Weight approximate Max 3 lb 1 36 kg For reference onl...

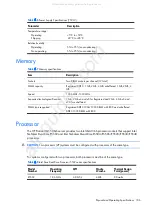
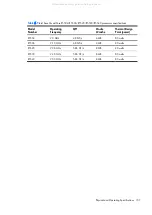
Страница 106: ...d x16 for unbuffered DIMM type supported Registered DDR3 1066 1333 DIMM with ECC and unbuffered DDR3 1333 DIMM with ECC Processor The HP ProLiant ML150 G6 server provides two Intel LGA1366 processor sockets that support Intel Nehalem Dual Core E5502 and Intel Nehalem Quad Core E5504 E5506 E5520 E5530 E5540 processors CAUTION Two processor 2P systems must be configured with processors of the same t...

Страница 107: ...ations Model Number Operating Frequency QPI On die L2 cache Thermal Design Point power E5504 2 0 GHz 4 8 GT s 4 MB 80 watts E5506 2 13 GHz 4 8 GT s 4 MB 80 watts E5520 2 26 GHz 5 86 GT s 8 MB 80 watts E5530 2 40 GHz 5 86 GT s 8 MB 80 watts E5540 2 53 GHz 5 86 GT s 8 MB 80 watts All manuals and user guides at all guides com ...
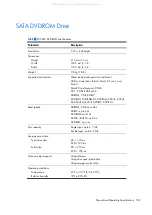
Страница 108: ...D Plus CD Extra 0 CD ROM CD R CD RW DVD ROM DVD ROM DL DVD RAM DVD R DVD R DL DVD RW DVD R DVD RW DVD R DL Read speeds CD ROM CD R up to 48x CD RW up to 32x DVD ROM up to16x DVD R R RW up to 8x DVD RAM up to 4x Disc capacity Single layer up to 4 7 GB Double layer up to 8 5 GB Average access time Typical random Full stroke CD 125 ms DVD 140 ms CD 210 ms DVD 250 ms Three way eject support Using soft...

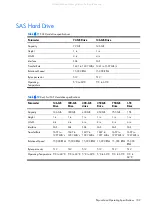
Страница 109: ...meter 146 GB Drive 300 GB Drive 400 GB drive 450 GB Drive 750 GB Drive 1 TB Drive Capacity 146 GB 300 GB 400 GB 450 GB 750 GB 1 TB Height 1 in 1 in 1 in 1 in 1 in 1 in Width 4 in 4 in 4 in 4 in 4 in 4 in Interface SAS SAS SAS SAS SAS SAS Transfer Rate 1607 to 1997 MB s 1607 to 1997 MB s 1607 to 1997 MB s 1607 to 1997 MB s 1607 to 1997 MB s 1607 to 1997 MB s Rotational Speed 15 000 RPM 15 000 RPM 1...

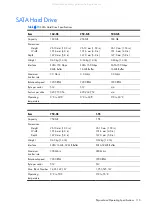
Страница 110: ...te 3 0 Gb s 3 0 Gb s 3 0 Gb s Rotational speed 7200 RPM 7200 RPM 7200 RPM Byte per sector 512 512 n a Sectors per drive 320 173 056 490 234 752 n a Operating temperature 0 C to 60 C 0 C to 60 C 0 C to 60 C Item 750 GB 1 TB Capacity 750 GB 1 TB Dimensions Height Width Depth 26 10 mm 1 03 in 101 6 mm 4 0 in 147 0 mm 5 8 in 26 10 mm 1 03 in 101 6 mm 4 0 in 147 0 mm 5 8 in Weight 0 63 kg 1 4 Ib 0 63 k...

Страница 111: ...ur needs To help us improve the documentation send any errors suggestions or comments to Documentation Feedback mailto docsfeedback hp com Include the document title and part number version number or the URL when submitting your feedback All manuals and user guides at all guides com a l l g u i d e s c o m ...

Страница 112: ...air CSR 5 D Diagnostic tools and Setup Utilities BIOS Setup Utility 72 BIOS software 72 BIOS update 90 clear CMOS 91 POST 91 DIMM slots 52 documentation feedback 111 drive bay configuration optical drive 34 overview 33 tape drive 34 drives 33 cable connections 32 cable management 31 E electrostatic discharge See ESD ESD damage precautions 25 work area recommendations 25 F front bezel closing 30 op...

Страница 113: ...evices bus channels 56 PCI slots 56 PCI expansion cards PCI slots 56 removing 57 Peripheral Component Interconnect See PCI devices personal injury warning 27 power fluctuations caution 27 power supply part number 102 power supply unit See PSU power down procedures 27 Power On Self Test POST error indicators 92 POST related troubleshooting 94 recoverable POST errors 92 processor applying thermal gr...

Страница 114: ...anel 27 front bezel 29 system fan replacing 63 System Unit specifications 101 T thermal grease caution 46 U uninterruptible power supply See UPS UPS 27 W warnings battery replacement 60 component level repairs 24 hot surface 27 improper repairs 24 personal injury 27 PSU replacement 68 technician notes 24 warranty 5 work area recommendations 25 All manuals and user guides at all guides com ...
Отзывы: