background image


System BIOS configuration  34  


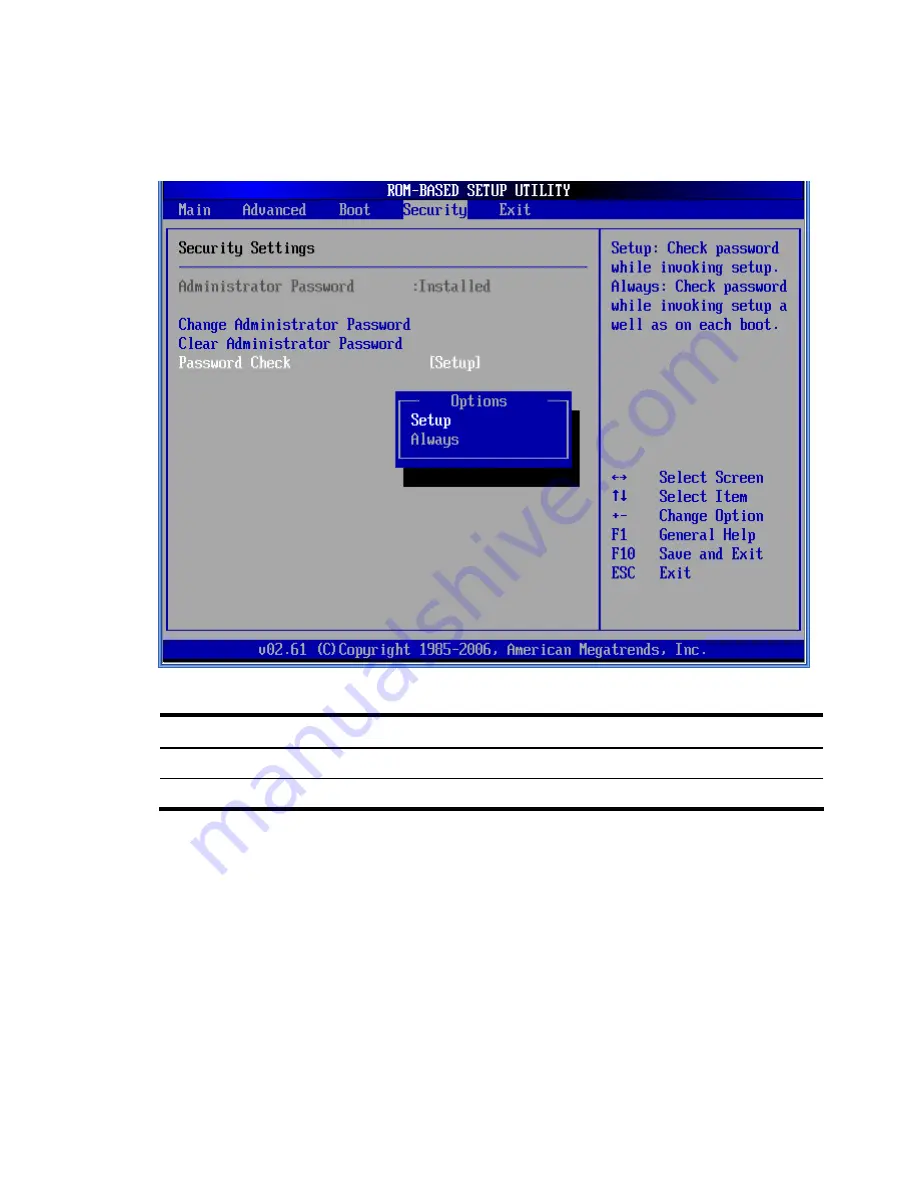
To check the administrator password: 

1.


In the Security menu screen, select 

Password check

, and then press 

Enter

2.


Select one of the available options and then press 

Enter

Figure 25  

Password Check submenu  


Table 16 

  Password Check submenu fields


Option Description 

Setup 

Select this option, BIOS will check password when Setup utility is invoked. 

Always 

Select this option, BIOS will check password on each power on or reboot. 


Содержание ProLiant DL160 G5P

Страница 1: ...HP ProLiant DL160 G5p Server Software Configuration Guide Part number 498334 001 First edition September 2008 ...

Страница 2: ... should be construed as constituting an additional warranty HP shall not be liable for technical or editorial errors or omissions contained herein Microsoft Windows and Windows NT are U S registered trademarks of Microsoft Corporation Windows Server 2003 is a trademark of Microsoft Corporation Intel Pentium and Itanium are trademarks or registered trademarks of Intel Corporation or its subsidiarie...

Страница 3: ...alling Windows NOS 42 Section3 Completing the installation 43 Section4 Configuring the system 44 Section5 Configuring the network 46 Section6 Installing additional HP accessories 48 Installing Red Hat Enterprise Linux NOS 48 Installation flow 48 Pre installation instructions 48 Red Hat Enterprise Linux 4 installation 48 Red Hat Enterprise Linux 5 installation 51 Installing SUSE Linux Enterprise Se...

Страница 4: ...Contents 4 Index 63 ...

Страница 5: ...ines At power on or reset the software performs Power On Self Test POST routines to test system resources and run the operating system Perform run time routines Using the software perform basic hardware routines that can be called from DOS and Windows applications AMIBIOS Setup Utility NOTE For ease of reading the AMIBIOS Setup Utility will be referred to as Setup or Setup Utility in this guide Al...

Страница 6: ...on data to be retained when power is turned off The values take effect when the system is booted POST uses these values to configure the hardware If the values and the actual hardware do not agree POST generates an error message You must run the Setup Utility to change the BIOS settings from the default or current configuration Accessing the Setup Utility 1 Turn on the monitor and the server If th...

Страница 7: ... move the cursor to each field Select a value for the currently selected field if it is user configurable Press the or keys repeatedly to scroll through each value one at a time or press the Enter key to choose from a pop up menu that displays all possible values at once A parameter that is enclosed in square brackets is user configurable Grayed out parameters are not user configurable for one of ...

Страница 8: ...re 2 General Help Screen Setup Utility menus The Setup Utility menu bar displays the five primary menu selections For detailed information and screenshots of these Setup menus and their related submenus refer to the following sections ...

Страница 9: ...escription System Overview Displays the system ROM Version the date when the Setup utility was created and identification number Processor Displays the CPU version speed and count System Memory Displays the amount of system memory detected during POST System Serial Number Displays the server serial number The serial number is indicated on the serial number label pull tab on the front panel Asset T...

Страница 10: ...submenu fields Field Description Options Summary Screen Set this value to not allow display of the hardware summary screen before booting the OS The setting default value is Disabled Disabled Set this value to allow display of the hardware summary screen before booting the OS Enabled Bootup Num Lock Set this value to allow the Number Lock on the keyboard to be enabled automatically when the comput...

Страница 11: ... allow wait up to 15 seconds for an F1 press The Setting default value is Delayed Delayed Set this value to allow wait indefinitely for an F1press Enabled Set this value to continue boot process without waiting for an F1 press Disabled Restore on AC Power Loss Set this value to restore previous power state before loss occurred The Setting default value is Last State Last State Set this value to al...

Страница 12: ...ces IPMI Configuration Select this option and press Enter to access the submenu you can use the submenu to view the contents of IPMI A delay may be noticed when selecting IPMI this is due to the retrieval of sensor data In its submenu use the up and down Arrow keys to select an item Use the Plus and Minus keys to change the value of the selected option USB Configuration These items control various...

Страница 13: ...n of the selected item appears on the right side of the screen The settings are described on the following pages CPU Configuration submenu Figure 6 CPU Configuration submenu Table 5 CPU Configuration submenu fields Field Description Options C1E Support This should be enabled in order to enable or disable the Enhanced Halt State The Setting default value is Enabled Enabled Disables the item Disable...

Страница 14: ...Adjacent Cache Line Prefetch feature Enabled Intel Virtualization Tech A VMM can utilize the additional HW Caps provided by Intel Virtualization Tech The Setting default value is Enabled Enabled The setting default value is Disabled Disabled Intel SpeedStep Tech This setting is available if the processor supports SpeedStep Enabling this value will let CPU run at appropriate speed and voltage as de...

Страница 15: ...puter system from using IDE and SATA device Disabled Setting this mode to support compatible mode Compatible Configure SATA as Setting this value configure SATA as IDE mode The Setting default value is IDE IDE Setting this value configure SATA as RAID mode RAID Legacy IDE Channels Set this value only support SATA device SATA Only Set this value support PATA as primary device select SATA as seconda...

Страница 16: ... value is the best setting to use if the onboard IDE controllers are set to a specific IDE disk drive in the BIOS 0 Set this value to stop the setup from searching the IDE bus for IDE disk drives in 5 seconds 5 Set this value to stop the setup from searching the IDE bus for IDE disk drives in 10 seconds 10 Set this value to stop the setup from searching the IDE bus for IDE disk drives in 15 second...

Страница 17: ...s the standard setting The most common serial device connected to this port is a mouse If the system will not use a serial device it is best to set this port to Disabled 3E8 IRQ4 Set this value to allow the serial port to use 3E8 as its I O port address and IRQ 4 for the interrupt address If the system will not use a serial device it is best to set this port to Disabled 2E8 IRQ3 Set this value to ...

Страница 18: ...n the left frame of the screen to go to the submenu for that item Then you can press Enter to enter its submenu You can display an about Serial Port Configuration option by highlighting it using the Arrow keys LAN Configuration Select set LAN configuration in the left frame of the screen to go to the submenu for that item You can display an about LAN option by highlighting it using the Arrow keys ...

Страница 19: ... These items are for information only and cannot be modified by the user Figure 10 SEL Configuration submenu Table 9 SEL Configuration submenu fields Field Description View BMC System Event Log The option views BMC system event log Select this option and press Enter to access the submenu to view the contents of System Event log Clear BMC System Event Log The option specifies clear system event log...

Страница 20: ...stem This setting will assign the serial port connector to the BMC baseboard management controller BMC Serial Port Switching This setting allows the Serial port switch between system and BMC The setting default value is Enabled Enabled This setting will prevent the Serial port from switching between system and BMC Disabled Serial Port Connection Mode Serial port connection mode is Direct The setti...

Страница 21: ...ng this value will prevent support from share NIC mode The setting default value is Disabled Disabled Setting this value will allow support for share NIC mode Disabled the KVM Enabled DHCP IP Source Setting this value will allow manual IP assignment Disabled Setting this value will allow dynamic IP assignment The setting default value is Enabled Enabled ...

Страница 22: ...t this value to allow BMC to power down if the operating system crashes or hangs Power Down Set this value to allow BMC to power cycle if the operating system crashes or hangs Power Cycle BMC Watch Dog Time Out Sets a 10 minute timeout value for BMC to wait before assuming the system has crashed and needs to reset The setting default value is 10 minutes 10 Min Sets a 5 minute timeout value for BMC...

Страница 23: ...cription Options Sets a 20 minute timeout value for BMC to wait before assuming the system has crashed and needs to reset 20 Min Sets a 30 minute timeout value for BMC to wait before assuming the system has crashed and needs to reset 30 Min Figure 14 Hardware health information submenu ...

Страница 24: ... Figure 15 Remote Access Configuration submenu Table 13 Remote Access Configuration submenu fields Field Description Options Remote Access Enable to select Remote Access type Enabled Disable to select Remote Access type The setting default value is Disabled Disabled ...

Страница 25: ...tions USB Controller This setting allows the use of the USB function The setting default value is Enabled Enabled This setting makes the onboard USB function unavailable Disabled USB 2 0 Controller This setting allows the use of USB ports transfer data in 480Mbps This is the default setting HiSpeed This setting allows the use of USB ports transfer data in 12Mbps FullSpeed BIOS EHCI Hand Off Set th...

Страница 26: ...oot Setup screen and press Enter Then you can select it as the first boot device or disabled it as the 1st Drive Embedded NIC Port 1 PXE The option specifies the embedded NIC Port 1 PXE The setting default value is Enabled Embedded NIC Port 2 PXE The option specifies the embedded NIC Port 2 PXE The setting default value is Disabled NIC2 Port The option specifies the NIC Port2 the default is enable...

Страница 27: ...System BIOS configuration 27 Figure 18 Boot Device Priority submenu NOTE When you select a boot category from the boot menu a list of devices in that category appears ...

Страница 28: ...System BIOS configuration 28 Hard Disk Drives submenu Figure 19 Hard Disk Drive submenu ...

Страница 29: ...nd change all settings in the Setup Utility Figure 20 Security menu To set an administrator password 1 Indicates whether a supervisor password has been set if the password has been installed installed displays if not not installed displays 2 In the Security menu screen in the Change Administrator Password field press Enter The Enter New Password window displays ...

Страница 30: ...guration 30 Figure 21 Enter New Password 3 Type a new password in the Enter New Password box The password may consist of up to six alphanumeric characters A Z a z 0 9 Press Enter the Confirm New Password window displays ...

Страница 31: ...on 31 Figure 22 Confirm New Password 4 Type the same password in the Confirm New Password box to verify the first entry and then press Enter The Password Installed OK window displays Press OK to finish the password installed ...

Страница 32: ...word field press Enter The Enter New Password window displays Type a new password in the Enter New Password box 2 Type the same password in the Confirm New Password box to verify the first entry then press Enter the Password Installed OK windows display press Enter to finish To clear the administrator password 1 In the Security menu screen in the Clear Administrator Password field press Enter The ...

Страница 33: ...System BIOS configuration 33 To clear the administrator password Figure 24 Clear User Password submenu ...

Страница 34: ...hen press Enter 2 Select one of the available options and then press Enter Figure 25 Password Check submenu Table 16 Password Check submenu fields Option Description Setup Select this option BIOS will check password when Setup utility is invoked Always Select this option BIOS will check password on each power on or reboot ...

Страница 35: ...Discard the changes and exit the Setup utility Discard Changes Discard the changes in the utility Load Optimal Defaults Loads the default settings for all BIOS setup fields BIOS Summary Display screen The BIOS Summary Displays basic and important information about the current server configuration and is necessary for troubleshooting and may be required when asking for technical support This inform...

Страница 36: ...ed 4 Presses F10 to save the changes you made and close the Setup Utility 5 Reboot the server The BIOS Summary Screen is displayed briefly at the end of POST Figure 27 BIOS Summary Screen 6 Press the Pause Break key to continue displaying the screen until another key is pressed 7 Press any key to continue with the system bootup Recording custom Setup values Write down the settings from the Setup U...

Страница 37: ...fer to the HP DL160 G5p Server Maintenance and Service Guide for the location of this jumper block and the clear CMOS setting To clear CMOS 1 Perform the pre installation procedures 2 If necessary remove any expansion boards assemblies or cables that prevent access to press CMOS button SW6 3 Locate the clear CMOS button SW6 on the system board 4 Press clear CMOS button SW6 to clear the CMOS memory...

Страница 38: ...e firmly plugged in The power outlet to which the server is connected is working The server and monitor are both turned on The bicolor power status LED indicator on the front panel must be green The monitor s contrast and brightness settings are correct All internal cables are properly connected and all boards firmly seated The processor is seated in its socket on the system board The heat sink is...

Страница 39: ...System BIOS configuration 39 If the server now works replace the boards and accessories one at a time to determine which one is causing the problem ...

Страница 40: ...e Server 9 32 and 64 bit SUSE Linux Enterprise Server 10 32 and 64 bit http www novell com linux Sun Solaris Enterprise Sun Solaris 10 64 bit http www sun com solaris NOS pre installation procedure Perform the two pre NOS installation steps in this section before installing the NOS of your choice 1 Configure the hardware aspect of the server 2 Update the server BIOS Hardware setup Prepare the serv...

Страница 41: ... installation CD you must change the SATA mode setting in the Serial ATA submenu from SATA to PATA otherwise the operating system kernel will hang Pre installation instructions 1 Complete the NOS pre installation procedures 2 Have the following installation requirements on hand HP DL160 G5p Server Support CD The applicable Microsoft Windows NOS CD ROM s Six blank formatted 3 5 inch diskettes A Win...

Страница 42: ... install the Windows NOS press Enter Otherwise press C to create a drive partition NOTE Windows Server 2003 does not have the 2 GB limitation present in Windows NT 4 0 6 In this example we will create a 10 GB partition 7 Press C to create a partition 8 At the Create partition size prompt type 10240 then press Enter 9 Select unpartitioned space and press C again to create additional partitions HP r...

Страница 43: ... server Phase 2 Installing the HP network driver During the Windows NOS installation the OS may not detect the embedded HP network interface card The following procedure helps you install the LAN driver using the Support CD 1 Insert the Support CD in the server s optical media drive By default the Support CD automatically runs and displays the Welcome page Close this window 2 Click Start Settings ...

Страница 44: ... click View Print to get a report 3 Verify that the installed drivers are digitally signed a In the Device Manager window select the device such as HP AHA 29160 that you want to verify b Right click Properties then click the Driver tab c Locate the Digital Signer If the driver of that device is digitally signed the message MS Windows 2003 Publisher or Microsoft Windows Hardware Compatibility Publi...

Страница 45: ...ensing requirement listed on the screen for this mode Consult with your Microsoft representative for setting the licensing server 5 Select the default permissions for application compatibility then click Next 6 Click Next to accept the support tools and administrator tools settings 7 If prompted insert the Windows NOS CD ROM 8 Click Finish to close the wizard 9 Click Yes to reboot the system Be su...

Страница 46: ...click the folder then select Sharing 2 Create users using the Windows NOS version Computer Management utility To open the utility click Start Programs Administrative Tools Computer Management System Tools Local Users and Groups Users 3 Connect the client PCs to the network your server operates on 4 Open a command prompt window to verify the TCP IP configuration and enter the command ipconfig all 5...

Страница 47: ...me 11 Click Next at Database and Log Locations to accept the default directories 12 Click Next at Shared System Volume to accept the default settings The system displays a dialog box that reads The Wizard can not contact the DNS Server 13 Confirm your DNS configuration or install and configure a DNS server on this computer 14 Click OK 15 Click Next to accept the installation of DNS on your new ser...

Страница 48: ...ry for the detailed installation procedure and or to the attached readme txt file associated with the driver The readme txt file can be found on the appropriate driver diskette Pre installation instructions 1 Complete the NOS pre installation procedures 2 Have the following installation requirements on hand HP DL160 G5p Server Support CD Red Hat Enterprise Linux CD ROMs Red Hat Enterprise Linux 4 ...

Страница 49: ...hen select a hard drive 3 Click Next to continue 4 If a Warning dialog box appears click Yes to continue 5 At the Partitioning dialog box click Next 6 Review the Disk Setup settings and modify if necessary then click Next Boot Loader Configuration HP recommends keeping the default option then click Next to continue Network Configuration Review the Network Configuration settings and verify that the...

Страница 50: ... RHEL4 CD ROMs depending on the packages you have chosen to install Complete Installation After completing the installation click Reboot to close the installation program and reboot the system Section4 Configuring the initial setup settings Once the system reboots the new Red Hat environment is loaded You need to configure the initial setup settings Welcome Click Next to start the initial setup co...

Страница 51: ...s with a generic 104 key PC keyboard After selecting the appropriate option for the keyboard layout click Next to continue Disk Partitioning Setup HP recommends selecting the automatic partitioning mode 1 Select Remove all partitions on selected drives and create default layout 2 Click Next to continue 3 If a Warning dialog box appears click Yes to continue Network Configuration Review the Network...

Страница 52: ...boot the system Section4 Configuring the initial setup settings Once the system reboots the new Red Hat environment is loaded You need to configure the initial setup settings Welcome Click Forward to start the initial setup configuration License Agreement Read the license agreement If the terms of the agreement are acceptable click Forward Firewall Review the Firewall Configuration settings and mo...

Страница 53: ...on instructions 1 Complete the NOS pre installation procedures 2 Have the following installation requirements on hand HP DL160 G5p Server Support CD SUSE Linux Enterprise Server CD ROMs SUSE Linux Enterprise Server 9 6 discs SUSE Linux Enterprise Server 10 4 discs A Windows PC that has a Floppy drive Optical media drive Browser that supports HTML Two or more clients for testing purposes optional S...

Страница 54: ...alphanumeric characters then click Next to continue Network Configuration Review the Network Configuration settings and verify that they fit your environment then click Next to continue Test Internet Connect Skip this test You can test the network connection after completing the NOS installation Click Next to proceed with the installation Service Configuration Review the Services settings and sele...

Страница 55: ...lock and Time Zone settings then click Next to continue Installation Setting 1 Review the default installation settings and modify them to meet your network environment 2 Click Accept to initialize the installation process 3 Click Install to start the file copying The system automatically reboots once the first part of the file copying is completed You may be prompted to insert the rest of the SLE...

Страница 56: ... server Pre installation instructions 1 Complete the NOS pre installation procedures 2 Have the following installation requirements on hand HP DL160 G5p Server Support CD Sun Solaris 10 Update 1 DVD NOTE You must first install a DVD compatible optical media drive on your server before installing Sun Solaris 10 A Windows PC that has a Floppy drive Optical media drive Browser that supports HTML Two ...

Страница 57: ...Device Monitor then press F2 4 Verify that the Video Device setting shows XF86 VESA Matrox Graphics Inc Unknown Board then press F2 5 Select the display device used by your system then press F2 If you are using a 17 inch CRT monitor select MultiFrequency 38 KHz Up to 1024x768 interlaced 6 Select your display device s screen size then press F2 7 Set the preferred Resolution Color Refresh Rate setti...

Страница 58: ...ick Next to continue Specify Media Click CD DVD then click Next to initialize the installation process License Read the license agreement If the terms of the agreement are acceptable select the Accept check box then click Next to continue Select Type of Install Click Custom Install then click Next to choose the Solaris options you intend to install Select Software Localizations Click a on the GUI ...

Страница 59: ...nue Ready to Install An installation information summary is displayed Verify this information then click Install Now to start the installation process Upon completing the installation the system automatically reboots You can now eject the SS10U1 DVD Once the system reboots the new Sun Solaris environment is loaded The following message appears Do you need to override the system s default NFS versi...

Страница 60: ... are installed according to the described step by step instructions 2 Check to make sure you have not left loose tools or parts inside the server 3 Reinstall any expansion boards riser board assemblies peripherals board covers brackets and system cables that you have removed 4 Reinstall the top cover a Place the cover on the chassis approximately 1 25 cm 0 5 in toward the rear of the unit then sli...

Страница 61: ... 5 Press Enter to bring up a prompt 6 If the first prompt is for a password press Enter again 7 At the Login prompt type your user name and press Enter The default user name is admin 8 At the Password prompt type your password and press Enter The default password is admin The message CLP Session Initiated displays 9 At the prompt type cd map1 nic1 to navigate to the correct directory The command l...

Страница 62: ...nu set the Serial port Assignment field to System or BMC See the Serial Port Configuration submenu fields section for more information 2 In the Console Redirection submenu set Remote Access to Enable See the Console Redirection submenu fields section for more information 3 Press F10 to Save and Exit ...

Страница 63: ...es 35 Discard Changes and Exit 35 E Embedded NIC PXE 26 F Fan Control Policy 19 H Heading 1 5 I IDE 17 IP subnet mask 61 IPMI LAN interface 61 L LAN Configuration 18 LAN Controller 61 Load Option Default 35 M Main Manu 9 memory 9 N New Password box 30 P password check 34 POST 5 37 POST Watchdog Timer Action 22 Power On Self Test 37 Pre installation 56 R RAID 17 Red Hat Enterprise Linux 4 50 52 Rem...

Страница 64: ...Index 64 U USB 2 0 Controller 25 USB Controller 25 V View BMC System Event Log 19 W Watchdog Configuration 18 ...

Отзывы: