


MSM710 Controller Quickstart
2
HP ProCurve Networking
Status lights
All three status lights are located on the front panel.
Important information to read before installation
Warning:
PROFESSIONAL INSTALLATION REQUIRED
Prior to installing or using this device, consult with a professional installer trained in RF
installation and knowledgeable in local regulations including building and wiring codes,
safety, channel, power, indoor/outdoor restrictions, and license requirements for the
intended country. It is the responsibility of the end user to ensure that installation and
use comply with local safety and radio regulations.
Cabling
: You must use the appropriate cables, and where applicable, surge protection, for
your given region. For compliance with EN55022 Class-B emissions requirement, use
shielded Ethernet cables.
Country of use
: Some versions of the unit require the installer to select the country of
operation during set up. Once the country has been set, the unit will automatically limit the
available wireless channels, ensuring compliant operation in the selected country. Incorrectly
entering the country may result in illegal operation and may cause harmful interference to
other systems.
Safety:
Take note of the following safety information during installation.
•
If your network covers an area served by more than one power distribution system, be
sure all safety grounds are securely interconnected.
•
Network cables may occasionally be subject to hazardous transient voltages (caused by
lightning or disturbances in the electrical power grid).
•
Handle exposed metal components of the network with caution.
•
This product does not have a power switch. It is powered-on when the LAN port is
connected to the external power supply is plugged into a PoE power source.
•
This product and all interconnected equipment must be installed indoors within the
same building (except for outdoor models), including all PoE-powered network
connections as described by Environment A of the IEEE 802.3af standard.
Installation
It is recommended that you mount the MSM710 only after performing the procedures in this
Quickstart and familiarizing yourself with the product.
•
For table-top usage, attach the rubber feet to the bottom corners.
•
For rack or wall mounting, you can order the optional part:
HP ProCurve MSM710
Controller Rack Mounting Kit
, part number J9404A.
•
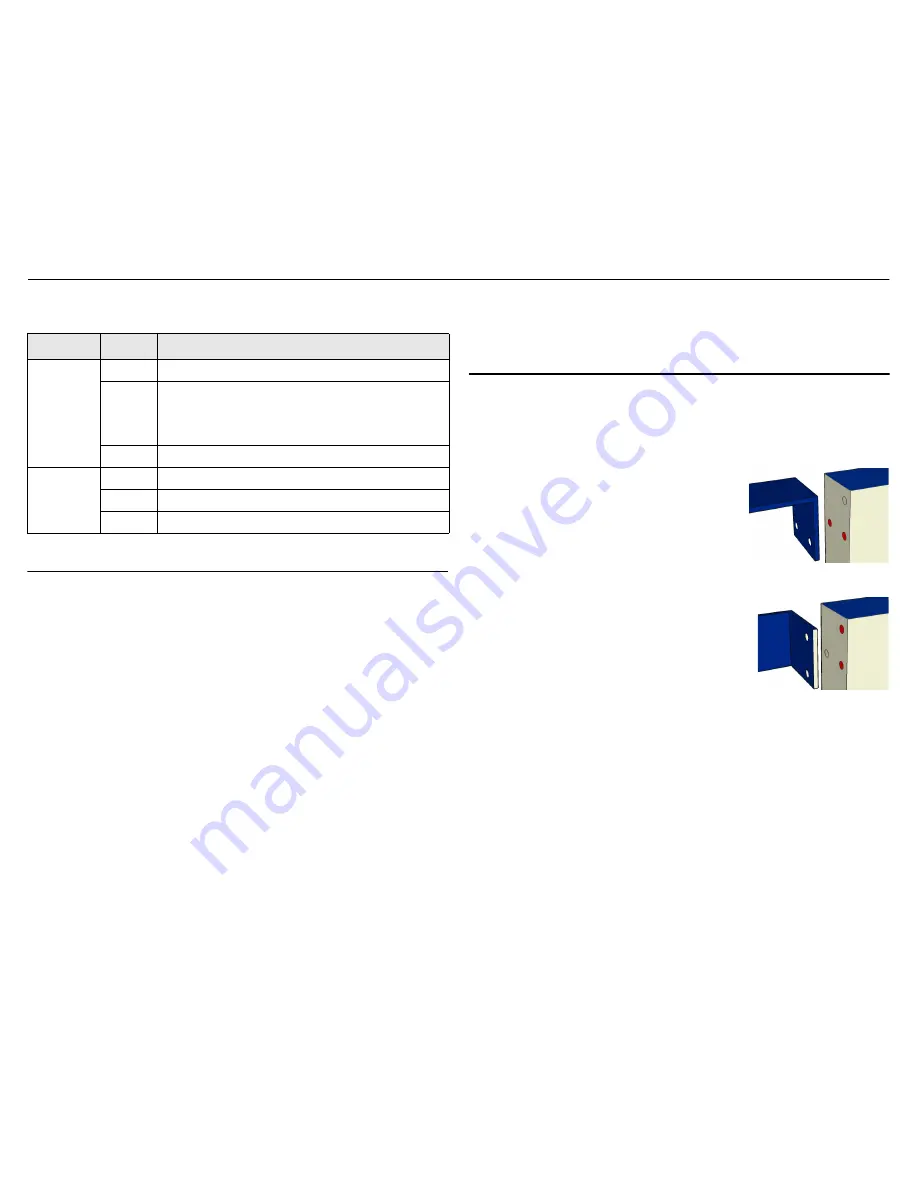
For standard 48 cm (19-inch) rack mounting first
attach a mounting bracket to each side of the MSM710
using the provided screws (see image to right), and
then mount it in the rack.
•
For wall mounting, attach the MSM710 to a wall so that
the front faceplate (with status lights) faces the ceiling,
the Ethernet ports face the floor, and the top of the unit
is flat against the wall. Do this as follows:
1.
Rotate the mounting bracket 90 degrees (from how
it is used for rack mounting) and attach it to the two
screw holes along the bottom edge of the MSM710
(see image to right).
2.
Drill holes in the wall and insert appropriate wall
anchors (not supplied) according to their directions.
The anchors must support at least 2.2 kg (5
pounds). Allow extra weight for cables.
3.
Fasten the MSM710 to the wall anchors using the screws supplied with the
anchors. If needed, use washers on top of the bracket.
Powering the MSM710
The MSM710 can be powered by:
•
The provided 48-volt power supply.
•
A 10/100 or 10/100/1000 PoE-enabled switch. Various PoE-enabled switches are
available from HP ProCurve.
•
An HP ProCurve PoE 1-Port Power Injector (J9407A).
Caution:
If the MSM710 will be powered by a user-supplied PoE power injector, use
only a gigabit-compatible power injector. PoE injectors designed for 10/100
networks only are NOT compatible with the MSM710.
Light
State
Description
Power
Off
The MSM710 has no power.
Blinking
The MSM710 is starting up. If the power light continues to
blink for several minutes, it indicates that the software failed
to load. Reset or power cycle the MSM710. If this condition
persists, contact HP ProCurve Customer Care.
On
The MSM710 is fully operational.
Ethernet:
LAN
and
Internet
Off
Port is not connected or there is no activity.
Blinking
Transmit/receive activity.
On
Stays on for a short period when the link is established.