HP Pavilion dv4000 - notebook pc Скачать руководство пользователя страница 95

6–4

Hardware and Software Guide

PC Cards and ExpressCards

Removing a PC Card

Ä

CAUTION: 

To prevent loss of work or an unresponsive system, stop the 

PC Card before removing it.

1. Stop the PC Card by selecting the 

Safely Remove Hardware


icon in the notification area at the far right of the taskbar, and 
then selecting the PC Card. (To display the Safely Remove 
Hardware icon, select Show Hidden Icons on the taskbar.)

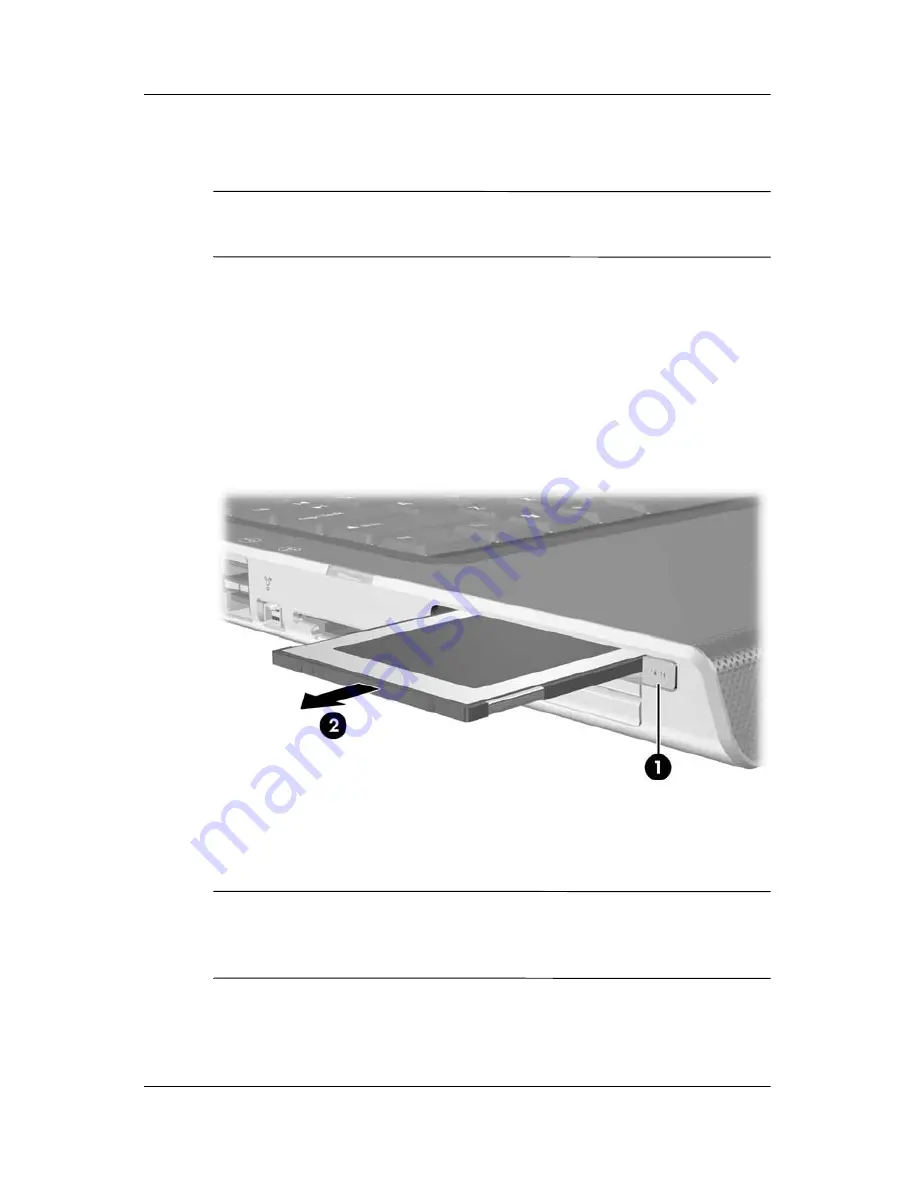
2. Press the PC Card eject button 

1

. (This action extends the 

button into position for releasing the PC Card.)

3. Gently slide out the card 

2

.

4. Replace the PC Card cover if you are not inserting another 

PC Card.

An inserted PC Card uses power even when not in use. To 
conserve power, stop or remove a PC Card when you are not 
using it.

Содержание Pavilion dv4000 - notebook pc

Страница 1: ...ware and Software Guide HP Notebook Series Document Part Number 375424 001 March 2005 This guide explains how to identify access and use most of the hardware and software features available on your notebook ...

Страница 2: ...ation contained herein is subject to change without notice The only warranties for HP products and services are set forth in the express warranty statements accompanying such products and services Nothing herein should be construed as constituting an additional warranty HP shall not be liable for technical or editorial errors or omissions contained herein Hardware and Software Guide HP Notebook Se...

Страница 3: ... Components 1 9 Speakers Display Release Button and Consumer IR Lens 1 9 Lights 1 10 Left Side Components 1 11 Ports and Jacks 1 11 Media and Memory Card Slots 1 13 Right Side Components 1 14 Bottom Components 1 16 Mini PCI and Memory Module Compartment 1 16 Bays Battery Latch and Vents 1 17 Additional Hardware Components 1 18 Additional Components 1 19 Optical Discs 1 19 Labels 1 19 ...

Страница 4: ...ptions 2 10 Using Power Schemes 2 10 Setting a Standby Password 2 11 Setting Other Power Preferences 2 11 Processor Performance Controls Select Models Only 2 13 Battery Pack 2 15 Charging a Battery Pack 2 15 Monitoring the Charge in a Battery Pack 2 16 Low Battery Conditions 2 17 Calibrating a Battery Pack 2 19 Conserving Battery Pack Power 2 22 Replacing a Battery Pack 2 24 Storing a Battery Pack...

Страница 5: ...the Volume 4 1 Using the Audio In Microphone Jack 4 2 Using the Audio Out Headphone Jack 4 2 Connecting the Audio Out Headphone Jack 4 3 Video Features 4 4 Connecting an S Video Device 4 4 Displaying a Video Image 4 6 Multimedia Software 4 6 Observing the Copyright Warning 4 7 Installing Software 4 8 Enabling AutoPlay 4 8 Changing DVD Region Settings 4 9 5 Drives Drive Care 5 2 Removing the Primar...

Страница 6: ...s Select Models Only Using Digital Media 7 1 Inserting Digital Cards 7 2 Removing Digital Cards 7 3 Disabling or Restarting Digital Cards 7 4 8 Memory Modules What Is a Memory Module 8 1 Replacing a Memory Module 8 2 Hibernation File 8 6 9 USB Devices What Is USB 9 1 Using USB Devices 9 2 Operating System and Software 9 2 10 Modem and Networking Internal Modem 10 1 Connecting a Modem Cable 10 2 Us...

Страница 7: ...es 11 12 Turning On the Devices 11 14 Turning Off and Disabling the Devices 11 15 12 Security Security Features 12 1 Security Preferences in the Setup Utility 12 2 QuickLock 12 3 Passwords 12 3 HP and Windows Passwords 12 4 HP and Windows Password Guidelines 12 5 HP Administrator Password 12 6 Setting HP Administrator Passwords 12 7 Entering HP Administrator Passwords 12 8 Power On Passwords 12 8 ...

Страница 8: ...1 Preparing for a Software Update 14 2 Downloading and Installing an Update 14 4 System Restore Points 14 8 Setting a Restore Point 14 8 Restoring to a Restore Point 14 9 Repairing or Reinstalling Applications 14 9 Reinstalling Applications from Your Hard Drive 14 10 Reinstalling Applications from Discs 14 10 Repairing the Operating System 14 11 Reinstalling the Operating System 14 12 Reinstalling...

Страница 9: ... 16 Travel and Shipping Preparation for Travel and Shipping 16 1 Tips for Traveling with Your Notebook 16 1 17 Specifications Operating Environment 17 1 Rated Input Power 17 2 Expansion Port Input Output Signals Select Models Only 17 3 Index ...

Страница 10: ...is chapter provides information on the functions and features of components when used in Microsoft Windows If using QuickPlay select models only the functionality of some components may differ Refer to the HP QuickPlay User Guide for more information ...

Страница 11: ...o key Displays the Microsoft Windows Start menu 3 fn key Combines with other keys to perform system tasks as hotkeys For example pressing fn f7 decreases screen brightness 4 Embedded numeric keypad keys 15 Can be used like the keys on an external numeric keypad 5 Windows applications key Displays a shortcut menu for items beneath the pointer For more information about hotkeys refer to Hotkeys in C...

Страница 12: ...e left button on an external mouse 3 Right TouchPad button Functions like the right button on an external mouse 4 TouchPad vertical scroll zone Scrolls up or down This table describes default settings For information about changing the functions of these TouchPad components refer to Setting TouchPad Preferences in Chapter 3 Keyboard and TouchPad ...

Страница 13: ...y briefly press to resume from standby In hibernation briefly press to restore from hibernation If the system has stopped responding and Windows shutdown procedures cannot be used press and hold for at least 5 seconds to turn off the notebook 2 Display switch Initiates standby when the notebook is closed This table describes default settings For information about changing the function of the displ...

Страница 14: ...cription 1 Quick Launch buttons select models only Launch default multimedia digital imaging or music applications varies by model To reassign another application to a Quick Launch button refer to Quick Launch Buttons Select Models Only in Chapter 3 Keyboard and TouchPad 2 Volume down button Decreases system volume Continued ...

Страница 15: ...he wireless functionality on or off but does not create a wireless connection To establish a wireless connection a wireless network must already be set up For more information refer to Chapter 11 Wireless Select Models Only 4 Volume mute button Mutes or restores volume 5 Volume up button Increases system volume ...

Страница 16: ...ff Notebook is off or in hibernation 2 Wireless light select models only On One or more internal wireless devices have been turned on To establish a wireless connection a wireless network must already be set up For more information refer to Chapter 11 Wireless Select Models Only 3 Mute light On Volume is muted 4 Num lock light On Num lock or the embedded numeric keypad is on 5 Caps lock light On C...

Страница 17: ...an contact during normal operation is minimized To avoid the possibility of exceeding the FCC radio frequency exposure limits human proximity to the antennae should be not less than 20 cm 8 inches during normal operation including when the notebook display is closed To establish a wireless connection a wireless network must already be set up For more information refer to Chapter 11 Wireless Select...

Страница 18: ...nts Speakers Display Release Button and Consumer IR Lens Component Description 1 Consumer infrared IR lens select models only Links the notebook to an optional remote control 2 Stereo speakers 2 Produce stereo sound 3 Display release button Opens the notebook ...

Страница 19: ... is in standby Off Notebook is off or in hibernation 2 Battery light On The battery pack is charging Blinking The battery pack has reached a low battery condition Off The battery pack is fully charged or not inserted 3 IDE Integrated Drive Electronics drive light On or blinking The internal hard drive or an optical drive is being accessed ...

Страница 20: ...s Depending on your notebook model component locations may vary Refer to the following illustrations Component Description 1 Power connector Connects the AC adapter cable 2 RJ 11 modem jack Connects the modem cable 3 RJ 45 network jack Connects a network cable not included Continued ...

Страница 21: ...s 5 USB ports Connect optional USB devices Number of USB ports vary by model 6 1394 port 4 pin Connects an optional 1394a device such as a scanner a digital camera or a digital camcorder 7 External monitor port Connects an optional VGA monitor or projector 8 S Video out jack Connects an optional S Video device such as a television VCR or video capture card 9 Audio in microphone jack Connects an op...

Страница 22: ...Description 1 Digital Media Slot select models only Supports the following optional digital cards SD Secure Digital Memory Card SD I O Card Memory Stick Memory Stick Pro MultiMediaCard xD Picture Card and SmartMedia 2 PC Card slot In Windows supports an optional Type I or Type II 32 bit CardBus or 16 bit PC Card 3 ExpressCard slot select models only Supports an optional ExpressCard ...

Страница 23: ...ion 1 Optical drive Supports an optical disc such as a CD or DVD 2 Audio out headphone jack Connects an optional headphone or powered stereo speakers Also connects the audio function of an audio video device such as a television or VCR 3 Audio in microphone jack Connects an optional stereo microphone 4 USB ports Connect optional USB devices Number of USB ports vary by model Continued ...

Страница 24: ...6 S Video out jack Connects the video function of an optional S Video device such as a television VCR or video capture card 7 Security cable slot Attaches an optional security cable to the notebook The purpose of security solutions is to act as a deterrent These solutions do not prevent the product from being mishandled or stolen ...

Страница 25: ...he display of a warning message install only a Mini PCI device authorized for use in your notebook by the governmental agency that regulates wireless devices in your country If you install an unauthorized device and then receive a warning message remove the device to restore notebook functionality Then contact Customer Care Contains 2 memory module slots that support replaceable memory modules The...

Страница 26: ... drive 2 Vents 4 Provide airflow to cool internal components Ä To prevent overheating do not obstruct vents Do not allow a hard surface such as a printer or a soft surface such as pillows or thick rugs or clothing to block airflow 3 Battery bay Holds a battery pack 4 Battery pack release latch Releases a battery pack from the battery bay ...

Страница 27: ...to DC power 2 Power cord Connects an AC adapter to an AC outlet 3 Battery pack Powers the notebook when the notebook is not connected to external power 4 Modem cable Connects a modem to an RJ 11 telephone jack or to a country specific modem adapter 5 Country specific modem adapter included by region as required Adapts the modem cable to a non RJ 11 telephone jack Power cords modem cables and modem...

Страница 28: ... information you might need when you troubleshoot system problems or travel internationally with the notebook Service Tag Provides the product name product number P N and serial number S N of your notebook You might need the product number and the serial number when you contact Customer Care The Service Tag label is affixed to the bottom of the notebook To display the information on the Service Ta...

Страница 29: ...ry module compartment cover Wireless certification labels Some notebook models include an optional WLAN device and or an optional Bluetooth device If your notebook model includes one or more wireless devices a certificate providing regulatory information about each device and the approval markings of some of the countries in which the device has been approved for use is included with your notebook...

Страница 30: ...ug the cord into a grounded earthed 3 pin outlet Do not disable the power cord grounding pin for example by attaching a 2 pin adapter The grounding pin is an important safety feature It is possible to receive an electric shock from a system that is not properly grounded This chapter provides information on power functionality when used in Windows If using QuickPlay select models only power functio...

Страница 31: ...wer supplied through one of the following devices AC adapter Optional AC adapter Optional docking device Optional automobile or aircraft adapter Charge or calibrate a battery pack in the notebook External power supplied through one of the following devices AC adapter Optional AC adapter Optional docking device Optional automobile or aircraft adapter Install or modify system software or write to a ...

Страница 32: ...e do not leave your notebook in standby for extended periods Connect the notebook to an external power source Standby reduces power to system components that are not in use When standby is initiated your work is saved in random access memory RAM and the screen is cleared When you resume from standby your work returns to the screen where you left off Saving your work before initiating standby is no...

Страница 33: ...ts down the notebook When you restore from hibernation your work returns to the screen where you left off If a power on password has been set the password must be entered to restore from hibernation You can disable hibernation However if hibernation is disabled and the system reaches a low battery condition the system will not automatically save your work while power is on or when standby has been...

Страница 34: ... removing the battery pack is recommended to extend the life of the battery pack when the notebook will be disconnected from external power for an extended period For details on battery pack storage refer to Storing a Battery Pack later in this chapter When the Power Supply Is Uncertain Make sure that hibernation remains enabled especially if you are operating the notebook on battery power and do ...

Страница 35: ...ared and Bluetooth communication and drive media Note the following guidelines If the notebook is in standby or hibernation you cannot initiate an infrared or Bluetooth transmission If standby or hibernation is accidentally initiated while a drive medium such as a diskette CD or DVD is in use Your playback may be interrupted You may see a warning message Putting the computer into hibernation or st...

Страница 36: ...ff Task Procedure Results Turn on the notebook Press the power standby button The power standby light is turned on The Windows operating system loads Shut down the notebook 1 Save your work and close all open applications 2 Select Start Turn Off Computer Turn Off The power standby light is turned off The Windows operating system shuts down The notebook is turned off If the system is unresponsive a...

Страница 37: ...he system initiates standby After 10 minutes of inactivity while running on battery power After 25 minutes of inactivity while running on external power The power standby light blinks The screen is cleared Resume from standby Use one of the following procedures Briefly press the power standby button Use the TouchPad or press a TouchPad button Press any key on the keyboard Open the display if stand...

Страница 38: ...ed the system initiates hibernation after 30 minutes of notebook inactivity or when the battery pack reaches a critical low battery condition If the notebook is connected to external power the system does not initiate hibernation The power standby light is turned off The screen is cleared Restore from hibernation Use one of the following procedures Briefly press the power standby button Press a bu...

Страница 39: ...ebook from external power and remove the battery pack For more information about removing and storing the battery pack refer to the Storing a Battery Pack section in this chapter Power Options Using Power Schemes A power scheme controls the amount of power the notebook uses while running on external power or on a battery pack and also sets the notebook to initiate standby or hibernation after a pe...

Страница 40: ...andby 3 Select OK For information about other passwords and security features refer to Chapter 12 Security Setting Other Power Preferences You can change the function of the power standby button the fn f5 hotkey and the display switch At the default settings for the fn f5 hotkey power standby button and display switch when the notebook is on Briefly pressing the power standby button initiates hibe...

Страница 41: ...y while the notebook is in standby the display switch turns on the notebook To change the function of the power standby button select a function from the drop down list for When I press the power button on my computer To change the function of the fn f5 hotkey select a function from the drop down list for When I press the sleep button on my computer 2 Select OK The hibernate function is available ...

Страница 42: ...ssor speed when the power source changes from external power to battery pack power or when the notebook use changes between active and idle Processor performance controls are managed in the Power Options window To access Windows XP processor performance controls Select Start Control Panel Performance and Maintenance Power Options Power Schemes tab The power scheme you select determines how the pro...

Страница 43: ...r Home Office Desk Always runs at the highest performance state Performance state is determined based on CPU demand Portable Laptop Performance state is determined based on CPU demand Performance state is determined based on CPU demand Presentation Performance state is determined based on CPU demand Runs at the lowest possible performance state Always On Always runs at the highest performance stat...

Страница 44: ...ver the notebook is connected to external power through an AC adapter or through an optional docking device or an optional automobile or aircraft adapter A battery pack inserted in the notebook charges whether the notebook is off or in use but the battery pack charges faster while the notebook is off Charging may take longer if a battery pack is new has been unused for 2 weeks or more or is much w...

Страница 45: ...brate the battery pack instead of simply charging it For information about battery calibration refer to Calibrating a Battery Pack later in this chapter Displaying Charge Reports To display battery charge information on the screen in Windows use the Windows Power Meter feature To access the Windows Power Meter display Select Start Control Panel Performance and Maintenance Power Options Power Meter...

Страница 46: ...the notebook reaches a low battery condition a text warning message is displayed and the battery light blinks If a low battery condition is not resolved and the amount of charge remaining in the battery pack continues to drop the notebook eventually enters a critical low battery condition When the notebook enters a critical low battery condition If hibernation is enabled the system initiates hiber...

Страница 47: ... until the power standby light turns off To resolve a low battery condition If external power is available connect the notebook to the external power source If a charged battery pack is available turn off the notebook or initiate hibernation insert the charged battery pack and then turn on the notebook If no power source is available save your work Then initiate hibernation or shut down the notebo...

Страница 48: ...een unused for one month or more When the notebook has been running primarily on external power and rarely on battery power for more than one month When battery charge displays report large changes in the percentage of power remaining within 2 minutes For example if the Power Meter displays 20 percent of a full charge remaining and then less than 2 minutes later displays only 5 percent of a full c...

Страница 49: ...lly charged The notebook battery light is turned off Discharging the Battery Pack ÄCAUTION To prevent loss of work save your work before beginning an unattended discharge procedure The notebook must remain on throughout the discharge process The battery pack can discharge whether or not you are using the notebook but the battery pack will discharge faster if the notebook is in use If you use the n...

Страница 50: ...eck box 2 Select Start Control Panel Performance and Maintenance Power Options Power Schemes tab 3 Record all settings in the Plugged in column and all settings in the Running on batteries column so you can reset them after calibration 4 Use the drop down lists to set each item in both columns to Never 5 Select OK 6 Disconnect the notebook from the external power source but do not turn off the not...

Страница 51: ...ttery pack is fully recharged and the battery light is turned off You can use the notebook while the battery pack is recharging but the battery pack will charge faster if the notebook is turned off 2 If the notebook is turned off turn on the notebook after the battery pack is fully charged and the battery light is off 3 Select Start Control Panel Performance and Maintenance Power Options Power Sch...

Страница 52: ...nal speakers whenever possible When you must use the internal speakers minimize system volume Volume can be adjusted with the volume buttons Minimize screen brightness To decrease screen brightness press the fn f7 hotkey To increase screen brightness press the fn f8 hotkey If you leave your work initiate standby or hibernation or shut down the notebook Selecting Power Conservation Settings To set ...

Страница 53: ...ibernation If you initiate hibernation do not begin the following procedure until the power standby lights are turned off indicating that hibernation is complete Removing a Battery Pack To remove a battery pack 1 Turn the notebook upside down 2 Slide the battery release latch 1 to release the battery pack 3 Pivot the battery pack away from the notebook 2 and remove it from the battery bay 3 ...

Страница 54: ...ower Hardware and Software Guide 2 25 Inserting a Battery Pack To insert a battery pack 1 Turn the notebook upside down 2 Insert the battery pack 1 into the battery bay and rotate it 2 until it is seated ...

Страница 55: ...tery pack store it in a cool dry place Use the following table to estimate how long you can safely store a battery pack The storage times provided are based on a battery pack that contains 50 percent of a full charge A fully charged battery pack can be safely stored for longer periods a battery pack containing a lower charge can be safely stored for less time Calibrate a battery pack that has been...

Страница 56: ...se a battery pack to high temperatures above 60 C 140 F Replace only with the battery pack approved for this notebook N When a battery pack has reached the end of its useful life do not dispose of the battery pack in general household waste Follow the local laws and regulations in your area for computer battery pack disposal In Europe dispose of or recycle battery packs by using the public collect...

Страница 57: ...oard and TouchPad This chapter provides information on the functions of the keyboard and TouchPad when used in Windows If using QuickPlay select models only functionality may differ Refer to the HP QuickPlay User Guide for more information ...

Страница 58: ...ton Functions like the left button on an external mouse 3 Right TouchPad button Functions like the right button on an external mouse 4 TouchPad vertical scroll zone Scrolls up or down This table describes default settings For information about changing the functions of these TouchPad components refer to Setting TouchPad Preferences later in this chapter ...

Страница 59: ... surface in the direction you want to move the pointer To execute the click functions of the left or right button on an external mouse press the left or right TouchPad button To scroll up or down slide your finger up or down in the TouchPad scroll zone The TouchPad is enabled when the notebook is turned on If you work with keystrokes rather than mouse actions you may prefer to disable the TouchPad...

Страница 60: ...d by default Edge motion which enables you to continue to scroll even though your finger has reached the edge of the TouchPad disabled by default Palm Check which helps prevent moving the pointer unintentionally if your palms contact the TouchPad as you type disabled by default Other features such as mouse speed preferences and mouse trails are also found in the Mouse Properties window To access M...

Страница 61: ...ys are preset combinations of the fn key 2 with one of the following keys esc key 1 function keys 3 backspace key 4 enter key 5 and end key 6 The icons on the f1 through f12 function keys represent their hotkey functions The functions of all hotkeys are described in the following sections ...

Страница 62: ... default Internet browser fn f3 Switches the image among displays fn f4 Initiates standby fn f5 Initiates QuickLock fn f6 Decreases screen brightness fn f7 Increases screen brightness fn f8 Plays pauses or resumes an audio CD or DVD fn f9 Stops an audio CD or DVD fn f10 Plays the previous track or chapter on an audio CD or DVD fn f11 Plays the next track or chapter on an audio CD or DVD fn f12 Nav...

Страница 63: ...k key twice then the second key only of the hotkey combination For example to use the fn f7 command on an external keyboard press scroll lock scroll lock f7 Using Hotkey Commands Open Help and Support Center fn f1 The fn f1 hotkey opens the Help and Support Center In addition to providing information about your Windows operating system the Help and Support Center provides Information about your no...

Страница 64: ...vices the fn f3 hotkey opens the Windows Internet Connection wizard For information about using the wizard and other Internet connection methods refer to the printed Getting Started guide included with your notebook After you have set up your Internet or network services and your Web browser home page you can use the fn f3 hotkey to quickly access your home page and the Internet Switch Image fn f4...

Страница 65: ... boards with composite video in jacks Composite video can be connected to the notebook only when it is connected to an optional docking device Initiate Standby fn f5 The fn f5 hotkey is set by default to initiate standby When standby is initiated your work is saved in random access memory RAM the screen is cleared and power is conserved When the notebook is in standby the power standby lights blin...

Страница 66: ...protects your work by displaying the operating system Log On window While the Log On window is displayed the notebook cannot be accessed until a Windows user password or a Windows administrator password is entered Before you can use QuickLock you must set a Windows user password or a Windows administrator password For instructions refer to the Help and Support Center To access the Help and Support...

Страница 67: ...longer you hold down the fn f8 hotkey the more the screen brightens To decrease screen brightness press the fn f7 hotkey Media Activity Hotkeys fn f9 through fn f12 The 4 left hand buttons control media activity The 3 right hand buttons control volume The following 4 media activity hotkeys can be used to control the play of an audio CD or a DVD To control the play of a video CD in Windows use the ...

Страница 68: ...CD or a DVD fn f10 The fn f10 hotkey stops the play of an audio CD or a DVD You must stop a CD or DVD that is playing before you can remove it from the optical drive Play Previous Track or Chapter of an Audio CD or a DVD fn f11 The fn f11 hotkey plays the previous track of an audio CD or the previous chapter of a DVD that is playing Play Next Track or Chapter of an Audio CD or a DVD fn f12 The fn ...

Страница 69: ...en Press the fn enter hotkey once to make a selection Display System Information fn esc The fn esc hotkey displays information about system hardware components and software version numbers In the fn esc display the version of the system BIOS basic input output system is displayed as the BIOS date On some notebook models the BIOS date is displayed in decimal format The BIOS date is sometimes called...

Страница 70: ...ur Internet browser to a favorite Web page An application such as Microsoft Word A document such as an Excel worksheet Button assignments can be grouped into schemes When you select a scheme only the button assignments within that scheme are active Set up button assignments and schemes change them or delete them in the Quick Launch buttons window To program a Quick Launch button 1 Select Start Con...

Страница 71: ...pad When the embedded numeric keypad is turned on each key on the keypad performs the function indicated by the icon in the upper right corner of the key The embedded numeric keypad cannot be used while an external numeric keypad is connected to the notebook To turn the keypad on Press fn num lk 2 The num lock light 3 is turned on To turn the embedded numeric keypad off press fn num lk again ...

Страница 72: ...d hold fn shift to type with the key in uppercase Releasing fn returns a keypad key to its set function For example a keypad key returns to its keypad function if the keypad is turned on or to its standard function if the keypad is turned off Using an External Numeric Keypad The embedded numeric keypad cannot be turned on while an optional external numeric keypad is connected to the notebook Most ...

Страница 73: ...al numeric keypad as you work press the num lk key on the external numeric keypad not on the notebook When an external numeric keypad is turned on and is in num lock mode the num lock light on the notebook is on When an external numeric keypad is turned off or is turned on with num lock mode turned off the num lock light on the notebook is off ...

Страница 74: ...iffer Refer to the HP QuickPlay User Guide for more information Audio Features Adjusting the Volume To adjust volume use the volume buttons on the notebook Component Description Volume down button Press to decrease volume Volume up button Press to increase volume Volume mute button Press to mute volume The mute light is turned on To restore volume press the volume down volume up or volume mute but...

Страница 75: ...g the Audio In Microphone Jack The audio in microphone jack connects an optional stereo microphone It is recommended that you use an electret condenser microphone with a 3 5 mm plug If you connect a dynamic microphone the recommended sensitivity may not be achieved Depending on your notebook model the location of the audio in microphone jack varies Using the Audio Out Headphone Jack ÅWARNING To re...

Страница 76: ...otebook is set by default to transmit analog audio signals through the audio out headphone jack The notebook can also transmit S PDIF digital audio signals through the audio out jacks To transmit S PDIF signals to an external device the system must include an optional docking device When any device is connected to an audio out jack the internal speakers are disabled When you connect a device to an...

Страница 77: ...ook and displaying it on your television you need a standard 3 5 mm audio cable available from most computer or electronics retailers Plug one end of the audio cable into an audio out headphone jack on the notebook Plug the other end of the cable into the audio in jack on the external device For more information about the notebook audio out jacks and about the types of devices that can be connecte...

Страница 78: ...eo cable available from most computer or electronics retailers To connect the S Video cable 1 Plug either end of the S Video cable into the notebook S Video out jack illustrated below 2 Plug the other end of the cable into the S Video in jack on the external device Depending on your notebook model the location of the S Video out jack will vary ...

Страница 79: ... determined by your region and notebook model The following list describes the capabilities of some of the multimedia software that may be included with your notebook Windows Media Player Plays audio CDs and DVDs and copies audio and data CDs It also plays common audio and video file types such as MP3 WMA AVI MPG and WMV This software is included with the Windows operating system InterVideo WinDVD...

Страница 80: ... select notebooks For more information about using multimedia software refer to the online Help for the software Your notebook may include additional multimedia software Be sure to explore Your desktop icons The software listed at Start All Programs The preloaded items that may be available at Start All Programs SW Setup Observing the Copyright Warning It is a criminal offense under applicable cop...

Страница 81: ...n 5 Restart the notebook if prompted Repeat the installation procedure for all software you want to install WinDVD Creator has special drive requirements for proper installation To install WinDVD Creator refer to the instructions provided with the InterVideo WinDVD Creator CD Enabling AutoPlay AutoPlay is an option in Windows that turns the Autorun feature on or off Autorun starts a program or pla...

Страница 82: ...matches the region setting on your DVD drive If the region code on a DVD does not match the region setting on your drive a Playback Of Content From This Region Is Not Permitted message is displayed when you insert the DVD To play the DVD you must change the region setting on your DVD drive DVD region settings can be changed through the operating system or through some DVD players Using the Operati...

Страница 83: ...Player icon in the notification area at the far right of the taskbar Select Start All Programs InterVideo WinDVD InterVideo WinDVD 2 Right click the WinDVD player window 3 Select Setup 4 Select the button for the region 5 Select OK Using Other DVD Software To change region settings on a drive using a DVD player other then WinDVD refer to the documentation provided with the player ...

Страница 84: ... initiate standby select Start Turn Off Computer Standby For more information on initiating and resuming from standby refer to Chapter 2 Power Removable drives enable you to store and access data A USB drive can be added by connecting the drive to a USB port on the notebook or on an optional docking device For information about connecting a USB drive refer to the Using USB Devices section in Chapt...

Страница 85: ...lectrostatic damage to the notebook or a drive Discharge yourself from static electricity before handling a drive by touching a grounded metal object Avoid touching the connectors on a drive For more information about preventing electrostatic damage refer to the Regulatory and Safety Notices guide Avoid exposing a drive or a diskette to devices with magnetic fields Security devices with magnetic f...

Страница 86: ...e not sure whether the notebook is in hibernation turn the notebook on by pressing the power standby button Then shut down the notebook through the operating system The hard drive that is in the hard drive bay is the primary hard drive Remove it only after the notebook is properly shut down To remove the primary hard drive 1 Save your work and close any open applications 2 Shut down the notebook a...

Страница 87: ... 4 Hardware and Software Guide Drives 5 Lift the hard drive bay cover 1 and remove it from the notebook 2 6 Slide the hard drive toward the edge of the notebook to release it 1 7 Remove the hard drive 2 ...

Страница 88: ...oftware Guide 5 5 Reinstalling the Primary Hard Drive To reinstall the primary hard drive 1 Lower the hard drive into the hard drive bay 1 2 Slide the hard drive away from the edge of the notebook until it is fully seated 2 ...

Страница 89: ... and Software Guide Drives 3 Align the tabs on the hard drive cover with the slots on the notebook 1 and press the hard drive cover down until it snaps into place 2 4 Tighten the screws on the hard drive bay cover ...

Страница 90: ...ess gently on the paper clip until the media tray is released and then pull out the tray until it is fully extended 2 3 Remove the disc from the tray by gently pressing down on the spindle while lifting the outer edges of the disc 3 Handle the disc by the edges not the flat surfaces If the media tray is not fully extended tilt the disc as you remove it To protect the disc place it in a protective ...

Страница 91: ...event possible video degradation and loss of audio or video playback functionality do not initiate standby or hibernation while playing any type of media If standby or hibernation is accidentally initiated while a drive medium such as a CD CD RW or DVD is in use the following results may occur Your playback may be interrupted You may see the following warning Putting the computer into hibernation ...

Страница 92: ...perating system Do not install other software such as card services socket services or enablers that may also be supplied by the PC Card manufacturer A PC Card is a credit card sized accessory designed to conform to the standard specifications of the Personal Computer Memory Card International Association PCMCIA The notebook supports 32 bit CardBus and 16 bit PC Cards The notebook is equipped with...

Страница 93: ...erting a PC Card CAUTION To prevent damage to the connectors Use minimal pressure when inserting a PC Card into a PC Card slot Do not move or transport the notebook while a PC Card is inserted 1 Press the PC Card eject button 1 and then remove the PC Card cover 2 ...

Страница 94: ...d Software Guide 6 3 2 Hold the PC Card label side up with the connector facing the notebook 3 Gently slide the card into the slot until the card is seated The operating system will issue a sound to indicate that a device has been detected ...

Страница 95: ...he far right of the taskbar and then selecting the PC Card To display the Safely Remove Hardware icon select Show Hidden Icons on the taskbar 2 Press the PC Card eject button 1 This action extends the button into position for releasing the PC Card 3 Gently slide out the card 2 4 Replace the PC Card cover if you are not inserting another PC Card An inserted PC Card uses power even when not in use T...

Страница 96: ...r performance and scalability and is designed to conform to the standard specifications of the PCMCIA To support a broad range of applications ExpressCards come in 2 sizes ExpressCard 34 and ExpressCard 54 The ExpressCard slot on your notebook supports one ExpressCard which may be either size Component 1 ExpressCard 34 2 ExpressCard 54 ...

Страница 97: ...nstall only the device drivers for your operating system Do not install other software such as card services socket services or enablers that may also be supplied by the ExpressCard manufacturer Inserting an ExpressCard ÄCAUTION To prevent damage to the ExpressCard connectors Use minimal force when inserting an ExpressCard into the ExpressCard slot Do not move or transport the notebook while an Ex...

Страница 98: ...PC Cards and ExpressCards Hardware and Software Guide 6 7 3 Hold the ExpressCard label side up with the connectors facing the notebook 4 Gently slide the card into the slot until the card is seated ...

Страница 99: ...tions and complete all activities that are supported by the ExpressCard 2 To stop an ExpressCard select the Safely Remove Hardware icon on the taskbar and then select the ExpressCard To display the Safely Remove Hardware icon on the taskbar click the arrow icon for Show Hidden Icons 3 Gently press and quickly release the ExpressCard to eject it 1 4 Slide the ExpressCard out of the slot 2 5 Replace...

Страница 100: ...Secure Digital Input Output SD I O MultiMediaCard MMC Memory Stick MS Memory Stick Pro MSP SmartMedia SM xD Picture Card XD Digital memory cards provide secure data storage and convenient data sharing SD I O cards provide extended input output functions such as wireless LAN and digital TV tuner devices These cards are often used with digital media equipped cameras and PDAs as well as other noteboo...

Страница 101: ... Use minimal force when inserting a digital card into a Digital Media Slot Do not move or transport the notebook while digital cards are inserted 1 Hold the card label side up with the connectors facing the notebook 2 Gently slide the card into the Digital Media Slot until the card is seated The card will extend slightly beyond the edge of the notebook ...

Страница 102: ...ctivities that are supported by the card such as a data transfer and close all applications 2 To stop a digital card select the Safely Remove Hardware icon on the taskbar and then select the digital card To display the Safely Remove Hardware icon on the taskbar click the arrow icon for Show Hidden Icons 3 Slide the card out of the slot ...

Страница 103: ...he card conserves power To disable an inserted digital card Select the My Computer icon on the Windows desktop right click the drive assigned to the card and then select Eject The card is stopped but is not released from the Digital Media Slot To restart the card remove and then reinsert it For instructions refer to Inserting Digital Cards and Removing Digital Cards earlier in this chapter ...

Страница 104: ...ity by touching a grounded metal object For more information refer to the Regulatory and Safety Notices guide The notebook has one memory module compartment located on the bottom of the notebook You can increase the amount of RAM random access memory in the notebook with an approved optional memory module Each notebook memory module slot supports one 256 MB 512 MB 1024 MB or 2048 MB DDR2 SODIMM me...

Страница 105: ...s off or in hibernation turn the notebook on by pressing the power standby button Then shut down the notebook through the operating system 2 Disconnect all external devices connected to the notebook 3 Disconnect the power cord 4 Remove any battery packs from the notebook 5 Loosen the memory module cover screws 1 6 Lift the memory module cover away from the notebook 2 ...

Страница 106: ...mory module slot remove it a Pull away the retention clips on each side of the module 1 The module tilts upward b Grasp the edges of the module and gently pull the module out of the memory module slot 2 To protect a memory module after removal place it in an electrostatic safe container ...

Страница 107: ...otched edge of the module with the tabbed area in the memory module slot b With the module at a 45 degree angle from the surface of the memory module compartment press the module into the memory module slot until it is seated 1 c Press the module downward until the retention clips snap into place 2 ...

Страница 108: ...Memory Modules Hardware and Software Guide 8 5 9 Replace the memory module cover 1 and tighten the memory module cover screws 2 ...

Страница 109: ...ger hibernation file To display the amount of RAM in the system Select Start Control Panel Performance and Maintenance System General tab or Press fn esc To display the amount of free space on your hard drive a Double click the My Computer icon on the desktop b Select your hard drive Information about the space on the drive is displayed in a status bar at the bottom of the window To display the am...

Страница 110: ...l Serial Bus USB is a hardware interface that can be used to connect external devices such as a USB keyboard mouse drive printer scanner or hub to the notebook Depending on model the notebook has 2 or 4 standard USB connectors that support USB 1 1 and USB 2 0 devices ...

Страница 111: ...bs must be connected either to a USB port on the notebook or to a port on a powered hub Operating System and Software A USB device functions in the same way as a comparable non USB device with one exception By default USB devices do not function unless an operating system that supports USB is installed in the notebook Some USB devices may require additional support software which is usually includ...

Страница 112: ...cks for digital PBX systems may resemble analog telephone jacks but are not compatible with the modem Immediately disconnect your modem cable if you accidentally connect it to a digital PBX system line A modem cable which has a 6 pin RJ 11 connector at each end must be connected to an analog telephone line In some countries a country specific modem adapter is required ...

Страница 113: ... the equipment do not plug a modem cable into the network jack 1 If the modem cable contains noise suppression circuitry 1 which prevents interference from TV and radio reception orient the circuitry end of the cable toward the notebook 2 Plug the modem cable into the modem jack 2 on the notebook 3 Plug the other end of the modem cable into the RJ 11 telephone jack 3 ...

Страница 114: ...e to the equipment do not plug a modem cable into the network jack 1 If the modem cable contains noise suppression circuitry 1 which prevents interference from TV and radio reception orient the circuitry end of the cable toward the notebook 2 Plug the modem cable into the modem jack 2 on the notebook 3 Plug the other end of the modem cable 3 into the country specific modem adapter 4 Plug the count...

Страница 115: ...preserving your home country configuration add a new configuration for each location in which you will use the modem ÄCAUTION Selecting a country other than the one in which the notebook is located may cause your modem to be configured in a way that violates the telecommunications regulations or laws of that country In addition your modem may not function properly if the correct country selection ...

Страница 116: ...ience connection problems while using the modem outside your home country the following suggestions may help Check the telephone line type The modem requires an analog not a digital telephone line A line described as a PBX line is usually a digital line A telephone line described as a data line fax machine line modem line or standard telephone line is probably an analog line Check the tone or puls...

Страница 117: ...o ignore all dial tones before dialing 1 Select Start Control Panel Network and Internet Connections Phone and Modem Options Modems tab 2 Select your modem Properties Modem tab 3 Clear the Wait for Dial Tone Before Dialing check box If you continue to receive the No Dial Tone error message after clearing the check box 1 Select Start Control Panel Network and Internet Connections Phone and Modem Op...

Страница 118: ... preinstalled modem software for terminal emulation and data transfer 1 Select Start All Programs Accessories Communications 2 Select the appropriate fax or terminal emulation program or Internet connection wizard Network Cable A network cable not included has an 8 pin RJ 45 connector at each end ...

Страница 119: ...network cable contains noise suppression circuitry 1 which prevents interference from TV and radio reception orient the circuitry end of the cable toward the notebook 2 Plug the network cable into the network jack 2 on the notebook 3 Plug the other end of the cable into an RJ 45 wall jack 3 ...

Страница 120: ... notebook can connect to wireless networks in corporate offices your home and public places Wireless networks include wireless local area networks WLANs or hotspots Hotspots are wireless access points available in public places such as airports restaurants coffee shops hotels and universities A Bluetooth wireless notebook can connect to other Bluetooth wireless enabled devices using a wireless per...

Страница 121: ...lustration shows the wireless button 1 and light 2 In addition to the wireless button and light your notebook may have a software utility Wireless Assistant select models only that enables you to control your wireless devices Wireless Assistant is a software utility that enables you to turn on and off the 802 11 and Bluetooth wireless devices individually For more information on using Wireless Ass...

Страница 122: ...N hotspot typically uses wireless access points that can handle a large number of computers and accessories and can separate critical network functions A home or small office WLAN typically uses a wireless router which enables several wireless and wired computers to share an Internet connection a printer and files without additional pieces of hardware or software Wireless access point and wireless...

Страница 123: ...4 GHz 802 11g which came later also operates at 2 4 GHz but supports data rates of up to 54 Mbps An 802 11g WLAN device is backward compatible with 802 11b devices so they can operate on the same network 802 11a supports data rates of up to 54 Mbps but operates at a frequency of 5 GHz 802 11a is not compatible with 802 11b and 802 11g For information on identifying the type of device in your noteb...

Страница 124: ...connected to the Internet This wireless network includes An optional broadband modem either DSL or cable and high speed Internet service purchased from an Internet service provider ISP 1 An optional wireless router purchased separately 2 Your wireless notebook 3 As this network grows additional wireless and wired computers can be connected to the network to access the Internet If you need technica...

Страница 125: ...ss light is turned on If the wireless light is off turn on the 802 11 wireless device Refer to Device Power States later in this chapter For your home WLAN verify that your router is correctly configured For instructions refer to your router documentation Functional range for subsequent WLAN connections vary depending on your notebook WLAN implementation router manufacturer and interference from v...

Страница 126: ...Personal or WEP security encryption on the router you may want to use one or more of the following security measures Change the default network name SSID and password Use a firewall Set security on your Web browser Enable MAC address filtering on the router For more information about WLAN security refer to the HP Web site at http www hp com go wireless English only for details Installing Wireless ...

Страница 127: ...ify the 802 11 wireless device from the list that is displayed The listing for an 802 11 wireless device includes the term wireless LAN WLAN or 802 11 If no 802 11 wireless device is listed either your notebook does not have an integrated 802 11 wireless device or the driver for the 802 11 wireless device is not properly installed Accessing WLAN Software and Documentation Your WLAN software is pre...

Страница 128: ...del information and then follow the instructions provided at the Web site WLAN software is provided in the Network category To access model information about your computer refer to the serial number label The serial number label is on the bottom of the notebook To access documentation for your WLAN software 1 Install the WLAN software as instructed earlier in this chapter 2 Open the utility 3 Sele...

Страница 129: ...ides the following functions Personal Information Management PIM item transfer Sends and receives information files such as business cards calendar items notes and message items to and from another Bluetooth computer or device PIM synchronization Synchronizes PIM data between a computer PDA or cell phone using Bluetooth File Transfer Sends and receives files to and from another Bluetooth computer ...

Страница 130: ... camera and other Bluetooth devices The camera can be controlled remotely by a notebook and images can be transferred from a camera to be stored on a computer or to be printed Human interface device Provides a wireless connection to other Bluetooth devices such as keyboards pointing devices gaming devices and remote monitoring devices Fax Provides a Bluetooth connection that enables a notebook to ...

Страница 131: ...ction with Wireless Assistant select models only By default the 802 11 wireless and Bluetooth devices and wireless light 2 are turned on when you turn on the notebook Turning on a wireless device does not automatically create a WLAN or connect you to a WLAN For information on setting up a WLAN refer to Wireless Local Area Network Select Models Only earlier in this chapter ...

Страница 132: ...hen the wireless devices are disabled you must enable them before you can turn them on or off with Wireless Assistant To view the state of your wireless devices place the cursor over the Wireless Assistant icon in the notification area at the far right of the taskbar or open Wireless Assistant by double clicking the icon in the notification area Wireless Assistant displays the status of the device...

Страница 133: ...eless Assistant shows that both WLAN and Bluetooth are disabled Wireless light is off You want to turn on either or both devices 1 Press the wireless button The devices return to their previous on or off state 2 If the wireless devices are turned off right click the Wireless Assistant icon in the notification area 3 Select the device or devices you want to turn on Wireless Assistant shows that one...

Страница 134: ...sistant shows that both WLAN and Bluetooth are off Wireless light is off You want to disable both devices Press the wireless button Wireless Assistant shows that one device is on and the other device is off Wireless light is on You want to disable both devices Press the wireless button You want to turn off both devices 1 Right click the Wireless Assistant icon in the notification area 2 Select the...

Страница 135: ...m a variety of risks Depending on your environment some security features may be unnecessary It is recommended that you follow the procedures in this chapter for using Antivirus software Windows updates Firewall software In addition to the Windows operating system security measures the following table may help you decide which other security features to use Most of these security features can be c...

Страница 136: ...r a diskette Device Security Unauthorized access to data HP administrator password Firewall software Windows updates Unauthorized access to the BIOS settings and other system identification information HP administrator password Unauthorized removal of the notebook Security cable slot used with an optional security cable For more information on the security cable slot refer to the Optional Security...

Страница 137: ...rd For instructions refer to the Help and Support Center by selecting Start Help and Support To initiate QuickLock press fn f6 To exit QuickLock enter your Windows user password or Windows administrator password Passwords Most security features use passwords Whenever you set a password write down the password and store it in a secure location away from the notebook If you forget your power on pass...

Страница 138: ...nal information about Windows passwords such as screen saver passwords select Start Help and Support HP Passwords Function HP administrator password Protects access to the Setup utility Power on password Used to access the notebook during startup and when you restart the notebook Windows Passwords Function Administrator password Protects Windows administrator level access to notebook contents User...

Страница 139: ...rd before resuming from standby a Windows password not a power on password must be entered to resume from standby The same word or series of letters or numbers used for an HP password can be used for another HP password or for a Windows password with the following considerations The text of HP passwords can be any combination of up to 8 letters and numbers and is not case sensitive An HP password ...

Страница 140: ...vel access to your notebook contents You can however use the same text for both passwords HP Administrator Password The HP administrator password protects the configuration settings and system identification information in the Setup utility After this password is set it must be entered to access the Setup utility The HP administrator password Is not interchangeable with a Windows administrator pas...

Страница 141: ... in the lower left corner of the screen 4 Use the arrow keys to select Security Administrator Password and then press enter To set an HP administrator password type your password in the Enter New Password and Confirm New Password fields and then press enter To change an HP administrator password type your current password in the Enter Current Password field type the new password in the Enter New P...

Страница 142: ... it is set entered changed or deleted Must be set and entered with the same type keys For example a power on password set with keyboard number keys will not be recognized if you enter it with embedded numeric keypad number keys Can include any combination of up to 8 letters and numbers and is not case sensitive Setting Power On Passwords A power on password is set changed or deleted in the Setup u...

Страница 143: ... Current Password field type the new password in the Enter New Password and Confirm New Password fields and then press enter To delete a power on password type the current password in the Enter Current Password field press enter 3 times and then press f10 5 To save your preferences and exit the Setup utility press f10 and then follow the instructions on the screen Your preferences are set when you...

Страница 144: ...3 Open the Setup utility by turning on or restarting the notebook Press f10 while Setup message is displayed in the lower left corner of the screen 4 Select Security Device Security and then enter your preferences 5 Use the arrow keys to select an item Then To disable an item press f5 or f6 to toggle the field for the item to Disable and then press enter To reenble an item press f5 or f6 to toggle...

Страница 145: ...s software can detect most viruses destroy them and in most cases repair damage they have caused To provide protection against newly discovered viruses antivirus software must be updated Norton AntiVirus is preinstalled on the notebook For information about using and updating the Norton AntiVirus software Select Start All Programs Norton AntiVirus Help and Support For more information about comput...

Страница 146: ...itical Security Updates for Windows XP disc may have been included with your notebook to provide additional updates delivered after the computer was configured Throughout the life of the computer Microsoft will continue to update the operating system and make these updates available on their Web site To update your system using the Critical Security Updates for Windows XP disc 1 Insert the disc in...

Страница 147: ...ing the firewall To protect your privacy it is recommended that you use firewall software Your notebook comes with preinstalled firewall software Refer to the online Help in the firewall software application for additional information Under some circumstances a firewall can block access to Internet games interfere with printer or file sharing on a network or block authorized e mail attachments To ...

Страница 148: ...able Security solutions are designed to act as deterrents These deterrents may not prevent a product from being mishandled or stolen To install a security cable 1 Loop the security cable around a secured object 2 Insert the cable lock into the security cable slot ...

Страница 149: ...Security Hardware and Software Guide 12 15 3 Turn the key counterclockwise 1 remove the key 2 and keep it in a safe location ...

Страница 150: ...s operating system is not working or will not load The utility reports information about the notebook and provides settings for startup security and other preferences Step by step instructions for setting specific preferences are included by topic earlier in this guide For example procedures for setting security preferences are provided in Chapter 12 Security ...

Страница 151: ...1 To open the Setup utility turn on or restart the notebook in Windows and then press f10 while the prompt Press F10 to enter setup is displayed in the lower left corner of the screen 2 Use the arrow keys to select the Advanced menu 3 Press f5 or f6 or use the arrow keys to select a language and then press enter 4 When a confirmation prompt with your preference selected is displayed press enter to...

Страница 152: ...tility is open press f1 Displaying System Information The following procedure explains how to display system information in the Setup utility 1 To open the Setup utility turn on or restart the notebook in Windows and then press f10 while the prompt Press F10 to enter setup is displayed in the lower left corner of the screen 2 Access the system information on the Main and Advanced menus To display ...

Страница 153: ... f10 and then follow the instructions on the screen The Setup utility default settings are set when you exit the Setup utility and are in effect when the notebook restarts Identification information including ROM version information is retained Using Advanced Setup Utility Features This guide describes the Setup utility features recommended for all users For more information about the Setup utilit...

Страница 154: ...nd save your changes from the current session use either of the following procedures Press f10 and then follow the instructions on the screen or If the Setup utility menus are not visible press esc to return to the menu display Then use arrow keys to select the Exit menu Exit Saving Changes and then press enter When you use the f10 procedure you are offered an option to return to the Setup utility...

Страница 155: ...s of the software provided with your notebook as they become available You may find that the easiest way to update the software provided with your notebook is to use the software update links provided at Start Help and Support If you prefer to work from more detailed instructions the information in the following sections will help you to Prepare for updates Access updates at the HP Web site Downlo...

Страница 156: ... the following sections for information on how to access notebook product and ROM information The notebook ROM stores the BIOS basic input output system The BIOS determines how the notebook hardware interacts with the operating system and external devices and also supports such notebook services as time and date Accessing Notebook Product Information To access the updates for your notebook you wil...

Страница 157: ...rmation can also be displayed in the Setup utility 1 Open the Setup utility To open the Setup utility turn on or restart the notebook 2 Before Windows opens and while the Press F10 to enter setup prompt is displayed in the lower left section of the screen press f10 3 If the Setup utility does not open with system information displayed use the arrow keys to select the Main menu When the Main menu i...

Страница 158: ...or downloading and installing A ROM update A SoftPaq containing an update other than a ROM update for example an application update Downloading and Installing a ROM Update ÄCAUTION To prevent serious damage to the notebook or an unsuccessful installation download and install a ROM update only while the notebook is connected to reliable external power using the AC adapter Do not download or install...

Страница 159: ...and access the ROM update you want to download 3 At the download area a Record the date name or other identifier of any ROM update that is later than the ROM currently installed on your notebook You may need this information to locate the update later after it has been downloaded to the hard drive b Record the path to the default or custom location on the hard drive to which the ROM package will d...

Страница 160: ...th you recorded earlier to the folder on your hard drive that contains the update 3 To begin the installation open the folder and then double click the file with an exe extension for example Filename exe The ROM update installation begins 4 To complete the installation follow the instructions on the screen After a message on the screen reports a successful installation you can delete the downloade...

Страница 161: ...ect Start All Programs Accessories Windows Explorer 5 In the left pane of the Windows Explorer window select My Computer and then your hard drive designation which is typically Local Disk C 6 Select the SWSetup folder which is the destination folder for most downloads from the HP Web site If you don t see the download in the SWSetup folder look in the My Documents folder 7 In the destination folde...

Страница 162: ...settings or add software or hardware Manually setting additional restore points provides additional protection for your system files and settings It is recommended that you manually set restore points Before you add or extensively modify software or hardware Periodically whenever the system is performing optimally Restoring to any restore point does not affect your data files For example restoring...

Страница 163: ...ecovery disc If you have not reinstalled your operating system some applications preloaded on your notebook such as those available in the Software Setup utility can also be repaired or reinstalled from your hard drive The application reinstallation process repairs or replaces corrupted system files within the application and reinstalls deleted system files within the application In most cases If ...

Страница 164: ...ect the software you want to reinstall select or clear the appropriate check boxes Reinstalling Applications from Discs To reinstall applications from discs 1 Insert the disc into the optical drive If Autorun is enabled an installation wizard is displayed If Autorun is disabled select Start Run Enter x setup exe where x is your CD drive designation and then select OK 2 When the installation wizard...

Страница 165: ...t down the notebook using the operating system press and hold the power button for 5 seconds 4 Press the power button again to start the notebook 5 When prompted press any key to boot from the disc After a few minutes the Welcome to Setup screen is displayed On the Welcome to Setup screen do not press R step 8 in this procedure until you have completed steps 6 and 7 6 Press enter to continue A Lic...

Страница 166: ...essfully repair the operating system you can reinstall it To reinstall the operating system 1 Connect the notebook to a power outlet through the AC adapter and turn on the notebook 2 Immediately insert the Operating System disc into the notebook 3 Shut down the notebook using the standard shutdown procedure for your operating system If you are unable to shut down the notebook using the operating s...

Страница 167: ... The notebook restarts in Windows when the process is complete Reinstalling Device Drivers and Other Software After the operating system installation process is complete you must reinstall drivers To reinstall drivers use the Driver Recovery disc included with the notebook 1 While running Windows insert the Driver Recovery disc into the optical drive If you do not have Autorun enabled select Start...

Страница 168: ...with the software Many applications include an update feature that you can access from a Help button or menu item within the application Installing a Retail Version of an Operating System ÄCAUTION To prevent the loss of notebook operating system enhancements do not install a retail version of an operating system In some cases the loss of enhancements may result in an unresponsive system The operat...

Страница 169: ...ble product To maintain its performance and promote longevity follow these guidelines Carry and store your notebook in a portable carrying case Ä To prevent possible damage to the display do not place anything on top of the notebook even when it is in the carrying case Keep liquids and excessive moisture away from your notebook and keyboard to prevent costly repairs To reduce the risk of electric ...

Страница 170: ...e disconnected from external power for more than 2 weeks Shut down the notebook Remove all battery packs and store them in a cool dry place Temperature ÅWARNING The notebook is designed to run demanding applications at full power As a result of increased power consumption it is normal for the notebook to feel warm or hot when used continuously To avoid potential discomfort or burns do not block th...

Страница 171: ... use a regular vacuum cleaner to clean the keyboard because you may deposit normal household debris on the surfaces rather than remove it Clean the keyboard regularly to prevent keys from sticking and to remove dust lint and particles that can become trapped beneath the keys Ideally use a can of compressed air with a straw extension to blow air in and around the keys ...

Страница 172: ...dges and lint frequently clean your display with a soft damp lint free cloth If the screen requires additional cleaning use an antistatic screen cleaner or premoistened antistatic wipes TouchPad Grease and dirt on the TouchPad can cause your cursor to jump around on the display screen To avoid this wash hands frequently when using the notebook and clean the TouchPad with a damp cloth ...

Страница 173: ... 5 If the notebook will be disconnected from an external power source for more than 2 weeks remove all battery packs and store them in a cool dry place 6 If you are shipping the notebook place it in the original packing box or similar protective packaging and label the package as FRAGILE Tips for Traveling with Your Notebook Take a backup of your work with you Keep the backup separate from the not...

Страница 174: ...tion or GPRS General Packet Radio Service device you must turn off the device before boarding and keep it turned off if you plan to use your notebook during the flight If you are traveling internationally Consult a service partner or Customer Care about power cord and adapter requirements for each location in which you plan to use the notebook Voltage frequency and plug configurations vary Refer t...

Страница 175: ... notebook in extreme environments Factor Metric U S Temperature Operating 10 C to 35 C 50 F to 95 F Nonoperating 20 C to 60 C 4 F to 140 F Relative humidity noncondensing Operating 10 to 90 10 to 90 Nonoperating 5 to 95 5 to 95 Maximum altitude unpressurized Operating 14 7 to 10 1 psia 15 m to 3 048 m 50 ft to 10 000 ft Nonoperating 14 7 to 4 4 psia 15 m to 12 192 m 50 ft to 40 000 ft ...

Страница 176: ...the notebook can be powered from a stand alone DC power source it is strongly recommended that the notebook be powered only with an AC adapter or DC power cord supplied with or approved for your notebook The notebook is capable of accepting DC power within the following specifications This product is designed for IT power systems in Norway with phase to phase voltage not exceeding 230 Vrms Input P...

Страница 177: ...elpful if you plan to use an optional notebook docking device that connects to the expansion port 2 on your notebook select models only For the location of the expansion port 2 refer to Left Side Components in Chapter 1 Component ID If your notebook has an expansion port 2 it has only one expansion port The term expansion port 2 describes the type of expansion port ...

Страница 178: ...ot all docking devices will support these features Feature Support USB 2 0 Yes 10 100 Ethernet Yes Gigabit Ethernet No IEEE 1394 4 pin port Yes Consumer IR for optional remote control only Yes select models only Power inputs 65 W Composite video Yes S Video Yes Component video Yes select models only S PDIF audio Yes DVI No Headphone speaker audio out Yes Microphone audio in Yes ...

Страница 179: ...ng 1 19 applications See software software updates audio in jack identifying 1 12 1 14 using 4 2 audio out jack identifying 1 12 1 14 using 4 3 automobile adapter 2 15 AutoPlay 4 8 autorun 4 8 B battery bay 1 17 battery light displaying charge status 2 15 2 17 identifying 1 10 battery pack acceptable temperature ranges 2 26 calibrating 2 19 charging 2 15 conserving power 2 22 disposing of 2 27 ide...

Страница 180: ...urity 1 15 cables audio 4 4 modem 1 18 10 1 network 1 11 10 7 S Video 4 4 See also power cord calibration battery 2 19 caps lock light 1 7 card and socket services PC Card 6 1 6 6 card See PC Card Secure Digital SD Memory Card carrying notebook 15 1 CD drive See optical drives CDs audio hotkeys 3 11 displaying contents 5 8 removing 5 7 Certificate of Authenticity label 1 19 cleaning notebook 15 1 ...

Страница 181: ...Digital Media Slot 1 13 display cleaning 15 4 controlling brightness 3 11 switching image 3 8 See also display switch display release button 1 9 display switch identifying 1 4 setting preferences 2 12 drive media airport security effects 5 2 interference with hibernation and standby 2 6 drivers PC Card 6 1 reinstalling or repairing 1 19 retail operating systems 14 14 wireless devices 11 6 drives a...

Страница 182: ...ices 16 2 GSM Global System for Mobile Communication devices 16 2 H hard drive bay identifying 1 17 hard drives installing primary 5 3 self test 13 4 headphone jack identifying 1 12 1 14 using 4 3 headphones 4 3 Help and Support Center 3 7 See also technical support hibernation caution 2 4 disabling 2 4 enabling 2 4 file space requirements for 8 6 initiated during critical low battery condition 2 ...

Страница 183: ...entifying components bottom 1 16 front 1 9 left side 1 11 right side 1 14 top 1 2 infrared communication interference 2 6 installing CD and DVD software 4 8 Internet Connection Wizard 3 8 Internet Explorer 3 8 J jacks audio in microphone 1 12 1 14 4 2 audio out headphone 1 12 1 14 4 3 RJ 11 modem 1 11 10 2 RJ 45 network 1 11 10 7 S Video out 1 12 1 15 4 4 See also connector power ports K keyboard ...

Страница 184: ...ules adding 8 2 overview 8 1 supported 8 1 Memory Stick MS 7 1 Memory Stick Pro MSP 7 1 memory displaying amount of 3 7 microphone 4 2 microphone jack identifying 1 12 1 14 using 4 2 Microsoft Certificate of Authenticity label 1 19 Mini PCI compartment 1 16 model number 14 2 model identifying notebook 3 7 modem connecting 10 2 connection problems 10 5 country specific adapter 1 18 10 3 dial tones ...

Страница 185: ...lling 14 11 repairing 14 11 security 12 1 System Restore 14 8 operating system Windows reinstalling or repairing 1 19 optical drives identifying 1 14 removing disc 5 7 P passwords forgetting 12 3 HP 12 4 HP guidelines 12 5 power on 12 4 12 8 QuickLock 3 10 standby 2 11 using 12 3 Windows 12 4 Windows administrator 3 10 Windows guidelines 12 5 Windows user 3 10 passwords coordinating 12 5 PC Card e...

Страница 186: ...product name and number notebook 1 19 3 7 projector connecting 1 12 1 15 switching image 3 8 Q Quick Launch buttons identifying 1 5 3 14 programming 3 14 QuickLock 3 10 QuickLock hotkey 12 3 QuickPlay 1 1 R RAM random access memory 8 1 8 6 rated input power specifications 17 2 recovery discs 14 9 region settings DVD 4 9 regulatory information Modem Approval label 1 20 Regulatory label 1 19 wireles...

Страница 187: ... overview 13 1 restoring default settings 13 4 setting security preferences 12 2 shift key hibernation function 2 9 keypad function 3 16 shipping 16 1 shortcut menu 1 2 shutdown 2 5 2 7 2 10 signals supported 17 4 sleep button 2 11 3 10 slots Digital Media 1 13 ExpressCard 1 13 memory module 8 1 PC Card 1 13 SD Card 7 1 security cable 1 15 SmartMedia SM card 7 1 socket services ExpressCard 6 6 PC ...

Страница 188: ...2 1 15 switch display identifying 1 4 settings 2 12 system information 13 3 14 3 System Restore 14 8 system restore points 14 8 T technical support 1 19 16 2 See also Help and Support Center telephone line type 10 5 television connecting audio 4 3 connecting video 4 5 temperature battery pack 2 26 specifications 15 2 17 1 terminal emulation 10 7 TouchPad cleaning 15 4 enabling tapping 3 4 identify...

Страница 189: ...logo key 1 2 Windows password guidelines 12 5 Windows Start menu 1 2 Windows user password See passwords Wired Equivalent Privacy WEP 11 7 wireless documentation 11 8 overview 11 1 security 11 7 wireless antennae 1 8 Wireless Assistant 11 2 11 13 wireless button 1 6 11 2 11 12 wireless certification label 1 20 wireless devices disabling 11 15 drivers 11 6 identifying 11 8 Mini PCI compartment 1 16...

Отзывы: