HP Pavilion DM4-1060 Скачать руководство пользователя страница 88

12.

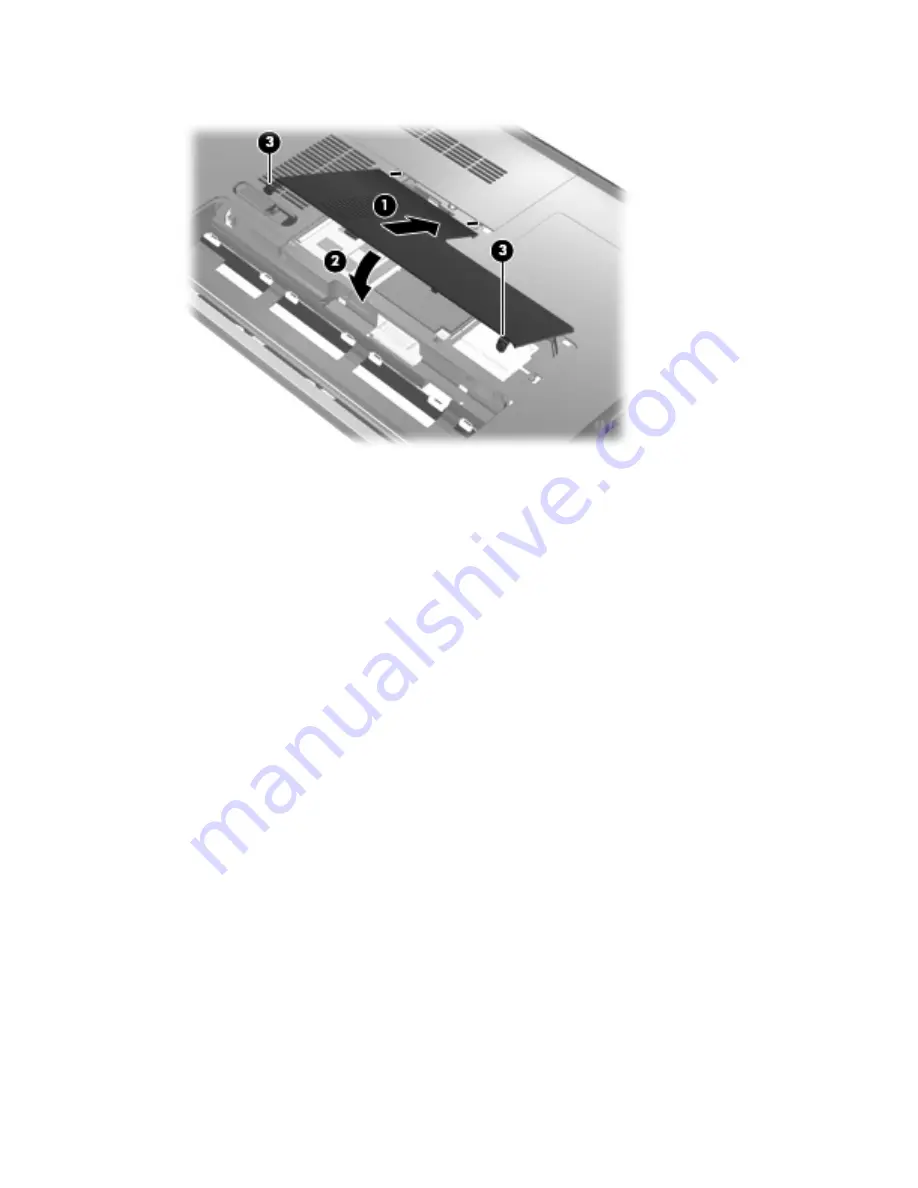
Tighten the memory/wireless module compartment cover screws 

(3)

.

13.

Replace the battery.

14.

Turn the computer right-side up, and then reconnect external power and external devices.

15.

Turn on the computer.

Upgrading a memory module in the primary memory module slot

The primary memory module slot is stacked below the expansionary memory module slot. To upgrade
a memory module in the primary memory module slot, follow these steps:

1.

Save your work.

2.

Shut down the computer.

If you are not sure whether the computer is off or in Hibernation, turn the computer on by pressing
the power button. Then, shut down the computer through the operating system.

3.

Disconnect all external devices connected to the computer.

4.

Unplug the power cord from the AC outlet.

5.

Turn the computer upside down on a flat surface, and then remove the battery.

6.

Loosen the memory/wireless module compartment cover screws 

(1)

.

78

Chapter 9   Memory modules

Содержание Pavilion DM4-1060

Страница 1: ...HP Pavilion Notebook PC User Guide ...

Страница 2: ...r HP products and services are set forth in the express warranty statements accompanying such products and services Nothing herein should be construed as constituting an additional warranty HP shall not be liable for technical or editorial errors or omissions contained herein First Edition April 2010 Document Part Number 609891 001 Product notice This user guide describes features that are common ...

Страница 3: ...llow another hard surface such as an adjoining optional printer or a soft surface such as pillows or rugs or clothing to block airflow Also do not allow the AC adapter to contact the skin or a soft surface such as pillows or rugs or clothing during operation The computer and the AC adapter comply with the user accessible surface temperature limits defined by the International Standard for Safety o...

Страница 4: ...iv Safety warning notice ...

Страница 5: ...ss controls 13 Using the wireless action key 13 Using HP Wireless Assistant software 13 Using operating system controls 14 Using a WLAN 14 Setting up a WLAN 15 Protecting your WLAN 15 Connecting to a WLAN 16 Roaming to another network 17 Using HP Mobile Broadband select models only 17 Inserting a SIM 17 Removing a SIM 18 Using Bluetooth wireless devices 19 Bluetooth and Internet Connection Sharing...

Страница 6: ... your multimedia components 31 Using the media activity functions 33 Using the media activity action keys 33 Multimedia software 33 Opening preinstalled multimedia software 34 Using HP MediaSmart software 34 Using other multimedia software 34 Installing multimedia software from a disc 35 Audio 35 Connecting external audio devices 35 Checking your audio functions 35 Using the audio out headphone ja...

Страница 7: ...erratically 46 A movie is not visible on an external display 47 The process of burning a disc does not begin or it stops before completion 47 A device driver must be reinstalled 47 Obtaining the latest HP device drivers 48 Obtaining the latest Windows device drivers 48 Webcam 48 Adjusting webcam properties 49 5 Power management 50 Setting power options 50 Using power saving states 50 Initiating an...

Страница 8: ...Step 1 Fully charge the battery 58 Step 2 Disable Hibernation and Sleep 59 Step 3 Discharge the battery 59 Step 4 Fully recharge the battery 60 Step 5 Reenable Hibernation and Sleep 60 Conserving battery power 60 Storing a battery 60 Disposing of a used battery 61 Replacing the battery 61 Switching between graphics modes select models only 61 Shutting down the computer 61 6 Drives 63 Identifying i...

Страница 9: ...in Setup Utility 83 Administrator password 84 Managing an administrator password 84 Entering an administrator password 85 Power on password 85 Managing a power on password 85 Entering a power on password 85 Using antivirus software 85 Using firewall software 86 Installing critical security updates 86 Installing an optional security cable 86 Using the fingerprint reader 87 Locating the fingerprint ...

Страница 10: ...92 Exiting Setup Utility 93 Setup Utility menus 93 Main menu 93 Security menu 93 System Configuration menu 93 Diagnostics menu 94 13 Software updates 95 Updating the BIOS 95 Determining the BIOS version 95 Downloading a BIOS update 96 Updating programs and drivers 96 Index 98 x ...

Страница 11: ...Top components TouchPad Component Description 1 TouchPad on off button Turns the TouchPad on and off Quickly double tap the button to turn the TouchPad on and off 2 TouchPad zone Moves the pointer and selects or activates items on the screen 3 Left TouchPad button Functions like the left button on an external mouse 4 Right TouchPad button Functions like the right button on an external mouse This t...

Страница 12: ... off 3 Wireless light White An integrated wireless device such as a wireless local area network WLAN device and or a Bluetooth device is on NOTE Wireless devices are enabled at the factory Amber All wireless devices are off 4 Caps lock light White Caps lock is on 5 TouchPad light Amber TouchPad is disabled 6 Fingerprint reader light White Fingerprint read is good Amber Fingerprint read is bad 2 Ch...

Страница 13: ...fly to exit Hibernation If the computer has stopped responding and Windows shutdown procedures are ineffective press and hold the power button for at least 5 seconds to turn off the computer To learn more about your power settings select Start Control Panel System and Security Power Options 2 Fingerprint reader Allows a fingerprint logon to Windows instead of a password logon This table describes ...

Страница 14: ... key 2 fn key Displays system information when pressed in combination with the esc key 3 Windows logo key Displays the Windows Start menu 4 Windows applications key Displays a shortcut menu for items beneath the pointer 5 Action keys Execute frequently used functions Front components 4 Chapter 1 Features ...

Страница 15: ... optical drive is being accessed Off The optical drive is idle 2 Optical drive Reads writes optical discs 3 USB ports 2 Connect optional USB devices 4 Battery light White The computer is connected to external power and the battery is fully charged Amber The computer is connected to external power and the battery is charging Blinking A battery that is the only available power source has reached a l...

Страница 16: ...tional powered stereo speakers headphones ear buds a headset or television audio 5 Drive light White The hard drive is being accessed Amber HP ProtectSmart Hard Drive Protection has temporarily parked the hard drive 6 Power light On Power is on Blinking The computer is in the Sleep state NOTE Another power light is located next to the power button 7 Vents 3 Enable airflow to cool internal componen...

Страница 17: ...SATA components such as an eSATA external hard drive Display components Component Description 1 Internal display switch Turns off the display if the display is closed while the power is on 2 Webcam light White The webcam is in use 3 Webcam Records video and captures still photographs 4 Internal microphone Record sound Identifying the hardware 7 ...

Страница 18: ...eless LAN module a wireless WAN module and memory modules NOTE To prevent an unresponsive system replace the wireless module only with a wireless module authorized for use in the computer by the governmental agency that regulates wireless devices in your country or region If you replace the module and then receive a warning message remove the module to restore computer functionality and then conta...

Страница 19: ... with wireless wide area networks WWANs The antennas are not visible from the outside of the computer For optimal transmission keep the areas immediately around the antennas free from obstructions To see wireless regulatory notices refer to the section of the Regulatory Safety and Environmental Notices that applies to your country or region These notices are located in Help and Support Identifying...

Страница 20: ...ixed to the computer provide information needed when troubleshooting system problems or traveling internationally with the computer Service tag Provides important information including The service tag label is affixed to the bottom of the computer When contacting technical support have this information available Item Component Description 1 Product name This is the product name affixed to the fron...

Страница 21: ...ry label is affixed inside the battery bay Wireless certification label s select models only Provides information about optional wireless devices and the approval markings of some of the countries or regions where the devices have been approved for use An optional device might be a wireless local area network WLAN device or an optional Bluetooth device If the computer model includes one or more wi...

Страница 22: ...ommunicates directly with other devices and devices must be relatively close together typically within 10 meters approximately 33 feet of each other Computers with WLAN devices support one or more of the following IEEE industry standards 802 11b the first popular standard supports data rates of up to 11 Mbps and operates at a frequency of 2 4 GHz 802 11g supports data rates of up to 54 Mbps and op...

Страница 23: ...ss controls You can control the wireless devices in your computer using these features Wireless action key HP Wireless Assistant software Operating system controls Using the wireless action key The computer has a wireless action key one or more wireless devices and a wireless light All of the wireless devices on your computer are enabled at the factory so the wireless light is on white when you tu...

Страница 24: ...nter that allows you to set up a connection or network connect to a network manage wireless networks and diagnose and repair network problems To access the Network and Sharing Center select Start Control Panel Network and Internet Network and Sharing Center For more information select Start Help and Support Using a WLAN With a WLAN device you can access a wireless local area network WLAN which is ...

Страница 25: ... that make the public environment more secure and anonymous If you are concerned about the security of your computer in a hotspot limit your network activities to noncritical e mail and basic Internet surfing When you set up a WLAN or access an existing WLAN always enable security features to protect your network from unauthorized access The common security levels are Wi Fi Protected Access WPA Pe...

Страница 26: ...s a security code Type the code and then click OK to complete the connection NOTE If no WLANs are listed you are out of range of a wireless router or access point NOTE If you do not see the network you want to connect to click Open Network and Sharing Center and then click Set up a new connection or network A list of options is displayed You can choose to manually search for and connect to a netwo...

Страница 27: ... SIM A SIM contains basic information about you such as a personal identification number PIN as well as network information Some computers include a SIM that is preinstalled in the battery bay If the SIM is not preinstalled it may be provided in the HP Mobile Broadband information provided with your computer or the mobile network operator may provide it separately from the computer For information...

Страница 28: ...ng a SIM To remove a SIM 1 Shut down the computer If you are not sure whether the computer is off or in Hibernation turn the computer on by pressing the power button Then shut down the computer through the operating system 2 Close the display 3 Disconnect all external devices connected to the computer 4 Unplug the power cord from the AC outlet 5 Turn the computer upside down on a flat surface with...

Страница 29: ... information on configuring and using Bluetooth devices refer to the Bluetooth software Help Bluetooth and Internet Connection Sharing ICS HP does not recommend setting up one computer with Bluetooth as a host and using it as a gateway through which other computers may connect to the Internet When two or more computers are connected using Bluetooth and Internet Connection Sharing ICS is enabled on...

Страница 30: ...computer You may be prompted for your permission or password for tasks such as installing software running utilities or changing Windows settings Refer to Help and Support for more information 1 Select Start Control Panel System and Security 2 In the System area click Device Manager 3 Click the arrow next to Network adapters to expand the list and show all adapters 4 Identify the WLAN device from ...

Страница 31: ...y are alphanumeric codes that identify your computer to the network For a network connected to your personal wireless router review the router user guide for instructions on setting up the same codes on both the router and the WLAN device For a private network such as a network in an office or at a public Internet chat room contact the network administrator to obtain the codes and then enter the c...

Страница 32: ...rk and then click Remove Cannot connect to the wireless router If you are trying to connect to the wireless router and are unsuccessful reset the wireless router by removing power from the router for 10 to 15 seconds If the computer still cannot make a connection to a WLAN restart the wireless router For details refer to the router manufacturer s instructions Connecting to a local area network LAN...

Страница 33: ...2 Plug the other end of the cable into a network wall jack 2 Connecting to a local area network LAN 23 ...

Страница 34: ... the TouchPad zone is active the light is off To turn the TouchPad on and off quickly double tap the TouchPad off indicator Navigating To move the pointer touch and slide your finger across the TouchPad in the direction you want the pointer to go Use the left and right TouchPad buttons like the corresponding buttons on an external mouse To scroll up and down using the TouchPad touch and slide your...

Страница 35: ...Selecting Use the left and right TouchPad buttons like the corresponding buttons on an external mouse Using pointing devices 25 ...

Страница 36: ...led at the factory To view and enable these features click the Synaptics icon in the notification area at the far right of the taskbar and then click the Device Settings tab Select the device and then click Settings Scrolling Scrolling is useful for moving up or down on a page or image To scroll place two fingers slightly apart on the TouchPad and drag them across the TouchPad in an up down left o...

Страница 37: ...of the action keys will open a specific shortcut menu within that application NOTE The action key feature is enabled at the factory You can disable this feature in Setup Utility BIOS and revert back to pressing the fn key and one of the function keys to activate the assigned function Icon Action Description Help and Support Opens Help and Support which provides information about your Windows opera...

Страница 38: ...on of a DVD or a BD Play Pause Plays pauses or resumes an audio CD a DVD or a BD If an audio CD a DVD or a BD is not playing press this key to begin or resume the play If an audio CD a DVD or a BD is playing press this key to pause the play Stop Stops audio or video playback of a CD a DVD or a BD Next track section Plays the next track of an audio CD or the next section of a DVD or a BD Decrease v...

Страница 39: ...hold down the fn key briefly press the second key of the hotkey command and then release both keys at the same time Cleaning the TouchPad and keyboard Dirt and grease on the TouchPad can cause the pointer to jump around on the screen To avoid this clean the TouchPad with a damp cloth and wash your hands frequently when using the computer WARNING To reduce the risk of electric shock or damage to in...

Страница 40: ...30 Chapter 3 Pointing devices and keyboard ...

Страница 41: ...ntegrated webcam that allows you to capture and share video Preinstalled multimedia software that allows you to play and manage your music movies and pictures Multimedia action keys that provide fast access to multimedia tasks NOTE Your computer may not include all of the components listed The following sections explain how to identify and use the multimedia components included with your computer ...

Страница 42: ...key 7 Speakers 2 Produce sound 8 Audio out headphone jack Produces sound when connected to optional powered stereo speakers headphones earbuds a headset or television audio WARNING To reduce the risk of personal injury adjust the volume before putting on headphones earbuds or a headset For additional safety information refer to the Regulatory Safety and Environmental Notices NOTE When a device is ...

Страница 43: ...3 To play the previous track of an audio CD or the previous section of a DVD or BD press the f5 action key 1 To play the next track of an audio CD or the next section of a DVD or BD press the f8 action key 4 Multimedia software The computer includes preinstalled multimedia software Some computer models also include additional multimedia software on an optical disc Depending on the hardware and sof...

Страница 44: ...ogram that you want to open Using HP MediaSmart software Your computer has preinstalled HP MediaSmart software MediaSmart turns your computer into a mobile entertainment center You can enjoy music and DVD and BD movies You can also view Internet TV and live TV and manage and edit your photo collections NOTE You must purchase an optional external TV tuner to watch record and pause live TV on the co...

Страница 45: ...f personal injury adjust the volume before putting on headphones earbuds or a headset For additional safety information refer to the Regulatory Safety and Environmental Notices To connect external devices such as external speakers headphone or a microphone refer to the information provided with the device For best results remember the following tips Be sure that the device cable is securely connec...

Страница 46: ...the headphone jack In addition to connecting headphones the headphone jack is used to connect the audio out function of an audio device such as external powered speakers or a stereo system When connecting a device to the headphone jack use only a 3 5 mm stereo plug When a device is connected to a headphone jack the speakers are disabled Using the audio in microphone jack The computer is equipped w...

Страница 47: ...HDMI device The computer includes an HDMI High Definition Multimedia Interface port The HDMI port connects the computer to an optional video or audio device such as a high definition television or any compatible digital or audio component NOTE To transmit video signals through the HDMI port you need an HDMI cable purchased separately The computer can support one HDMI device connected to the HDMI p...

Страница 48: ...yback device as follows 1 Right click the Speakers icon in the notification area at the far right of the taskbar and then click Playback devices 2 On the Playback tab click either Digital Output or Digital Output Device HDMI 3 Click Set Default and then click OK To return audio to the computer speakers follow these steps 1 Right click the Speakers icon in the notification area at the far right of ...

Страница 49: ...d with this drive may not be compatible with many single layer DVD drivers and players LightScribe discs must be purchased separately LightScribe creates a grayscale image similar to black and white photography CAUTION To prevent possible audio and video degradation loss of information or loss of audio or video playback functionality do not initiate Sleep or Hibernation while reading a CD DVD or B...

Страница 50: ...iscs for sharing and storing data home videos and photos These discs are read compatible with most DVD ROM drives and DVD video players With a LightScribe enabled drive and LightScribe software you can write data to the disc and then add a designer label to the outside of the disc Blu ray Discs BDs BD is a high density optical disc format for the storage of digital information including high defin...

Страница 51: ... Default Programs Change AutoPlay settings 2 Confirm that the Use AutoPlay for all media and devices check box is selected 3 Click Choose a default and then select one of the available options for each media type listed 4 Click Save to confirm your selections NOTE For more information about AutoPlay refer to Help and Support Changing DVD region settings Most DVDs that contain copyrighted files als...

Страница 52: ...een and then click Copy Disc located on the left side of the screen Power2Go reads the source disc and copies the data to a temporary folder on your hard drive 4 When prompted remove the source disc from the optical drive and insert a blank disc into the drive After the information is copied the disc you created ejects automatically Creating burning a CD DVD or BD CAUTION Observe the copyright war...

Страница 53: ...avigate to the folder where the source files are stored 6 Open the folder and then drag the files to the drive that contains the blank disc 7 Initiate the burning process as directed by the program you have selected NOTE You cannot create an audio DVD with CyberLink Power2Go For specific instructions refer to the software manufacturer s instructions These instructions may be provided with the soft...

Страница 54: ...t the disc carefully as you remove it 4 Close the disc tray and place the disc in a protective case The computer does not detect the optical drive If Windows does not detect an installed device the device driver software may be missing or corrupted If you suspect that the optical drive is not being detected verify that the optical drive is listed in the Device Manager utility 1 Remove any discs fr...

Страница 55: ...yback window in the multimedia program may close To return to playing the CD DVD or BD click the Play button in your multimedia program to restart the disc In rare cases you may need to exit the program and then restart it A disc does not play Save your work and close all open programs before playing a CD DVD or BD Log off the Internet before playing a CD DVD or BD Be sure that you insert the disc...

Страница 56: ...elect Screen resolution 2 Select Advanced settings Monitor tab 3 Select High Color 16 bit if this setting is not already selected 4 Click OK A disc does not play automatically 1 Select Start Default Programs Change AutoPlay settings 2 Confirm that the Use AutoPlay for all media and devices check box is selected 3 Click Save A disc should now start automatically when it is inserted into the optical...

Страница 57: ... the contents to a new disc and then burn from your hard drive Reinstall the disc burning device driver located in the DVD CD ROM drives category in Device Manager A device driver must be reinstalled 1 Remove any discs from the optical drive 2 Select Start Control Panel System and Security Then in the System area click Device Manager 3 In the Device Manager window click the arrow next to the type ...

Страница 58: ...dows device drivers You can obtain the latest Windows device drivers by using Windows Update This feature can be set to automatically check for and install updates for the Windows operating system and other Microsoft products To use Windows Update 1 Select Start All Programs Windows Update NOTE If you have not previously set up Windows Update you will be prompted to enter settings before you can c...

Страница 59: ... Hue is distinct from saturation which measures the intensity of the hue Saturation Controls the strength of color in the final image A higher saturation setting creates a bolder image a lower saturation setting creates a more subtle image Sharpness Controls the definition of edges in an image A higher sharpness setting creates a more defined image a lower sharpness setting creates a softer image ...

Страница 60: ... perform any computer functions while the computer is in the Sleep state or in Hibernation Initiating and exiting Sleep The system is set at the factory to initiate Sleep after 15 minutes of inactivity when running on battery power and 30 minutes of inactivity when running on external power Power settings and timeouts can be changed using Power Options in Windows Control Panel With the computer on...

Страница 61: ...ay the percentage of remaining battery charge and the current power plan move the pointer over the battery meter icon To access Power Options or to change the power plan click the battery meter icon and select an item from the list Different battery meter icons indicate whether the computer is running on battery or external power The icon also displays a message if the battery has reached a low ba...

Страница 62: ...wakeup 3 Click Change Settings that are currently unavailable 4 Click Require a password recommended NOTE If you need to create a user account password or change your current user account password click Create or change your user account password and then follow the on screen instructions If you do not need to create or change a user account password go to step 5 5 Click Save changes Using externa...

Страница 63: ...es Disconnect power from the computer by unplugging the power cord from the AC outlet not by unplugging the power cord from the computer If provided with a 3 pin attachment plug on the power cord plug the cord into a grounded earthed 3 pin outlet Do not disable the power cord grounding pin for example by attaching a 2 pin adapter The grounding pin is an important safety feature To connect the comp...

Страница 64: ...n the computer whenever the computer is plugged into AC power charges the battery and also protects your work in case of a power outage However a battery in the computer slowly discharges when the computer is off and unplugged from external power WARNING To reduce potential safety issues use only the battery provided with the computer a replacement battery provided by HP or a compatible battery pu...

Страница 65: ...removing the battery CAUTION Removing a battery that is the sole power source can cause loss of information To prevent loss of information initiate Hibernation or shut down the computer through Windows before removing the battery To insert the battery 1 Turn the computer upside down on a flat surface with the battery bay toward you 2 Align the front of the battery with the outer edge of the batter...

Страница 66: ...g a new battery charge it fully before turning on the computer Charge the battery until the battery light turns white NOTE If the computer is on while the battery is charging the battery meter in the notification area may show 100 percent charge before the battery is fully charged Allow the battery to discharge below 5 percent of a full charge through normal use before charging it If the battery h...

Страница 67: ...ry alerts and system responses can be changed using Power Options in Windows Control Panel Preferences set using Power Options do not affect lights Identifying low battery levels When a battery that is the sole power source for the computer reaches a low battery level the battery light blinks If a low battery level is not resolved the computer enters a critical battery level and the battery light ...

Страница 68: ... or Save your work and shut down the computer Resolving a low battery level when the computer cannot exit Hibernation When the computer lacks sufficient power to exit Hibernation follow these steps 1 Insert a charged battery or plug the computer into external power 2 Exit Hibernation by pressing the power button Calibrating a battery Calibrate a battery under the following conditions When battery ...

Страница 69: ...ibernate after so that you can reset it after the calibration 8 Change the On battery setting to Never 9 Click OK 10 Click Save changes Step 3 Discharge the battery The computer must remain on while the battery is being discharged The battery can discharge whether or not you are using the computer but the battery will discharge faster while you are using it If you plan to leave the computer unatte...

Страница 70: ...recorded for the items in the On battery column 4 Click Change advanced power settings 5 Click the plus sign next to Sleep and then click the plus sign next to Hibernate after 6 Reenter the setting that you recorded for On battery 7 Click OK 8 Click Save changes Conserving battery power Select the Power saver power plan through Power Options under System and Security in Windows Control Panel Turn ...

Страница 71: ...capacity indicator turns green yellow Switching between graphics modes select models only The computer is equipped with switchable graphics and has two modes for processing graphics When switching from AC power to battery power the computer switches from High performance mode to Power saving mode to conserve battery life Similarly when switching from battery power to AC power the computer switches...

Страница 72: ...e Windows Shut down command To shut down the computer NOTE If the computer is in the Sleep state or in Hibernation you must first exit Sleep or Hibernation before shutdown is possible 1 Save your work and close all open programs 2 Click Start 3 Click Shut down If the computer is unresponsive and you are unable to use the preceding shutdown procedures try the following emergency procedures in the s...

Страница 73: ...rting a drive shut down the computer If you are unsure whether the computer is off in the Sleep state or in Hibernation turn the computer on and then shut it down through the operating system Do not use excessive force when inserting a drive into a drive bay Do not type on the keyboard or move the computer while the optical drive select models only is writing to a disc The write process is sensiti...

Страница 74: ...ng software running utilities or changing Windows settings Refer to Windows Help and Support for more information For additional information access the Disk Defragmenter software Help Using Disk Cleanup Disk Cleanup searches the hard drive for unnecessary files that you can safely delete to free up disk space and help the computer to run more efficiently To run Disk Cleanup 1 Select Start All Prog...

Страница 75: ...p or Hibernation except as described in the following Note NOTE If the computer is running on battery power and reaches a critical battery level HP ProtectSmart Hard Drive Protection allows the computer to initiate Hibernation The computer will not activate battery alarms set on the Alarms tab in Power Options properties Before you move the computer HP recommends that you either shut it down or in...

Страница 76: ... To remove the hard drive 1 Save your work 2 Shut down the computer and close the display 3 Disconnect all external devices connected to the computer 4 Unplug the power cord from the AC outlet 5 Turn the computer upside down on a flat surface and then remove the battery NOTE To be able to remove the hard drive from the computer you must first remove the memory wireless module compartment cover 6 W...

Страница 77: ...e cable from the system board 1 11 Remove the hard drive screws 2 12 Use the black plastic tab on top of the hard drive to lift the hard drive away from the computer 3 To install a hard drive 1 Insert the hard drive into the hard drive bay at a 45 degree angle 1 2 Tighten the hard drive screws 2 Replacing the hard drive 67 ...

Страница 78: ...system board 3 4 Align the tabs on the hard drive cover with the notches on the computer 5 Close the cover 1 6 Tighten the hard drive cover screws 2 7 Align the tabs 1 on the memory wireless module compartment cover with the notches on the computer 68 Chapter 6 Drives ...

Страница 79: ...ighten the memory wireless module compartment cover screws 3 10 Replace the battery 11 Turn the computer right side up and then reconnect external power and external devices 12 Turn on the computer Replacing the hard drive 69 ...

Страница 80: ...ect an optional hub or expansion product Connecting a USB device CAUTION To prevent damage to a USB connector use minimal force to connect a USB device To connect a USB device to the computer connect the USB cable for the device to the USB port You will hear a sound when the device has been detected NOTE The first time you connect a USB device the Installing device driver software message is displ...

Страница 81: ...xternal hard drive Some eSATA devices may require additional support software which is usually included with the device For more information about device specific software refer to the manufacturer s instructions NOTE The eSATA port also supports an optional USB device Connecting an eSATA device CAUTION To prevent damage to an eSATA port connector use minimal force to connect an eSATA device To co...

Страница 82: ... the notification area at the far right of the taskbar NOTE To display the Safely Remove Hardware and Eject Media icon click the Show hidden icons icon the arrow at the left of the notification area 2 Click the name of the device in the list NOTE You are prompted that it is safe to remove the hardware device 3 Remove the device 72 Chapter 7 External devices ...

Страница 83: ...ity SDHC Memory Card standard and large size xD Picture Card XD Inserting a digital card CAUTION To avoid damaging the digital card or the computer do not insert any type of adapter into the Digital Media Slot CAUTION To prevent damage to the digital card connectors use minimal force to insert a digital card 1 Hold the digital card label side up with the connectors facing the computer 2 Insert the...

Страница 84: ...o remove a digital card a Click the Safely Remove Hardware and Eject Media icon in the notification area at the far right of the taskbar NOTE To display the Safely Remove Hardware and Eject Media icon click the Show hidden icons icon the arrow at the left side of the notification area b Click the name of the digital card in the list NOTE You are prompted that it is safe to remove the hardware devi...

Страница 85: ... NOTE To use a dual channel configuration when adding a second memory module be sure that both memory modules are the same size Adding or replacing a memory module in the expansion memory module slot The expansion memory module slot is stacked above the primary memory module slot To add or replace a memory module in the expansion memory module slot follow these steps 1 Save your work 2 Shut down t...

Страница 86: ...e memory module The memory module tilts up CAUTION To prevent damage to the memory module hold the memory module by the edges only Do not touch the components on the memory module b Grasp the edge of the memory module 2 and gently pull the module out of the memory module slot To protect a memory module after removal place it in an electrostatic safe container 76 Chapter 9 Memory modules ...

Страница 87: ... the memory module b With the memory module at a 45 degree angle from the surface of the memory module compartment press the module 2 into the memory module slot until it is seated c Gently press the memory module 3 down applying pressure to both the left and right edges of the memory module until the retention clips snap into place 10 Align the tabs 1 on the memory wireless module compartment cov...

Страница 88: ...e a memory module in the primary memory module slot follow these steps 1 Save your work 2 Shut down the computer If you are not sure whether the computer is off or in Hibernation turn the computer on by pressing the power button Then shut down the computer through the operating system 3 Disconnect all external devices connected to the computer 4 Unplug the power cord from the AC outlet 5 Turn the ...

Страница 89: ... Pull away the retention clips 1 on each side of the memory module The memory module tilts up CAUTION To prevent damage to the memory module hold the memory module by the edges only Do not touch the components on the memory module b Grasp the edge of the memory module 2 and gently pull the module out of the memory module slot To protect a memory module after removal place it in an electrostatic sa...

Страница 90: ...ace of the memory module compartment press the module 2 into the memory module slot until it is seated c Gently press the memory module 3 down applying pressure to both the left and right edges of the memory module until the retention clips snap into place 10 Align the tabs 1 on the memory wireless module compartment cover with the notches on the computer NOTE If you removed a memory module from t...

Страница 91: ...ry wireless module compartment cover screws 3 13 Replace the battery 14 Turn the computer right side up and then reconnect external power and external devices 15 Turn on the computer Adding or replacing memory modules 81 ...

Страница 92: ...zed access to data Firewall software Windows updates Unauthorized access to Setup Utility BIOS settings and other system identification information Administrator password Ongoing or future threats to the computer Critical security updates from Microsoft Unauthorized access to a Windows user account User password Unauthorized removal of the computer Security cable slot used with an optional securit...

Страница 93: ...eir functions For additional information about Windows passwords such as screen saver passwords select Start Help and Support Setting passwords in Windows Password Function Administrator password Protects administrator level access to computer contents NOTE This password cannot be used to access Setup Utility contents User password Protects access to a Windows user account It also protects access ...

Страница 94: ...check before the Press the ESC key for Startup Menu message is displayed you must enter the administrator password to access Setup Utility Managing an administrator password To set change or delete this password follow these steps 1 Open Setup Utility by turning on or restarting the computer While the Press the ESC key for Startup Menu message is displayed in the lower left corner of the screen pr...

Страница 95: ...rent Password field type a new password in the Enter New Password and Confirm New Password fields and then press enter To delete a power on password type your current password in the Enter Current Password field and then press enter 4 times 3 To save your changes and exit Setup Utility use the arrow keys to select Exit Exit Saving Changes Your changes go into effect when the computer restarts Ente...

Страница 96: ...ntly resolve the problem reconfigure the firewall Installing critical security updates CAUTION Microsoft sends alerts regarding critical updates To protect the computer from security breaches and computer viruses install all critical updates from Microsoft as soon as you receive an alert Updates to the operating system and other software may have become available after the computer was shipped To ...

Страница 97: ...computer Near the bottom of the TouchPad On the right side of the keyboard On the upper right side of the display On the left side of the display Depending on your computer model the fingerprint reader may be oriented horizontally or vertically Both orientations require that you swipe your finger perpendicular to the metallic sensor Using the fingerprint reader 87 ...

Страница 98: ...s to the finger you want to register The next page opens outlining that finger in green 6 Slowly swipe your chosen finger over the fingerprint sensor NOTE If the swipe is not completed correctly a message explains why the swipe was unsuccessful NOTE For best results swipe the same finger in the same direction each time you use the fingerprint reader 7 Continue swiping the same finger over the fing...

Страница 99: ...on to Windows To log on to Windows using your fingerprint follow these steps 1 Immediately after you have registered your fingerprints restart Windows 2 Swipe any of your registered fingers to log on to Windows Using the fingerprint reader 89 ...

Страница 100: ...de for additional information on QuickWeb Disabling and enabling QuickWeb To disable or reenable QuickWeb from within the Windows operating system 1 Select Start All Programs HP QuickWeb The HP QuickWeb Installer folder is displayed Click HP QuickWeb Configuration Tool 2 Select the Enable QuickWeb check box 3 Click OK NOTE The HP QuickWeb Configuration Tool can also be accessed by selecting Start ...

Страница 101: ...anguage of Setup Utility The following procedure explains how to change the language of Setup Utility If Setup Utility is not already running begin at step 1 If Setup Utility is already running begin at step 2 1 Open Setup Utility by turning on or restarting the computer While the Press the ESC key for Startup Menu message is displayed in the lower left corner of the screen press f10 or Open Setup...

Страница 102: ...tem information such as the system time and date and identification information about the computer is displayed 3 To exit Setup Utility without changing any settings use the arrow keys to select Exit Exit Discarding Changes and then press enter Restoring default settings in Setup Utility The following procedure explains how to restore the Setup Utility default settings If Setup Utility is not alre...

Страница 103: ...y not be supported by your computer Main menu Select To do this System information View and change the system time and date View identification information about the computer View specification information about the processor memory size system BIOS and keyboard controller version select models only Security menu Select To do this Administrator password Enter change or delete an administrator pass...

Страница 104: ... disable boot from diskette Internal Network Adapter boot Enable disable boot from Internal Network Adapter Boot Order Set the boot order for Hard drive Internal CD DVD ROM drive USB Diskette on Key USB hard disk USB CD DVD ROM drive USB floppy Network adapter Diagnostics menu Select To do this Hard Disk Self Test Run a comprehensive self test on the hard drive NOTE On models with two hard drives ...

Страница 105: ...y be prompted for your permission or password for tasks such as installing software running utilities or changing Windows settings Refer to Help and Support for more information 2 Access the updates on the HP Web site at http www hp com 3 Install the updates Updating the BIOS To update the BIOS first determine what BIOS version you currently have and then download and install the new BIOS Determin...

Страница 106: ... update later after it has been downloaded to your hard drive b Follow the on screen instructions to download your selection to the hard drive Make a note of the path to the location on your hard drive where the BIOS update will be downloaded You will need to access this path when you are ready to install the update NOTE If you connect your computer to a network consult the network administrator b...

Страница 107: ... a window containing additional information 6 Click Install now to install the updated driver NOTE In some locations you may be able to download the driver and install it later To do this click Download only to save the file to your computer When prompted click Save and then select a storage location on your hard drive After the file is downloaded navigate to the folder where the file was stored a...

Страница 108: ...61 inserting 55 low battery levels 57 recharging 60 removing 55 replacing 61 storing 60 battery bay 8 11 Battery Check 54 battery light 5 56 57 battery power 54 battery release latch 8 55 battery temperature 60 battery identifying 10 bays battery 8 11 hard drive 8 BD playing 40 45 removing 43 44 BIOS updating 95 Blu ray Disc BD 39 Blu ray R RE DVD RW SuperMulti DL Drive 39 Blu ray ROM DVD R SuperM...

Страница 109: ...estures TouchPad 26 graphic modes switching 61 H hard disk drive HP ProtectSmart Hard Drive Protection 64 installing 67 removing 66 replacing 66 hard drive HP ProtectSmart Hard Drive Protection 64 identifying 8 installing 67 removing 66 replacing 66 hard drive self test 94 hardware identifying 1 HDMI port 37 HDMI connecting 37 headphone audio out jack 6 32 headphones 32 Help and Support key 27 Hib...

Страница 110: ...t 94 memory replacing memory modules 75 78 memory wireless module compartment cover removing 66 76 replacing 69 77 microphone audio in jack 6 microphone internal 32 microphones supported 36 Microsoft Certificate of Authenticity label 11 minimizing interference 22 monitor connecting 36 mouse external connecting 27 setting preferences 24 multimedia components identifying 31 multimedia software using...

Страница 111: ...g 95 using 34 solid state drive SSD 63 speakers 5 32 storing battery 60 switchable graphics 61 System Configuration menu 93 system information hotkey 29 system information displaying 92 93 T temperature 60 TouchPad buttons 1 gestures 26 navigating 24 pinching or zooming 26 scrolling 26 selecting 25 turning on and off 24 using 24 TouchPad light identifying 2 TouchPad on off button identifying 1 Tou...

Страница 112: ...etwork WLAN connecting 16 corporate WLAN connection 16 equipment needed 15 functional range 16 label 11 public WLAN connection 16 security 15 WLAN antenna identifying 9 WLAN device 12 writable media 50 WWAN antenna identifying 9 WWAN device 17 102 Index ...

Страница 113: ......

Отзывы: