background image

Removal and replacement procedures

Maintenance and Service Guide

4–27

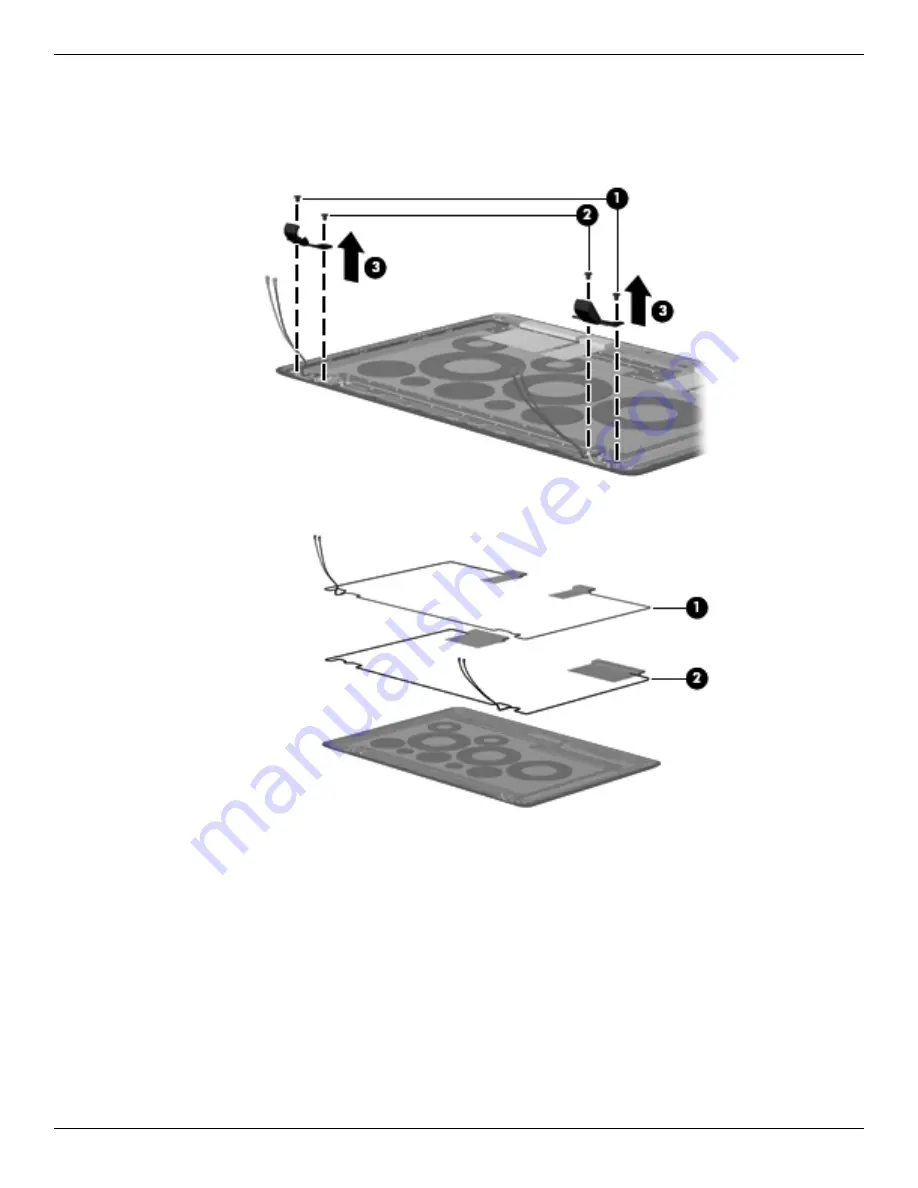
14. If it is necessary to replace the wireless antennas:

a. Remove the hinge covers from the enclosure by removing the two silver broadhead Phillips 2.0×3.0 screws 

1

 and the two black broadhead Phillips 2.0×3.0 screws 

2

.

b. Lift up on the hinge covers 

3

.

c. Remove the WLAN 

1

 and the WWAN 

2

 antennas from the enclosure.

Reverse this procedure to install the wireless antennas.

Содержание PAVILION DM3

Страница 1: ...21 001 September 2009 This guide is a troubleshooting reference used for maintaining and servicing the computer It provides comprehensive information on identifying computer features components and spare parts troubleshooting computer problems and performing computer disassembly procedures ...

Страница 2: ......

Страница 3: ...Microsoft and Windows are U S registered trademarks of Microsoft Corporation SD Logo is a trademark of its proprietor The information contained herein is subject to change without notice The only warranties for HP products and services are set forth in the express warranty statements accompanying such products and services Nothing herein should be construed as constituting an additional warranty H...

Страница 4: ...t allow another hard surface such as an adjoining optional printer or a soft surface such as pillows or rugs or clothing to block airflow Also do not allow the AC adapter to contact the skin or a soft surface such as pillows or rugs or clothing during operation The computer and the AC adapter comply with the user accessible surface temperature limits defined by the International Standard for Safet...

Страница 5: ...atalog Service tag 3 1 Computer major components 3 2 Plastics kit 3 5 Cable kit 3 6 Mass storage devices 3 7 Miscellaneous parts 3 8 Sequential part number listing 3 9 4 Removal and replacement procedures Preliminary replacement requirements 4 1 Tools required 4 1 Service considerations 4 1 Grounding guidelines 4 2 Component replacement procedures 4 5 Service tag 4 5 Computer feet 4 6 Battery 4 6 ...

Страница 6: ...D display specifications 6 2 Hard drive specifications 6 3 Blu ray ROM DVD R RW SuperMulti Double Layer Drive specifications 6 4 DVD RW and CD RW SuperMulti Double Layer Drive specifications 6 5 DVD ROM Drive specifications 6 6 System DMA specifications 6 7 System memory map specifications 6 7 System interrupt specifications 6 8 System I O address specifications 6 9 7 Screw listing Phillips PM2 0 ...

Страница 7: ...io in microphone 9 1 Audio out headphone 9 1 External monitor 9 2 HDMI 9 3 RJ 45 network 9 4 Universal Serial Bus 9 4 10Power cord set requirements Requirements for all countries and regions 10 1 Requirements for specific countries and regions 10 2 11Recycling Battery 11 1 Display 11 1 Index ...

Страница 8: ...vii Maintenance and Service Guide ...

Страница 9: ...300 2 26 GHz processor 6 MB L2 cache 1066 MHz front side bus FSB SU7300 1 3 GHz processor 3 MB L2 cache 800 MHz FSB Intel Pentium SU4100 1 3 GHz processor 2 MB L2 cache 800 MHz FSB Intel Celeron SU2300 1 2 GHz processor 1 MB L2 cache 800 MHz FSB AMD Turion Neo X2 Dual Core 1 6 GHz processor 1 MB L2 cache AMD Athlon Neo X2 Dual Core 1 6 GHz processor 512 K L2 cache AMD Athlon Neo 1 6 GHz processor ...

Страница 10: ...e aspect BrightView LED display assembly 13 3 in high definition HD 1366 768 BrightView LED display assembly 13 3 in thin with brushed aluminum display assembly Memory 2 customer accessible upgradable memory module slots Supports dual channel memory Supports the following DDR2 configurations at 800 MHz 8192 MB total system memory 4096 2 dual channel 6144 MB total system memory 4096 2048 dual chann...

Страница 11: ...lid state drive SSD in single HDD configurations Support for 128 GB SSD in single HDD configurations Optical drives 12 7 mm tray load Serial ATA SATA Fixed removal of 1 screw required Customer accessible DVD RW SuperMulti Double Layer Drive with LightScribe External USB Blu ray ROM DVD R RW SuperMulti Double Layer Drive with LightScribe Diskette drive Supports external USB drive only Supports boot...

Страница 12: ...02 11a b g n WLAN Bluetooth with 2 antennas Non Intel wireless 2nd source non Intel electromagnetic EM only 802 11b g 802 11b g low cost Bluetooth with 2 antennas 802 11a b g n draft 802 11n WLAN 802 11a b g n draft 802 11 WLAN Bluetooth Intel wireless Intel WiFi Link 5100 Wireless AGN w 2 antennas Intel WiFi Link 5100 Wireless AGN Bluetooth w 2 antennas Intel WiFi Link 5100 Wireless ABG w 2 anten...

Страница 13: ... aspect vs standard aspect video HDMI v 1 3b supporting 1080p with HDCP key Multi pin AC power non smart pin RJ 45 Ethernet includes link and activity lights USB 2 0 4 VGA Dsub 15 pin supporting 1600 1200 external resolution at 75 GHz and 1920 x 1200 external resolution at 60Hz Keyboard pointing devices Full size keyboard TouchPad with TouchPad buttons Supports 2 way scroll with legend Taps enable...

Страница 14: ...ional 32 bit Windows 7 Professional 64 bit Microsoft Office preinstalled on Windows 7 Home Basic 32 bit and 64 bit Windows 7 Home Premium 32 bit and 64 bit Windows 7 Professional 32 bit and 64 bit Serviceability End user replaceable parts AC adapter Battery system Hard drive Memory modules Wireless modules RTC battery Category Description Systems with Intel processors Systems with AMD processors ...

Страница 15: ...on the screen 3 Left TouchPad button Functions like the left button on an external mouse 4 TouchPad on off button Enables disables the TouchPad 5 TouchPad scroll zone Scrolls up or down 6 Right TouchPad button Functions like the right button on an external mouse This table describes factory settings To view or change pointing device preferences select Start Devices and Printers Then right click th...

Страница 16: ...er may look slightly different from the illustration in this section Item Component Description 1 Caps lock light On Caps lock is on 2 Mute light On Computer sound is off 3 Num lock light On The embedded numeric keypad is enabled or num lock is on for an optional external numeric keypad ...

Страница 17: ...tem functions 3 num lk key Enables disables the embedded numeric keypad when pressed in combination with the fn key 4 Embedded numeric keypad keys When the keypad has been enabled the keys can be used like the keys on an external numeric keypad 5 Windows applications key Displays a shortcut menu for items beneath the pointer 6 Windows logo key Displays the Windows Start menu 7 fn key Executes freq...

Страница 18: ...battery level the battery light begins blinking rapidly Off If the computer is plugged into an external power source the light is turned off when all batteries in the computer are fully charged If the computer is not plugged into an external power source the light stays off until the battery reaches a low battery level 3 Drive light White The hard drive is being accessed Blinking The hard drive or...

Страница 19: ...o turn off the computer To learn more about your power settings select Start Control Panel System and Security Power Options 3 Wireless light Blue An integrated wireless device such as a wireless local area network WLAN device a wireless wide area network WWAN device and or a Bluetooth device is on Amber All wireless devices are off 4 Wireless button Turns the wireless feature on or off but does n...

Страница 20: ...ptional USB devices Select models can be configured with an optional external USB optical disc drive For more information refer to the printed Quick Setup poster 7 Digital Media Slot Supports the following digital card formats Memory Stick Memory Stick Pro MultiMediaCard Secure Digital Memory Card Secure Digital High Capacity Memory Card xD Picture Card x D Picture Card Type H x D Picture Card Typ...

Страница 21: ...unresponsive system replace the wireless module only with a wireless module authorized for use in the computer by the governmental agency that regulates wireless devices in your country or region If you replace the module and then receive a warning message remove the module to restore computer functionality and then contact technical support through Help and Support 6 Hard drive bay Holds the hard...

Страница 22: ...Service Guide External component identification Display components Item Component Description 1 Internal microphone Records sound 2 Webcam light On The webcam is in use 3 Webcam Records video and captures still photographs ...

Страница 23: ...wireless wide area networks WWAN 2 WLAN antennas 2 Send and receive wireless signals to communicate with wireless local area networks WLAN The antennas are not visible from the outside of the device For optimal transmission keep the areas immediately around the antennas free from obstructions To see wireless regulation notices refer to the section of the Regulatory Safety and Environmental Notices...

Страница 24: ...al hardware components Item Component Description 1 Power cord Connects the AC adapter 2 AC adapter Converts AC power to DC power 3 Battery Powers the computer when the computer is not plugged into external power Batteries and power cords vary in appearance by region or country ...

Страница 25: ...r 2 Serial number s n This is an alphanumeric identifier that is unique to each product 3 Part number Product number p n This number provides specific information about the product s hardware components The part number helps a service technician determine what components and parts are needed 4 Model description This is the alphanumeric identifier used to locate documents drivers and support for th...

Страница 26: ...3 2 Maintenance and Service Guide Illustrated parts catalog Computer major components ...

Страница 27: ... 001 For use in the United Kingdom 575926 031 For use in Germany 575926 041 For use in France 575926 051 For use in Italy 575926 061 For use in Spain 575926 071 French Canada 575926 121 For use in Portugal 575926 131 For use in Turkey 575926 141 For use in Latin American 575926 161 For use in Saudi Arabia 575926 171 For use in Brazil 575926 201 For use in the Czech Republic 575926 221 For use in R...

Страница 28: ...Intel Pentium Processor 1 3 GHz 800 MHz FSB 2MB L2 cache UMA 580661 001 Intel Pentium Processor 1 3 GHz 800 MHz FSB 2MB L2 cache discrete 580662 001 Intel Core2Duo Processor 2 26 GHz 1066 MHz FSB 6MB L2 cache discrete 580663 001 Intel Core2Duo Processor 1 3 GHz 800 MHz FSB 3MB L2 cache UMA 584078 001 q WLAN module WLAN 802 11ABGN MD2020 MOW 518437 001 WLAN 802 11ABGN MD2020 ROW 518437 002 WLAN 802...

Страница 29: ... kit pb Memory module compartment access cover 580691 001 a Hard drive Hard drive hardware kit 580683 001 Item Description Spare part number Item Description Spare part number Plastics kit 580691 001 1 Hard drive bay access cover 2 Memory module compartment access cover ...

Страница 30: ...3 6 Maintenance and Service Guide Illustrated parts catalog Cable kit Item Description Spare part number 1 Cable kit 580843 001 Power DC cable RJ 45 cable Lid sensor cable LED board with cable ...

Страница 31: ...cludes hard drive connector 250GB INTERNAL 5400RPM 580677 001 320GB INTERNAL 5400RPM 580678 001 500GB INTERNAL 5400RPM 580679 001 250GB INTERNAL 7200RPM 580680 001 320GB INTERNAL 7200RPM 580681 001 500GB INTERNAL 7200RPM 580682 001 160GB INTERNAL 7200RPM 581181 001 SSD 128GB AMD systems 581182 001 SSD 160GB Intel systems 582077 001 ...

Страница 32: ...pan 490371 291 For use in South Africa 490371 AR1 For use in South Korea 490371 AD1 For use in Switzerland 490371 111 For use in Taiwan 490371 AB1 For use in the People s Republic of China 490371 AA1 For use in the United Kingdom and Singapore 490371 031 For use in the United States 490371 001 Rubber kit 580697 001 Screw kit Phillips PM2 5 2 5 screw Phillips PM2 0 2 5 screw Phillips PM2 0 5 0 scre...

Страница 33: ...d for use in the People s Republic of China 490371 031 Power cord for use in the United Kingdom and Singapore 490371 001 Power cord for use in the United States 504593 003 WLAN 802 11BG DEMI 2 MOW 504593 004 WLAN 802 11BG DEMI 2 ROW 518434 001 WLAN 802 11ABGN 2X2 CLARET 2 MOW 518434 002 WLAN 802 11ABGN 2X2 CLARET 2 ROW 518436 001 WLAN 802 11BGN MEDOC MOW 518436 002 WLAN 802 11BGN MEDOC ROW 518437 ...

Страница 34: ...isplay cable 580669 001 Webcam 580673 001 Memory 1 GB 800 MHz DDR2 580674 001 Memory 2 GB 800 MHz DDR2 580675 001 Memory 4 GB 800 MHz DDR2 580677 001 Hard drive 250GB INTERNAL 5400RPM 580678 001 Hard drive 320GB INTERNAL 5400RPM 580679 001 Hard drive 500GB INTERNAL 5400RPM 580680 001 Hard drive 250GB INTERNAL 7200RPM 580681 001 Hard drive 320GB INTERNAL 7200RPM 580682 001 Hard drive 500GB INTERNAL...

Страница 35: ...35 FF 1 6G Althon 581176 001 System board L625 FF 1 6 Turion 581177 001 Display 13 3 HD BV MA 581181 001 160 GB hard drive internal 7200RPM 581182 001 SSD 128GB AMD systems 581186 001 Heat sink UMA AMD systems 581187 001 Heat sink discrete AMD systems 582077 001 Hard drive SSD 160GB Intel systems 583925 001 Top cover AMD systems 588159 001 Display 13 3 HD BrightView LED 591223 001 Display 13 3 HD ...

Страница 36: ...3 12 Maintenance and Service Guide Illustrated parts catalog ...

Страница 37: ...ssembly and reassembly can damage plastic parts Use care when handling the plastic parts Apply pressure only at the points designated in the maintenance instructions Cables and connectors ÄCAUTION When servicing the computer be sure that cables are placed in their proper locations during the reassembly process Improper cable placement can damage the computer Cables must be handled with extreme car...

Страница 38: ...ck mailer or other suitable form of protective packaging and label the package FRAGILE Grounding guidelines Electrostatic discharge damage Electronic components are sensitive to electrostatic discharge ESD Circuitry design and structure determine the degree of sensitivity Networks built into many integrated circuits provide some protection but in many cases ESD contains enough power to alter devic...

Страница 39: ...en touching a component or assembly Store reusable ESD sensitive parts from assemblies in protective packaging or nonconductive foam Use transporters and conveyors made of antistatic belts and roller bushings Be sure that mechanized equipment used for moving materials is wired to ground and that proper materials are selected to avoid static charging When grounding is not possible use an ionizer to...

Страница 40: ...e proper ground wear a strap snugly against the skin at all times On grounded mats with banana plug connectors use alligator clips to connect a wrist strap When standing use foot straps and a grounded floor mat Foot straps heel toe or boot straps can be used at standing workstations and are compatible with most types of shoes or boots On conductive floors or dissipative floor mats use foot straps ...

Страница 41: ...nd model number provided on the service tag Item Component Description 1 Product name This is the product name affixed to the front of the computer 2 Serial number s n This is an alphanumeric identifier that is unique to each product 3 Part number Product number p n This number provides specific information about the product s hardware components The part number helps a service technician determin...

Страница 42: ...ther the computer is off or in Hibernation turn the computer on and then shut it down through the operating system 2 Disconnect all external devices connected to the computer 3 Disconnect the power from the computer by first unplugging the power cord from the AC outlet and then unplugging the AC adapter from the computer Remove the battery 1 Turn the computer upside down on a flat surface with the...

Страница 43: ...Removal and replacement procedures Maintenance and Service Guide 4 7 Install the battery by inserting it into the battery bay and pressing down on it until you hear a click ...

Страница 44: ...e whether the computer is off or in Hibernation turn the computer on and then shut it down through the operating system 2 Disconnect all external devices connected to the computer 3 Disconnect the power from the computer by first unplugging the power cord from the AC outlet and then unplugging the AC adapter from the computer 4 Remove the battery see Battery on page 4 6 Remove the SIM 1 Press in o...

Страница 45: ...e the battery see Battery on page 4 6 Remove the hard drive 1 Position the computer with the front toward you 2 Loosen the three Phillips PM2 5x5 0 captive screws 1 that secure the hard drive cover to the computer 3 Lift the right side 2 of the hard drive cover to detach it from the computer The hard drive cover is included in the Plastics Kit spare part number 580691 001 Description Spare part nu...

Страница 46: ...e system 6 Grasp the Mylar tab 3 on the hard drive and pull it up to remove the hard drive from the sytem 7 If it is necessary to replace the hard drive bracket or connector follow these steps a Remove the four Phillips PM3 0x4 0 screws 1 that secure the hard drive bracket to the hard drive b Grasp the Mylar tabs on the bracket and lift the bracket 2 straight up to remove it from the hard drive Re...

Страница 47: ...computer by the governmental agency that regulates wireless devices in your country or region If you replace the module and then receive a warning message remove the module to restore computer functionality and then contact technical support through Help and Support 1 Position the computer with the front toward you 2 Disconnect the WWAN antenna cables 1 from the terminals on the WWAN module The re...

Страница 48: ... the WLAN module ÄCAUTION To prevent an unresponsive system replace the wireless module only with a wireless module authorized for use in the computer by the governmental agency that regulates wireless devices in your country or region If you replace the module and then receive a warning message remove the module to restore computer functionality and then contact technical support through Help and...

Страница 49: ...he white WLAN antenna cable is connected to the WLAN module Aux terminal 5 Remove the two Phillips PM2 5x3 0 screws 2 that secure the WLAN module to the computer The WLAN module tilts up 6 Remove the WLAN module 3 by pulling it away from the slot at an angle WLAN modules are designed with a notch 4 to prevent incorrect insertion of the WLAN module into the WLAN module slot Reverse this procedure t...

Страница 50: ...e WLAN module on page 4 12 Remove the memory module The slot nearest the front edge of the computer is for primary memory The slot next to it is for expansion memory 1 Pull away the retention clips 1 on each side of the memory module to release the memory module The memory module tilts up ÄCAUTION To prevent damage to the memory module hold it by the edges only Do not touch the components on the m...

Страница 51: ... outlet and then unplugging the AC adapter from the computer 4 Remove the battery see Battery on page 4 6 5 Remove the memory wireless module compartment cover see WLAN module on page 4 12 6 Remove the WLAN module see WLAN module on page 4 12 Remove the RTC battery 1 Turn the system board upside down with the audio connectors toward you 2 The RTC battery has adhesive holding it down Lift up slight...

Страница 52: ...tery see Battery on page 4 6 Remove the keyboard 1 Position the computer with the front toward you 2 Remove the following screws The Phillips PM2 0x6 0 screw 1 that is near the hard drive bay The Phillips PM2 0x4 0 screw 2 in the battery bay Country or region Spare part number Country or region Spare part number Belgium 580687 A41 Russia 580687 251 Brazil 580687 201 Saudi Arabia 580687 171 The Cze...

Страница 53: ...n position the computer so that the display is its base and the keyboard is in the upright position 5 On the bottom of the computer press in on the keyboard release tabs 6 Return the computer to its upright position 7 Lift the rear edge of the keyboard until it rests at an angle 8 Slide the keyboard back until it rests on the switch cover and display ...

Страница 54: ...on force ZIF connector 1 to which the keyboard cable is attached and then disconnect the keyboard cable 2 from the system board ÄCAUTION Take care when releasing the ZIF connector The connector can be easily damaged if handled incorrectly 10 Remove the keyboard Reverse this procedure to install the keyboard ...

Страница 55: ...t unplugging the power cord from the AC outlet and then unplugging the AC adapter from the computer 4 Remove the battery see Battery on page 4 6 5 Remove the following components a Hard drive see Hard drive on page 4 9 b Memory wireless module compartment cover see WLAN module on page 4 12 c Keyboard see Keyboard on page 4 16 Remove the top cover 1 Turn the unit upside down with the front facing y...

Страница 56: ...ment procedures 3 Turn the computer right side up and disconnect the following cables Top cover cable 1 from the board Touch pad cable 2 from the board Bluetooth module cable 3 from the board 4 Remove the six Phillips PM2 5x6 0 screws from the sheet metal ...

Страница 57: ...acement procedures Maintenance and Service Guide 4 21 5 Lift up on the front edge 1 of the top cover 6 Pull up on the back edge 2 of the top cover to remove from the unit Reverse this procedure to install the top cover ...

Страница 58: ...tenna cables from the WLAN module see WLAN module on page 4 12 and WWAN module see WWAN module on page 4 11 6 Remove the keyboard see Keyboard on page 4 16 7 Remove the top cover see Top cover on page 4 19 Remove the display assembly 1 Close the computer 2 Turn the computer display side up with the front toward you 3 Disconnect and remove the WLAN cables 1 from the clips 2 built into the base encl...

Страница 59: ... one of the screws secures a display support strap On the right side the left most screw secures a ground strap for the wireless cables After removing all six screws note that the power cable on the left hinge may interfere with the removal of the display Simply move the panel around the cable and then lift On the right side there is a metal plate that you must workaround to remove the display 8 I...

Страница 60: ...il the bezel disengages from the display enclosure c Remove the display bezel 4 9 To remove the panel a Remove the following six screws 1 Two Phillips 2 5 3 0 screws on top that secure the display panel to the display enclosure 2 Two Phillips 2 5 5 0 screws on top of each hinge 3 Two Phillips 2 5 4 0 screws on the bottom of each hinge 10 Remove the panel 4 from the enclosure ...

Страница 61: ...necessary to replace the display panel cable a Turn the display panel upside down with the bottom edge toward you b Release the adhesive support strip 1 c Disconnect the display panel cable 2 from the connector on the back of the display panel The display panel cable is available using the spare part number 580668 001 Reverse the procedure to replace the display cable ...

Страница 62: ...h is spared as 580669 001 and includes the cable a Place the panel enclosure flat on the table with the webcam furthest away from you b Loosen the webcam 1 up by pulling on it to break the adhesive bond and pull up c Disconnect the camera module 2 from the camera cable Reverse the procedure to install the webcam module ...

Страница 63: ...tennas a Remove the hinge covers from the enclosure by removing the two silver broadhead Phillips 2 0 3 0 screws 1 and the two black broadhead Phillips 2 0 3 0 screws 2 b Lift up on the hinge covers 3 c Remove the WLAN 1 and the WWAN 2 antennas from the enclosure Reverse this procedure to install the wireless antennas ...

Страница 64: ...er 4 Remove the battery see Battery on page 4 6 5 Remove the keyboard see Keyboard on page 4 16 6 Remove the top cover see Top cover on page 4 19 Remove the speakers 1 Position the base enclosure with the front edge toward you 2 Disconnect the speaker cable 1 from the system board 3 Remove the three silver Phillips 2 0 6 0 screws 2 that secure the speakers to the enclosure There are rubber grommet...

Страница 65: ...unplugging the AC adapter from the computer 4 Remove the battery see Battery on page 4 6 5 Remove the keyboard see Keyboard on page 4 16 6 Remove the top cover see Top cover on page 4 19 Remove the front LED board 1 Position the base enclosure with the front edge toward you 2 Disconnect the LED board cable 1 from the system board 3 Remove the two Phillips 2 5 4 0 screws 2 that secure the LED board...

Страница 66: ...ge 4 6 5 Remove the following components a Hard drive see Hard drive on page 4 9 b Memory module compartment access cover see WLAN module on page 4 12 c Keyboard see Keyboard on page 4 16 d Display assembly see Display assembly on page 4 22 e Top cover see Top cover on page 4 19 Remove the USB board 1 Disconnect the USB board cable 1 from the system board 2 Remove the Phillips 2 5 4 0 screw 2 to d...

Страница 67: ...ge 4 16 d Display assembly see Display assembly on page 4 22 e Top cover see Top cover on page 4 19 Remove the fan 1 Disconnect the fan cable 1 from the system board 2 Remove the two Phillips 2 5 6 0 screws 2 3 Remove the fan 3 from the enclosure Reverse this procedure to install the fan To properly ventilate the computer allow at least 7 6 cm 3 in of clearance on the left side of the computer The...

Страница 68: ...nnected to the computer 3 Disconnect the power from the computer by first unplugging the power cord from the AC outlet and then unplugging the AC adapter from the computer 4 Remove the battery see Battery on page 4 6 5 Remove the top cover see Top cover on page 4 19 Remove the Bluetooth module and cable 1 Remove the Phillips 2 0 4 0 screw 1 to release the Bluetooth module 2 Lift the cable tape 2 t...

Страница 69: ...that the following additional components are removed from the defective system board and installed on the replacement system board SIM see SIM on page 4 8 WLAN module see WLAN module on page 4 12 Memory modules see Memory module on page 4 14 WWAN module see WWAN module on page 4 11 Fan see Fan on page 4 31 RTC battery see RTC battery on page 4 15 Description Spare part number AMD Athlon Neo Proces...

Страница 70: ...enclosure 2 Disconnect the power connector 2 from the enclosure 3 Remove the five Phillips 2 5 4 0 screws that secure the system board to the base enclosure 4 Lift up 1 on the right side of the system board and then pull it to the right 2 to remove the system board from the base enclosure Reverse this procedure to install the system board ...

Страница 71: ... the power cord from the AC outlet and then unplugging the AC adapter from the computer 4 Remove the battery see Battery on page 4 6 5 Remove the following components a Hard drive see Hard drive on page 4 9 b Memory module compartment cover see WLAN module on page 4 12 c Keyboard see Keyboard on page 4 16 d Display assembly see Display assembly on page 4 22 e Top cover see Top cover on page 4 19 f...

Страница 72: ...ry see Battery on page 4 6 5 Remove the following components a Hard drive see Hard drive on page 4 9 b Memory wireless module compartment cover see WLAN module on page 4 12 c Keyboard see Keyboard on page 4 16 d Display assembly see Display assembly on page 4 22 e Top cover see Top cover on page 4 19 f System board see System board on page 4 33 Remove the heat sink 1 Loosen the four captive Philli...

Страница 73: ...nguage or the Setup Utility The following procedure explains how to change the language of the Setup Utility If the Setup Utility is not already running begin at step1 If the Setup Utility is already running begin at step 2 1 Open the Setup Utility by turning on or restarting the computer While the Press the ESC key for Startup Menu message is displayed in the lower left corner on the screen press...

Страница 74: ...displayed press f10 2 Select Main Menu System information such as the system time and date and identification information about the computer is displayed 3 To exit the Setup Utility without changing any settings use the arrow keys to select Exit Exit Discarding Changes then press enter Restoring default settings in the Setup Utility The following procedure explains how to restore the Setup Utility...

Страница 75: ...ty menus are not visible press esc to return to the menu display then use the arrow keys to select Exit Exit Saving Changes then press enter To exit the Setup Utility without saving your changes from the current session If the Setup Utility menus are not visible press esc to return to the menu display Then use the arrow keys to select Exit Exit Discarding Changes the press enter After either choic...

Страница 76: ...y your computer Main menu Security menu Select To do this System Information View and change the system time and date View identification information for the computer View specification information for the processor memory size system BIOS and keyboard controller version select models only Select To do this Administrator Password Enter change or delete administrator password Power On Password Ente...

Страница 77: ...n will always be on Action Key Mode Enable disable the Action Key Mode Boot Options Set the following boot options f10 and f12 Delay seconds Set the delay for the f10 and f12 functions of the Setup Utility in intervals of 5 seconds 0 5 10 15 or 20 CD Rom Boot Enable disable boot from CD ROM Floppy Boot Enable disable boot from diskette Internal Network Adapter Boot Enable disable boot from interna...

Страница 78: ...5 6 Maintenance and Service Guide Setup Utility BIOS ...

Страница 79: ...74 A Temperature Operating not writing to optical disc 0 C to 35 C 32 F to 95 F Operating writing to optical disc 5 C to 35 C 41 F to 95 F Nonoperating 20 C to 60 C 4 F to 140 F Relative humidity Operating 10 to 90 Nonoperating 5 to 95 Maximum altitude unpressurized Operating 15 m to 3 048 m 50 ft to 10 000 ft Nonoperating 15 m to 12 192 m 50 ft to 40 000 ft Applicable product safety standards spe...

Страница 80: ... 11 2 in Diagonal 33 6 cm 13 3 in Number of colors Up to 16 8 million Contrast ratio 250 1 typical Brightness 200 nits typical Pixel resolution Pitch 0 279 0 279 mm Format 1366 768 or 1280 720 Configuration RGB vertical stripe Backlight LED Character display 80 25 Total power consumption 4 0 W Viewing angle 40 horizontal 120 40 vertical typical ...

Страница 81: ...al read including setting Single track 1 0 ms 1 5 ms 2 0 ms 2 0 ms Average 14 0 ms 12 0 ms 12 0 ms 12 0 ms Maximum 22 0 ms 22 0 ms 22 0 ms 22 0 ms Logical blocks 976 773 168 625 142 448 488 397 168 312 581 808 Disc rotational speed 7200 and 5400 rpm 7200 and 5400 rpm 7200 and 5400 RPM 7200 and 5400 rpm Operating temperature 5 C to 55 C 41 F to 131 F 1 GB 1 billion bytes when referring to hard driv...

Страница 82: ...VD R DVD R DL DVD RW DVD R DVD R DL DVD RW DVD RAM Ver 2 CD DA CD ROM mode 1 and mode 2 CD ROM XA mode 2 form 1 and form 2 Photo CD single and multiple sessions CD Extra CD R CD RW and CD TEXT DVD RAM Ver 2 DVD R DVD R CD R and CD ROM Access time BD DVD Random 230 ms 180 ms Cache buffer 4 5 MB Data transfer rate 2X BD RAM 9 MB sec 8X DVD 2 400 KB sec 16X CD R 2 400 KB sec 16X CD RW 2 400 KB sec ...

Страница 83: ... CD RW CD R CD RW DVD ROM DVD 5 DVD 9 DVD 10 DVD 18 DVD R DVD RW DVD R DVD RW and DVD RAM CD R CD RW DVD R DVD RW DVD R DVD RW and DVD RAM Access time CD DVD Random 175 ms 230 ms Cache buffer 2 5 MB Data transfer rate 24X CD ROM 3 600 KB sec 8X DVD 10 800 KB sec 24X CD R 3 600 KB sec 16X CD RW 2 400 KB sec 8x DVD R 10 800 KB sec 4X DVD RW 5 400 KB sec 8X DVD R 10 800 KB sec 4X DVD RW 5 400 KB sec ...

Страница 84: ... MODE CD CD I CD I Bridge Photo CD Video CD Multisession CD Photo CD CDEXTRA Portfolio CD R CD RW CDR CD RW DVD ROM DVD 5 DVD 9 DVD 10 DVD 18 DVD R DVD RW DVD R DVD RW DVD RAM CD R and CD RW Access time CD DVD Random 110 ms 130 ms Cache buffer 2 MB Data transfer rate 24X CD ROM 3 600 KB sec 8X DVD 10 800 KB sec 24X CD R 3 600 KB sec 24X CD RW 3 600 KB sec ...

Страница 85: ...roller DMA5 Not applicable DMA6 Not assigned DMA7 Not assigned ExpressCard controller can use DMA 1 2 or 5 Size Memory address System function 640 KB 00000000 0009FFFF Base memory 128 KB 000A0000 000BFFFF Video memory 64 KB 000C0000 000CFFFF Video BIOS 64 KB 000E8000 000FFFFF System BIOS 00100000 XFFFFFFF Extended memory based on memory installed X 1 0000000 FEDFFFFF PCI bus FED00000 FED003FF High...

Страница 86: ...ernet controller IRQ18 Intel ICH9 family USB universal host controller 2939 Intel ICH9 family USB universal host controller 2936 IRQ19 Intel ICH9 family USB2 enhanced controller 293C IRQ20 Intel ICH9 family USB2 enhanced controller 293A Intel ICH9 family USB universal host controller 2934 IRQ21 Intel ICH9M E M SATA AHCI controller IRQ22 Intel ICH9 family USB universal host controller 2935 Default ...

Страница 87: ...tural keyboard 061 Motherboard resources 062 Microsoft ACPI compliant embedded controller 063 Motherboard resources 064 Standard 101 102 key or Microsoft natural keyboard 065 Motherboard resources 066 Microsoft ACPI compliant embedded controller 067 Motherboard resources 070 Motherboard resources 071 077 System CMOS real time clock 080 Motherboard resources 081 091 Direct memory access controller ...

Страница 88: ...ly PCI express root port3 2944 7000 701F ICH9M E M SATA AHCI controller 7020 703F ICH9 family USB universal host controller 2936 7040 705F ICH9 family USB universal host controller 2935 7060 707F ICH9 family USB universal host controller 2934 7080 709F ICH9 family USB universal host controller 2939 70A0 70BF ICH9 family USB universal host controller 2938 70C0 70DF ICH9 family USB universal host co...

Страница 89: ...formation for the screws used in the computer The screws listed in this chapter are available in the Screw Kit spare part number 580698 001 Phillips PM2 0 3 0 screw Where used One screw that secures the LED module to the top cover Color Quantity Length Thread Head diameter Silver 1 3 0 mm 2 0 mm 5 0 mm ...

Страница 90: ...uide Screw listing Phillips PM2 0 3 0 broadhead screw Where used Four screws that secures the hinge covers to the back LCD cover Color Quantity Length Thread Head diameter Silver and Black 2 silver and 2 black 3 0 mm 2 0 mm 7 0 mm ...

Страница 91: ...Guide 7 3 Phillips PM2 0 4 0 screw Where used Two screws that secure the hard drive to the computer Where used Five screws that secure the heat sink to the system board Color Quantity Length Thread Head diameter Black 8 4 0 mm 2 0 mm 5 0 mm ...

Страница 92: ...7 4 Maintenance and Service Guide Screw listing Where used One screw that secures the Bluetooth module to the top cover ...

Страница 93: ...isting Maintenance and Service Guide 7 5 Phillips PM2 0 6 0 screw Where used Three screws that secure the speakers to the base enclosure Color Quantity Length Thread Head diameter Silver 3 6 0 mm 2 0 mm 5 0 mm ...

Страница 94: ...ew listing Phillips PM2 5 3 0 screw Where used Two screws that secure the WWAN module to the computer Where used Two screws that secure the WLAN module to the computer Color Quantity Length Thread Head diameter Black 6 3 0 mm 2 5 mm 5 0 mm ...

Страница 95: ...Screw listing Maintenance and Service Guide 7 7 Where used Two screws that secure the display panel to the display enclosure ...

Страница 96: ...sting Phillips PM2 5 4 0 screw Where used Two screws that secure the TouchPad to the top cover Where used Two screws that secure the display panel to the display enclosure Color Quantity Length Thread Head diameter Black 12 4 0 mm 2 5 mm 5 0 mm ...

Страница 97: ...Service Guide 7 9 Where used Two screws that secure the power LED to the base enclosure Where used One screw that secures the USB board to the base enclosure Where used Five screws that secure the system board to the base enclosure ...

Страница 98: ...rew listing Phillips PM2 5 5 0 screw Where used Six screws that secure the LCD panel to the computer Where used Two screws that secure the bezel to the display panel Color Quantity Length Thread Head diameter Black 10 5 0 mm 2 5 mm 5 0 mm ...

Страница 99: ...Screw listing Maintenance and Service Guide 7 1 1 Where used Two screws that secure the display panel to the display enclosure ...

Страница 100: ...intenance and Service Guide Screw listing Phillips PM2 5 6 0 screw Where used Two screws that secure the system fan to the base enclosure Color Quantity Length Thread Head diameter Black 2 6 0 mm 2 5 mm 5 0 mm ...

Страница 101: ...rtant system files Creating system restore points operating system feature System restore points allow you to reverse undesirable changes to your computer by restoring the computer to an earlier state Recovering a program or driver Recovery Manager software feature This feature helps you reinstall a program or driver without performing a full system recovery Performing a full system recovery Recov...

Страница 102: ...gh quality DVD R double layer DVD R DVD R double layer DVD R BD R writable Blu ray or CD R discs All these discs are purchased separately DVDs and BDs have a much higher capacity than CDs If you use CDs up to 20 discs may be required whereas only a few DVDs or BDs are required Read write discs such as CD RW DVD RW double layer DVD RW and BD RE rewritable Blu ray discs are not compatible with the R...

Страница 103: ... shot of your settings The screen shot can be a time saver if you have to reset your preferences To copy the screen and paste it into a word processing document follow these steps 1 Display the screen you want to save 2 Copy the screen image To copy only the active window press alt fn prt sc To copy the entire screen press fn prt sc 3 Open a word processing document and then select Edit Paste The ...

Страница 104: ...nning utilities or changing Windows settings Refer to Help and Support for more information Using system restore points When you back up your system you are creating a system restore point A system restore point allows you to save and name a snapshot of your hard drive at a specific point in time You can recover back to that point if you want to reverse subsequent changes made to your system Recov...

Страница 105: ... soon as you set up your computer Recovery Manager software allows you to repair or restore the system if you experience system failure or instability Recovery Manager works from recovery discs or from a dedicated recovery partition select models only on the hard drive However if your computer includes a solid state drive SSD you may not have a recovery partition If that is the case recovery discs...

Страница 106: ...m a recovery from the partition on the hard drive from either the Start button or f11 This restores the computer to its factory condition To restore the system from the partition follow these steps 1 Access Recovery Manager in either of the following ways Select Start All Programs Recovery Manager Recovery Manager or Turn on or restart the computer then press esc while the Press the ESC key for St...

Страница 107: ...nd Service Guide 9 1 9 Connector pin assignments Audio in microphone Audio out headphone Pin Signal 1 Audio signal in 2 Audio signal in 3 Ground Pin Signal 1 Audio out left channel 2 Audio out right channel 3 Ground ...

Страница 108: ...gnments External monitor Pin Signal 1 Red analog 2 Green analog 3 Blue analog 4 Not connected 5 Ground 6 Ground analog 7 Ground analog 8 Ground analog 9 5 VDC 10 Ground 11 Monitor detect 12 DDC 2B data 13 Horizontal sync 14 Vertical sync 15 DDC 2B clock ...

Страница 109: ...TMDS data 2 2 TMDS data 2 shield 3 TMDS data 2 4 TMDS data 1 5 TMDS data 1 shield 6 TMDS data 1 7 TMDS data 0 8 TMDS data 0 shield 9 TMDS data 0 10 TMDS clock 11 TMDS clock shield 12 TMDS clock 13 CEC 14 No connect 15 DDC clock 16 DDC data 17 Ground 18 5V power 19 Hot plug detect ...

Страница 110: ...nce and Service Guide Connector pin assignments RJ 45 network Universal Serial Bus Pin Signal 1 Transmit 2 Transmit 3 Receive 4 Unused 5 Unused 6 Receive 7 Unused 8 Unused Pin Signal 1 5 VDC 2 Data 3 Data 4 Ground ...

Страница 111: ...r all countries and regions The following requirements are applicable to all countries and regions The length of the power cord set must be at least 1 5 m 5 0 ft and no more than 2 0 m 6 5 ft All power cord sets must be approved by an acceptable accredited agency responsible for evaluation in the country or region where the power cord set will be used The power cord sets must have a minimum curren...

Страница 112: ...PT 3 or equivalent No 18 AWG 3 conductor The wall plug must be a two pole grounding type with a NEMA 5 15P 15 A 125 V or NEMA 6 15P 15 A 250 V configuration 3 The appliance coupler flexible cord and wall plug must bear a T mark and registration number in accordance with the Japanese Dentori Law The flexible cord must be Type VCT or VCTF 3 conductor 1 00 mm conductor size The wall plug must be a tw...

Страница 113: ...t When you remove these components handle them carefully Materials Disposal This HP product contains mercury in the backlight in the display assembly that might require special handling at end of life Disposal of mercury may be regulated because of environmental considerations For disposal or recycling information contact your local authorities or see the Electronic Industries Alliance EIA Web sit...

Страница 114: ...y assembly 1 Remove all screw covers 1 and screws 2 that secure the display bezel to the display assembly 2 Lift up and out on the left and right inside edges 1 and the top and bottom inside edges 2 of the display bezel until the bezel disengages from the display assembly 3 Remove the display bezel 3 ...

Страница 115: ...inverter 2 Some systems may not have a backlight assembly to remove 5 Remove all screws 1 that secure the display panel assembly to the display enclosure 6 Remove the display panel assembly 2 from the display enclosure 7 Turn the display panel assembly upside down 8 Remove all screws that secure the display panel frame to the display panel ...

Страница 116: ...nel frame 10 Remove the display panel frame 2 from the display panel 11 Remove the screws 1 that secure the backlight cover to the display panel 12 Lift the top edge of the backlight cover 2 and swing it outward 13 Remove the backlight cover 14 Turn the display panel right side up 15 Remove the backlight cables 1 from the clip 2 in the display panel ...

Страница 117: ...ide down 17 Remove the backlight frame from the display panel ÅWARNING The backlight contains mercury Exercise caution when removing and handling the backlight to avoid damaging this component and causing exposure to the mercury 18 Remove the backlight from the backlight frame ...

Страница 118: ...om the LCD panel 20 Remove the screws 2 that secure the LCD panel to the display rear panel 21 Release the LCD panel 3 from the display rear panel 22 Release the tape 4 that secures the LCD panel to the display rear panel 23 Remove the LCD panel 24 Recycle the LCD panel and backlight ...

Страница 119: ...ons TouchPad 2 1 wireless 2 5 C cable kit spare part numbers 3 6 cables service considerations 4 1 caps lock light 2 2 chipset product description 1 2 components bottom 2 7 buttons 2 9 display 2 1 fingerprint reader 2 9 front 2 4 left side 2 6 lights 2 2 pointing device 2 1 right side 2 5 top 2 9 computer feet locations 4 6 spare part number 4 6 Computer Setup accessing 5 1 Diagnostics menu 5 5 na...

Страница 120: ...thernet product description 1 4 external media card product description 1 5 external monitor port connector pinout 9 2 location 2 6 F fan removal 4 31 spare part number 4 31 feet locations 4 6 spare part number 4 6 fn key 2 3 front components 2 4 G graphics product description 1 2 grounding equipment and methods 4 2 H hard drive precautions 4 2 product description 1 3 removal 4 9 spare part number...

Страница 121: ...ight 2 2 numeric keypad keys 2 3 O operating system product description 1 6 optical drive precautions 4 2 product description 1 3 specifications 6 4 6 5 6 6 P packing guidelines 4 3 passwords 5 4 plastic parts 4 1 pointing device components 2 1 illustrated 2 1 product description 1 5 ports display 2 6 product description 1 5 USB 2 5 2 6 power cable removal 4 35 spare part numbers 3 6 power connect...

Страница 122: ...ard drive 6 3 optical drive 6 4 6 5 6 6 system DMA 6 7 system I O address 6 9 system interrupt 6 8 system memory map 6 7 system board removal 4 33 spare part numbers 4 33 System Configuration menu 5 5 system DMA specifications 6 7 system I O address specifications 6 9 system interrupt specifications 6 8 system memory map specifications 6 7 system recovery 8 1 T tools required 4 1 top components 2 ...

Отзывы: