background image

2

5

• Take care to ensure that nothing is restricting or 

coming into contact with the lens as it extends. Holding 

the lens with your hand so it cannot extend creates the 

risk of malfunction.

• Pressing [ ] (PLAY) while in the REC mode switches 

to the PLAY mode. The lens retracts about 10 seconds after switching modes.

• The LCD Save and Power Saving (pages 9

2

) will turn off power automatically if you 

do not perform any operation for a preset amount of time.

Press [ON/OFF] (Power).

• You can configure the camera so power does not turn on when you press [

(REC) or [ ] (PLAY). You also can configure the camera to turn off when you 

press [

] (REC) or [ ] (PLAY) (page 9

3

).

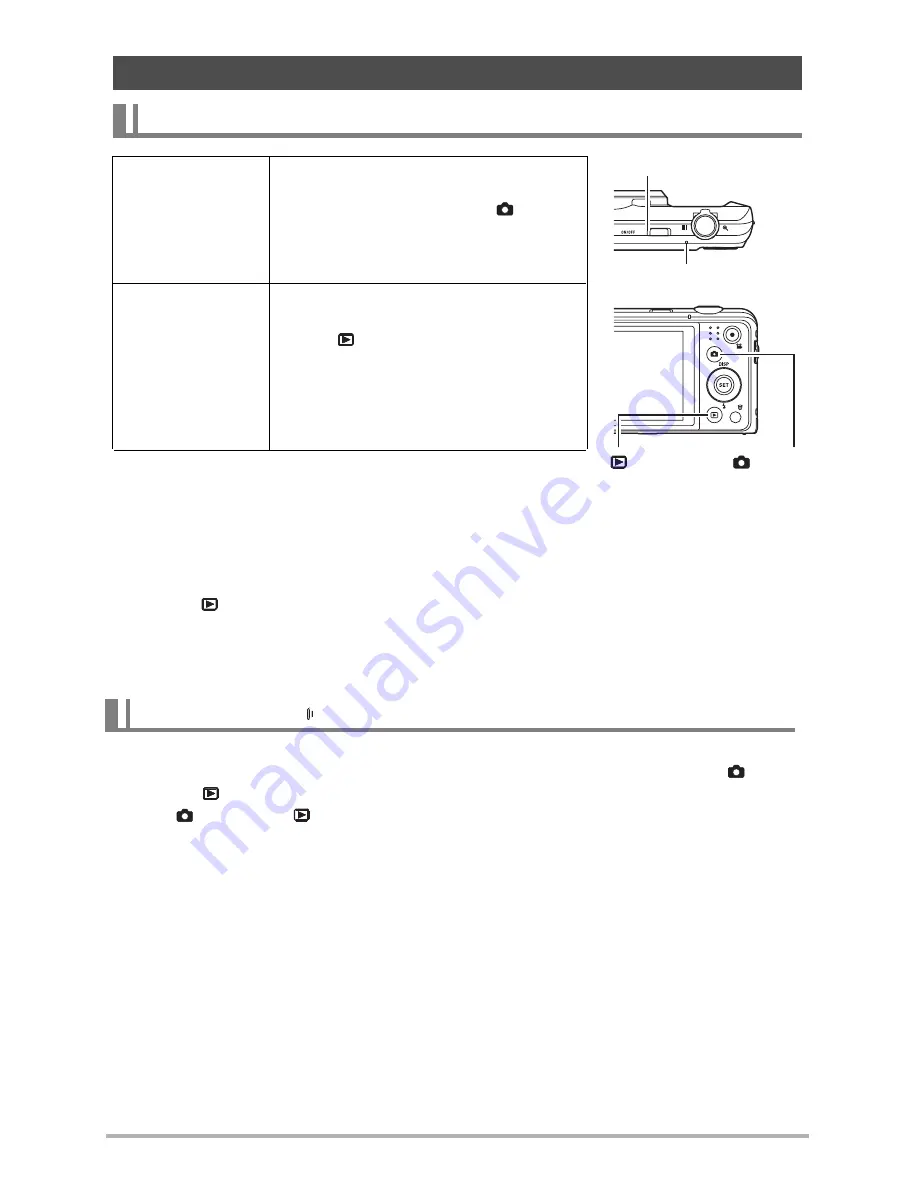
Power

ing the Camera On and Off

To turn power on

To turn on power 

and enter the 

REC mode

This feature is not enabled by default.  

Refer to page 9

3

 for details.

Press [ON/OFF] (Power) or 

[

]

 (REC).

• The back lamp will light green 

momentarily and the lens will 

extend out of the camera (page 2

7

).

To turn on power 

and enter the 

PLAY mode

This feature is not enabled by default.  

Refer to page 9

3

 for details. 

Press [ ] (PLAY).

• The back lamp will light green 

momentarily and a

 photo or video


currently 

stored in camera memory 

will 

appear on the monitor screen 

(page 

2

9

).

To 

power

 off the camera

[ON/OFF] (Power)

Back lamp

[ ] (PLAY)

[

] (REC)

Содержание p550

Страница 1: ...p550 Digital Camera User Manual ...

Страница 2: ...or editorial errors or omissions contained herein LCD Panel The liquid crystal panel of the monitor screen uses high precision technology that provides a pixel yield in excess of 99 99 This means that some very small number of pixels may not light or may remain lit at all times This is due to the characteristics of the liquid crystal panel and does not indicate malfunction Take a few test shots Be...

Страница 3: ... by one or more of the following measures Reorient or relocate the receiving antenna Increase the distance between the equipment and the receiver Connect the equipment to an outlet on a circuit different from that to which the receiver is connected Consult the dealer or an experienced radio TV technician for help Declaration of Conformity This device complies with Part 15 of the FCC rules Operatio...

Страница 4: ...g again Battery contacts may be dirty Wipe them with a dry cloth Try connecting to a different computer USB port Depending on the setup of your computer you may not be able to charge the camera s battery over a USB connection 1 Open the battery cover and remove the current battery With the monitor screen side of the camera facing upwards slide the stopper in the direction indicated by the arrow in...

Страница 5: ...gh pressure generating device etc Should you ever notice leakage strange odor heat generation discoloration deformation or any other abnormal condition while using charging or storing a battery immediately remove it from the camera and keep it away from open flame Do not use or leave the battery under direct sunlight in an automobile parked in the sun or in any other area subject to high temperatu...

Страница 6: ...d Off 25 To turn power on 25 To turn off the camera 25 Holding the Camera Correctly 26 To shoot a photo 27 Viewing Photos 29 Deleting Photos and Videos 30 To delete a single file 30 To delete specific files 31 To delete all files 31 Photo Shooting Precautions 32 Auto Focus Restrictions 32 Photograph Tutorial 33 Using the Control Panel 33 Changing the Photo Size Size 34 Using Flash Flash 37 Using t...

Страница 7: ...g Photo Image Quality Quality Snapshot 61 Correcting Photo Brightness EVCompensation 61 Controlling White Balance WhiteBalance 62 Specifying ISO Sensitivity ISO 63 Optimizing Photo Brightness D Lighting 63 Using Built in Color Mode ColorMode 63 Viewing Photos and Videos 64 Viewing Photos 64 Viewing a Video 64 Zooming an On screen Image 65 Displaying the photo Menu 65 Other Playback Functions PLAY ...

Страница 8: ...onfiguring World Time Settings World Time 89 Time Stamping Snapshots DateStamp 90 Setting the Camera s Clock Adjust 90 Specifying the Date Format 91 Specifying the Display Language Language 91 Configuring Sleep State Settings LCDSave 92 Configuring Auto Power Settings PowerSaving 92 Configuring and Settings REC PLAY 93 Disabling File Deletion Disable 93 Configuring USB Protocol Settings USB 94 Sel...

Страница 9: ...camera check to make sure that all items shown below are included If anything is missing contact your original retailer Unpacking Digital camera Rechargeable lithium ion battery USB adapter Strap USB cable Quick Start Guide ...

Страница 10: ...ront lamp page 39 6 Lens 7 Microphone pages 47 72 8 REC button pages 25 27 9 Back lamp pages 16 18 25 37 10 Video button page 46 11Strap hole 12 USB AV port 13Connector cover 14 SET button page 33 15 Delete button page30 16 PLAY button pages 25 29 17Control button pages12 30 33 37 52 18Monitor screen pages10 12 Back 19Battery memory card slots pages 15 23 104 107 20Tripod hole Use this hole when a...

Страница 11: ...city page 46 3 Recording mode page 27 4 White balance setting page62 5 Burst page 57 6 Image deterioration indicator page 45 7 Photo image size page 34 8 Photo image quality page 61 9 Video image quality page 36 10Flash page 37 11Self timer page 39 12Face Tracking page 40 13D Lighting page 63 14ISO sensitivity page 63 15Date time page 91 16EV Compensation page 61 17Focus frame pages 28 58 18Date S...

Страница 12: ...11 Video image quality page 36 1 Recording mode page 46 2 Remaining video memory capacity page 46 3 Video recording time page 46 4 EV value page 61 5 Battery level indicator page 20 6 Video recording indicator page 46 1 File type 2 Protect indicator page 72 3 Folder name file name page 86 4 Photo image quality page 61 5 Photo image size page 34 6 ISO sensitivity page 63 7 Aperture value 8 Shutter ...

Страница 13: ...ty page 36 5 Date time page 90 6 Battery level indicator page 20 Configuring Monitor Screen Settings Information display on Displays information about photo settings etc REC mode only Information display Date Time on In addition to information about photo settings displays video setting information and the date time screen You can specify the date format you want to use page 91 Information display...

Страница 14: ... digital camera stores photos on a memory card so you can record and delete photots a countless number of times Play Record You can use the photos you record in a variety of different ways Store photos on your computer Print photos Attach photots to e mail ...

Страница 15: ...ra sets up automatically Then all you need to do is press the shutter button for great photos Silent The Silent mode disables flash mutes camera operation tones and changes other settings to help ensure that operation does not bother others around you See page 41 for more information See page 50 for more information See page 40 for more information Face Tracking Point the camera at a person and it...

Страница 16: ... battery cover Slide the battery cover slider towards OPEN and then open it as indicated by the arrows in the illustration 2 Load the battery Insert the battery into the compartment with the terminal facing inside the camera with correct orientation as shown Press the battery in until the stopper secures it in place 3 Close the battery cover Close the battery cover and then shift the slider toward...

Страница 17: ...t the camera with the USB cable as shown 3 Connect the other end with the USB adapter and plug it into a power outlet or with the USB port of PC directly for charging Back Lamp Operation 4 After charging is complete disconnect the USB cable from the camera and then unplug the power cord from the power outlet Charge the Battery Lamp Status Description Lit Red Charging Flashing Red Abnormal ambient ...

Страница 18: ...y over a USB connection If this happens use of the USB adapter that comes with the camera is recommended 1 Power off the camera Check to make sure that the camera s monitor screen is blank If it isn t press ON OFF Power to turn off the camera IMPORTANT The first time you connect the camera to your computer with the USB cable an error message may appear on your computer If this happens disconnect a...

Страница 19: ...ons Back Lamp Operation 3 After charging is complete disconnect the USB cable from the camera and then from the computer Lamp Status Description Lit Red Charging Flashing Red Abnormal ambient temperature charging taking abnormally long or battery problem page 3 Off Charging complete USB port USB cable included with camera USB AV port Large connector Small connector Making sure that the mark on the...

Страница 20: ...ice Attempting to use a different charger can result in unexpected accident A battery that is still warm due to normal use may not charge fully Give the battery time to cool before charging it A battery discharges slightly even when it is not loaded in the camera Because of this it is recommended that you charge the battery immediately before you need to use it Charging the camera s battery may ca...

Страница 21: ... the camera for about 30 days with no power supplied while the battery is dead will cause its date and time settings to be cleared A message telling you to configure time and date settings will appear the next time you power on the camera after restoring power When this happens configure date and time settings page 90 Battery Power Conservation Tips When you do not need to use the flash select For...

Страница 22: ...ON OFF Power to turn on the camera 2 Use and to select the language you want and then press SET 3 Use and to select a date format and then press SET Example July 10 2012 YY MM DD 12 7 10 DD MM YY 10 7 12 MM DD YY 7 10 12 4 Set the date and the time Use and to select the setting you want to change and then use and to change it To switch between 12 hour and 24 hour format press Video 5 After setting...

Страница 23: ...y card is loaded are saved to the memory card When no memory card is loaded they are saved to built in memory SD Memory Card Up to 2GB SDHC Memory Card 2GB to up 32GB SDXC Memory Card 32GB up to 2TB Use one of the above types of memory card The above are supported memory card types as of August 2012 Noted memory card capacities are standard values Use only SD cards that are compliant with the SD C...

Страница 24: ...rd slot all the way in until you hear it click securely into place 3 Close the battery cover Close the battery cover and then shift the slider towards LOCK For information about how to replace the memory card see page 101 IMPORTANT Never insert anything besides asupported memory card page 22 into the memory card slot Should water or any foreign object ever get into the card slot immediately power ...

Страница 25: ...y has photos or other files on it will delete its contents and cannot be retrieved Normally you do not need to format a memory card again However if storing to a card has slowed down or if you notice any other abnormality re format the card Be sure to use the camera to format a memory card Formatting a memory card on a computer and then using it in the camera can slow down data processing by the c...

Страница 26: ... turn on when you press REC or PLAY You also can configure the camera to turn off when you press REC or PLAY page 93 Powering the Camera On and Off To turn power on To turn on power and enter the REC mode This feature is not enabled by default Refer to page 93 for details Press ON OFF Power or REC The back lamp will light green momentarily and the lens will extend out of the camera page 27 To turn...

Страница 27: ...n the shutter speed NOTE Take care that your fingers and the strap do not cover any of the areas indicated in the illustration To protect against accidentally dropping the camera attach the wrist strap and make sure it is around your fingers or wrist while you are operating the camera Never swing the camera around by its strap The supplied strap is intended for use with this camera only Never use ...

Страница 28: ...C mode Make sure is on the display If it isn t see page 50 2 Point the camera at the subject You can zoom the photo if you want To shoot a photo Monitor screen Shutter button REC Remaining Photo Memory Capacity Snapshot mode icon Wide Angle Telephoto Zoom controller ...

Страница 29: ...the focus frame in the center of the screen To track the movement of a moving subject Half press the shutter button to follow and focus automatically on a moving subject See Tracking page 58 for more information When you half press the shutter button the camera automatically adjusts exposure and focuses on the subject it is currently pointed at Mastering how much pressure is required for a half pr...

Страница 30: ...an clear the information to view only the photo page 12 You can zoom in on the photo by sliding the zoom controller towards page 65 If you are taking a photo that is very important to you it is recommended that you zoom the photo and check its details after recording it 2 Use and to scroll between images Holding down either button scrolls at high speed NOTE Half pressing the shutter button while i...

Страница 31: ...nd the audio file You cannot delete files while video or audio recording is in progress The delete menu will not appear if you press Delete while On is selected for the camera s Disable setting page 93 You can delete files only while Off is selected for Disable 1 Press Delete 2 Use and to scroll through the files until the one you want to delete is displayed 3 Use and to select Delete and then pre...

Страница 32: ...e 4 Repeat step 3 to select other files if you want After you are finished selecting files press Delete 5 Use and to select Yes and then press SET This deletes the files you selected To exit the delete operation press Delete 1 Press Delete 2 Use and to select Delete All Files and then press SET 3 Use and to select Yes and then press SET to delete all files This will cause the message There are no ...

Страница 33: ...ion The actual photo will be recorded at the quality set for the image quality setting page 61 Shooting Indoors under Fluorescent Lighting Minute flickering of fluorescent lighting can affect the brightness or color of an photo Any of the following can make proper focus impossible Solid color wall or other very low contrast subject Strongly back lit subject Very shiny subject Blinds or other subje...

Страница 34: ...d 3 5 After all of the settings are the way you want press SET This will apply the settings and return to the REC mode If you selected MENU the REC menu will appear If you selected SCN the Scene Mode scene menu will appear You can close the Control Panel by pressing Disable Using the Control Panel Control Panel Available settings 1 9 5 3 4 7 8 2 6 SET 1 Photo image size quality pages 34 61 2 Video...

Страница 35: ...ls A digital camera photo is a collection of small dots called pixels The more pixels there are in a photo the more detail there will be However you generally can do with fewer pixels when printing an image L size through a print service attaching a photo to e mail when viewing the photo on a computer etc About photo sizes The size of a photo indicates how many pixels it contains and is expressed ...

Страница 36: ... print large size prints such as A3 size Small Number of Pixels Less detail but takes up less memory Best when you want to send photos by e mail etc Image Size Pixels Suggested Print Size and Application Description 16M 4608x3456 Poster Print Good detail for better clarity even for photos cropped page 71 from the original 3 2 4608x3072 Poster Print 16 9 4608x2592 HDTV 10M 3648x2736 A3 Print Good d...

Страница 37: ...idelines only 200 dpi print resolution Specifying Video Image Quality Video quality is a standard that determines the detail smoothness and clarity of a video during playback Shooting with the high quality 1280 setting will result in better quality but it also shortens the amount of time you can shoot 1 In the REC mode press SET 2 Use and to select the second Control Panel option from the top Vide...

Страница 38: ...nd brightness conditions Forced Off Flash does not fire Forced On Flash always fires This setting can be used to brighten a subject that normally comes out dark due to daylight or backlight daylight synchro flash Red Eye Reduction Flash fires automatically This type of flash can be used to reduce the chance of redness in the subject s eyes Flash Back lamp Flashes orange while the flash is charging...

Страница 39: ...mage colors Select Forced Off for the flash setting when shooting in areas where flash photograph is prohibited Red eye Reduction Using the flash to shoot at night or in a dimly lit room can cause red spots inside the eyes of people who are in the photo This is caused when the light from the flash reflects off of the retina of the eye When red eye reduction is selected as the flash mode the camera...

Страница 40: ...timer cannot be used together with the following features Movie Simple Mode some Scene Mode scenes Using the Self timer Self timer Self timer 10 sec Self timer 10 seconds Self timer 2 sec Self timer 2 seconds When shooting under conditions that slow down the shutter speed you can use this setting to prevent image blur due to camera movement Self timer x3 Shoots three photos one photo 10 seconds af...

Страница 41: ...MPORTANT The camera performs center focus if it cannot detect a face The only focus mode available while face tracking is enabled is Auto Focus AF Face Tracking may take a bit longer when you hold the camera sideways Detection of the following types of faces is not supported Face that is obstructed by hair sunglasses a hat etc or a face in dark shade A profile or a face that is at an angle A face ...

Страница 42: ... Flash and Self timer are not included in the control panel This means that these settings cannot be changed from the Control Panel See the following for details Flash page 37 Self timer page 39 Sounds page 87 Entering the Silent mode in the REC mode will also enter the Silent mode in the PLAY mode automatically page 69 The Simple mode eliminates troublesome setups and simplifies taking photos Thi...

Страница 43: ...Simple Mode There is also a MENU option which you can select to display a menu screen for configuring image quality page 61 and Setup tab page 87 settings In the Simple mode the Quality tab can be used to configure the Video Quality and D Lighting settings only The settings of menu options that appear on the normal REC menu but not on the Simple mode REC menu are automatically fixed at their optim...

Страница 44: ...pply your setting s and display the Simple Mode viewfinder screen indicating the camera is ready to shoot If you selected MENU in step 2 pressing SET will display the REC menu See Advanced Settings page 52 for details about configuring its settings Pressing Delete will exit the Control Panel Setting Available Options Photo Size Flash Auto On Off Self timer Self timer 10 sec Simple Mode MENU Qualit...

Страница 45: ...oot the photo IMPORTANT Digital zoom is disabled while date stamp page 90 is turned on NOTE The higher the digital zoom factor the coarser the photo Note that the camera also has a function that lets you record using digital zoom without image deterioration page 45 Use of a tripod is recommended to protect against image blur due to camera movement when shooting with telephoto Performing a zoom ope...

Страница 46: ...s a deterioration of photo quality some digital zoom without photo deterioration is possible with image sizes of 10M and smaller The range in which you can use digital zoom without photo deterioration is indicated on the display The deterioration point depends on the photo size Optical Zoom and Digital Zoom Switch Point Zoom bar Focusing range Displayed for Auto Focus Macro Focus and Manual Focus ...

Страница 47: ...if memory becomes full before you press Video The maximum allowed for a single movie recording is 4 GB in file size or 29 minutes in length Video recording stops automatically when either of these limits is reached Shooting with Scene Mode With Scene Mode page 50 you can select the sample scene that matches the type of video you are trying to shoot and the camera will change its setup accordingly ...

Страница 48: ...o Shooting a very bright subject can cause a vertical band or a pink cast on the monitor screen image This does not indicate malfunction When using the camera s built in memory or certain types of memory cards it can take too much time to record data which can result in breaks in the image and or audio This condition is indicated by and flashing on the monitor screen To avoid loss of movie frames ...

Страница 49: ...nsert a marker into the recording During playback you will be able to jump to the markers in the recording 5 Press the shutter button again to stop audio recording To create another audio recording file repeat steps 4 and 5 To turn off Voice REC press SET use and to select the bottom Control Panel option SCN and then select Auto NOTE You can use DISP during audio recording to toggle the monitor sc...

Страница 50: ...item from the top Playback Start and pressing SET page 66 Voice REC Playback Controls NOTE See page 30 for information about deleting a voice recording file To play back an audio recording Fast forward fast reverse Play pause SET Jump to marker While playback is paused press or to jump to the next marker and then press SET to resume playback Volume adjustment Press and then press Monitor screen on...

Страница 51: ...Use and to select the bottom Control Panel option SCN and then press SET page 33 This will display a menu of Scene Mode scenes The initial default selection is Auto 3 Use and to move the boundary to the scene you want to select The scene menu has multiple pages Use and to scroll between menu pages You can access information about the currently selected scene See page 51 for details To return to no...

Страница 52: ...lly performs a digital noise reduction process when either of these scenes is selected This means that it will take a bit longer for the photo to be saved which is indicated by the back lamp flashing green Do not perform any key operation during that time Also it is a good idea to use a tripod to avoid image blur due to camera movement when shooting at slow shutter speeds High Sensitivity The high...

Страница 53: ...screen 3 Use and to select the tab where the menu item you want to configure is located 4 Use and to select the menu item you want and then press 5 Use and to change the setting of the selected menu item 6 After the setting is the way you want press SET to apply the setting and return to the viewfinder screen Pressing instead of SET applies the selected setting and returns to the menu item selecti...

Страница 54: ...are not available while the camera is in the Silent mode page 41 REC Menu Operations in This Manual REC menu operations are represented in this manual as shown below The following operation is the same one described under Example REC Menu Screen Operation on page 52 Procedure REC SET MENU Quality Tab Quality Use and to select the Quality tab Use and to select Quality and then press Press SET Press...

Страница 55: ... you slide the zoom controller REC Mode Settings REC Selecting a Focus Mode Focus Settings Type of Shot Focus Mode Approximate Focus Range 1 Photo Videos Photo Videos Auto Focus General recording Automatic Automatic Approximately 5 cm to infinity 2 0 to Wide Angle Macro Close ups Automatic Approximately 1 cm to 50 cm 0 39 to 19 7 Fifth step zoom from the Widest Angle setting Super Macro Close ups ...

Страница 56: ...acking page 40 Use of the flash together with Macro Focus can cause the light of the flash to become blocked which may result in unwanted lens shadows in your image Whenever you perform an optical zoom operation while shooting with Auto Focus Macro Focus or Manual Focus a value will appear on the monitor screen to tell you the focus range as shown below Example X cm to X is the actual focusing ran...

Страница 57: ...exposure AE Procedure REC SET MENU REC Tab Focus Frame You can use this procedure to select from among five different shapes including a heart shape for the focus frame NOTE Half pressing the shutter button will cause the focus frame to change one of the shapes shown below When shooting with face tracking or the Simple mode the frame shape is Changing the Focus Frame Shape Focus Frame Settings Foc...

Страница 58: ...age When shooting to built in memory burst shooting is relatively slow You cannot use the self timer in combination with Burst Procedure REC SET MENU REC Tab Stabilizer You can turn on the camera s Stabilizer feature to reduce image blur due to subject movement or camera movement when shooting a moving subject using telephoto when shooting a fast moving subject or when shooting under dim lighting ...

Страница 59: ... is mounted on a tripod Turn off Stabilizer Procedure REC SET MENU REC Tab AF Area IMPORTANT Selecting Tracking can cause vibration and noise to occur due to lens operation while tracking a subject This does not indicate malfunction Specifying the Auto Focus Area AF Area Spot This mode takes readings of a small area in the center of the image This setting works well with focus lock page 55 Multi W...

Страница 60: ...description will appear on the display for certain icons when you switch between REC functions Functions Supported by Icon Help REC Mode Flash Metering Mode White Balance Self timer EV Compensation Assigning Functions to the and Keys L R Key Setting key operation EV Compensation Adjusts the EV Compensation value page 61 White Balance Changes the white balance setting page 62 ISO Changes the ISO Se...

Страница 61: ...n back on while the Scene Mode memory item is enabled all of the other memory items except for zoom position are initialized to the currently selected Scene Mode sample scene setup regardless of the enabled disabled status of the other memory items Configuring Power On Default Settings Memory Setting Disabled Initial Default Setting Enabled Scene Mode Photo Auto Setting at power off Flash Auto Foc...

Страница 62: ... SET This applies the exposure compensation value The exposure compensation value you set remains in effect until you change it or turn off the camera which causes it to revert to 0 0 NOTE When shooting under very dark or very bright conditions you may not be able to obtain satisfactory results even after performing exposure compensation Photo Quality Settings Quality Specifying Snapshot Photo Qua...

Страница 63: ...s Daylight Overcast etc Controlling White Balance White Balance Auto Configures the camera to adjust white balance automatically Daylight For shooting outdoors on a clear day Overcast For shooting outdoors on an overcast rainy day in the shade etc Shade For shooting on a clear day in the shade of trees or buildings Fluorescent_1 For shooting under white or day white fluorescent lighting Fluorescen...

Страница 64: ...lity Tab Color Mode Settings Off B W Sepia Red Green Blue Yellow Pink and Purple Specifying ISO Sensitivity ISO Auto Adjusts sensitivity automatically according to conditions ISO 64 Lower sensitivity Higher sensitivity Slow shutter speed Fast shutter speed Set for shooting in dimly lit areas Less noise Some coarseness increased digital noise ISO 100 ISO 200 ISO 400 ISO 800 ISO 1600 Optimizing Phot...

Страница 65: ...increases the speed of the fast forward or fast reverse operation To return to normal playback speed press SET Play pause SET 1 frame forward back Holding down either button scrolls continuously Volume adjustment Press and then press Volume can be adjusted only while movie playback is in progress Information display on off DISP Zoom Slide the zoom controller in the direction of You can use and to ...

Страница 66: ...age zoom factor is 8X certain photo sizes may not allow zooming up to the full 8X Pressing SET will lock the current zoom factor for the on screen image You can then use and to scroll between photos using the same zoom factor Pressing SET again will unlock the zoom factor and allow you to use and to move around the currently displayed photos 1 In the PLAY mode slide the zoom controller towards Use...

Страница 67: ...can perform for each of the PLAY Panel items Using the PLAY Panel Exit Exits the PLAY Panel Playback Start The operation that is performed when this item is selected depends on the type of file that is currently displayed on the monitor screen Video Starts video playback page 64 Voice REC Starts voice recording playback page 49 Audio snapshot Starts audio playback page 72 Slideshow Displays a slid...

Страница 68: ...to select the menu item you want and then press 3 Use and to change the setting of the selected menu item 4 Press SET to apply the setting NOTE Pressing Delete performs one of the following operations If you previously selected a tab pressing Delete returns to the viewfinder screen If you previously selected menu item pressing Delete returns to the tab Selected menu item Tabs Procedure PLAY SET ME...

Страница 69: ... a Slideshow on the Camera Slideshow Start Starts the slideshow Time Time from the start to the end of the slideshow 1 to 5 minutes 10 minutes 15 minutes 30 minutes 60 minutes Interval Amount of time each image remains displayed Use and to select a value from 1 to 30 seconds or MAX If you specify a value from 1 to 30 seconds images change at the specified interval but the audio portion of movies a...

Страница 70: ...ff in the Silent mode Procedure PLAY Photo Screen SET MENU PLAY Tab Rotate 1 Use and to select Rotate and then press SET Each press of SET will rotate the displayed image 90 degrees left 2 When the displayed photo is at the orientation you want press Delete NOTE Note that this procedure does not actually change the photo data It simply alters how the photo is displayed on the camera s monitor scre...

Страница 71: ...ecific files 1 Use and to scroll through the files until the one you want to protect is displayed 2 Use and to select On and then press SET An image that is protected is indicated by the icon 3 To protect other files repeat steps 1 and 2 To exit the protect operation press Delete To unprotect a file select Off instead of On in step 2 above All Files On Protects all files 1 Use and to select All Fi...

Страница 72: ...riginal photo Procedure PLAY Photo Screen SET MENU PLAY Tab Trimming You can crop a photo to trim parts you do not need and save the result in a separate file The original photo is also retained Use the zoom controller to zoom the photo to the size you want use and to display the portion of the photo you want to cut out and then press SET The image produced by cropping a 3 2 or 16 9 image will hav...

Страница 73: ...udio perform the following operation Voice Memo Delete SET Delete IMPORTANT Note that you cannot restore the original audio of an Audio Snapshot after you delete or re record it 1 In the PLAY mode use and to scroll through the photos until the Audio Photos you want is displayed An audio photo is one that has a icon 2 Press Video to start playback Adding Audio to a Photo Voice Memo You can add audi...

Страница 74: ...me adjustment Press and then press Display content switching DISP Stop playback Movie Copying Files Copy Copy to Card Copies all files from built in camera memory to a memory card This option copies all the files in built in camera memory It cannot be used to copy a single file Copy to Camera Copies a single file on the memory card to built in camera memory Files are copied to the folder in built ...

Страница 75: ...m printed Printing on a Home Printer Printing photos on a Printer with Memory Card Slot You can use a printer equipped with a memory card slot to print photos directly from a memory card For details see the user documentation that comes with your printer Connecting Directly to a PictBridge Compatible Printer You can print on a printer that supports PictBridge page 75 Printing with a Computer After...

Страница 76: ...r s USB port Make sure that you insert the cable connector into the USB AV port until you feel it click securely into place Failure to insert the connector fully can result in poor communication or malfunction Note that even while the connector is fully inserted you still will be able to see the metal part of the connector as shown in the illustration When connecting the USB cable to a USB port ma...

Страница 77: ...n the monitor screen 6 Use and to select Print and then press SET Printing will start and the message Busy Please wait will appear on the monitor screen The message will disappear after a short while even though printing is still being performed Pressing any camera button will cause the printing status to re appear The print menu screen will re appear when printing is complete If you selected Sing...

Страница 78: ...copies You can specify a value up to 99 Specify 00 if you do not want to print the photo If you want to include the date in the photos press Video so On is shown for date stamp Repeat steps 1 and 2 to configure settings for other photos if you want 3 Press SET Configuring the Same DPOF Settings for All the Photos Procedure PLAY Photo Screen SET MENU PLAY Tab DPOF All images 1 Use and to specify th...

Страница 79: ... to enhance printed image quality Contact your printer manufacturer for information about models that support Exif Print printer upgrades etc Configuring camera settings Configure DPOF settings page 77 You can turn date stamp on and off each time you print You can configure settings so some images include the date stamp and some don t Configure the Camera s Time Stamp setting page 90 The camera s ...

Страница 80: ...lication for details Precautions for Windows Users The bundled software requires Administrator privileges to run Operation on a self made computer is not supported Operation may not be possible under certain computer environments Things you can do using a computer Save photos to a computer and view them there Save photos and view them manually USB connection pages 80 Transfer photos stored on your...

Страница 81: ...g the camera to a computer with a USB cable starts charging of the camera s battery page 17 Make sure that you insert the cable connector into the USB AV port until you feel it click securely into place Failure to insert the connector fully can result in poor communication or malfunction Note that even while the connector is fully inserted you still will be able to see the metal part of the connec...

Страница 82: ...hen My Documents If you already have a DCIM folder in Documents Windows 7 Windows Vista or My Documents Windows XP the next step will overwrite it If you want to keep the existing DCIM folder you need to change its name or move it to a different location before performing the next step 11 Windows 7 users On the Documents Organize menu select Paste Windows Vista users On the Documents Edit menu sel...

Страница 83: ...y to play back videos recorded with this camera on a computer The above are recommended system environments Configuring one of these environments does not guarantee proper operation Certain settings and other installed software may interfere with proper playback of movies Never use your computer to modify delete move or rename any photo or video files that are in the camera s built in memory or on...

Страница 84: ...the Set Up tab select USB and then press 3 Use and to select Mass Storage and then press SET 4 Turn off the camera and then use the USB cable that comes with the camera to connect it to your Macintosh Connecting the camera to a computer with a USB cable starts charging of the camera s battery page 17 Make sure that you insert the cable connector into the USB AV port until you feel it click securel...

Страница 85: ...era After making sure that the green back lamp is unlit disconnect the camera from the computer To view copied photos 1 Double click the camera s drive icon 2 Double click the DCIM folder to open it 3 Double click the folder that contains the photos you want to view 4 Double click the file you want to view A photo that was rotated on the camera will be displayed on your Macintosh screen in its ori...

Страница 86: ...roper playback of videos Movie Playback Precautions Proper video playback may not be possible on some Macintosh models If you experience problems try the following Change the movie image quality setting to 640 Upgrade to the latest version of QuickTime Shut down other applications that are running Even if proper playback is not possible on your Macintosh you can use the AV cable that comes bundled...

Страница 87: ...eep track of multiple DCIM copies of the DCIM folders it to change its name to a date or something similar after you copy it to your computer If you later decided to return the folder to the camera however be sure to change its name back to DCIM The camera is designed to recognize only a root file with the name DCIM Note the camera also will not be able to recognize the folders inside the DCIM fol...

Страница 88: ...es output See the following for more information REC Menu page 49 PLAY Menu page 65 Configuring Camera Sound Settings Sounds Startup Sound 1 Sound 2 Sound 3 Off Half Shutter On Off Shutter Beep Beep Specifies the sound volume This setting is also used as the audio level during video output Playback Specifies the volume of video and Audio Photo audio output This volume setting is not used during vi...

Страница 89: ...a Startup Image Specifying the File Name Serial Number Generation Rule File Numbering Continue Tells the camera to remember the last used file number A new file will be named using the next sequential number even if files are deleted or if a blank memory card is loaded If a memory card is loaded and that card already has files stored on it and the largest sequential number in the existing file nam...

Страница 90: ...To change the Destination setting to summer time use and to select DST and then select On Summer time is used in some geographical areas to advance the current time setting by one hour during the summer months 3 Use and to select the geographic area you want and then press SET 4 Use and to select the city you want and then press SET 5 Press SET IMPORTANT Before configuring World Time settings make...

Страница 91: ...sabled when certain Scene Mode scenes are being used Procedure SET MENU Set Up Tab Adjust When the date and time settings are what you want press SET to apply them You can specify a date from 2001 to 2049 Be sure to select your Home City page 89 before setting the time and date If you set the time and date while the wrong city is selected for your Home City the times and dates of all of the World ...

Страница 92: ...et Up Tab Language Specify the display language you want 1 Select the tab on the right 2 Select Language 3 Select the language you want Camera models sold in certain geographic areas may not support display language selection Specifying the Date Format YY MM DD 12 7 10 DD MM YY 10 7 12 MM DD YY 7 10 12 Specifying the Display Language Language 1 2 3 ...

Страница 93: ...ck or recording During video recording and playback When both LCD Save and Power Saving are turned on Power Saving takes priority Procedure SET MENU Set Up Tab Power Saving Power Saving turns off the camera whenever no camera operation is performed for a preset amount of time Trigger Time Settings 1 min 2 min 5 min The trigger time is always 5 minutes in the PLAY mode Power Saving is disabled unde...

Страница 94: ... press Delete while Disable is turned on You can protect against accidental deletion of photos by selecting On for Disable Performing a format operation page 95 will cause all photos to be deleted even if file deletion is disabled On selected for Disable for some photos Configuring and Settings REC PLAY Power On Camera powers on whenever REC or PLAY is pressed Power On Off Camera powers on or off ...

Страница 95: ...the video signal system of the TV or other video equipment Photos cannot be displayed correctly on a TV or video equipment that is not NTSC or PAL Configuring USB Protocol Settings USB Mass Storage Select this setting when connecting to a computer pages 80 81 With this setting the computer sees the camera as an external storage device Use this setting for normal transfer of images from the camera ...

Страница 96: ...g will cause all files to be deleted even if file deletion is disabled On selected for Disable page 93 for some files Make sure the camera s battery is sufficiently charged before starting a formatting operation Formatting may not be performed correctly and the camera may stop operating normally if the camera powers down while formatting is in progress Never open the battery cover while formatting...

Страница 97: ...or screen Doing so creates the risk of skin inflammation Should monitor screen liquid ever get into your mouth immediately rinse your mouth out and contact your physician Should monitor screen liquid ever get into your eyes or onto your skin immediately rinse with clean water for at least 15 minutes and contact your physician Connections Never plug any devices that are not specified for use with t...

Страница 98: ...apart or modify it in any way Doing so creates the risk of electric shock burn injury and other personal injury Locations To Be Avoided Never leave the camera in any of the following types of locations Doing so creates the risk of fire and electric shock Areas subject to large amounts of humidity or dust Food preparation areas or other locations where oil smoke is present Near heaters on a heated ...

Страница 99: ...e back lamp is flashing green after turning off the camera Disconnecting the USB cable while communication is in progress Using a battery that is low Other abnormal operations Any of the above conditions can cause an error message to appear on the monitor screen page 110 Perform the action indicated by the message that appears Operating Environment Operating Temperature Requirements 0 to 40 C 32 t...

Страница 100: ...nd does not indicate malfunction Unplug the power adapter from the power outlet when you are not using the USB adapter Never use detergent to clean the power adapter especially the plug Never cover the USB adapter with a blanket etc Doing so creates the risk of fire Other Precautions The camera becomes slightly warm during use This is normal and does not indicate malfunction Never plug the power a...

Страница 101: ...e battery has reached the end of its service life Replace the battery with a new one Storage Precautions Storing the battery for a long time while it is charged can cause deterioration of battery characteristics If you do not plan to use a battery for some time fully use up its charge before storing it Always remove the battery from the camera when you are not using it A battery left in the camera...

Страница 102: ... 94 However it is recommended that you always take along multiple memory cards whenever using the camera far away from the home or office As you record data to and delete data from a memory card a number of times it loses its ability to retain data Because of this periodic re formatting of a memory card is recommended Electrostatic charge electrical noise and other phenomena can cause data to beco...

Страница 103: ...rd a memory card or the camera or if you transfer ownership to another party When discarding a memory card either physically destroy the memory card or use commercially available data delete software to completely delete the data on the memory card When transferring ownership of a memory card to another party use commercially available data deletion software to completely delete the data on it Use...

Страница 104: ...items are not available while the camera is in the Silent mode page 38 REC Mode REC Tab Quality Tab Reset Initial Default Settings Focus Auto Focus Focus Frame Burst Off Stabilizer On AF Area Spot L R Key Off Grid Off Icon Help On Memory Scene Mode Off Flash On Focus Off White Balance Off ISO Off AF Area On Burst Off Self timer Off MF Position Off Zoom Position Off Quality Snapshots Normal EV Comp...

Страница 105: ... Sound 2 Sound 3 Off Half Shutter On Off Shutter On Off Beep On Off Beep 0 7 Playback 0 7 Startup Image Off File Numbering Continue World Time Home Date Stamp Off Adjust Date Format Language LCD Save 1 min Power Saving 2 min REC PLAY Disable Disable Off USB Mass Storage TV Out Format Reset Rotate DPOF Protect Resize Trimming Voice Memo Copy ...

Страница 106: ...othing happens when a button is pressed Remove the battery from the camera and then reload it Photo and Video Recording Photo is not recorded when the shutter button is pressed 1 If the camera is in the PLAY mode press REC to enter the REC mode 2 If the flash is charging wait until the charge operation finishes 3 If the message Memory Full appears transfer photos to your computer delete photos you...

Страница 107: ...raits Use Auto Focus for scenery and portrait shots page 54 3 You may be trying to use Auto Focus or Infinity when shooting a close up shot Use the Macro for close ups page 54 There is a vertical line in the monitor screen image Shooting a very brightly lit subject can cause a vertical band to appear in the monitor screen image This is a CCD phenomenon known as vertical smear and does not indicate...

Страница 108: ... shots come out bad Use the following Scene Mode scenes page 50 when shooting at night Night Scene for shooting night scenery only Night Scene Portrait for shooting people against night scenery Subjects are too dark when taking photos in a seashore or ski area Sunlight reflected by water sand or snow can cause underexposure of photos Change the flash mode setting to Forced On for daylight synchro ...

Страница 109: ...guage The wrong display language is selected Change the display language setting page 91 Files cannot be transferred over a USB connection 1 The USB cable may not be connected securely Check all connections 2 The wrong USB communication protocol is selected Select the correct USB communication protocol in accordance with the type of device you are connecting pages 80 3 If the camera is not powered...

Страница 110: ...nd date settings After that the settings will not be reset if you remove the battery If the time and date are reset to their factory default settings when you remove the battery after it has been loaded for more than 48 hours it could mean that the camera s setting memory is defective Buttons are not responsive right after the power has been turned on With large capacity memory cards there is a de...

Страница 111: ...Files could not be saved because battery is low Folder cannot be created You are trying to record a file while there are already 9999 files stored in the 999th folder If you want to record more delete files you no longer need page 30 LENS ERROR This message appears and the camera turns off whenever lens performs some unexpected operation If the same message appears after you turn power back on con...

Страница 112: ... card There are no printing images Set up DPOF There are currently no files specified for printing Configure the required DPOF settings page 77 This card is not formatted The memory card loaded in the camera is not formatted Format the memory card page 95 This file cannot be played The file you are trying to access is corrupted or is a type that cannot be displayed by this camera This function can...

Страница 113: ...4 to 300 mm in 35 mm format Nine lenses in eight groups including aspherical lens Zoom 12 5X optical zoom 4X digital zoom 50 0X in combination with optical zoom Up to 159 5X when HD Zoom and Digital zoom are used in combination VGA size Focusing Contrast Detection Auto Focus Focus Modes Auto Focus Macro Focus Super Macro Focus Infinity Manual Focus AF Area Spot Multi Tracking Approximate Focus Sna...

Страница 114: ...st Scene Mode Face Tracking Stabilizer D Lighting Simple Mode Videos 1280 with monaural audio Audio Voice REC Silent Mode Approximate Maximum Audio Recording Times After Recording 30 seconds per photo Voice REC 2 hours 20 minutes 37 seconds when using built in memory Monitor Screen 2 7 inch TFT color LCD 230 400 960x240 dots Viewfinder Monitor Screen Timekeeping Function Date and Time Recorded wit...

Отзывы: