HP NetServer LH 4 Скачать руководство пользователя страница 2

Overview of NetServer Features
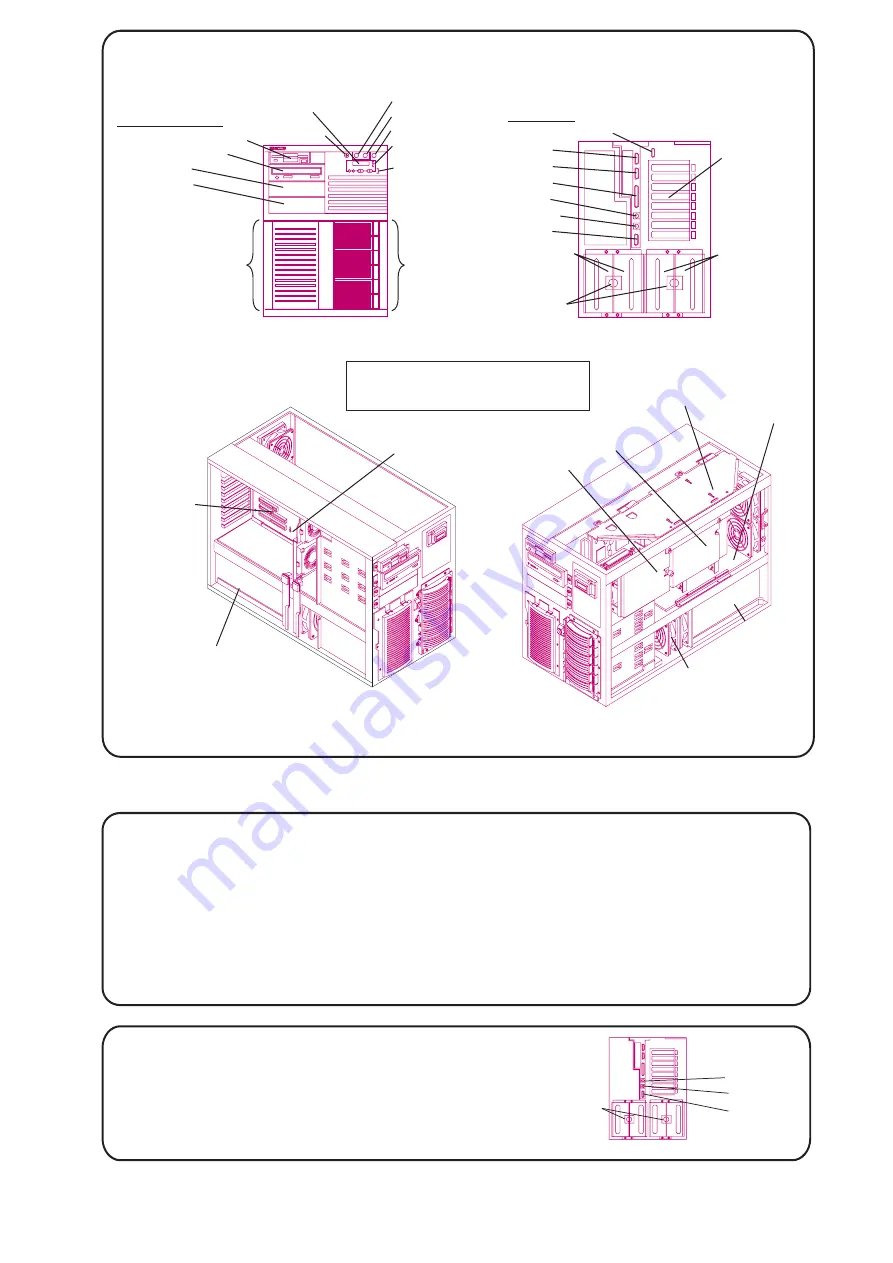
Serial B

Serial A

Parallel

Mouse

Keyboard

Monitor

AC Power
Connectors

Front View

Rear View

Left Front View

Shelf 1 (Flexible Disk Drive)

Shelf 2 (CD-ROM Drive)

Processor Cage

Backplane

Hot-Swap
Power Supply

Shelf 3 (Empty)

Shelf 4 (Empty)

Hot-Swap
Mass Storage
Cage

Hot-Swap
Power Supply
Modules

Right Front View

Hot-Swap
Power Supply
Cage

Keyboard Lock Switch

Power Switch

Reset Switch

Bezel Lock

2

Hot-Swap
Mass Storage
Expansion
Bay (Empty)

Hot-Swap
Power Supply
Modules

Status Lights

Display Control
Buttons

Front Panel
Display

Remote Management

I/O Connectors:

Accessory Board
Sockets

Accessory Board
Slot Covers

NOTE

Power redundancy requires four power

supply modules. No redundancy is

available with three modules.

Redundant Fan

Non-Hot-Swap Shelves:

3

4

Obtain HP Navigator CD-ROM Release History

!

!

!

!

Call HP’s fax system at 1-800-333-1917 (or 1-208-344-4809 from

your fax machine), and request document number 6005

http://www.hp.com/netserver/servsup

ftp://ftp.hp.com/pub/servers

GO HPPC; download 6005.txt from the NetServer library

Fax—

Internet WWW—

Internet FTP—

CompuServe—

Connect Monitor, Keyboard, and Mouse

1. Connect cables:

2. Connect UPS:

Connect the monitor, keyboard, and mouse

cables and the AC power cords to the appropriate connectors on

the rear of the chassis.

If you have an uninterruptible power supply

(UPS), refer to the instructions supplied with it. Install and turn on

the UPS.

Mouse

Keyboard

Monitor

Rear View

Before you begin installing your HP NetServer, ensure that you have the

latest version of the software by obtaining the current

release history. It describes the latest

HP NetServer

Navigator CD-ROM

software

updates to each release of the Navigator CD-ROM, as well as

instructions for obtaining the current release.

AC Power Connectors

You can obtain the release history from one of the HP NetServer

information resources listed here.
To obtain drivers and utilities for the non-HP components of your system,

follow the directions provided by the component or network operating

system (NOS) manufacturer to access the necessary Internet, BBS, or

CompuServe site containing the drivers and software.

Memory Cage

System Board Assembly

I/O Board

All manuals and user guides at all-guides.com

Содержание NetServer LH 4

Страница 1: ...who installs administers and troubleshoots LAN servers Hewlett Packard Company assumes that you are qualified in the servicing of computer equipment and trained in recognizing hazards in products with hazardous energy levels ESD Warning Tools Required This HP NetServer contains sensitive electronic devices that can be damaged by electrostatic discharge ESD ESD hazards are a result of installation ...

Страница 2: ...ownload 6005 txt from the NetServer library Fax Internet WWW Internet FTP CompuServe Connect Monitor Keyboard and Mouse 1 Connect cables 2 Connect UPS Connect the monitor keyboard and mouse cables and the AC power cords to the appropriate connectors on the rear of the chassis If you have an uninterruptible power supply UPS refer to the instructions supplied with it Install and turn on the UPS Mous...

Страница 3: ... and unplug telephone cables Note that the power switch does not turn off the standby power Disconnect the power cord to turn off standby power If the backlight on the LCD display is on standby power is on CAUTION Wear a wrist strap and use a static dissipating work surface connected to the chassis at all times To replace a cover insert the tabs inside the rear of the cover into the slots at rear ...

Страница 4: ...into its socket The retaining clips flip along the sides of the board when it seats The memory boards need to be identical so it does not matter which board is Memory A or B 2 Open the memory cage cover Loosen the cover screw Swing the cover open 3 Remove both memory boards Release the latches and remove both boards Place them on a suitable anti static surface 4 Install DIMMs Align the notches on ...

Страница 5: ...talled in the hot swap mass storage cage There are two different height hot swap trays available to accommodate drives of different form factors Six low profile devices or four half height devices or combinations of these two devices may be installed in the hot swap mass storage cage Hot Swap Module Configurations and SCSI Addresses Key Half Height Disk Module Disk Spacer Low Profile Disk Module o...

Страница 6: ...e information about reserving system resources refer to Information Assistant and to Configuring an ISA Non Plug and Play Board in the If the system hangs before the Setup Utility starts remove the ISA non Plug and Play board run the Setup utility to reserve system resources for it then reinstall the board HP NetServer LH 4 LH 4r User Guide Assistant Select View System Information to get informati...

Отзывы: