

MSM320-R Access Point Quickstart
4
HP ProCurve Networking
10.
Carefully thread the cleanly-cut end of the Ethernet cable through the Sealing Nut (A)
end of the quick-disconnect assembly, and push through approximately 30 cm (1 foot)
of cable.
Note:
The next two steps should be performed by someone with experience building
Ethernet cables.
11.
Prepare the cable and attach it to the RJ-45 Plug (G) according to the directions
included with your crimping tool.
12.
Before continuing, test the cable with a portable Ethernet cable tester to ensure that the
RJ-45 plug (G) is correctly connected.
13.
Carefully pull the cable slack back through the quick-disconnect assembly until the
RJ-45 Plug (G) is almost touching the Body (F). Adjust the cable position so that the
RJ-45 Plug (G) fits precisely into the RJ-45 cutout in the Body (F), and press down the
plastic tab so the plug fits correctly.
14.
Tighten the threads between Sealing Nut (A) and Clamp Ring (C)
by hand
, until the cable
is firmly anchored.
Do not over tighten. Do not tighten with tools.
Install the MSM320-R
1.
Mount the MSM320-R on a wall or pole using the supplied brackets so that the antennas
are pointing up. Local electrical and building codes will dictate many installation
aspects.
2.
(See photo “Grounded body (via grounding lug).”) Attach the supplied grounding lug
(through the bracket) to one of the lower screw holes on the MSM320-R body, and
attach a grounding wire with the set screw.
3.
(See photo on the left side of page 1.) Manually screw on antenna surge suppressors to
the antenna connectors on top of the MSM320-R. Position the gas tube covers so that
they can be removed for future tube replacement. Attach the two supplied antennas.
Note:
If installing an optional HP antenna, first attach the lightning arrester to the AP,
attach the antenna adapter to the arrester, then attach the antenna connector to the
adapter. See also the antenna documentation.
4.
(See photo “Grounded surge suppressor.”) Attach a grounding wire to at least one of the
antenna surge suppressors. For the model shown, remove the crimp connector, crimp it
to the wire, and then screw the crimp connector back onto the surge suppressor.
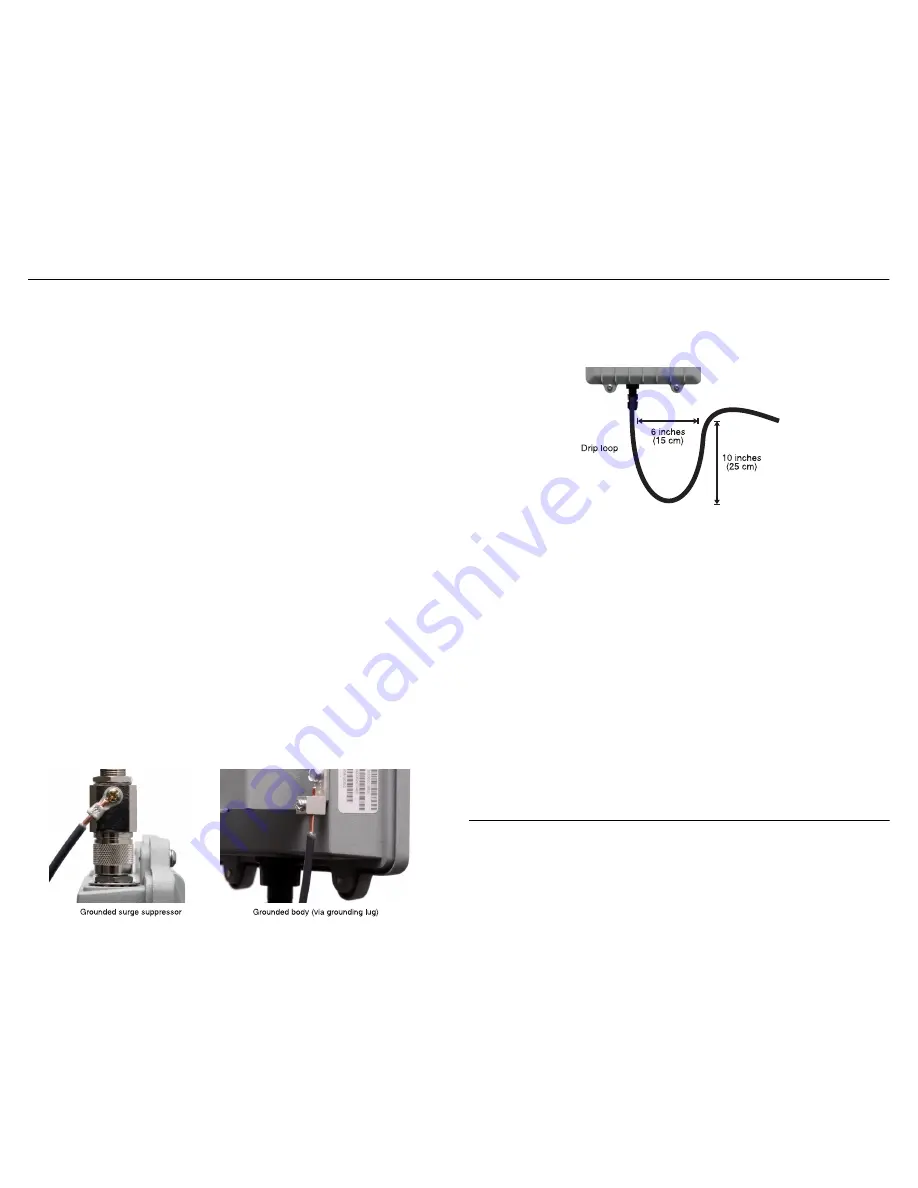
5.
Create a drip loop in the Ethernet cable below the MSM320-R. A drip loop provides
additional protection against water running down the Ethernet cable and into the
connector. Form the loop as shown here. Make sure that the distance between the loop
start and end points is at least 15 cm (6 inches), and that the cable hangs down at least
25 cm (10 inches).
6.
(See illustration “Weatherproof connector parts” on previous page.) Mate the RJ-45
Plug (G) with the socket on the MSM320-R, hold it firmly in place, and tighten the Screw
Nut (E)
by hand. Do not over tighten. Do not tighten with tools.
7.
Install an Ethernet surge suppressor as close as possible to the MSM320-R, ideally
within .6 meters (two feet). This helps reduce the effects of any charge carried by the
cable to the MSM320-R. Install this Ethernet surge suppressor between the MSM320-R
and the PoE power source.
The Ethernet cable will typically need to be cut and have the cable end coming from the
PoE injector connected to the Ethernet surge suppressor input (Line) and have the cable
end coming from the MSM320-R connected to the Ethernet surge suppressor output
(Equipment). Follow the instructions included with the Ethernet surge suppressor.
Include a drip loop for both the input and output cables. Connect a grounding wire to the
Ethernet surge suppressor.
Powering the MSM320-R
The MSM320-R can be powered by:
•
A PoE-enabled switch. A number of PoE-enabled switches are available from HP
ProCurve.
•
HP ProCurve 1-Port Power Injector (J9407A).
Initial configuration (autonomous mode)
This procedure describes how to switch a factory-default MSM320-R to autonomous mode
and then perform its initial configuration that enables you to establish a wireless connection
through the MSM320-R to the Internet.
Note:
For controlled mode configuration, instead see
Working with controlled APs
in the
MSM7xx Controllers Management and Configuration Guide
.