background image

Removal and Replacement Procedures 

System Board 


IMPORTANT:  You must re-enter the server serial number through RBSU if you replace the system 
board. Refer to “Re-entering the Server Serial Number” in this chapter. 

To remove the system board: 

1.  Power down and remove power from the server. Refer to “Powering Down the Server” in 

this chapter. 

2.  Unlock and open the front bezel (tower server only). 


IMPORTANT:  You must unlock the tower bezel before removing the access panel. Refer to “Front 
Bezel” in th
is chapter. 

3.  Remove the access panel. Refer to “Access Panel” in this chapter. 

4.  Remove the redundant fan cage, if installed. Refer to “Redundant Fan Cage” in this 

chapter. 

5.  Remove all expansion boards. Refer to “PCI-X Expansion Boards” in this chapter. 

6.  Remove the processor air baffle. Refer to “Processor Air Baffle” in this chapter. 

7.  Remove the center wall. Refer to “Center Wall” in this chapter. 

8.  Disconnect all cables. 

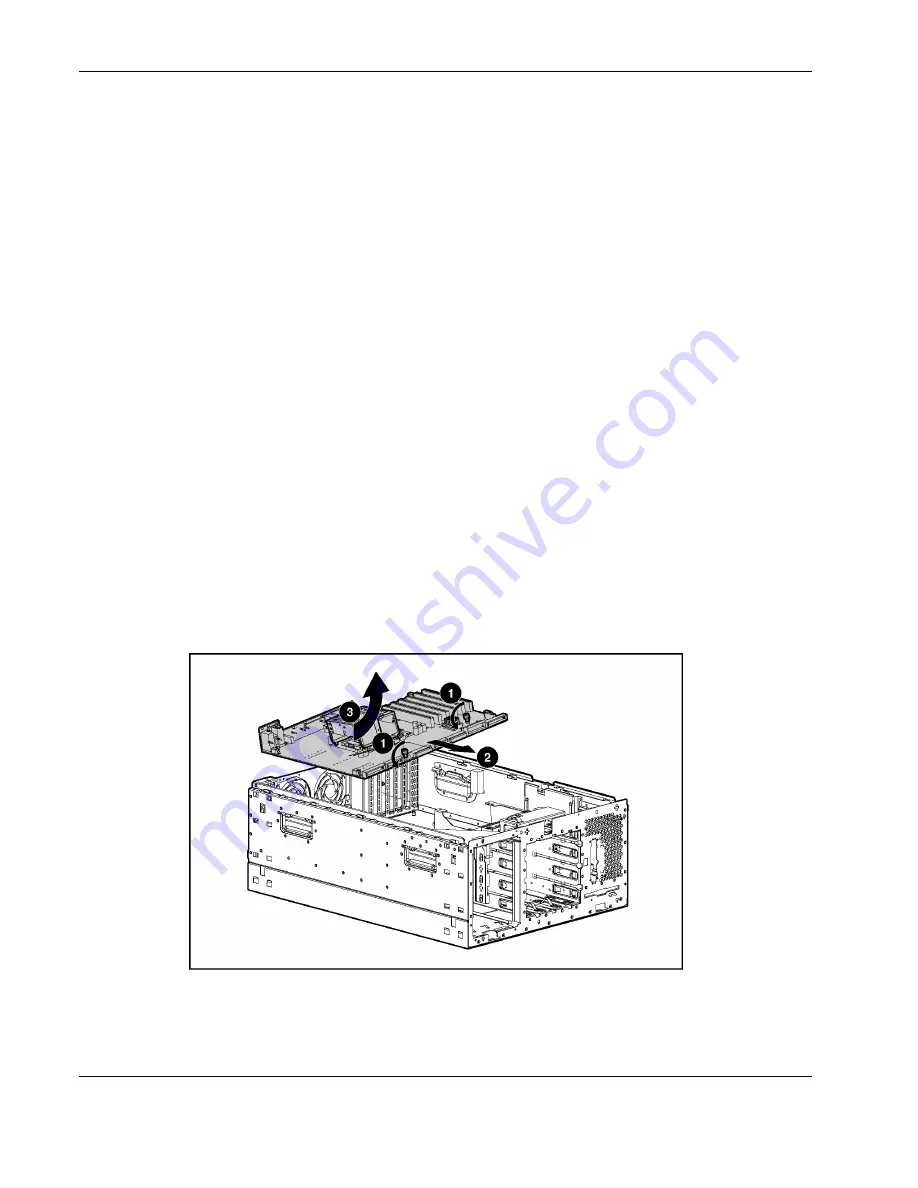
9.  Loosen the two thumbscrews securing the system board to the chassis (1). 

10.  Slide the system board toward the front of the chassis to release it from the six retaining 

guides (2). 

11.  Lift the system board out of the chassis and tilt it to one side to clear the cable guide (3). 


Figure 2-52:  Removing the system board 

2-56 

HP ProLiant ML370 Generation 3 Server Maintenance and Service Guide 

Содержание ML370 - ProLiant - G3

Страница 1: ...HP ProLiant ML370 Generation 3 Server Maintenance and Service Guide January 2004 Sixth Edition Part Number 281778 006 ...

Страница 2: ...any shall not be liable for technical or editorial errors or omissions contained herein The information in this document is provided as is without warranty of any kind and is subject to change without notice The warranties for HP products are set forth in the express limited warranty statements accompanying such products Nothing herein should be construed as constituting an additional warranty HP ...

Страница 3: ...ment 2 2 Rack Warnings and Cautions 2 2 Server Warnings and Cautions 2 3 Preparation Procedures 2 4 Extending the Server from the Rack 2 5 Powering Down the Server 2 7 Removing the Server from the Rack 2 9 Hot Plug Procedures 2 11 Feet 2 12 Front Bezel 2 13 Access Panel 2 14 Rack Bezel 2 15 Rack Rails 2 16 Power Supply Blank 2 17 Hot Plug Power Supply 2 18 Hard Drive Blank 2 19 Hot Plug SCSI Hard ...

Страница 4: ...tors and Switches System LEDs 4 1 Front Panel LEDs 4 2 Hot Plug SCSI Hard Drive LEDs 4 3 RJ 45 Connector LEDs 4 5 Rear Unit Identification LED Switch 4 6 Hot Plug Power Supply LEDs 4 7 Hot Plug Fan LEDs 4 8 System Board LEDs 4 9 External Health LED 4 11 System LEDs and Internal Health LED Status Combinations 4 12 System Board Switches 4 14 Non Maskable Interrupt Switch 4 15 System Identification S...

Страница 5: ...Contents Index HP ProLiant ML370 Generation 3 Server Maintenance and Service Guide v ...

Страница 6: ......

Страница 7: ...odule level repair Because of the complexity of the individual boards and subassemblies no one should attempt to make repairs at the component level or to make modifications to any printed wiring board Improper repairs can create a safety hazard WARNING To reduce the risk of personal injury from electric shock and hazardous energy levels do not exceed the level of repairs specified in these proced...

Страница 8: ...TION The computer is designed to be electrically grounded earthed To ensure proper operation plug the AC power cord into a properly grounded AC outlet only NOTE Any indications of component replacement or printed wiring board modifications may void any warranty viii HP ProLiant ML370 Generation 3 Server Maintenance and Service Guide ...

Страница 9: ...n integrated nonvolatile management log that contains fault and management information The contents of the Integrated Management Log IML can be viewed with Insight Manager Telephone Numbers For the name of the nearest HP authorized reseller In the United States call 1 800 345 1518 In Canada call 1 800 263 5868 For HP technical support In the United States and Canada call 1 800 652 6672 Outside the...

Страница 10: ...own and a spare parts list for ProLiant ML370 Generation 3 servers Figure 1 1 shows the mechanical components Figure 1 2 shows the system components Refer to Table 1 1 for the names of referenced spare parts HP ProLiant ML370 Generation 3 Server Maintenance and Service Guide 1 1 ...

Страница 11: ...Illustrated Parts Catalog Mechanical Components Figure 1 1 Mechanical components 1 2 HP ProLiant ML370 Generation 3 Server Maintenance and Service Guide ...

Страница 12: ...Illustrated Parts Catalog System Components Figure 1 2 System components HP ProLiant ML370 Generation 3 Server Maintenance and Service Guide 1 3 ...

Страница 13: ... 7 Hard drive blank 302531 002 313046 001 8 Power supply blank 224955 001 233601 001 9 Torx T 15 tool 249476 001 290557 001 System Components 10 Power supply 500 W 216068 002 230993 001 11 Fans 92 mm 224994 001 231213 001 12 3 3 V lithium battery 334149 001 179322 001 13 Power button switch with cable 225034 001 230986 001 14 Processor with heatsink a Intel Xeon TM 2 4 GHz 512 KB L2 cache 261668 0...

Страница 14: ...8 001 b Receptacle door snap stone 148525 003 c Retainer card guide PCI 233614 004 d Fastener 0 15 inch plastic standoff 225249 001 e Fastener 0 202 inch plastic standoff 225250 001 f Clip cable adhesive 1 77 inch 241347 007 g Clip retainer 0 125 inch diameter 115151 007 h Assembly PCI latch and base 228194 002 22 Hardware kit 230980 001 a Bracket rear removable 224965 001 b Bracket diskette tray ...

Страница 15: ...M PC2100 1 2 in 261583 031 300699 001 31 512 MB DDR DIMM PC2100 1 2 in 261584 041 300700 001 32 1 GB DDR DIMM PC2100 1 2 in 261585 041 300701 001 33 2 GB DDR DIMM PC2100 1 2 in 261586 051 300702 001 Options 34 Rear fan cage 224956 001 230984 001 35 Telco rack mounting kit 233752 001 236856 001 36 Third party rack mounting kit 232336 001 236857 001 37 Two bay hot plug drive cage 236894 001 253761 0...

Страница 16: ...rming service procedures review the following safety information Electrostatic Discharge A discharge of static electricity can damage static sensitive devices or microcircuitry Proper packaging and grounding techniques are necessary precautions to prevent damage To prevent electrostatic damage observe the following precautions Transport products in static safe containers such as conductive tubes b...

Страница 17: ...etwork interface connection WARNING To reduce the risk of electric shock fire or damage to the equipment do not plug telephone or telecommunications connectors into this receptacle CLASS 1 LASER PRODUCT This label or equivalent is located on the surface of the CD ROM drive This label indicates that the product is classified as a Class 1 Laser Product Rack Warnings and Cautions WARNING To reduce th...

Страница 18: ...fety feature Plug the power cord into a grounded earthed electrical outlet that is easily accessible at all times Unplug the power cord from each power supply to disconnect power to the equipment WARNING Because the rack allows you to stack server components in a vertical rather than a horizontal plane you must take precautions to provide for rack stability and safety to protect both personnel and...

Страница 19: ... access to internal components Power down the server If you must remove the server from a rack or a non hot plug component from the server power down the server and disconnect the power cables before removal Remove the server from the rack If the rack environment cabling configuration or the server location in the rack creates unmanageable conditions remove the server from the rack If the server i...

Страница 20: ...d the server on the sliding rack rails until the spring load rail lock engages 2 Figure 2 1 Extending the server from the rack WARNING To reduce the risk of personal injury be careful when pressing the server rail release latches and sliding the server into or out of the rack The sliding rails could pinch your fingertips HP ProLiant ML370 Generation 3 Server Maintenance and Service Guide 2 5 ...

Страница 21: ...ance procedure 1 Press the tabs on the ends of both sliding server rails and slide the server back into the rack Figure 2 2 Server rails tab locations 2 Tighten the thumbscrews to secure the server in the rack 2 6 HP ProLiant ML370 Generation 3 Server Maintenance and Service Guide ...

Страница 22: ...sconnect power from the system CAUTION Electrostatic discharge can damage electronic components Be sure you are properly grounded before beginning any installation procedure For more information refer to the Electrostatic Discharge section in this chapter Rack Server To power down the rack server 1 Back up the server data 2 Shut down the operating system as directed in the operating system instruc...

Страница 23: ...0 seconds Portions of the power supply and some internal circuitry remain active until the AC power cord is disconnected If the server has multiple power supplies installed it is necessary to remove all power cords to remove all power from the system Figure 2 4 Pressing the Power On Standby button tower server 5 Be sure that the system power LED on the front panel near the Power On Standby button ...

Страница 24: ...o remove the server from the rack 1 Power down the server Refer to Powering Down the Server in this chapter 2 Disconnect all AC power cords from the AC outlets and then from the server Figure 2 5 Unlocking the cable management arm hinge Figure 2 6 Swinging open the cable management arm to access the cables HP ProLiant ML370 Generation 3 Server Maintenance and Service Guide 2 9 ...

Страница 25: ...bles from the server Figure 2 8 Removing the cable management arm from the server NOTE You may leave the cables attached to the cable management arm 5 Loosen the thumbscrews that secure the front bezel to the front of the rack 6 Slide the server out of the rack 7 Place the server on a sturdy level surface 2 10 HP ProLiant ML370 Generation 3 Server Maintenance and Service Guide ...

Страница 26: ... fan procedures be sure that the fan zone is fully populated For hot plug power supply procedures be sure that a redundant power supply is installed For hot plug drive procedures determine whether the drive is part of an array For guidelines on hot plug SCSI hard drive replacement refer to the HP ProLiant Servers Troubleshooting Guide HP ProLiant ML370 Generation 3 Server Maintenance and Service G...

Страница 27: ...on the foot 1 3 Slide the foot out of the locking slot and pull it off the chassis 2 Figure 2 9 Removing the feet 4 Repeat steps 2 and 3 for the other feet To replace a foot slide it back onto the locking slot Be sure that the foot snaps securely into the holder Repeat with the remaining feet 2 12 HP ProLiant ML370 Generation 3 Server Maintenance and Service Guide ...

Страница 28: ...s only To remove the front bezel 1 Unlock and open the front bezel 2 Lift the front bezel and remove it from the chassis Figure 2 10 Removing the front bezel tower server To replace the front bezel reverse steps 1 and 2 HP ProLiant ML370 Generation 3 Server Maintenance and Service Guide 2 13 ...

Страница 29: ...panel Refer to Front Bezel in this chapter 1 Push the release latch securing the access panel to the chassis 1 2 While holding the release latch down slide the access panel back about 1 5 cm 0 6 in and then pull it away from the chassis 2 Figure 2 11 Removing the access panel rack server To replace the access panel reverse step 2 When the release latch snaps into place the access panel is secure 2...

Страница 30: ...anel in this chapter 2 Loosen the internal rack bezel thumbscrews Figure 2 12 Loosening the rack bezel thumbscrews 3 Slide the bezel up to release the spools from the keyholes and pull it away from the server Figure 2 13 Removing the rack bezel To replace the rack bezel reverse steps 2 and 3 HP ProLiant ML370 Generation 3 Server Maintenance and Service Guide 2 15 ...

Страница 31: ...ght of the right most fan grating 2 Press the rail against the side of the chassis and slide it to the front of the server to release the rails 2 3 Align the four keyholes above the four spools on the side of the chassis and remove the rail 3 Figure 2 14 Pressing the release key 4 Repeat steps 1 through 3 to remove the other rail To replace the rack rails reverse steps 2 and 3 2 16 HP ProLiant ML3...

Страница 32: ...k 2 Figure 2 15 Removing a power supply blank To replace the power supply blank reverse steps 1 and 2 WARNING Populate bays with either a power supply or a blank Proper airflow can only be maintained when the bays are populated Unpopulated power supply bays can lead to improper cooling and thermal damage To replace the blank with a redundant power supply refer to Hot Plug Power Supply in this chap...

Страница 33: ... the rear panel of the server to the right of the right most fan grating 3 Press the port colored button on the power supply handle to release the latch 1 and pull the handle down 2 4 Slide the hot plug power supply out of the chassis 3 Figure 2 16 Removing the hot plug power supply CAUTION Always populate power supply bays with either a power supply or blank Operating the server without installin...

Страница 34: ... in this chapter 2 Squeeze in the tabs 1 and pull the blank out of the hard drive cage 2 Figure 2 17 Removing a hard drive blank CAUTION Always populate drive bays with either a hard drive or blank Operating the server without installing a hard drive or blank results in improper airflow and improper cooling that can lead to thermal damage To replace the hard drive blank slide the blank into the ba...

Страница 35: ...ving a hot plug SCSI hard drive CAUTION Always populate drive bays with either a hard drive or blank Operating the server without a hard drive or blank results in improper airflow and improper cooling that can lead to thermal damage IMPORTANT Always populate hard drive bays starting with the lowest SCSI ID To replace the hot plug SCSI hard drive 1 Insert the hard drive into the available drive bay...

Страница 36: ...l in this chapter 3 Slide the media latch to release the blanks 1 while pushing out the removable media blanks 2 from behind Figure 2 19 Removing the removable media blanks CAUTION Always populate drive bays with either a hard drive or blank Operating the server without installing a hard drive or blank results in improper airflow and improper cooling that can lead to thermal damage To replace a re...

Страница 37: ...ous energy or of damage to the equipment when working on energized servers Remove all watches rings and any other loose fitting jewelry Avoid the use of conductive tools inside the server that could bridge live parts Figure 2 20 System fan locations NOTE Fan locations are labeled in the chassis and on the system configuration labels attached to the access panel Table 2 1 System Fan Locations Item ...

Страница 38: ...el before removing the access panel Refer to Front Bezel in this chapter 2 Remove the access panel Refer to Access Panel in this chapter 3 Grasp the plastic handle at the top of the fan and pull upward 1 4 Lift the hot plug fan out of the fan cage 2 Figure 2 21 Removing a system fan To replace the hot plug system fan slide it into a fan cage slot and press down until the fan is seated securely Be ...

Страница 39: ...Power On Standby button to the Off position still provides auxiliary power to the PCI X expansion slot and may damage the board or other system components You must power down and remove power from the server to perform non hot plug removal and replacement procedures The procedures in this section are for non hot plug service items regardless of rack type or environment 2 24 HP ProLiant ML370 Gener...

Страница 40: ...ss panel Refer to Front Bezel in this chapter 3 Remove the access panel Refer to Access Panel in this chapter 4 Remove the fans from the redundant fan cage Refer to System Fans in this chapter 5 Loosen the two thumbscrews securing the redundant fan cage retaining bracket to the chassis 1 6 Remove the bracket from the chassis 2 Figure 2 22 Removing the redundant fan cage retaining bracket 7 Remove ...

Страница 41: ...al and Replacement Procedures Figure 2 23 Removing the redundant fan cage To replace the redundant fan cage reverse steps 4 through 7 2 26 HP ProLiant ML370 Generation 3 Server Maintenance and Service Guide ...

Страница 42: ... and blanks Refer to Hard Drive Blank and Hot Plug SCSI Hard Drive in this chapter 5 Disconnect the point to point SCSI cable from the SCSI hard drive backplane 1 6 Disconnect the power cable from the SCSI hard drive backplane 2 NOTE The center wall is removed from Figure 2 24 for clarity Figure 2 24 Disconnecting the SCSI and power cables 7 Remove the four T 15 screws securing the hard drive cage...

Страница 43: ...ge reverse steps 5 through 8 CAUTION When routing cables be sure that the cables are not located where they can be pinched or crimped IMPORTANT Be sure that all power and signal cables to the hard drive cage are reconnected properly 2 28 HP ProLiant ML370 Generation 3 Server Maintenance and Service Guide ...

Страница 44: ... bus expansion slot 1 bus 2 64 bit 100 MHz 2 PCI X bus expansion slot 2 bus 2 64 bit 100 MHz 3 PCI X bus expansion slot 3 bus 10 64 bit 100 MHz 4 PCI X bus expansion slot 4 bus 10 64 bit 100 MHz 5 PCI X bus expansion slot 5 bus 6 64 bit 100 MHz 6 PCI X bus expansion slot 6 bus 6 64 bit 100 MHz HP ProLiant ML370 Generation 3 Server Maintenance and Service Guide 2 29 ...

Страница 45: ...cess panel Refer to Access Panel in this chapter 4 Press down on the top of the PCI X slot release lever 1 and swing the release lever upward 2 5 Lift the expansion slot cover out of the server 3 Figure 2 27 Removing a PCI X expansion slot cover IMPORTANT Retain the slot cover for later use PCI X expansion slots must be populated with either an expansion board or a slot cover to maintain proper te...

Страница 46: ...the server without an expansion board or an expansion slot cover installed results in improper airflow and improper cooling which can lead to thermal damage To remove a PCI X expansion board 1 Power down and remove power from the server Refer to Powering Down the Server in this chapter 2 Unlock and open the front bezel tower server only 3 Remove the access panel Refer to Access Panel in this chapt...

Страница 47: ...replace a PCI X expansion board 1 Position the expansion board above the expansion slot and slide the board into the slot using the PCI X guide to align the board with the slot 2 Press down on the expansion board to seat it in the slot 3 Press the PCI X slot release lever down until it clicks into place to lock the slot 4 If the PCI X guide clip does not snap forward to secure the board pull it in...

Страница 48: ... expansion slot cover Refer to PCI X Expansion Slot Cover in this chapter 5 From behind the chassis push up on the lever locking tab 1 6 Pull the release lever forward to disengage the rear tabs from the server wall 2 Figure 2 30 Removing a PCI X slot release lever 7 Remove the slot release lever from the chassis 8 Repeat steps 5 through 7 to remove other slot release levers To replace slot releas...

Страница 49: ...chapter 3 Remove the access panel Refer to Access Panel in this chapter 4 Remove the PCI X expansion boards Refer to PCI X Expansion Boards in this chapter 5 Pull the bottom of the clip out 1 while pushing down on the top of the guide clip 2 6 When the tabs align with the slots pull the guide clip away from the center wall 3 Figure 2 31 Removing a PCI X guide clip 7 Remove the guide clip from the ...

Страница 50: ...unlock the tower bezel before removing the access panel Refer to Front Bezel in this chapter 3 Remove the access panel Refer to Access Panel in this chapter 4 Loosen the two thumbscrews that secure the air baffle to the center wall 1 5 Lift the air baffle up and out of the server 2 Figure 2 32 Removing the processor air baffle To replace the processor air baffle reverse steps 4 and 5 HP ProLiant M...

Страница 51: ...ng the access panel Refer to Front Bezel in this chapter 3 Remove the access panel Refer to Access Panel in this chapter 4 Remove the PCI X expansion boards Refer to PCI X Expansion Boards in this chapter 5 Remove the processor air baffle Refer to Processor Air Baffle in this chapter 6 Loosen the four thumbscrews 1 and lift the wall up enough to reach the fan cable 2 Figure 2 33 Lifting the center...

Страница 52: ...t the fan cable from the system board Figure 2 34 Disconnecting the fan cable 8 Lift the center wall away from the chassis To replace the center wall reverse steps 6 through 8 HP ProLiant ML370 Generation 3 Server Maintenance and Service Guide 2 37 ...

Страница 53: ...ide the media latch to release the drive 1 while pushing the CD ROM drive from inside the chassis slightly out of the bay 2 To remove the drive in a rack configuration press down on the media latch located on the side of the drive cage Figure 2 35 Partially removing the CD ROM drive CAUTION Always populate the CD ROM drive bay with either a CD ROM drive or a removable media blank Operating the ser...

Страница 54: ...e CD ROM drive from the chassis To replace the CD ROM drive 1 Slide the drive halfway into the bay 2 Connect any required cables to the drive 3 Slide the CD ROM drive fully into the bay until it is seated securely CAUTION When routing cables be sure that the cables are not located where they can be pinched or crimped HP ProLiant ML370 Generation 3 Server Maintenance and Service Guide 2 39 ...

Страница 55: ...the access panel Refer to Access Panel in this chapter 4 Remove the processor air baffle Refer to Processor Air Baffle in this chapter 5 Remove the PCI X expansion boards Refer to PCI X Expansion Boards in this chapter 6 Remove the center wall Refer to Center Wall in this chapter 7 Disconnect the power button LED assembly cable from the system board and the power supply backplane Figure 2 37 Disco...

Страница 56: ...nt of the server 2 Figure 2 38 Removing the power button LED assembly 10 Remove the assembly from the chassis To replace the power button LED assembly push the assembly and the cables through the front of the server Be sure that the assembly is seated securely HP ProLiant ML370 Generation 3 Server Maintenance and Service Guide 2 41 ...

Страница 57: ...nel in this chapter 4 Remove the PCI X expansion boards Refer to PCI X Expansion Boards in this chapter 5 Remove the processor air baffle Refer to Processor Air Baffle in this chapter 6 Remove the center wall Refer to Center Wall in this chapter 7 Remove the power button LED assembly Refer to Power Button LED Assembly in this chapter 8 Disconnect the diskette drive cable from the diskette drive 1 ...

Страница 58: ... drive cage is removed for clarity in Figure 2 40 Figure 2 40 Removing the diskette drive 13 Remove the diskette drive from the chassis To replace the diskette drive 1 Place the diskette drive back into the chassis flush with the front of the server 2 Slide the diskette retaining bracket into place 3 Secure the thumbscrew 4 Reconnect the diskette drive cable to the diskette drive and the system bo...

Страница 59: ...er To remove a processor assembly 1 Power down and remove power from the server Refer to Powering Down the Server in this chapter 2 Unlock and open the front bezel tower server only IMPORTANT You must unlock the tower bezel before removing the access panel Refer to Front Bezel in this chapter 3 Remove the access panel Refer to Access Panel in this chapter 4 Remove the processor air baffle Refer to...

Страница 60: ...locking lever 2 Figure 2 42 Lifting the processor retaining bracket and releasing the processor locking lever 9 Remove the processor heatsink assembly 10 Repeat steps 5 through 8 to remove a second processor assembly if necessary HP ProLiant ML370 Generation 3 Server Maintenance and Service Guide 2 45 ...

Страница 61: ... retaining bracket and the three corresponding guide holes on the processor heatsink assembly Figure 2 43 Aligning the processor for installation b Be sure the processor locking lever is open c Insert the processor heatsink assembly into the processor socket 1 d Close the processor locking lever 2 IMPORTANT If the processor locking lever is not secured the processor retaining bracket will not clos...

Страница 62: ...cessor locking lever 3 Lower the processor retaining bracket into position over the processor Figure 2 45 Closing the processor retaining bracket 4 Press the processor retaining bracket lever down to secure the processor retaining bracket HP ProLiant ML370 Generation 3 Server Maintenance and Service Guide 2 47 ...

Страница 63: ...damage the processor or the processor socket NOTE When replacing a failed processor run the ROM Based Setup Utility RBSU after replacing the new processor to mark the failed processor as repaired Refer to the HP ProLiant ML370 Generation 3 Server Setup and Installation Guide or the HP ROM Based Setup Utility User Guide for more detailed information on RBSU 2 48 HP ProLiant ML370 Generation 3 Serve...

Страница 64: ...nel Refer to Access Panel in this chapter 4 Remove the processor air baffle Refer to Processor Air Baffle in this chapter 5 Press outward on the latches at each end of the PPM socket 1 6 Lift the PPM out of the slot 2 Figure 2 47 Removing a PPM NOTE The PPM on the server may look different from Figure 2 47 CAUTION Only install a PPM if the processor is installed Both the PPM and the processor must...

Страница 65: ...ot 2 Press evenly on the PPM to insert it into the slot until latches snap up to secure the module The clips on the PPM snap into a locked position automatically when the module is fully seated in the slot The module is keyed to be sure it is aligned correctly 2 50 HP ProLiant ML370 Generation 3 Server Maintenance and Service Guide ...

Страница 66: ...listed in this chapter Memory banks must be populated in pairs Figure 2 48 DIMM slots Table 2 3 ECC DDR DIMM Slot Locations Item Description 1 ECC DDR DIMM slot 1A 2 ECC DDR DIMM slot 2A 3 ECC DDR DIMM slot 3B 4 ECC DDR DIMM slot 4B 5 ECC DDR DIMM slot 5C 6 ECC DDR DIMM slot 6C CAUTION Use only HP or Compaq branded DIMMs from the supported kits DIMMs from other sources are known to adversely affec...

Страница 67: ...tion if not populated properly Removing DIMMs To remove a DIMM 1 Power down and remove power from the server Refer to Powering Down the Server in this chapter 2 Unlock and open the front bezel tower server only IMPORTANT You must unlock the tower bezel before removing the access panel Refer to Front Bezel in this chapter 3 Remove the access panel Refer to Access Panel in this chapter 4 Remove the ...

Страница 68: ...integrity IMPORTANT DIMMs do not seat fully if turned the wrong way To replace the DIMMs 1 Align the key slot on the bottom edge of the DIMM with the tab on the slot 2 Press down evenly on the DIMM until it is seated securely in the slot and the latches close HP ProLiant ML370 Generation 3 Server Maintenance and Service Guide 2 53 ...

Страница 69: ...to Access Panel in this chapter 4 Remove any hot plug power supplies Refer to Hot Plug Power Supply 5 Remove the PCI X expansion boards Refer to PCI X Expansion Boards in this chapter 6 Remove the processor air baffle Refer to Processor Air Baffle in this chapter 7 Remove the center wall Refer to Center Wall in this chapter 8 Disconnect the diskette drive CD ROM power cable 1 the power supply back...

Страница 70: ...he four retaining guides 11 Lift the backplane away from the server 2 Figure 2 51 Removing the power supply backplane To replace the power supply backplane reverse steps 8 through 11 NOTE Be sure that you align the four retaining guides on the chassis with the holes on the power supply backplane when replacing it HP ProLiant ML370 Generation 3 Server Maintenance and Service Guide 2 55 ...

Страница 71: ... Panel in this chapter 4 Remove the redundant fan cage if installed Refer to Redundant Fan Cage in this chapter 5 Remove all expansion boards Refer to PCI X Expansion Boards in this chapter 6 Remove the processor air baffle Refer to Processor Air Baffle in this chapter 7 Remove the center wall Refer to Center Wall in this chapter 8 Disconnect all cables 9 Loosen the two thumbscrews securing the sy...

Страница 72: ...o Processor Air Baffle in this chapter 5 Remove the expansion boards Refer to PCI X Expansion Boards in this chapter 6 Remove the center wall Refer to Center Wall in this chapter 7 Disconnect all cables 8 Remove the system board Refer to System Board in this chapter 9 Remove the processor Refer to Processor Assembly in this chapter 10 Remove the PPM Refer to Processor Power Module in this chapter ...

Страница 73: ...cord all cords must be unplugged before all power is removed from the server WARNING This server contains an internal lithium manganese dioxide or vanadium pentoxide battery There is risk of fire and burns if the battery pack is not handled properly To reduce the risk of personal injury Do not attempt to recharge the battery Do not expose to temperatures higher than 60 C 140 F Do not disassemble c...

Страница 74: ... it from the system board Figure 2 54 Battery location Figure 2 55 Removing the battery To replace the battery reverse step 4 Run RBSU to configure the system after replacing the battery Refer to the HP ROM Based Setup Utility User Guide for more information HP ProLiant ML370 Generation 3 Server Maintenance and Service Guide 2 59 ...

Страница 75: ...lect Serial Number The following warning is displayed WARNING WARNING WARNING The serial number is loaded into the system during the manufacturing process and should NOT be modified This option should ONLY be used by qualified service personnel This value should always match the serial number sticker located on the chassis Press the Enter key to clear the warning 3 Enter the serial number and pres...

Страница 76: ...ools This chapter is an overview of software and firmware diagnostic tools that are available for configuring monitoring and managing the server HP ProLiant ML370 Generation 3 Server Maintenance and Service Guide 3 1 ...

Страница 77: ...very and environmental recovery Unattended Recovery logs the error information to the Integrated Management Log IML resets the server and tries to restart the operating system Run RBSU and enable ASR Diagnostics Diagnostics tests and verifies operation of server hardware If Diagnostics finds a hardware failure it isolates the replaceable part if possible Access Diagnostics when POST detects a syst...

Страница 78: ...the Survey Utility from the SmartStart CD the Integration Maintenance Utility or the Management CD Integrated Management Log IML The IML is a log of system events such as system failures or nonfatal error conditions View events in the IML from within Insight Manager 7 Survey Utility Operating system specific IML utilities The IML requires operating system dependent drivers Refer to the SmartStart ...

Страница 79: ...e System Firmware Update Utility updates system firmware on remote servers from a central location used in conjunction with the Remote Deployment Utility Console Latest maintenance ROM executable file can be downloaded from www hp products servers platforms SmartStart Diskette Builder The SmartStart Diskette Builder is a utility that uses data stored on the SmartStart CD to create support diskette...

Страница 80: ...veral sets of LEDs that indicate the status and settings of hardware components This chapter discusses the following types and locations of LEDs Front panel Hot plug SCSI hard drive RJ 45 connector Rear unit identification LED switch Hot plug power supply Hot plug fan System board Information at the end of this section discusses the interactions between external and system board LEDs in troublesho...

Страница 81: ...r supply LED Green Normal system on Amber Redundant power supply failed Red Critical power supply failed Off Normal system off 4 Network LED embedded NIC only Green Network link Blinking Network link activity Off No network connection 5 Power On Standby button and LED Amber Power off auxiliary power only Green Power on Off Power cord not attached to the server or the power supply failed The intern...

Страница 82: ... Table 4 3 identify LED locations and analyze the status of each hot plug SCSI hard drive WARNING For hot plug hard drive replacement guidelines refer to the HP ProLiant Servers Troubleshooting Guide before removing the hard drive Figure 4 2 Hot plug SCSI hard drive LEDs Table 4 2 Hot Plug SCSI Hard Drive LEDs Item Description Status 1 Drive activity On Drive activity Off No drive activity 2 Onlin...

Страница 83: ... predictive failure alert is received and the drive is attached to an array controller The drive is not configured as part of an array Or If this drive is part of an array a powered on controller is not accessing the drive Or The drive is configured as an online spare Off Off On OK to replace the drive online The drive has failed and has been placed offline Off On Off OK to replace the drive onlin...

Страница 84: ... Table 4 4 identify the LED locations and status Figure 4 3 RJ 45 connector LEDs Table 4 4 RJ 45 Connector LEDs Item Description Status 1 Activity On or flashing Network activity Off No network activity 2 Link On Linked to network Off No network link HP ProLiant ML370 Generation 3 Server Maintenance and Service Guide 4 5 ...

Страница 85: ... or by the Insight Manager 7 application The rear UID identifies the location of an individual server in a rack of servers It also contains an integrated button to activate or deactivate the LED Figure 4 4 Rear UID and switch rack model The rear UID indicates the following states Blue on The switch is activated Blue flashing The system is being monitored remotely Off The switch is deactivated 4 6 ...

Страница 86: ... Item Description 1 Secondary redundant power supply 2 Primary power supply When the power supply LED is off the following conditions may exist No AC power is available The power supply has failed The power supply is in standby mode The power supply has exceeded current limit When the power supply LED is green the power is turned on and the power supply is functioning properly HP ProLiant ML370 Ge...

Страница 87: ... dual color LED Figure 4 6 Hot plug fan LED The hot plug fan LED indicates the following conditions Green The fan is operating normally Amber The fan has failed Off The fan is not powered or is not seated 4 8 HP ProLiant ML370 Generation 3 Server Maintenance and Service Guide ...

Страница 88: ...ture Online spare memory OSM status iLO Diagnostic Figure 4 7 System board LEDs Table 4 6 System Board LEDs Item Description Status 1 Memory status 1A 2 Memory status 2A 3 Memory status 3B 4 Memory status 4B 5 Memory status 5C 6 Memory status 6C Amber Memory failed Off Normal continued HP ProLiant ML370 Generation 3 Server Maintenance and Service Guide 4 9 ...

Страница 89: ... enabled Amber PSM failed over Off Normal memory configuration 9 Processor 2 Amber Processor or PPM failed Off Normal 10 Processor 1 11 PPM 1 12 System overtemperature Amber System overtemperature event Off Normal 13 iLO Diagnostic LEDs Refer to the iLO User s Guide on the Documentation CD 4 10 HP ProLiant ML370 Generation 3 Server Maintenance and Service Guide ...

Страница 90: ...ternal Health LED System LED and Color External Health LED Color Status Red Primary power supply or both power supplies have failed Power supply off Amber Secondary power supply has failed HP ProLiant ML370 Generation 3 Server Maintenance and Service Guide 4 11 ...

Страница 91: ... Internal Health LED Color Status Processor failure socket X amber Red Processor in socket X has failed Processor has failed over to offline spare Processor is not installed in socket X ROM detects a failed processor during POST Amber Processor in socket X is in pre failure condition Processors are missing PPM installed without processor Processor failure both sockets amber Red Processor types do ...

Страница 92: ... and Color Internal Health LED Color Status Red System has exceeded operating system cautionary level or critical hardware level System overtemperature amber Green Normal Red A required fan has failed Fan amber Amber A redundant fan has failed HP ProLiant ML370 Generation 3 Server Maintenance and Service Guide 4 13 ...

Страница 93: ...rrect the computer may not work properly and you may receive error messages on the screen This section discusses the following system board switches Non maskable interrupt System identification System maintenance Figure 4 8 System board switches Table 4 9 System Board Switches Item Switch Type 1 Non maskable interrupt switch SW4 2 System identification switch SW1 3 System maintenance switch SW2 4 ...

Страница 94: ...em experience a blue screen trap when the operating system crashes When this happens Microsoft recommends that system administrators perform a non maskable interrupt NMI event by pressing a dump switch The NMI event allows a hung system to once again become responsive The NMI switch or SW4 is used only in the event of a service emergency that requires a complete data dump in preparation for recove...

Страница 95: ...or the server by default Table 4 10 shows the switch settings and positions CAUTION Do not alter the default setting for the server Doing so causes improper server operation Table 4 10 System Identification Switch SW2 Position Description Settings for 2 4 GHz and 2 8 GHz models Settings for 3 06 GHz and above models 1 ID0 Off Off 2 ID1 Off Off 3 ID2 Off On 4 16 HP ProLiant ML370 Generation 3 Serve...

Страница 96: ...O security disabled 2 Configuration lock indicator Off System configuration can be changed On System configuration is locked and cannot be changed 3 Rack mount indicator Off System is in a tower configuration On System is in a rack mounted configuration 4 Enable diskette boot indicator Off Booting from diskette is controlled by RBSU On Booting from diskette is enabled and RBSU setting is overridde...

Страница 97: ... You must re enter the server serial number through RBSU after you clear NVRAM Refer to Re entering the Server Serial Number in Chapter 2 To erase all system configuration settings 1 Power down the server 2 Open the front bezel tower only 3 Remove the access panel 4 Remove the processor air baffle 5 Set the position 6 lever to the on position 6 Power up the server All configuration settings are no...

Страница 98: ...ot mode If both sides of the redundant ROM are corrupted the system automatically enters the disaster recovery mode and the server emits three extended beeps To perform ROMPaq disaster recovery 1 After hearing the three beeps insert a ROMPaq diskette with the latest system ROM from SmartStart IMPORTANT The ROMPaq flashes both sides of the redundant ROM This process may take up to ten minutes 2 Wai...

Страница 99: ... specifications for the server and optional hardware including the following Tower server Rack server Memory modules 1 44 MB diskette drive IDE CD ROM drive Wide Ultra3 hot plug SCSI hard drive HP ProLiant ML370 Generation 3 Server Maintenance and Service Guide 5 1 ...

Страница 100: ...ed input frequency 47 to 63 Hz Rated input current 7 3 A 110 V 3 6 A 220 V Rated input power 800 W BTUs per hour 2732 Power supply output Rated steady state power 500 W max Maximum peak power 550 W for up to 2 minutes Rated output voltages 5 3 3 12 12 VDC Rated auxiliary voltage 5 VDC Temperature range Operating 5 to 35 C 41 to 95 F Shipping 40 to 85 C 40 to 185 F Relative humidity noncondensing O...

Страница 101: ...3 A 110 V 3 6 A 220 V Rated input power 800 W BTUs per hour 2732 Power supply output Rated steady state power 500 W Height 22 07 cm 8 69 in Maximum peak power 550 W for up to 2 minutes Rated output voltages 5 3 3 12 12 VDC Rated auxiliary voltage 5 VDC Temperature range Operating 5 to 35 C 41 to 95 F Shipping 40 to 85 C 40 to 185 F Relative humidity noncondensing Operating 5 to 95 5 to 95 Non oper...

Страница 102: ...re Description DIMM sizes 256 MB 512 MB 1 GB or 2 GB Maximum memory 12 GB maximum 8 GB with online spare support Type configuration Registered ECC DDR DIMM 2 1 interleaving Module type PC2100 1 2 in DIMMs 5 4 HP ProLiant ML370 Generation 3 Server Maintenance and Service Guide ...

Страница 103: ...rives supported 1 Drive height One third height Drive rotation 300 rpm Transfer rate High 500 Kb s Low 250 Kb s Bytes sector 512 Sectors per track high low 18 9 Tracks per side high low 80 80 Access times Track to track high low 3 ms 6 ms Average high low 169 ms 94 ms Settling time 15 ms Latency average 100 ms Cylinders high low 80 80 Read write heads 2 HP ProLiant ML370 Generation 3 Server Mainte...

Страница 104: ... Depth 150 1 mm 5 85 in Width 208 0 mm 8 11 in Weight 0 950 kg 2 09 lb Data transfer rate Sustained 150 KB s sustained 1X 1500 4800 KB s 10X to 48X Burst 4 0 MB s Access times typical Full stroke 350 ms Random 150 ms Diameter 12 cm 8 cm 4 70 in 3 15 in Thickness 1 2 mm 0 05 in Track pitch 1 6 µm 6 3 x 10 7 in Cache buffer 128 KB Startup time 7 s Stop time 4 s single 30 s multisession Laser paramet...

Страница 105: ...ns Table 5 5 CD ROM Drive Specifications continued Feature Description Operating conditions Temperature 5 to 45 C 41 to 113 F Humidity 5 to 90 HP ProLiant ML370 Generation 3 Server Maintenance and Service Guide 5 7 ...

Страница 106: ... 54 cm 1 0 in One third 2 54 cm 1 0 in One third 2 54 cm 1 0 in Size 8 89 cm 3 5 in 8 89 cm 3 5 in 8 89 cm 3 5 in 8 89 cm 3 5 in Interface Wide Ultra3 Wide Ultra3 Wide Ultra3 Wide Ultra3 Transfer rate 160 MB sec 160 MB sec 160 MB sec 160 MB sec Rotational speed 15 000 RPM 15 000 RPM 10 000 RPM 10 000 RPM Physical configuration Bytes per sector 512 512 512 512 Logical blocks 17 773 524 35 566 080 7...

Страница 107: ...r cable ASR See Automatic Server Recovery 2 assembly PCI latch and base part number 1 5 diskette drive CD ROM power See diskette drive CD ROM power cable Automatic Server Recovery 2 ASR 3 2 hard drive power replacing 2 28 B point to point SCSI 2 27 power button LED See power button LED cable backplane power supply See power supply backplane power supply backplane See power supply backplane cable b...

Страница 108: ...r See PCI expansion slot cover installation guidelines 2 52 external health LED 4 2 part number 1 6 external power LED 4 2 part numbers 1 6 external system LED 4 1 removing 2 52 replacing 2 53 F specifications 5 4 fan cage See rear fan cage disconnecting fan cage cable part number 1 6 CD ROM drive cable 2 39 fan cage redundant See redundant fan cage CD ROM power cable 2 39 fan LEDs overview 2 22 d...

Страница 109: ...ard drive CD ROM drive data cable part number 1 6 memory 2 53 PCI X expansion board 2 32 hard drives SCSI PCI X expansion slot cover 2 30 LEDs 4 3 PCI X guide clips 2 34 removing 2 20 PCI X slot release levers 2 33 replacing 2 20 power button LED assembly 2 41 hardware kit part number 1 5 power supplies hot plug 2 18 health LEDs 4 2 power supply backplane 2 55 help resources ix power supply backpl...

Страница 110: ...9 tower server 5 2 LEDs fan 2 23 4 8 P fans 2 22 parts list and numbers 1 4 front and rear unit identification 4 6 PCI X expansion board slots 2 29 front panel 4 2 PCI X expansion boards front unit identification 4 2 removing 2 31 health 4 2 replacing 2 32 hot plug fans 4 8 PCI X expansion slot cover 2 30 hot plug SCSI hard drive See hot plug hard drive LEDs PCI X guide clips 2 34 PCI X slot relea...

Страница 111: ...g down the server 2 7 redundant power supply installing 2 18 PPMs See processor power modules PPMs release buttons hard drive 2 20 processor air baffle release latch access panel 2 14 part numbers 1 5 release lever PCI X slot 2 30 removing 2 35 remote management front and rear unit identification LEDs 4 6 processor assembly 2 44 processor fans locating 2 22 removable media blanks part numbers 1 4 ...

Страница 112: ...Start Diskette Builder Utility 3 4 hard drive cage 2 28 SmartStart software 3 3 hard drives 2 20 CD 3 3 hot plug power supplies 2 18 spare parts list and numbers 1 4 media blank 2 21 specifications memory 2 53 CD ROM drive 5 6 PCI X expansion board 2 32 DIMMs 5 4 PCI X expansion boards 2 32 diskette drive 5 5 PCI X expansion slot cover 2 30 hot plug SCSI hard drive 5 8 PCI X guide clips 2 34 memor...

Страница 113: ...Builder 3 4 wet bulb maximum tower server 5 2 Survey Utility 3 3 Wide Ultra3 hot plug SCSI hard drive operating 5 8 V third party rack mounting option kits part numbers 1 6 ventilation clearances viii thumbscrews W center wall 2 36 diskette drive 2 43 wall center part numbers 1 5 front bezel 2 5 warranty viii power supply backplane 2 55 website HP 2 1 rack bezel 2 15 weight redundant fan cage 2 25...

Отзывы: