background image

3-27

Using Identity Driven Manager

Configuring Access Profiles

8.

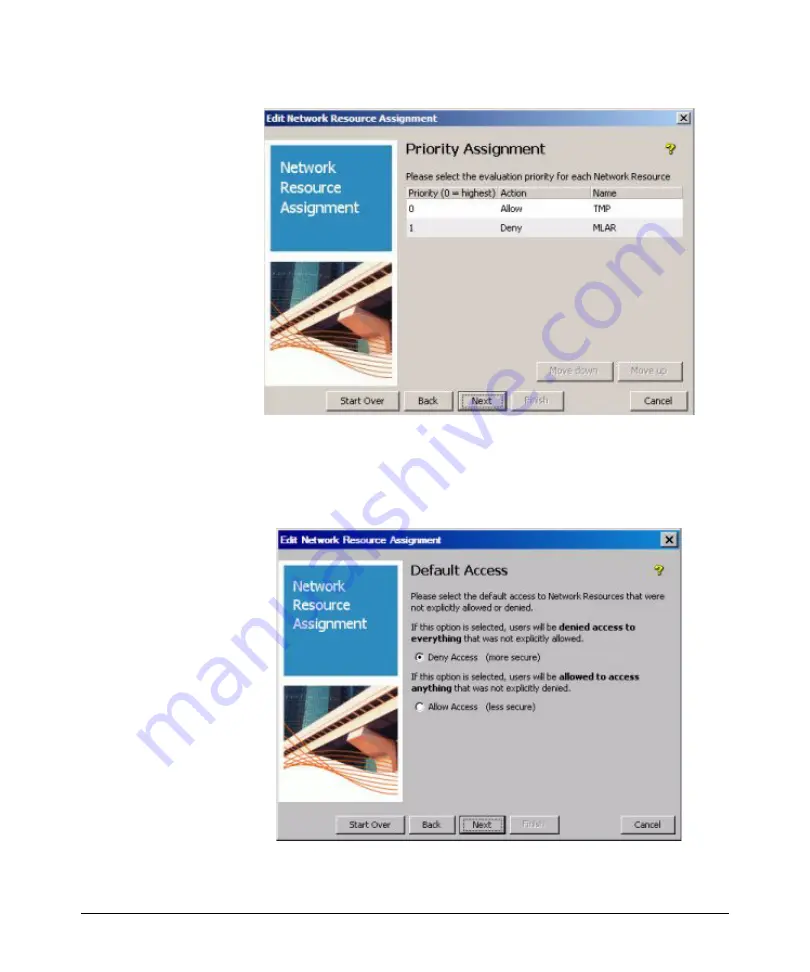
Set the priority (order of evaluation) for the Network Resources. To 
change the priority, click the Resource in the list, then click 

Move down


or 

Move up

. The first rule to match is the one that will be applied. 

9.

Click 

Next

 to continue to the Default Access window.

10. Select the option to tell IDM what to do if there are no matches found in 

the network resource access rules.

Содержание J4813A

Страница 1: ...ProCurve Identity Driven Manager User s Guide Software Release 2 0 ...

Страница 2: ...kofNetscapeCorporation Disclaimer The information contained in this document is subject to change without notice HEWLETT PACKARD COMPANY MAKES NO WARRANTY OF ANY KIND WITH REGARD TO THIS MATERIAL INCLUDING BUT NOT LIMITED TO THE IMPLIED WARRANTIES OF MERCHANTABILITY AND FITNESS FOR A PARTICULAR PURPOSE Hewlett Packard shall not be liable for errors contained herein or for incidental or consequenti...

Страница 3: ...ning to Use ProCurve IDM 1 15 ProCurve Support 1 15 2 Getting Started Before You Begin 2 2 Installing the IDM Agent 2 2 Using the IDM Auto Discover Feature 2 3 IDM Configuration Process Overview 2 3 IDM Usage Strategies 2 4 Understanding the IDM Model 2 5 IDM GUI Overview 2 6 IDM Dashboard 2 8 Using the Navigation Tree 2 9 Toolbars and Menus 2 13 Using IDM as a Monitoring Tool 2 14 IDM Preferences...

Страница 4: ...g New Realms 3 43 Modifying and Deleting Realms 3 44 Defining RADIUS Servers 3 45 Modifying and Deleting RADIUS Servers 3 46 Adding New Users 3 47 Adding users in IDM Manual Process 3 47 Modifying and Deleting Users 3 49 Using the User Import Wizard 3 50 Importing Users from Active Directory 3 51 Importing Users from an LDAP Server 3 57 Importing Users from XML files 3 68 4 Troubleshooting IDM IDM...

Страница 5: ...DM Architecture 1 5 Terminology 1 7 IDM Specifications 1 9 Supported Devices 1 9 Operating Requirements 1 9 Additional Requirements 1 10 Upgrading from Previous Versions of PCM and IDM 1 10 Learning to Use ProCurve IDM 1 15 Getting ProCurve Documentation From the Web 1 15 ProCurve Support 1 15 ...

Страница 6: ...of PCM to include authorization control features for edge devices in networks using RADIUS servers and Web Authentication MAC Authentication or 802 1x security protocols Using IDM simplifies user access configuration by automatically discovering Microsoft IAS RADIUS Servers Realms and users You can use IDM to monitor users on the network and to create and assign access policies that work to dynami...

Страница 7: ...tity in the user directory which can be an Active Directory database or flat file Based on the validation result received from the user directory the authentication server returns an accept or deny response to the switch 5 If the user is authenticated the ProCurve device grants the user access to the network If the user is not authenticated access is denied For networks using IDM access control is...

Страница 8: ...the user is authenticated the switch grants the user access to the network The IDM authorization information included in the authenti cation response is used to configure VLAN access QoS and Bandwidth parameters for the user and what network resources the user can access based on time and location of the user s login If the user is authenticated by the RADIUS server but IDM s authorization data in...

Страница 9: ...the user can access and what resources QoS bandwidth the user gets The following figure illustrates the IDM architecture and how it fits in with RADIUS Figure 1 4 IDM Architecture IDM consists of an IDM Agent that is co resident on the RADIUS server and an IDM Server that is co resident with PCM Configuration and access management tasks are handled via the IDM GUI on the PCM management workstation...

Страница 10: ...on and monitoring of Identity Driven Manager It operates as an add on module to PCM using the PCM model database to store IDM data and a Windows GUI client to provide access to configuration and monitoring tools for IDM You use the IDM GUI to monitor IDM Agent status and users logged into the network and to manage IDM configuration including Defining access parameters for the network such as locat...

Страница 11: ...ther wired or wireless Edge Device A network device switch or wireless access point that connects the user to the rest of the network The edge devices can be engaged in the process of granting user access and assigning a user s access rights and restrictions Endpoint Integrity Also referred to as Host Integrity this refers to the use of applications that check hosts attempting to connect to the ne...

Страница 12: ...s similar to an Active Directory Domain but it works across non Windows Linux etc systems Generally specified in User name as user realm VLAN A port based Virtual LAN configured on the switch When the client connec tion terminates the port drops its membership in the VLAN ...

Страница 13: ...stem requirements for IDM Server and Client installation are Minimum Processor 2 0 GHz Intel Pentium or equivalent Recommended Processor 3 0 GHz Intel Pentium or equivalent Minimum Memory 1 GB RAM Recommended Memory 2 GB RAM Disk Space 500 MB free hard disk space minimum A total of 1 GB will be required for PCM and IDM Implementation of one of the following RADIUS services The IDM agent will be in...

Страница 14: ...net locator us_partner index jsp If you plan to restrict user access to specific network segments you will need to configure VLANs within your network For information on using VLANs refer to the ProCurve Manager Network Adminis trator s Guide or the configuration guides that came with your switch Upgrading from Previous Versions of PCM and IDM The installation CD for PCM 2 1 contains the IDM 2 0 i...

Страница 15: ...ve Identity Driven Manager IDM Specifications When you upgrade to IDM 2 0 you need to manually install the IDM Agent upgrade on your RADIUS Server Refer to Installing the IDM Agent on page 2 2 for detailed instructions ...

Страница 16: ...License warning will be displayed each time you log in similar to the following Figure 1 5 ProCurve Expiring License warning dialogue Click No Continue to close the dialogue and just start the program Click OK to launch the Licensing administration screen NOTE You must first purchase a copy of ProCurve Identity Driven Manager from your networking reseller to get the Registration ID You do not need...

Страница 17: ...ier for the software as it appears in the upper left corner of the window You can also leave this window open and use the copy and paste functions to enter the Install ID in the My ProCurve software registra tion window 3 Click the Register button to go to the PCM registration web site 4 If this is an upgrade log in with your My ProCurve ID and password If you are a new user click the Register Her...

Страница 18: ...s in step 5 above 6 When you receive the License key go back to the Licensing window in PCM Enter the License key number in the Add license field then click Add To avoid data entry errors you can copy and paste the number from the e mail or My ProCurve My Software Web page NOTE You must first purchase a copy of ProCurve Manager Plus and or Identity Driven Manager to get the Registration ID You do ...

Страница 19: ...al information on configuring your network refer to the documentation that came with your switch Getting ProCurve Documentation From the Web 1 Go to the Procurve website at http www procurve com 2 Click on Technical Support 3 Click on Product manuals 4 Click on the product for which you want to view or download a manual ProCurve Support Product support is available on the Web at http www procurve ...

Страница 20: ...1 16 About ProCurve Identity Driven Manager ProCurve Support ...

Страница 21: ...IDM Configuration Process Overview 2 3 IDM Usage Strategies 2 4 Understanding the IDM Model 2 5 IDM GUI Overview 2 6 IDM Dashboard 2 8 Using the Navigation Tree 2 9 Toolbars and Menus 2 13 Using IDM as a Monitoring Tool 2 14 IDM Preferences 2 15 Using IDM Reports 2 18 IDM Session Cleanup Policy 2 27 User Session Information 2 29 ...

Страница 22: ...server to the access txt file on the PCM server For details refer to the ProCurve Manager Getting Started Guide under Configuring Client Server Access Permissions 2 Open a Web browser window on the RADIUS server and for the URL type in the IP address of the PCM server computer followed by a colon and the port ID 8040 For example if the IP address of the PCM server is 10 15 20 25 then on the RADIUS...

Страница 23: ...an display information for all RADIUS servers where the IDM Agent is installed WhenyoustarttheIDMClientandexpandthenavigationtreeintheIDMHome tab you will see any discovered or defined Realms found on the RADIUS server along with the IP Address for the RADIUS Server s IDM Configuration Process Overview To configure IDM to provide access control on your network first let IDM run long enough to disc...

Страница 24: ... monitor user activity on the network or to apply user authentication rules to improve network security and performance The following table identifies the IDM configuration for various deployment and usage strategies for IDM Table 2 1 IDM Deployment and Usage Strategies Authenticate Authorize Strategy Description VLAN QoS Rate Limit Network Resources Monitor and report user activity x Enhance norm...

Страница 25: ...ess Policy defined for it which governs the access rights that are applied to its Users as they enter the network In the IDM GUI the top level of the navigation tree is the Realm with all other information for APGs and RADIUS Servers beneath the Realm in the naviga tion tree Users are linked to the Realm to which they belong and the Access Policy Group to which they are assigned The IDM configurat...

Страница 26: ...ch the PCM Client The PCM Client will start up and the Login dialogue is launched Figure 2 1 PCM Client Login dialogue If you did not enter a Username or Password during install type in the default Username Administrator then Click Login to complete the login and startup For additional information on using the PCM Client refer to the ProCurve Manager Network Administrator s Guide ...

Страница 27: ...dows within the Identity Management Home window frame NOTE If the IDM Dashboard shows the IDM Agent Status as inactive and the Inventory and Logins panes show no data Check the PCM Events tab for the following entry PCM remote client authentication failure ip address Check for IDM application events related to devices supporting or not supporting the configuration Check to make sure the access txt...

Страница 28: ...entory The Inventory panel lists the current number of Realms RADIUS Servers Users Access Policy Groups Access Profiles Locations and Times that are defined in IDM IDM Events TheIDMEventspanelprovidesasummaryofIDMEventsbyseverity type Hovering with the mouse pointer over the event type displays the total number of events of that type currently in the log Clicking on the Events panel will display t...

Страница 29: ... The IDM tree is organized as follows Realms The top level of the tree lists each of the Realms that have been discovered by an IDM Agent or defined manually Clicking on the Realms node in the tree displays the Realms List in the right panel of the window Expanding the node displays each Realm name in the tree and Unassigned RADIUS Servers if they exist Figure 2 3 Realms List tab Clicking on the i...

Страница 30: ...a list of users in the Realm that were discovered by the IDM Agent or defined manually Figure 2 5 Realm Users tab NOTE There will be no auto discovered Realm Users or RADIUS server until a user has logged in to the network Expanding the Realm node in the tree will display the Access Policy Groups and RADIUS server nodes for the Realm ...

Страница 31: ... of currently configured groups You can also expand the node to view the APGs in the tree Figure 2 6 Access Policy Groups tab Click the individual group node in the tree to display the group s Properties Figure 2 7 Access Policy Group Properties tab The Users tab underneath contains the list of users currently assigned to the Access Policy Group ...

Страница 32: ...OTE If the RADIUS server is not in the IDM tree check in the PCM Events for the following message PCM remote client authentication failure ip address Make sure the IP address for the RADIUS server is included in the access txt file on the PCM server See Installing the IDM Agent on page 2 2 for details You can expand the RADIUS Servers node to view the servers in the tree Click the individual serve...

Страница 33: ...nent Toolbar icons for disabled functions are grayed out The component toolbar options are described under the process they support in the next chapter You can hover with the mouse to display Tooltips for each icon Using Right Click Menus You can also access most of the functions provided with IDM via the right click menus To use the right click menu select an object node in the navigation tree on...

Страница 34: ... Refer to the section on Radius Authentication and Accounting in the Access and Security Guide provided with the ProCurve switch for details on enabling session accounting You can enable or disable IDM monitoring using the IDM Preferences Using the IDM Preferences you can also configure IDM to work with existing Endpoint Integrity applications used to determine the compliance of the authenticating...

Страница 35: ...the Global Prefer ences Identity Management window Click on the option check boxes to select check or deselect blank the option 1 Toenable Endpointintegrity checktheEnableEndpointIntegritycheckbox This will enable the Endpoint Integrity option in the Access Rules defini tions and you can configure an Access Rule with one of the Endpoint Integrity options Pass Fail or ANY When you enable Endpoint I...

Страница 36: ...nd resets the RADIUS Server totals to zero when the server restarts If the status of users logged on or off seems incorrect it is possible that the session accounting is out of sync Use the Reset accounting statistics option to correct the problem This immediately closes any open sessions this has no effect on the user only on the IDM accounting and resets user login counts on the RADIUS server to...

Страница 37: ...erwritten each time user sessions are archived a To insert a timestamp in the front of the archive filename check the Prepend timestamp to archive filename option b To add a timestamp to the end of the archive filename check the Append timestamp to archive filename option 10 Click Ok to save your changes and exit the window Click Apply to save your changes and leave the Preferences window open Cli...

Страница 38: ...m the Tools menu The Report wizard screens and report parameters vary depending on the type of report selected When you select a report using the IDM Reports sub menu the Report wizard is launched Use the wizard to set filter options and selectable data elements When you click Finish the report is generated and the output displays on the IDM Client similar to the following example ...

Страница 39: ...ort Unsuccessful Login Report The Unsuccessful Login Report lists failed system logins which can be filtered by date The report includes the following information Bandwidth Usage Report The Bandwidth Usage Report lists bandwidth usage per User the top 25 bandwidth users You can filter the report to show results by top Users dates Realm and Access Policy Group This report is helpful in identifying ...

Страница 40: ...QOS Endpoint Integrity State BW Bandwidth User MAC Addresses The User MAC Addresses provides a listing of MAC Addresses in use and allowed for use by Access Policy Group and User You can filter the report to get data for any one or combination of Realm and Access Policy Group Endpoint Integrity State The Endpoint Integrity State report collects data on the Endpoint Integrity State for users along ...

Страница 41: ...1 From the global toolbar select Reports Schedule a Report option to launch the Report Scheduling Wizard The Report Scheduling wizard works in the same manner as a policy see Creating a Policy in Chapter 10 of the ProCurve Manager Network Administrator s Guide guiding you through the following steps 2 Enter a Name and Description for the report in the Set Policy Properties window 3 Click Next to c...

Страница 42: ...er the Start date and time b Click one of the radio buttons to select the Recurrence Pattern c Click to select the End date option Enter the End by date and time and Maximum occurrences as needed d Click Next to continue to the Report Type window ...

Страница 43: ...2 23 Getting Started Using IDM Reports 5 Click to select the Report Type from the list 6 Click Next to continue to the Report Filter window ...

Страница 44: ...se the All Dates option to set the Start Date and End Date for data to be included in the report The default report dates are from the first day of the month to the current date The Session Statistics Cleanup policy in PCM clears resets the session total to zero on the first day of each month b For some reports such as IDM Session History you also configure the data columns to be included in the r...

Страница 45: ... 25 Getting Started Using IDM Reports 9 Click the radio button to select the Report Format for output PDF HTML or CSV comma separated values 10 Click Next to continue to the Report Delivery Method window ...

Страница 46: ...eports appear in the PCM Policies list To edit the report policy 1 Select the report in the Policies list then click the edit icon in the toolbar to launch the report wizard 2 Edit the report parameters and the report schedule as needed To delete the report policy 1 Select the report in the Policies list then click the delete icon in the toolbar 2 Click Yes in the confirmation pop up to remove the...

Страница 47: ...n PCM on the first day of each month You can edit the policy if you want to change the cleanup recurrence schedule To modify the IDM Session Cleanup Policy 1 Click the Policies icon in the global PCM and IDM toolbar at the top of the window to display the list of Policies in PCM 2 Select the IDM Session Cleanup Policy and click the modify icon in the toolbar to start the policy wizard 3 Click Next...

Страница 48: ...ws in the End by field until the desired end date and time are shown IfyouselectedMaximumoccurrences typethenumberoftimesthepolicy should be enforced before it is disabled automatically 7 Click Finish to complete the process and exit the wizard If you select The action is Never No further action is required Policy definition is saved but will not be enforced One time No further action is required ...

Страница 49: ...euserlogged in and out where a user logged in from and how much bandwidth they consumed for example Based on the User Session information you can adjust access rights for users further restricting or providing additional network resources and access attributes as needed To review user session information 1 Navigate to the Realm the user belongs to and display the Users tab 2 Click the Session Info...

Страница 50: ...e user logged in Login Successful True if the user logged in successfully or False if login failed Location Name of the location where the user logged in Access Profile Access profile assigned to the access policy group governing the user s permissions during the session Realm Realm to which the user is currently assigned Username Username used to login Friendly Name Name of the user to which the ...

Страница 51: ... True if the user logged in successfully or False if login failed Reason login was unsuccessful Iftheloginwasunsuccessful thereasontheRADIUSserver or IDM denied the login e g access policy group not found for user or username password incorrect Session start Date and time the user logged in Session end time Date and time the user logged out or the session was ended Termination cause Reason the RAD...

Страница 52: ...the user to re authenticate you would use the Disable port function If you need to re enable the port so the user can resume the session use the Enable port function Click the Access Information tab to display details about the access attributes applied to the user session The Access Information tab of the User Status window contains the following information Location name Name of the location whe...

Страница 53: ...w 2 In the Username field type the complete user name of the user you want to find and display information This field is not case sensitive OR Access Policy Group Access policy group that governs user permissions for the session Access Profile Access profile assigned to the access policy group QoS assigned Qualityofserviceorpriorityforoutboundtraffic QoSranges from lowest to highest Rate limit ass...

Страница 54: ... sessions for the user 4 Click Find to display information for the specified user or computer 5 Click Close to exit the window User Reports To review information for multiple sessions run the User Report 1 Select a username in the Users tab of the Access Policy Group or RADIUS Server window 2 Click the User Report icon in the toolbar This launches the Report Wizard Report Filter window 3 Click the...

Страница 55: ...onfiguring User Access 3 37 Using Global Rules 3 39 Deploying Configurations to the Agent 3 42 Using Manual Configuration 3 43 Defining New Realms 3 43 Modifying and Deleting Realms 3 44 Defining RADIUS Servers 3 45 Modifying and Deleting RADIUS Servers 3 46 Adding New Users 3 47 Modifying and Deleting Users 3 49 Using the User Import Wizard 3 50 Importing Users from Active Directory 3 51 Importin...

Страница 56: ...including VLAN what VLANs the user can access QoS Quality of Service from lowest to highest Rate limits bandwidth that is available for the user Network Resources resources the user can access by IP address and or protocol These resources must be defined similarly to the Locations and Times used in the access rules Thus based on the rules defined in the APG the user gets the appropriate level of a...

Страница 57: ...e deployed to the IDM Agent on the RADIUS Server The authorization controls can then be applied when IDM detects an authenticated user login If you do not deploy the IDM configuration to the Agent on the RADIUS server it will not be applied NOTE If you want to modify or delete anAccess Policy Group or the locations times or access profiles used in the Access Policy Group make sure your changes wil...

Страница 58: ...guration Model Figure 3 1 Identity Management Configuration default display Click the node in the navigation tree to display the defined configuration parameters and add or edit new configuration parameters as described in the following sections ...

Страница 59: ...o match specific environments For example a generalized company location may include all of the ports on a switch or multiple switches through which users can connect to the net work You can define a lobby location as a single switch or a single port on the switch in order to restrict access to the network for visitors attaching to the network in the lobby To configure a location 1 Click the Locat...

Страница 60: ...ocation 1 Click the New Location icon in the toolbar to display the new locations window 2 Type in a Name for the location 3 Type in a Description for the location 4 Click Adddevice to open the New Device window and define the devices and or port combinations that will be included in the location ...

Страница 61: ...cted group Using the Manually enter device address option a Click the check box to enable the data entry field below it b Type in the IP address or DNS name of the device to be added 6 Use the Port Selection to define the ports on the device that will be associated with the location Click to select Any port on the switch or Click Select ports then use the pull down lists to select the Begin and En...

Страница 62: ...lick on a location in the navigation tree or in the Locations list to open the modify location panel You can also select the location in the list then click the Edit Location icon in the toolbar to display the Location in edit mode 3 Edit the location Name and Description as needed 4 To edit the device configuration for the location To Modify the device settings select the device in the list then ...

Страница 63: ... 1 Click the Locations node in the Identity Management Configuration navigation tree to display the Locations panel with the list of defined locations 2 Click on a location in the list to select it 3 Click on the Delete Location icon in the toolbar to remove the location The first time you use the Delete Location option a warning pop up is displayed Click Ok to continue or Cancel to stop the delet...

Страница 64: ...m the Classroom at any other time To configure a Time 1 Click the Times node in the Identity Management Configuration naviga tion tree to display the Times panel The Times window lists the name and description of defined times Double click the time in the list or select the time in the navigation tree to display the Time s properties including Name Name used to identify the time Description Brief ...

Страница 65: ...figuring Times Creating a New Time To configure a Time 1 Click the Times node in the Identity Management Configuration navigation tree to display the Times panel 2 Click the Add New Time toolbar icon to display the Create a new Time window ...

Страница 66: ...utton To restrict access to specific hours of the day click the From radio button and type the beginning and ending times The ending time must be later than the beginning time AM or PM must be specified Days of week Days of the week that a user will be accepted or rejected on the network Click the radio button next to the desired days Click the Custom radio button to enable the day s of the week c...

Страница 67: ... 3 12 4 Click Ok to save your changes and close the window NOTE If you modify or delete a Time check to make sure that the changes do not adversely affect users in Access Policy Groups where the Time is used Deleting a Time To remove an existing Time 1 Click the Times node in the Identity Management Configuration navigation tree to display the Times panel with the list of defined Times 2 Click on ...

Страница 68: ... to the current date You can use the field buttons to increase or decrease the date You can also type in a new date 5 In the Description field enter the text that will identify the holiday in the Holidays list 6 Click OK to save the holiday and close the window The new holiday appears in the Holidays list To edit a Holiday select it in the Holidays list then click Edit This launches the Edit Holid...

Страница 69: ...3 15 Using Identity Driven Manager Configuring Times ...

Страница 70: ...ple you can create a Network Resource to restrict guest accounts so that they only have access to the external Internet and no access to internal resources Or you can define a resource that allows HR employees to access the payroll systems and denies access to all other employees Network Resource features can be used only for switches that support IDM based ACLs As of this writing this includes on...

Страница 71: ...ose For details on the field entries refer to the definitions under Adding a Network Resource on the next page Name Name used to identify the resource IP Address IP Address for the switch associated with the resource any if the resource is being filtered by protocol Network Mask The subnet mask for the IP Address Ports Device port s associated with the resource or Any if the resource is being filt...

Страница 72: ...r the network resource Name Name used to identify the network resource Description Brief description of the network resource optional Resource Attributes IP Address To filter by device address uncheck the Any Address checkbox and type the IP address for the switch associated with the resource in the IP Address field Use the Any address option if you will be filtering by Protocol and application po...

Страница 73: ...nt Configuration navigation tree to display the Network Resources panel 2 Click in the list to select the network resource to edit then click the Edit Network Resource toolbar icon to display the Define Network Resource win dow 3 Edit the properties as needed Refer to Adding a Network Resource on the previous page for definitions 4 Click Ok to save the Network Resource definition and close the win...

Страница 74: ...ntity Management Configuration navigation tree to display the Network Resources panel 2 Click in the list to select the network resource to edit then click the Delete Network Resource toolbar icon 3 Click Yes in the confirmation pop up to complete the process The selected network resource is removed from the Network Resources list display ...

Страница 75: ...tings to provide the proper network access and resources for the user To begin click the Access Profiles node in the Identity Management Configuration navigation tree to display the Access Profiles window The Access Profiles window lists defined Access Profiles including The Access Profile tells the switch to override any local settings for the port the user is accessing with the settings specifie...

Страница 76: ...es are the same as defined in the Access Profiles list The Network Resources section lists the Network Resources included in the profile Priority The order in which the network resource rules are evaluated the first one to match each incoming packet is applied Action Indicates if access to the Network Resource is allowed or denied Resource The defined network resource name Accounting Tells the swi...

Страница 77: ...own menu which lists VLANs configured in PCM The DEFAULT_VLAN 1 allows access across all segments on the network If another VLAN is specified the user is only allowed access to that network segment QoS The Quality of Service or priority given to outbound traffic under this profile Select the setting from the pull down menu Bandwidth The rate limits applied for this profile Use the up down arrows t...

Страница 78: ...s profile The VLAN that gets set for a user will override the statically configured VLAN as well as the auth vid which may have been configured for that port Note also that if an unauth vid is set and the user is rejected by IDM for any reason the port is opened and the VLAN is set to the unauth vid 4 To assign the Network Resources click Edit This launches the Network Resource Assignment Wizard 5...

Страница 79: ... 6 To permit access to Network Resources a Select the Resource in the Available Resources list Use shift click to select multiple resources b Move the Available Resource s to the Allowed Resources list click c Click Next to continue to the Denied Resources window ...

Страница 80: ... 7 To deny access to Network Resources a Select the Resource in the Available Resources list Use shift click to select multiple resources b Move the Available Resource s to the Denied Resources list click c Click Next to continue to the Priority Assignment window ...

Страница 81: ...k Resources To change the priority click the Resource in the list then click Move down or Move up The first rule to match is the one that will be applied 9 Click Next to continue to the Default Access window 10 Select the option to tell IDM what to do if there are no matches found in the network resource access rules ...

Страница 82: ... to continue to the Resource Accounting window 12 Click the check box to enable the Accounting function optional This enables tracking of hits on this resource on the switch or access point Use CLI on the switch to review the hits 13 Click Next to continue to the Summary window ...

Страница 83: ...Access Profiles node in the Identity Management Configuration navigation tree to display the Access Profiles window 2 Click on an Access Profile in the list to select it 3 Click the Modify Access Profile icon in the toolbar to display the Modify Access Profile window The Modify window shows the details of the Access Profile similar to the Create a new Access Profile window 4 Modify the access prof...

Страница 84: ...ofile To remove an existing Access Profile 1 Click the Access Profiles node in the Identity Management Configuration navigation tree to display the Access Profiles window 2 Click on an Access Profile in the list to select it 3 Click on the Delete Access Profile icon in the toolbar to remove it The first time you use the Delete option a warning pop up is displayed Click Ok to continue or Cancel to ...

Страница 85: ...ork Location can identify physical wiring connec tions or VLANs configured to segment the network Time System Enpoint Integrity Access Profile Multiple access policy groups can be added to a realm and multiple access profiles locations and times can be referenced and configured in an access policy group When a user assigned to the APG is authenticated on the RADIUS Server the IDM Agent applies the...

Страница 86: ...Access Policy Groups tab You can expand the Access Policy Group APG node in the tree and click the individual APG node to display the policy Properties tab Creating an Access Policy Group 1 Click the Access Policy Group node in the IDM tree to display the Access Policy Groups tab 2 Click the Add Policy Group icon in the toolbar to display the New Access Policy Group window ...

Страница 87: ...reated by name and the ANY option If you select ANY and the access profile for the rule points to a VLAN ensure that the VLAN is configured on every switch to which users in this access policy group will be connecting Time Lists the Times you created by name and the ANY option System Systems from which the user can log in ANY allows user to login in on any system OWN restricts users to systems def...

Страница 88: ...kend ANY REJECT ANY weekday ANY Default When the user is authenticated IDM checks the Access Policies in the order listed If it is Saturday or Sunday the user s access is denied On any other day the user is allowed on the network If the order were reversed IDMwouldneverreadthe secondrulebecausethefirstrulewouldprovide a match every day of the week 8 Click OK to save the Access Policy Group and clo...

Страница 89: ...ference set the Endpoint Integrity option will appear in the Access Rules windows Select PASS to apply the access rule in cases where the system the user is logged in on passes the endpoint integrity check Select FAIL to apply the access rule in cases where the system the user is logged in on fails the endpoint integrity check Select ANY to apply the access rule regardless of the status passed fro...

Страница 90: ...window 4 Modify the Rules as needed by selecting different options from the pull down menus for each field see page 3 16 for field definitions 5 Click Ok to save your changes and close the window Click Cancel to close the window without saving the Access Policy Group changes Deleting an Access Policy Group 1 Click the Access Policy Group node in the IDM tree to display the Access Policy Groups tab...

Страница 91: ...e appropriate access to the network Click the Users tab on the Access Policy Group or Realm window to display the list of users The Users list identifies every defined user and contains the following infor mation for each user Logged In Icon indicates whether the user is currently logged in User is logged in User is logged out The icon is greyed out if session accounting is disabled Username Name ...

Страница 92: ...US servers but they are not governed by access policy group rules IDM will still collect and display event informa tion for users in the Default APG as long as they are authenticated by the RADIUS server 4 Click Ok to save the assignments and close the window The new APG assignments are displayed in the Users list Changing Access Policy Group Assignments To re assign users to a different APG 1 Cli...

Страница 93: ...to apply to a single user or access policy group Global Rules should not take the place of existing rules defined within the Access Policy Groups they are intended for special use cases To display global rules click on the Realm in the IDM navigation tree then click the Global Rules tab in the Realm display The Global Rules tab provides the following information for defined global rules Target Use...

Страница 94: ...To use the global rule for all users in the realm select the All Users To use the global rule for a specific user select Single User and type in the user name To use the global rule for an access policy group click Access Policy Group and select the group from the drop down menu Note If you want to create a global rule for multiple users or multiple groups you do this by creating multiple rules ea...

Страница 95: ... are listed in the Global Rules table Use the Move Up or Move Down button in the toolbar to arrange the rules in the order you want them to be applied IDM checks each rule in the list until a match on all parameters is found then applies the matching rule Changing Global Rules To edit Global Rules 1 Navigate to the Global Rules window 2 Select the rule you want to modify in the Rules list 3 Click ...

Страница 96: ...changes the IDM dashboard display will include a warning note in red text indicating that you need to deploy the new configu ration before changes will take effect Deployment overwrites and replaces the current configuration for that realm on that RADIUS server To deploy the IDM authorization policy configuration 1 Right click on the Realm in the IDM tree 2 Select the Deploy current policy to this...

Страница 97: ... the Add Realm icon on the toolbar to display the New Realm window 2 Enter the information for the Realm Type the Name used to identify the realm IntheAliasfield typeanalternatenamethatcanbeusedfortherealm ForexampleafullyqualifiedrealmNamecanbe idm main procurve and the Alias can be IDM This is most useful when using IDM with Active Directory andyoushouldmakesure thattheIDMrealmaliasmatches the A...

Страница 98: ...4 Click Ok to save the Realm changes and close the window The Realm modifications appears in the Realm List and Realm Properties tab To delete a Realm 1 Select the Realm in the Realm List 2 Click the Delete Realm icon in the toolbar 3 A pop up confirmation window is displayed When you delete a realm the users and Access Policy Groups belonging to the realm are also deleted Click one of the radio b...

Страница 99: ... clicktheRADIUS Servers folderintheIDMtreeandselectNew RADIUS server from the drop down menu to display the Define a New RADIUS Server window 2 In the IP Address field of the new RADIUS Server window type the IP address of the server being defined 3 In the Hostname field type the name used to identify the server in reports and displays 4 The Realm field defaults to the Realm where you selected the...

Страница 100: ...n the RADIUS server from the drop down menu Edit the Description of the server 4 Click Ok to save the RADIUS Server information and close the window The edited RADIUS Server information appears in the RADIUS List and the Properties tab for the server To delete an existing RADIUS Server NOTE Before you can completely delete the RADIUS server you need to uninstall the IDM Agent on the server Otherwi...

Страница 101: ...he Users tab on the Access Policy Groups or Realms window and then click the New User button to display the Define a new user window 2 Enter the information for the User Username The user s login name required Friendly Name Friendly name for the user Realm Select the Realm the user belongs to if different from the default realm Access Policy Group Select the Access Policy Group to which the user b...

Страница 102: ...ess to specific systems click New System to display the New User system dialog 5 Enter the MAC Address of the system in any format from which the user is allowed to login to the network then click OK The system information is displayed in the New User window If the user is allowed to login from more than one system repeat the process for each system 6 When the User s Systems are defined click OK t...

Страница 103: ... sets the access profile that is applied when the user logs in to the network The default is NONE Description Enter additional text describing the user if needed Add Modify or Delete User System information as needed To edit User Systems information select the System in the list then click Modify to display the Systems window and change the MAC Address To delete a User System select the System in ...

Страница 104: ...tomatically assigned to the appropriate policy group based on membership in the company directory When a user is removed from the company directory they are auto matically removed from the IDM user database In addition when a user s group membership is changed in the company directory their network access policy group is automatically changed accordingly Automating user import and synchronization ...

Страница 105: ... Users from Active Directory To import user information into IDM from an Active Directory 1 Select IDM User Import option from the Tools drop down list in the global toolbar This launches the IDM User Import Wizard 2 Click Next to continue to the Data Source selection window ...

Страница 106: ...3 52 Using Identity Driven Manager Using the User Import Wizard 3 Click the radio button to select the Active Directory data source 4 Click Next to continue to the Group Scope window ...

Страница 107: ...ction is done click Next to continue to the Import Groups window Group Description All Import users from all Active Directory groups Global Import users from the Global Active Directory group This will also get user data from any custom defined group in your Active directory Universal Import users from the Universal Active Directory group Domain Local Import users from the Domain Local Active Dire...

Страница 108: ...Import Wizard 8 Click the Select checkbox to choose the groups you want to import from the Active Directory to IDM If there is no checkbox the group already exists in IDM and does not need to be selected 9 Click Next to continue to the Add Users window ...

Страница 109: ... in the import data the user list is empty If any user exists in more than one Active Directory group you will be prompted to select the group the user will belong to in IDM a Select the group from the drop down list If you have a large number of users that belong to multiple groups click the checkbox to Assignalluserstoselectedgroup This will assign all the users to the selected group in a single...

Страница 110: ...ndow The Import data is compared to the existing user list in IDM Any users that exist in IDM that are not found in the Import data are listed Select any users you want to delete from IDM This window operates similarly to the Add Users window 12 Click Next to continue to the Users and Groups Commitment window 13 Click Go to save the selected group and user data adds and deletes to IDM 14 When the ...

Страница 111: ...n MS Active directory You can also import user data from other LDAP V3 version 3 servers e g Netscape LDAP server To import user information into to IDM from an LDAP Server 1 SelecttheIDM User Import optionfromtheTools drop downlistintheglobal toolbar to launch the IDM User Import Wizard 2 Click Next to continue to the Data Source selection window 3 Click the radio button to select the LDAP Server...

Страница 112: ... must be restarted after installing the certificate Contact your LDAP Administrator to get the certificate The trust store is available under the installation directory of PCM For example if PCM is installed under Program files Hewlett Packard type C cd c Program files Hewlett Packard PNM jre lib security C bin keytool import file ldapcertfile alias myldapcert keystore cacerts keypass certifi cate...

Страница 113: ... Base DN The Base Distinguished Name This is the node in the directory where the search for users will begin For example for the domain hp com the Base DN entry would be dc hp dc com Authentication Description Simple Simple authentication which is not very secure sends the LDAP server the fully qualified DN of the client user and the client s clear text password Digest MD5 In Digest MD5 the server...

Страница 114: ...p Simple authentication 1 In the Server field type the IP address or DNS name of the LDAP server 2 In the Domain field type the domainname It will be used tocreate a realm in IDM 3 Optionally in the Base DN field type the Base Distinguished Name IDM will search only for users and groups from this node of a directory tree 4 In the User field type the user s DN used to access the LDAP server 5 In th...

Страница 115: ... LDAP server administrator To set up Digest MD5 authentication 1 In the Server field type the DNS name of the LDAP server 2 In the Domain field type the domain name It is used to create a realm in IDM 3 Optionally in the Base DN field type the Base Distinguished Name IDM will search only for users and groups from this node of a directory tree 4 In the User field type the user DN used to access the...

Страница 116: ...ld type the IP address or DNS name of the LDAP server 2 In the Domain field type the domain name It will be used to create a realm in IDM 3 Optionally in the Base DN field type the Base Distinguished Name IDM will search only for users and groups from this node of a directory tree 4 In the User field type the user name used to access the LDAP server 5 In the Password field type the password associ...

Страница 117: ...et up External authentication 1 In the Server field type the DNS name of the LDAP server 2 In the Domain field type the domain name It is used to create a realm in IDM 3 Optionally in the Base DN field type the Base Distinguished Name IDM will search only for users and groups from this node of a directory tree 4 In the Keystore field type the keystore file name For JKS the Keystore is the location...

Страница 118: ...te from your LDAP Administrator For example if the X509 User Certificate is myldapcert cer and the alias is mycert use the following command to import the certificate in a keystore in c idmuser mykeystore on your IDM server C idmuser keytool import file myldapcert cer alias mycert trustcacerts keystore mykeystore If you are using a PKCS12 keystore ask your LDAP Administrator to provide you PKCS12 ...

Страница 119: ...f the LDAP server 2 In the Domain field type the domain name 3 Optionally in the Base DN field type the Distinguished Name IDM will search only for users and groups from this node of a directory tree 4 Click Next to continue to the Extract Users and Groups window The remainder of the process for importing users from LDAP Servers is the same as described for importing users from Active Directories ...

Страница 120: ... SSL_PORT 636 Port where LDAP server receives SSL bind requests BATCH_SIZE 50 Internal to IDM COUNT_LIMIT 0 Internal to IDM SASL_CONFIGURATION This section is for SSL configuration Digest MD5 Kerberos V5 and External QOP auth conf auth int auth Quality of protection Valid values are 1 and more of auth conf auth int auth separated by ENCRYPTION_STRENGTH high medium low Strength of encryption Valid ...

Страница 121: ...ption attribute DISPLAY_NAME displayName User display name attribute GROUP Group object OBJECT_CLASS Group Object class for Group COMMON_NAME cn common name attribute DESCRIPTION description Group Description attribute MEMBER member Group member attribute USER_MEMBER_ATTRIBUTE cn User attribute used to link member users from Group objects You would modify the LDAP_Server_Config section only if you...

Страница 122: ...wn in the XML User Import File Example on page 3 69 To identify the XML file 5 1 In the File name field type the complete path and name of the XML file 2 Click Next to continue to the Extract Users and Groups window The remainder of the process for importing users from LDAP Servers is the same as described for importing users from Active Directories a Select the Groups and Users to Import to IDM b...

Страница 123: ...er name username description user description displayName user display name Group name group name description group description Member name username Group Group name other group description other group description Group Domain DirData The description and displayName for the User element and the description for the Group element are optional Some Group elements may not have Member elements for exam...

Страница 124: ...3 70 Using Identity Driven Manager Using the User Import Wizard ...

Страница 125: ...4 1 4 Troubleshooting IDM Chapter Contents IDM Events 4 2 Using Event Filters 4 4 Using Activity Logs 4 8 Using Decision Manager Tracing 4 9 ...

Страница 126: ...t is cate gorized by the level of severity Sortable columns of information are available for each event Column Heading Description Source This column contains the name or IP address of the component or device that generated the event Severity The Severity column shows the severity of each event Events are categorized into five levels of severity Status The Status column identifies whether the even...

Страница 127: ...formation The details will vary based on the type of event Use the scroll bar or drag the top border of the Event Details section to review the entire event description Acknowledging an event indicates that you are aware of the event but it has not been resolved Depending on the IDM event settings the event is then removed from the event list or the status of the event is updated in the Events win...

Страница 128: ... icon in the toolbar Deleting an event removes the event from the Events list and reduces the Event count in the IDM Dashboard window Using Event Filters The events shown in the Events window can be filtered to show only specific types of events based on the device that generated the event severity date of occurrence or description To create an event filter 1 Click the Configure Filters icon on th...

Страница 129: ...a specific device or to filter out all events except a specific device Description Type the text for an event descriptions that you want to filter Use this parameter to filter out events by specific event description text Date Use this parameter to filter events for a specific date and time Status Use this parameter to display acknowledged or unacknowledged events only True acknowledged False unac...

Страница 130: ...In Date filters only events of greater or lesser value than the criteria are filtered 7 Click Ok to save the filter definition and exit the New Filters window The new filter appears in the Manage Filters list 8 Click Ok to close the Manage Filters window 9 Click Select Filters on the Events toolbar to display the list of filters then click to select the filter to be applied A check indicates the f...

Страница 131: ...t the filter to be deleted and click Delete The selected filter is deleted and the associated option is removed from the Select Filters drop down menu on the Events tab 5 Click Ok to exit the Manage Filters window Setting IDM Event Preferences Use the IDM Event Preferences to set up archiving and automatic deletion of events from the IDM Events tab and RADIUS Server Activity Logs To configure pref...

Страница 132: ... events will be retained 5 Click Ok to save the IDM Event Settings and close the window IDM s event archive is server logs IDMEventMgrServer ServerArchivedEvents log In a default installation the directory is Program Files Hewlett Packard PNM Using Activity Logs IDM also provides an Activity Log you can use to monitor events for specific RADIUS servers To view the Activity Log for a RADIUS Server ...

Страница 133: ...d off Log_radius_requests true false True will log RADIUS requests and the IDM agent response to RADIUS If the request is accepted then it also logs the access policy group policy rule and access profile that is sent to RADIUS The default setting is false RADIUS requests are not logged Log_radius_acc_events true false True will log session accounting events such as session start and stop The defau...

Страница 134: ...he SBR User directory If upper case characters are used in the password you may get the following error MAC Auth user gets rejected because of incorrect password The MAC Auth user will be rejected by SBR and eventually by IDM2 0 You can use the validate tool on SBR to verify if the MAC Auth user password is in lower case If it is not enter the MAC Auth user password MAC Address itself in lower cas...

Страница 135: ...r QoS support in IDM For the 2800 series release I 08 55 or newer of the device software is required for QoS support in IDM The 9300 series and 6100 series are not edge switches thus are not included in the table ProCurve unmanaged switches do not support IDM including 2700 series 2300 series 2124 and 408 Please check the ProCurve Web site www procurve com for the latest information on supported f...

Страница 136: ...ifferent than its pre Windows 2000 Domain Name then these two Domain Names may appear as different Realms to IDM This will only be true if users log into IDM using different formats e g OLDDOMAIN user versus user NewDomain Under most circumstances this will never be a prob lem It is best if the Active Directory Domain Name is the same as the pre Windows 2000 format e g use simple names without spe...

Страница 137: ... are two ways to look at the process of restricting user access using Access Profiles in Access Policy Group APG rules A Create rules that allow access B Create rules that reject access For example to create anAPG to allow accessduring the standard work week youcancreateaTimethatdefinesthe workweek thencreateanAccessPolicy to be applied during that time In this example a Default policy was created...

Страница 138: ...ove are quite simple However in instances where you want to be able to restrict user access to specific areas of the network at specific times or restrict network resources to users at specific times and locations the decision to use the allow vs reject method and the ordering of the rules becomes more complex Rate Limiting The option for rate limiting using the Bandwidth option in Access Profiles...

Страница 139: ...nown Realm for DM public static int REALM_NOT_FOUND 4 Realm config data is not found in DM cache public static int REALM_CACHE_NOT_FOUND 5 Access policy group is not found for a user public static int APG_NOT_FOUND 6 An access policy group doesn t have any policy rules public static int NO_RULES_IN_APG 7 Time constraint is not satisfied public static int TIME_DOES_NOT_PERMIT 8 Location constraint ...

Страница 140: ...A 6 IDM Technical Reference Types of User Events This page is intentionally unused ...

Страница 141: ...7 B Bandwidth 1 7 Bandwidth Usage Report 2 19 C Configuration Model 3 2 Configuration Report 2 19 D Decision Manager 1 6 delete 3 9 Deploy IDM configurations 3 42 Digest MD5 authentication 3 61 Disable user 2 32 Domain Names A 2 E Edge Device 1 7 Endpoint integrity enabling 2 15 Endpoint Integrity State 2 20 Endpoint Integrity support 3 35 Event Filter Operators 4 5 Event Preferences 4 7 Events 4 ...

Страница 142: ... 3 16 P port disable 2 32 Preferences 2 15 endpoint integrity support 2 15 Q QoS 1 7 R RADIUS 1 7 RADIUS Activity Log 4 8 RADIUS Server delete 3 46 edit definition 3 46 new 3 45 Rate Limiting A 3 Realm 1 8 delete 3 44 edit 3 44 Realms new 3 43 Rejecting access A 3 Reports scheduled 2 21 Rules sequence 3 34 Rules evaluation 3 34 S SASL Digest MD5 authentication 3 61 scheduling reports 2 21 Session ...

Страница 143: ...7 User Import Wizard 3 50 User Location Information 2 31 User MAC Addresses 2 20 User Properties 2 30 User Report 2 21 User Session information 2 29 User Systems 3 48 Users tab 3 37 W warranty 1 ii X XML file user import 3 68 XML Import File format 3 69 ...

Страница 144: ......

Отзывы: