background image

40  Chapter 4 General procedures

ENWW

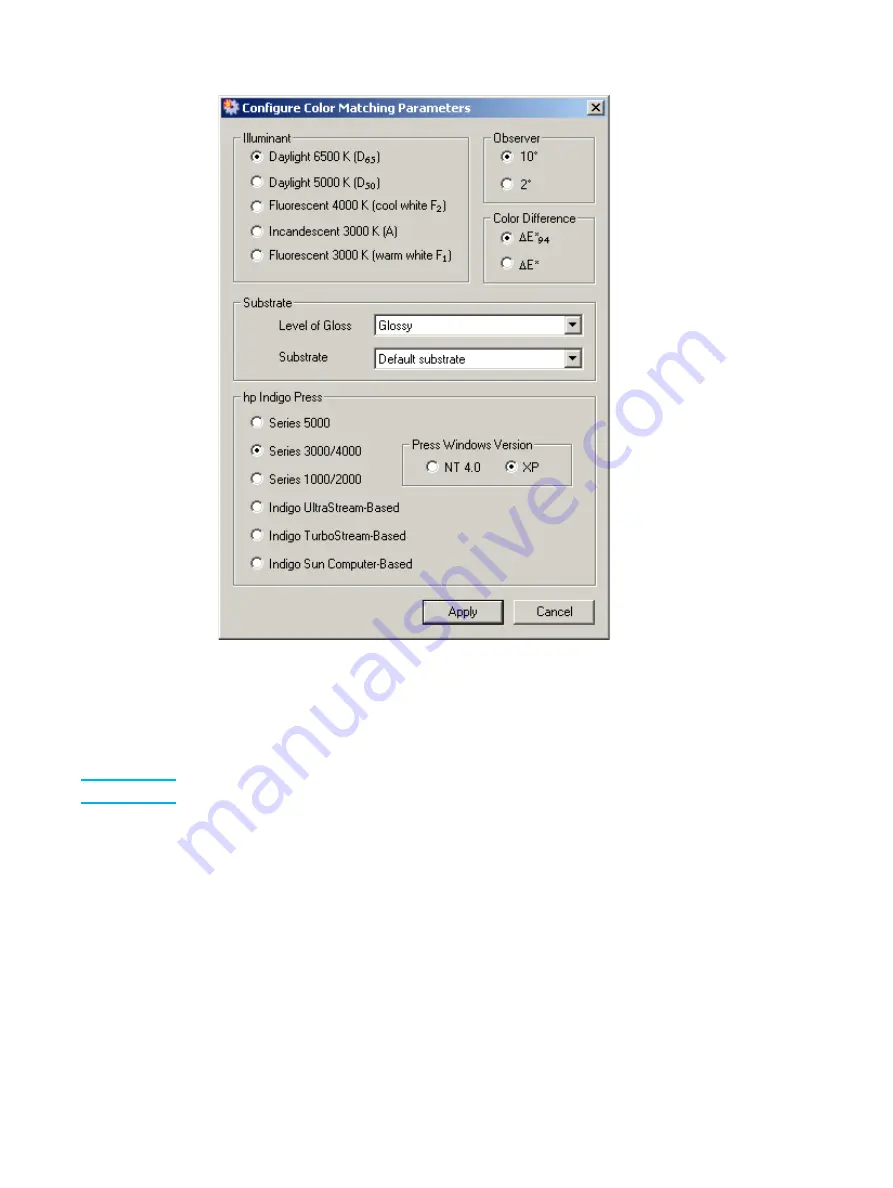
Configure Color Matching Parameters window

8

In the Illuminant section, select the type of lighting conditions that your customers use 
to check their printed output.

9

In the Observer section, select the spectrophotometer's angle of measurement. The 
default is 10°.

Note

The practical difference between 10° and 2° is insignificant.

10

In the Color Difference section, select the parameter to be used to indicate the color 
difference between the best or actual mix and the target color. See "

E*

94

" on page 

96 for an in-depth explanation of 

E*

94

.

11

The 

Level of Gloss

 parameter contents matches the choice made in step 4.  Select a 

different value only if necessary. 

12

Click the Substrates drop-down list. If the substrate is white, click Default substrate. If 
the substrate is other than white, do one of the following:

• Select the substrate from the list that most closely matches your substrate.

• Add a new substrate (refer to "Adding a new substrate" on page 74).

Содержание IndiChrome

Страница 1: ...HP IndiChrome Ink Mixing System User guide ...

Страница 2: ...HP IndiChrome Ink Mixing System User guide ...

Страница 3: ...ndigo Press HP Indigo Press RIP and HP ElectroInk are trademarks or registered trademarks of HP Adobe PostScript is a trademark of Adobe Systems Incorporated MS Windows and Windows are U S registered trademarks of Microsoft Corp All other products or name brands are trademarks of their respective holders The HP Indigo press is a Class 1 Laser Product containing high voltage power supplies and lase...

Страница 4: ...IMS software 27 HP IndiChrome Wizard 28 Toolbar 28 Exiting the IMS software 30 4 General procedures Calibrating the electronic scale 32 Calibrating the spectrophotometer 33 Performing a full calibration 33 Performing the daily calibration 33 Draining the water from the dispensing unit 34 Adjusting the dispensing unit for the press 35 Measuring a color 36 Selecting a PANTONE color 37 Save the Ink D...

Страница 5: ...revious version ink mix files 76 Exporting and deleting ink workspace files 77 Printing the color workspace details 77 Setting and displaying specific ink mix parameters 78 Color matching parameters 78 HP Indigo press selection 79 Ink print thickness 79 Color information summary 80 Increase decrease view of 2D color space 80 Zoom into 2D color space 81 Zoom by changing axes values 81 View the 3D c...

Страница 6: ...sion 94 Window menu item usage 95 How to use the IMS graphic window 95 Decreasing ink thickness 95 Using an old mix file for a new ink 95 Basic concepts 96 Color space 96 DE 94 96 Color gamut 97 System file types 97 Spare parts 98 Can shaker 98 Dispensing unit 99 Miscellaneous 100 Appendix B Service and support Index ...

Страница 7: ...6 Contents ENWW ...

Страница 8: ...hapter contains the following sections z User guide introduction z User guide structure z Conventions used in this guide z System requirements z Hardware configuration z Consumables z Important system information and limitations ...

Страница 9: ...ng and how to start and quit the HP IndiChrome ink mixing system software z 4 General procedures Describes the procedures that are performed during the various ink preparation steps how to calibrate the electronic scale and spectrophotometer measure sample colors adjust the air pressure of the dispensing unit prepare basic inks dispense ingredients and seal and shake cans z 5 Additional IMS proced...

Страница 10: ...in all uppercase for example Press the SHIFT key z Menu options appear in bold type for example From the File menu click New z Options in dialog boxes appear in bold type for example After selecting the options in the Print dialog box click OK z References to other sections in the guide appear in quotes for example See Installation on page 37 z Screen messages are displayed in a different font for...

Страница 11: ...on 7 0 z Pentium 133 MHz or faster computer at least 16 MB RAM Windows 95 or higher at least 5 MB free disk space one free serial port at least 16 bit or 64 K colors z Operational Local Area Network LAN your computer and the HP Indigo press computer must be nodes on the LAN This requirement is optional for Series 3000 4000 5000 presses UltraStream based presses Series 1000 2000 presses and TurboSt...

Страница 12: ...mixing system contains the following hardware components z Spectrophotometer The spectrophotometer measures colors It is connected to a serial port on the computer Spectrophotometer components z Crimper The crimper seals the receiving can with a valve Crimper Serial port adapter Main connector Second plug AC DC adapter cord jack AC DC adapter Power cord Calibration reference base Spectrophotometer...

Страница 13: ...pensing unit dispenses basic inks into a receiving can Dispensing unit z Shaker The shaker thoroughly mixes the prepared custom ink can Shaker Dispensing unit Coarse button Fine button Safety cover Timer knob Plate adjusting handle Upper plate Shaker plates ...

Страница 14: ...r compressor Note The label on the on off switch shows 250VAC This value refers to the switch only and indicates the upper limit of the supplied voltage Air inlet Air filter On off switch Air valve Outlet pressure knob Air outlet Outlet pressure gauge Air inlet Air filter On off switch Outlet pressure gauge Air valve Outlet pressure knob Air outlet ...

Страница 15: ...cans Magenta M MPS 2133 42 10 cans Cyan C MPS 2132 42 10 cans Black K MPS 2131 42 10 cans Orange 003 O MPS 2401 42 10 cans Violet 065 V MPS 2465 42 10 cans Bright Yellow 060 BY MPS 2460 42 10 cans Blue 013 B MPS 2403 42 10 cans Green 011 G MPS 2428 42 10 cans Rhodamine 050 Rh MPS 2450 42 10 cans Transparent 025 T MPS 2425 42 10 cans Startup kit MKT 0510 41 Mixed cans 2 MKT 0511 41 Empty cans 1 MKT...

Страница 16: ...k K Q4012A 10 cans Orange 070 O Q4003A 10 cans Violet 071 V Q4004A 10 cans Bright Yellow 074 BY Q4007A 10 cans Reflex Blue 075 RB Q4008A 10 cans Green 072 G Q4005A 10 cans Rhodamine 073 Rh Q4006A 10 cans Transparent 076 T Q4009A 10 cans Startup kit MKT 0510 51 Mixed cans 2 MKT 0511 51 Empty cans 1 MKT 0512 51 Mixed cans X MKT 0511 51 10 cans O V BY RB G Rh T and three empty cans Empty cans E MKT 0...

Страница 17: ...3 10 cans Black K MPS 3131 43 10 cans Orange 070 O MPS 3135 43 10 cans Violet 071 V MPS 3136 43 10 cans Bright Yellow 074 BY MPS 3123 43 10 cans Reflex Blue 075 RB MPS 3124 43 10 cans Green 072 G MPS 3121 43 10 cans Rhodamine 073 Rh MPS 3122 43 10 cans Transparent 076 T MPS 3125 43 10 cans Startup kit MKT 0510 51 Mixed cans 2 MKT 0511 51 Empty cans 1 MKT 0512 51 Mixed cans X MKT 0511 51 10 cans O ...

Страница 18: ...as they should be Double print The HP IndiChrome ink mixing system software may suggest that you formulate the ink for double printing This occurs when the best mix color in single print is not bright enough If you print the separation of such ink twice the solid color effect is accurate but the color shades are not Therefore double print should be used for printing solids only If you double print...

Страница 19: ... caused by using Rhodamine ink It causes the color of the squeegee in Series 1000 2000 TurboStream based and Sun computer based presses and the color of the developer in Series 3000 4000 5000 and UltraStream based presses to change to yellow However no deterioration of any other characteristics of the squeegee or developer is expected It causes an excess of particle residue to be found in the sepa...

Страница 20: ... the following sections z General warning z Warning signs z Material Safety Data Sheets MSDS z Preventing eye irritation z Electrical safety precautions z Emergency power cutoff z Flammable liquids and fumes z Handling and storing imaging oil and inks z Waste disposal ...

Страница 21: ...hrome ink mixing system should be posted at the site The following texts are recommended z To be operated by certified operators only z Do not wear ties or other loose clothing or loose jewelry when operating and maintaining the unit z No smoking open flames or sources of ignition allowed z Verify that the room is properly ventilated at all times z Keep hands away from moving machine parts z Ink a...

Страница 22: ...your country region Do not operate the shaker if it is not properly grounded If in doubt check with a licensed electrician or with your local HP Indigo office z We recommend that you perform a weekly check of grounding cables Emergency power cutoff Use one of the following methods to cut off power to the shaker in an emergency z Pull the electric plug out of the wall z Turn the timer to zero Flamm...

Страница 23: ...lations z When handling imaging oil and inks wear safety glasses with side shields long sleeved overalls and protective gloves as indicated on the Material Safety Data Sheets z Do not drink or otherwise ingest imaging oil or inks Waste disposal During the operation of the HP IndiChrome ink mixing system you use consumables that should be disposed of properly Consult your local authorities to deter...

Страница 24: ... 3Getting started This chapter contains the following sections z Overview z Detailed Automatic Workflow z Starting the ink mixing system IMS software z HP IndiChrome Wizard z Toolbar z Exiting the IMS software ...

Страница 25: ...repare a custom ink as follows 1 Ink formulation a Determine through measurement or PANTONE color selection the target color b Set the color match parameters for example substrate glossiness and type c Send the ink definition file to the HP Indigo press d Prepare and test a first can Prepare and test first can Is color OK Prepare additional cans Yes Prepare and test fix can Prepare and test new fi...

Страница 26: ...onal cans prepare the press for printing with the custom ink and prepare the RIP if necessary to accept a print file with special colors In the Manual method the HP IndiChrome Ink Mixing System does not determination the ink weights Thus the only possibility for correcting a color is through a fix can where the ink weights used in the fix can is determined by the person preparing the color Note On...

Страница 27: ...color to the expected color Perform color adjustment Select the sample print for comparison Visually inspect the printed color colors match No Improve color with fix can Prepare a fix can Mix the ink Prepare the basic inks Dispense the ingredients Seal and shake the can Prepare the press for test printing Add ink Perform flush Prepare a new first can Mix the ink Prepare the basic inks Dispense the...

Страница 28: ...MS software double click the Indimix V5 5 icon The following window appears hp IndiChrome window The hp IndiChrome Wizard window is open when the IMS software starts Note If the X Rite densitometer is not connected properly a message appears informing you to connect the densitometer and restart the IMS software ...

Страница 29: ... Wizard window at other times click the button The following ink mixing procedures are available z Choosing a PANTONE color see page 37 z Ready Mix Colors see page 64 z My Colors see page 68 z Manual Color Mixing see page 69 z Custom Color see page 71 Toolbar The following buttons are available on the IMS Toolbar IMS Toolbar Buttons Button Meaning Details Open the hp IndiChrome wizard See HP IndiC...

Страница 30: ...y a summary of the color information See Color information summary on page 80 Save the ink definition file See Save the Ink Definition file on page 43 Checks for better results with different illuminants See Improving visual match by changing illuminant on page 58 Set the axis range displayed in the 2D color space See Zoom by changing axes values on page 81 Show Hide the ink mix details panel See ...

Страница 31: ...n the File menu click Exit The Are you sure message appears Are you sure message 2 Click Yes If you changed any of the parameters affecting an ink mix the following message appears for each affected workspace Save changes message example To save the changes click Yes and click Save in the Save My Colors window ...

Страница 32: ...ess z Measuring a color z Selecting a PANTONE color z Transferring the ink definition file to the press z Preparing the basic inks z Dispensing the ingredients z Sealing the can z Shaking the can z Visually comparing the printed color z Adjusting the ink mix from the printed output z Undoing and redoing a measurement z Changing the optical density OD spec value z Comparing different ink mix result...

Страница 33: ... two seconds for the scale to show results 3 Press the Off button The message CAL 0 appears on the display 4 Place the adjusting weight in the center of the weighing pan After a short while the message CAL F appears on the display for a short time The exact weight of the adjusting weight that is 500 0 should appear on the display shortly afterwards If an adjusting error occurs or the wrong adjusti...

Страница 34: ...the Black calibration successful and the White calibration successful messages appear on the screen the full calibration was successful If not repeat this procedure one more time before calling the customer engineer Performing the daily calibration Calibrate the spectrophotometer once a day 1 From the Utilities menu click Calibrate Spectrophotometer and Frequent Calibration 2 Follow the instructio...

Страница 35: ...it do the following 1 Close the compressed air valve on the air compressor or compressed air pipe whichever you are using Draining the dispensing unit 2 Close the transparent safety door 3 Press and hold the Coarse button until all the excess air goes out of the dispenser 4 Release the Coarse button The water drains into the water container 5 Empty the water container Transparent safety door Dispe...

Страница 36: ... 1000 2000 TurboStream based and Sun computer based presses The nozzle is screwed onto the top can holder Adjusting the dispensing unit When dispensing to an empty Series 3000 4000 5000 or UltraStream based ink can place it directly on the weighing pan When dispensing to an empty Series 1000 2000 TurboStream based or Sun computer based ink can place it on a spacer ring on the electronic scale weig...

Страница 37: ...ectrophotometer To measure a color 1 Clear the sample surface of any dirt dust or moisture 2 Place the spectrophotometer shoe directly on the surface aligning the target eye opening over a continuous patch of the desired color 3 Press the spectrophotometer head down onto the shoe and hold it closed 4 Hold the head down until the spectrophotometer stops vibrating Make sure that you hold the spectro...

Страница 38: ...The PANTONE Color Simulations window appears Alternatively click the button or from the Edit menu click PANTONE Color Simulations PANTONE Color Simulations window Note If an R the letter R within parentheses appears next to the PANTONE color name the color is available as a Ready Mix color see Ready Mix colors on page 64 2 If your PANTONE Color Formula Guide is dated year 2000 or later select the ...

Страница 39: ...s selected the following message is displayed Very Matte Warning message If the Configure Color Matching Parameters window appears continue with step 8 6 If the ink mix only matches the target color under specific lighting conditions the Warning Metameric window appears Warning Metamerism window Two colors are considered metameric if under a specified illuminant they appear equivalent to the avera...

Страница 40: ...e mix precision on page 94 for an explanation of mix precision 7 If the target color is out of gamut at the regular thickness of the ink layer the Increase Thickness window appears You can improve the color match by printing with a greater ink thickness Increase Thickness window Select the relevant ink thickness as follows and click OK Regular thickness refers to a single print of the custom color...

Страница 41: ... section select the parameter to be used to indicate the color difference between the best or actual mix and the target color See E 94 on page 96 for an in depth explanation of E 94 11 The Level of Gloss parameter contents matches the choice made in step 4 Select a different value only if necessary 12 Click the Substrates drop down list If the substrate is white click Default substrate If the subs...

Страница 42: ...ss is one of the following select the operating system of the press Series 3000 4000 Series 1000 2000 Indigo TurboStream based HP Indigo Press section with Press Windows Version displayed 14 Click Apply The Save Workspace message displays Save workspace dialog box 15 Click Yes The Save My Colors window displays ...

Страница 43: ... type You can edit the default file name For example if the mix color is to be printed using a double print edit the file name to indicate this requirement This will ensure that the name of the ink file will indicate to the operator that a double print is required 16 Click Save Note For details on the Export File and Delete File procedures available from the Save My Colors window see Exporting and...

Страница 44: ...he Save Ink Definitions File window provides a file name for the ink definition file This name is the combination of the PANTONE color name and the press type You can edit the default file name Note The My Colors default location is C Program Files IMS This location can be opened by clicking on Utilities and Open Ink Definition File Folder 2 Click Save The following message appears Ink Definition ...

Страница 45: ...e printed the following message appears Remember to double print message Click OK Note Saving the ink definition file changes the color s workspace Stopping work on this color at this time will generate a message to save changes to the color Saving the color s workspace 1 From the File menu click Save or click the button The Save My Colors window displays ...

Страница 46: ... PANTONE color 45 Save My Colors window 2 Click Save If the workspace was already saved under that file name the following message is displayed File Already Exists window To continue with saving the workspace click Yes ...

Страница 47: ...ly the ink definition files select On Site Mixing osm in the Files of type field 4 Select the ink definition file The file must have the osm extension 5 Click Open 6 Click Close Indigo Sun computer based presses 1 Login User Mode as Supervisor to access the necessary options 2 From the Config menu click Colors Data Base The Colors Data Base window appears 3 Click OnSite DB 4 Click Read Note If the...

Страница 48: ...shaker Note The only cans that need shaking are those that have not been shaken in the past 24 hours Note If a basic ink can has been used previously some imaging oil may spill out of the can during shaking To prevent this wipe the bottom of the can with a tissue and cover the hole at the bottom of the can with adhesive tape 3 Operate the shaker to ensure that each basic ink is of uniform concentr...

Страница 49: ... is at the bottom closed end of the new empty receiving can by gently pushing down on it with the rounded end of a spatula Note A fix bottle is sometimes used instead of an empty receiving can when preparing a fix can 3 Open the transparent safety door of the dispensing unit and insert the first or next ingredient can listed in the Ingredients list Close the safety door 4 Press the red Tare button...

Страница 50: ...ula take small amounts of ink from the can cover and put them into the receiving can until the required amount of ink is reached CAUTION Beware of sudden ink spills 6 Optional Click the box in the check list that corresponds to the ingredient that you have finished adding to the receiving can Ingredients list 7 If you are dispensing into a receiving can repeat steps 2 through 5 for all the other i...

Страница 51: ...pacer ring 2 Raise the crimper lever all the way up 3 Put a valve on top of the prepared ink can Valve and prepared ink can 4 Push the round can base down and carefully insert the can into the can crimper Make sure that the top of the can enters the crimper completely and that the can is centered and flat on the round can base or spacer ring if it is used and not tilted Spacer ring Round can base ...

Страница 52: ...tion of cans into the shaker manually rotate the shaker plates until they are horizontal 3 Rotate the plate adjusting handle counterclockwise to raise the upper plate 4 Place an adapter ring on the valve side of the can and insert the can into the shaker with the valve facing up Note You may insert up to four cans in the shaker Position the cans in the central area of the shaker plates Lever Ink c...

Страница 53: ...for first and fix cans or four minutes for additional cans Note Rotating the timer knob operates the shaker You can stop the shaker by rotating the timer knob back to 0 8 When the shaking stops open the safety cover raise the upper plate and remove the cans 9 For additional cans shake the cans a second time by reinserting the cans with the valves facing down and repeating steps 5 through 8 Note Ad...

Страница 54: ...ted output Adjusting the ink mix from the printed output 1 With the IMS software running measure the printed color with a spectrophotometer The Spectral Measurement window appears Spectral Measurement window 2 Verify that the Actual Mixture of Inks option is selected If not select it Note If the Target Color option is selected and the Actual Mixture of Inks option is unavailable grayed out do the ...

Страница 55: ...appears without a preliminary accurate color match report Additional cans window The choice is as follows z Select Stop improving the formulation and click Apply at this stage you can now create cans of required ink color In the software the Weight changes to Additional cans and Best Mix displays the ink weights required for creating the additional cans z Select Continue improving the formulation ...

Страница 56: ...llowing message appears Compromise window The calculated ink weights needed to correct printed color would add to much ink to the ink tank The choice is as follows z Select Make a compromise correction and click OK create a compromise fix can that won t put too much ink in the ink tank The software displays the ink weights for the compromise fix can Prepare and install the fix can Print a new samp...

Страница 57: ... Measurement window see Changing the optical density OD spec value on page 57 and print another sample page Measure the color again The software resets the ink weights to the values they had before the measurement z Select Let the software try to mathematically account for the error in optical density and click Apply the software displays fix can ink weights Prepare and install the fix can Print a...

Страница 58: ...ed in the Undo Measurement window for the custom ink 5 Click OK 6 Click Print If you use an off line densitometer make sure that you measure the optical density OD with the optical filter specified in the Manual Color Adjustment window 7 Record the Measured OD of 100 value from the Custom Auto Color Adjustment window Note The measured OD value is very important for future printing Record the value...

Страница 59: ...to add window opens Which Color to Add window Select the color that you believe will give the best improvement The IMS system checks all the color results against different illuminants and if possible will recommend a more appropriate illuminant for the viewing environment If the following message appears click OK and the system will continue the check against another illuminant No spectral inform...

Страница 60: ...found the Change Illuminant window opens Change Illuminant window The recommendation is to change the current illuminant and the default illuminant Click Apply If no appropriate illuminant change is found the following message appears No illuminant gives requested correction message Click OK ...

Страница 61: ...om the pop up menu The Actual Mix window for that measurement result appears The Actual Mix window displays the following details The name linked to the measurement The ingredients of the mix as a percentage The optical density The change from the target color E 94 and the difference from the previous measurement L a b Note It may be required to zoom into the 2D color space to correctly differenti...

Страница 62: ...go press ws2000 user guide MNU 1651 51 HP Indigo press series 3000 HP Indigo press series 4000a UltraStream 2000 a See the last row of the table for exceptions Ink Replacement Kit user guideb b These manuals are included in the HP IndiChrome Ink Mixing System CA293 02280 HP Indigo press 5000a Ink Replacement Kit for the HP Indigo press 5000 user guideb CA294 02612 HP Indigo press 5500 Upgraded HP ...

Страница 63: ...62 Chapter 4 General procedures ENWW ...

Страница 64: ...rkflow z Mixing a custom color z Excluding a basic color from the ink mix z Adding a new substrate z Importing mix files including previous version ink mix files z Exporting and deleting ink workspace files z Printing the color workspace details z Setting and displaying specific ink mix parameters z Increase decrease view of 2D color space z Zoom into 2D color space z Zoom by changing axes values ...

Страница 65: ...ess and as many additional cans as required for print use Note The ink definition file for each Ready Mix color is located in the Ready Mix folder in C Program Files IMS To obtain the ink weights for a Ready Mix color perform the following steps 1 From the hp Indichrome Wizard window select Ready Mix Colors and click Apply The Ready Mix window appears Alternatively click the button Ready Mix windo...

Страница 66: ...Mix Colors window the following abbreviations are used R Ready Mix color C Coated paper D Double Print required 3 Select the Ready Mix Color from the list and click Load The color appears on the color space and ink weight information is displayed under the Ready Mix Color button ...

Страница 67: ...ick First Can to display the ink weights for the first can and click Additional Cans to display the ink weights for the print cans Note The Ready Mix workspace cannot be saved If required Ready Mix workspaces can be moved to manual color mixing See Manual color mixing on page 69 ...

Страница 68: ...ink definition file Clean the ink system Assign ink parameters to the target ink tank Add imaging oil Add ink Perform flush Calibrate the ink density sensor Perform color adjustment and visually inspect the printed color Click on Additional cans Prepare the RIP for the digital print Save the used custom ink INK FORMULATION PRODUCTION Prepare additional cans Specify the can capacity Dispense the in...

Страница 69: ...d window select My Colors and click Apply The Load My Colors window appears Alternatively click the button or from the File menu click Open Load My Colors window 2 Select the required mix color from the list and click Load The mix color s workspace loads and the details are displayed The color is available for further work Note For details on the Export File and Delete File procedures available fr...

Страница 70: ...nges can be made manually the fix can ink weights can be entered manually In addition to work with an ink mix where only the mix weights are supplied requires entering manual color mixing Note Once the manual process is entered return to the automatic process for that color is not available To enter manual color mixing select Manual Color Mixing on the hp Indichrome Wizard window or the Ink mix de...

Страница 71: ...rison of the printed color Print and compare the printed color to the expected color Perform color adjustment Select the sample print for comparison Visually inspect the printed color colors match No Prepare a fix can Mix the ink Prepare the basic inks Dispense the ingredients Seal and shake the can Prepare the press for test printing Add ink Perform flush Prepare the RIP for the digital print Sav...

Страница 72: ...from a printed page Using L a b target values To obtain the ink weights for a custom color perform the following steps 1 From the hp Indichrome Wizard window select Custom Color and click Apply The Create Custom Color window appears Create Custom Color window 2 Select the paper type 3 Enter the L a b target values and click Apply The Configure Color Matching Parameters window appears 4 Continue wi...

Страница 73: ...w appears Alternatively click the button or from the File menu click New 2 Measure the target color directly using the X Rite spectrophotometer The Spectral Measurement window appears Spectral Measurement window 3 Ensure that Target Color is selected 4 Click Apply The Configure Color Matching Parameters window appears 5 Continue with Selecting a PANTONE color step 8 on page 40 ...

Страница 74: ...asic color and select Properties from the pop up menu The Edit Basic Ink window appears Edit Basic Ink window 2 Clear the Active check box and click Apply The inactive color s flag is changed to gray and the color if present in the ink mix is removed from the ink mix To restore the availability of a basic color do the following steps 1 Right click on the basic color and select Properties from the ...

Страница 75: ...eters window see page 40 or page 78 if none of the substrates match the substrate for the print job a new substrate can be defined To define a new substrate do the following steps 1 Select Add new substrate from the Substrate list on the Configure Color Matching Parameters window Substrate list The Create New Substrate window appears ...

Страница 76: ...xtension 4 Click Save The measure spectrum now message appears Measure spectrum now message 5 Click OK 6 Measure the color of the substrate with the spectrophotometer The SPECTRUM RECEIVED message appears in the window below the Glossy Substrate Filename field Spectrum Received message 7 Click Apply The new substrate matching the substrate filename is now available for selection in the Substrate l...

Страница 77: ...e and select the mix files to be imported and click Open The message opens reporting on the number of files successfully imported and advising that the ink definition files should be re created Imported successfully and recreate ink files message 4 Click OK To import mix files made for a different HP Indigo press do the following steps 1 From the File menu click Import Import other press types mix...

Страница 78: ...ave My Colors windows are open For example to open the Load My Colors window select or from the File menu click Open Load My Colors window Select the required mix workspace name and click Export File or Delete File as required Printing the color workspace details To print the color workspace details perform the following steps 1 From the File menu click Print A standard Print window appears Altern...

Страница 79: ...r Matching Parameters window appears Configure Color Matching Parameters window Options relating to the following color matching parameters can be set from this window z Illuminant z Observer z Color difference z Substrate z HP Indigo Press For information on these options refer to page 40 To accept any changes to the color matching parameters click Apply ...

Страница 80: ...k definition file is altered as necessary Note Changing to Series 1000 2000 Indigo TurboStream Based or Indigo Sun Computer Based from one of the other presses causes the ink mixing system to discard the ink mix information for the current color 2 Save the current workspace Ink print thickness Click the button The Ink Layer Thickness window appears Ink Layer Thickness window The following thicknes...

Страница 81: ...ttings of the Color Matching parameters Close the window to continue work Increase decrease view of 2D color space To increase the size of the 2D color space panel on your monitor click This hides the color mixing information panel and allows the 2D color space panel to expand to the full width of the window Click again to display the color mixing panel and reduce the 2D color space panel to its p...

Страница 82: ... reduced area of the 2D color space To return to the default view of the 2D color space right click in the 2D color space panel and select Restore Default Scale from the pop up menu Zoom by changing axes values To change the scale used in the 2D color space panel and therefore change the portion of the 2D color space displayed perform the following steps 1 Click The Scale window appears Alternativ...

Страница 83: ... 2D representation of the CIE L a b color space To display a 3D representation of the color space perform the following steps 1 Click in the 2D space 2 Click the button 3D color space window To rotate on an axis of the 3D color space move the cursor left or right To change the axis used for rotation press Tab To zoom in on the 3D color space hold right click and move the cursor to the left to zoom...

Страница 84: ...of the HP IndiChrome window This chapter contains the following sections z Introduction z HP IndiChrome window customization z Saving and loading the HP IndiChrome window customization z Viewing and hiding the Toolbar and Status bar ...

Страница 85: ...omizable elements The HP IndiChrome window has the following customizable elements z Ink mix details back ground color z 2D color space background color not specifically visible in the above figure z Color name font z Visibility of the background bitmap In addition custimization sets can be saved and then loaded as preferred All these customization options are available from the Configuration subm...

Страница 86: ...ackground Color The Color window appears Color window 2 Select one of the default colors and click OK Alternatively click Define Custom Colors The Color window expands to allow for custom color selection Color window expanded Click on the custom color or enter the HSL or RGB values Click Add to Custom Colors The custom color appears in a Custom color rectangles Select the required rectangle and cl...

Страница 87: ...Refer to step 2 on page 85 for details on using the Color window Note The default background color for the 2D color space panel is white Changing the color name font 1 From the Configuration submenu of the View menu select Change Colors Font The Font window appears Font window 2 Select the font details you want for the color name display and click OK Note The default font for the color name in the...

Страница 88: ...mizations of the HP IndiChrome window can be saved and loaded as required Note The HP IndiChrome window always opens with the default look Saving the customization 1 From the Configuration submenu of the View menu select Save Configuration The Save View Configuration window appears Save View Configuration window 2 Type in a File name and Click Save Note You can set the custom configuration as defa...

Страница 89: ...onfiguration The Load View Configuration window appears Load View Configuration window 2 Select a configuration file and click Open Viewing and hiding the Toolbar and Status bar To view or hide either the Tool bar or the Status bar select respectively Toolbar or Status Bar from the View menu HP IndiChrome window Toolbar and Status bar Toolbar Status bar ...

Страница 90: ...ENWW 89 7Help This chapter contains the following sections z Online help z Useful links z Program updates ...

Страница 91: ...tton Help Topics window This is a standard Windows Help Topics window and after an initial standard database creation step the help topics can be searched Useful links The HP IndiChrome comes with a HTML page of useful links To access this page select Useful Links from the Help menu Program updates To access the web page for program updates click the button ...

Страница 92: ...ENWW Program updates 91 ...

Страница 93: ...92 Chapter 7 Help ENWW ...

Страница 94: ...ENWW 93 ASpecial options basic concepts and spare parts all presses This appendix contains the following sections z Special options z Basic concepts z Spare parts ...

Страница 95: ...essages such as The Actual Mix is only xx units away from the target color An accurate formulation has been achieved With these messages the software is merely suggesting that you complete the ink formulation stage they are not imperative instructions You may decide to continue trying to achieve a better match to the target color In addition mix precision determines the degree of metamerism that b...

Страница 96: ...ual mixes are represented by circles An outlined circle represents the actual mix that is currently in the ink tank A solid circle represents a previous actual mix To view the formulation of the best mix or of an actual mix right click on the plus or circle on the a b plot To zoom in on a region click and drag the mouse on that region To restore the default scale right click on the graphic display...

Страница 97: ...he brightness of a color Colors with large C values are referred to as bright saturated colors whereas colors with small C values are referred to as dull colors C is defined as E 94 As a default the HP IndiChrome ink mixing system uses E 94 to quantify differences between colors If the value of E 94 is small the two colors being compared are similar If the value of E 94 is large the two colors bei...

Страница 98: ...turated and neutral colors Color gamut The gamut of a printing device is the subspace of the color space that contains all the colors that may be printed by the device When a target color is found in the gamut of the ink mixing system the predicted E 94 of the best mix versus the target color is zero When the target color is outside the gamut IMS computes the best mix with the smallest possible E ...

Страница 99: ... number Back pad MJX 1058 01 Base pad MJX 0971 01 Can adapter rings 6 MJX 0912 01 Front pad and adhesive strip MJX 0946 01 MJX 1234 01 Timer knob MKN 0016 01 Upper and lower plate pad MJX 1113 01 Back pad Interlock Motor motor belt and timer inside Timer knob Base pads Lower plate pad Upper plate pad Safety cover Front pad and adhesive strip ...

Страница 100: ...N 0205 01 Air compressor 100 VAC Japan MFN 0206 01 Air and water tube 2 m MJX 1212 01 Electronic scale kit MJX 1146 51 Nozzle long MJX 1596 51 Nozzle short MPX 9053 52 Spacer ring MJX 1595 01 DISPENSPT CDR Air release valve Transparent safety door Air tube Electronic scale Interlock Can holder bottom Water tube Can holder top Nozzles short and long Spacer ring ...

Страница 101: ...d spare parts all presses ENWW Miscellaneous Description Catalog number Empty can kit for Series 3000 4000 5000 and UltraStream based presses MKT 0512 51 Empty can kit for Series 1000 2000 TurboStream based and Sun computer based presses MKT 0512 41 ...

Страница 102: ...d 353 0 1 605 8409 Distribution Channels DC 31 0 20 6545543 North America 1 800 204 6344 Israel 972 8 938 1818 North America Hewlett Packard Company Indigo Division 165 Dascomb Road Andover MA 01810 5897 USA International Hewlett Packard Company Indigo Division Limburglaan 5 6221 SH Maastricht The Netherlands Israel Hewlett Packard Company Indigo Division Kiryat Weizmann P O Box 150 Rehovot 76101 ...

Страница 103: ...EN 102 ...

Страница 104: ...indow 85 86 expanded 85 color workspace load 68 print 77 save 44 comparing ink mix results 60 components air compressor 13 can crimper 11 can shaker 12 dispensing unit 12 spectrophotometer 11 Compromise window 55 configuration hardware 11 Configure Color Matching Parameters window 40 78 Press Windows Version 41 substrate list 74 consumables Indigo Sun computer based presses 14 Indigo TurboStream b...

Страница 105: ...ndoing and redoing 57 measuring color 36 message Accurate color match 54 Check imaging oil conductivity 44 Improve color with Fix can 55 Ink Definition File created 43 No illuminant gives requested correction 59 No spectral information for target 58 Number of files imported successfully and re create ink files 76 Remember to double print 44 Warning very Matte 38 Metamerism 38 39 mix file using old...

Страница 106: ...tte message 38 Warning Metamerism window 38 waste disposal 22 Which Color to Add window 58 window 3D color space 82 Actual Mix 60 Additional Cans 54 Advanced Options 94 Change Illuminant 59 Color 85 86 Configure Color Matching Parameters 40 41 78 Create Custom Color 71 Edit Basic Ink 73 Font 86 Help Topics 90 hp IndiChrome 27 84 88 hp IndiChrome Wizard 28 Increase Thickness 39 Ink Layer Thickness ...

Страница 107: ...reorder P N CA294 02222 Copyright 2006 Hewlett Packard Company This is an HP Indigo digital print Printed in Israel www hp com go indigo ...

Отзывы: