background image

2

HP Firebird Desktop Essentials (Features may vary by model)

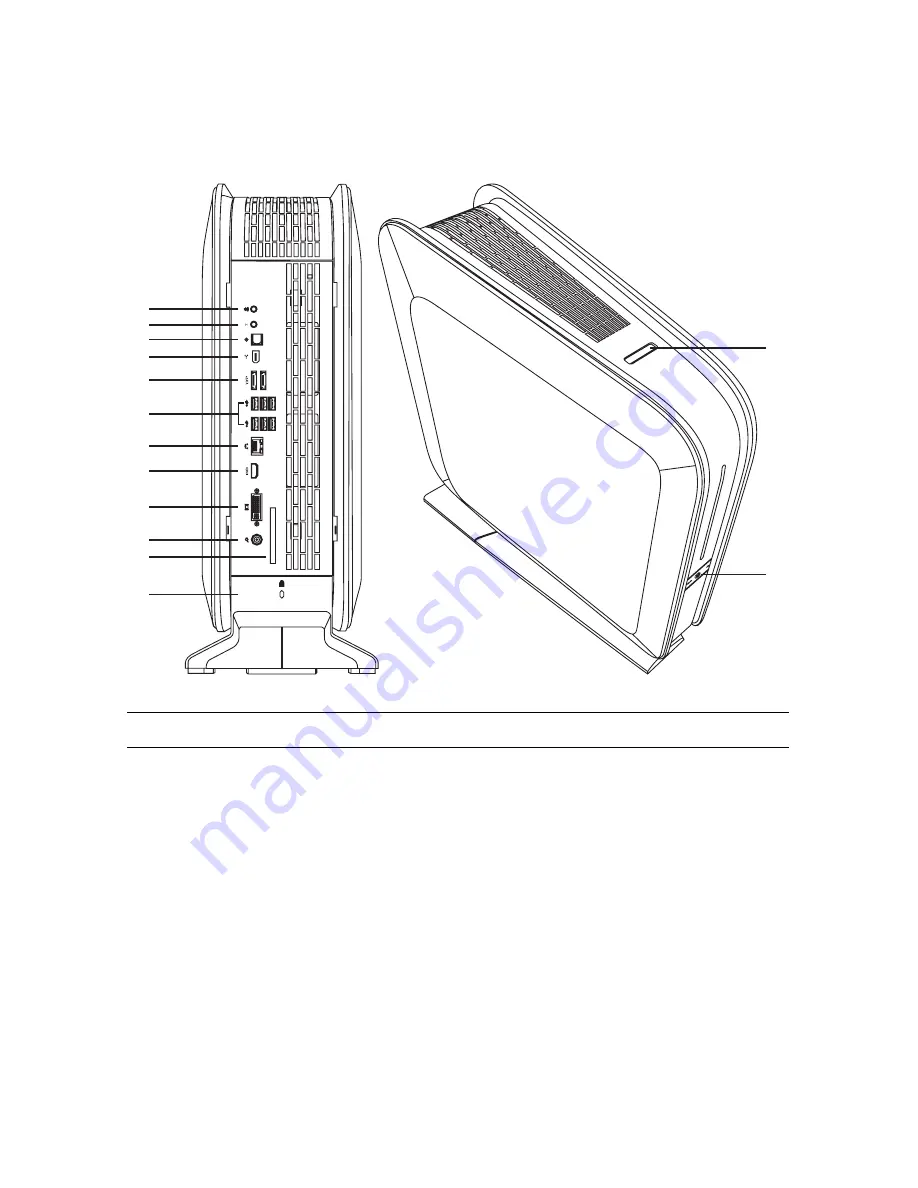
Connecting to the HP Firebird

Connect the main hardware devices, such as the monitor, keyboard, and mouse to the back 
of the HP Firebird. Other peripheral devices, such as a printer, scanner, or camera, also plug 
into connectors on the back of the HP Firebird. The following table shows some, but not all, 
connectors:

NOTE:

 The location, availability, and number of connectors on the system may vary.

A

B

C

D

E

F

G
H

I

J

K

L

M

N

Содержание HP Firebird

Страница 1: ...HP Firebird with VoodooDNA Desktop Essentials ...

Страница 2: ...SA Copyright 2008 Hewlett Packard Development Company L P This product incorporates copyright protection technology that is protected by U S patents and other intellectual property rights Use of this copyright protection technology must be authorized by Macrovision and is intended for home and other limited pay per view viewing uses only unless otherwise authorized by Macrovision Reverse engineeri...

Страница 3: ... On Your HP Firebird for the First Time 11 Finding More Information 11 Finding information on the Web 11 Finding onscreen Help and Support Center 11 Turning On the HP Firebird 11 Turning Off the HP Firebird 12 Using Shut Down 12 Restarting the HP Firebird 12 Using the Power button to restart your HP Firebird 13 Using Lock 13 Using Sleep Mode 13 Using Hibernate mode 14 Automatic Sleep Hibernate or ...

Страница 4: ...utomatically at startup 34 Running the Disk Cleanup Program 34 Manual Disk Cleanup 34 Automatic Disk Cleanup 34 Running the Disk Defragmenter Program 35 Checking for Hard Disk Drive Errors 36 Keeping the HP Firebird Free of Dust and Dirt 36 Cleaning the HP Firebird 37 Cleaning fans heat sink and inside the HP Firebird 38 Cleaning the keyboard and mouse 38 Troubleshooting Computer Problems 39 Audio...

Страница 5: ...nuals and warranty information in an easy to find safe location Hewlett Packard recommends that you store the system recovery discs with the documentation This allows easy access to all important system documents and files WARNING The power supply is preset for the country region in which you purchased your computer If you move please check the voltage requirements for your new location before plu...

Страница 6: ... monitor keyboard and mouse to the back of the HP Firebird Other peripheral devices such as a printer scanner or camera also plug into connectors on the back of the HP Firebird The following table shows some but not all connectors NOTE The location availability and number of connectors on the system may vary A B C D E F G H I J K L M N ...

Страница 7: ...An eSATA connection requires that the drive have its own power connector F 4 pin Universal Serial Bus USB connectors for connecting USB 2 0 devices such as a mouse keyboard or digital camera G Ethernet LAN RJ 45 connector This connector allows connection to a local area network LAN H High definition multimedia interface HDMI connector to connect a TV or monitor You may need to use an adapter VGA t...

Страница 8: ...e sure that all connections are secure and that all cabling is out of the way Do not place cabling in walkways or where it can be stepped on or damaged from placing furniture on it Keep the grill on the top of the system free of dust and do not rest objects or allow pets to sit on top of the system L Computer locking slot for use with a computer lock mechanism When in use the left panel will not o...

Страница 9: ...ning spikes to get into the system Some surge protection devices have surge protection for television cable connections as well Use those if the computer has a television tuner installed Not all power strips provide surge protection the power strip must be specifically labeled as having this capability Use a power strip whose manufacturer offers a damage replacement policy that replaces the equipm...

Страница 10: ...o immediately Re enabling SLI If you have disabled SLI or your system does not support it simply connect all monitors to the ports on the back of your system while it is powered off 1 Turn on the computer 2 Click the Windows Vista start button and then click Control Panel 3 Click the link in the top left to switch to Classic View Double click Personalization inside the control panel and then click...

Страница 11: ...then click Personalize 2 Click Display Settings 3 Select the monitor and then click a check mark in the box for Extend the desktop onto this monitor When the box is not checked the monitor displays a duplicate desktop 4 Click Apply 5 To change the direction that the desktop extends left or right to match how the displays are physically set up click a monitor and drag it to the desired position 6 C...

Страница 12: ...on Or Click No and change the resolution by using the slider under Display resolution again click Apply and then click Yes Setting Up a Local Area Network A home local area network LAN may consist of either a wired or a wireless network that you can use to connect the computer to other devices on the network including other computers The network components may include a hub or a switch which can c...

Страница 13: ...ble to the Ethernet connector A on the back of the computer and to the network router or LAN device A Ethernet connector RJ 45 port B Ethernet indicator lights 2 With the computer turned on check the indicator lights B next to the Ethernet connector for the status ACTIVITY Lit yellow during network data transfer activity LINK Lit green when there is a valid network connection NOTE Your Ethernet co...

Страница 14: ...10 HP Firebird Desktop Essentials Features may vary by model ...

Страница 15: ...1 Connect the external power source to the Power connector at the back of the system 2 Connect the external power source to a power outlet that is equipped with a surge protector 3 Turn on the devices in the following order a Press the Power button on the external monitor b Press the Power button to the left side of the badge After applying power the system power LED on the system front panel case...

Страница 16: ... keeps the computer operational During Away mode the computer can continue to perform tasks such as recording a scheduled TV program or streaming video and music files to a remote location Using Shut Down For best results when using Windows Vista turn off the system without pressing the power rocker switch on the front of the computer 1 Close any open software programs by clicking the X at the upp...

Страница 17: ...ton on the taskbar 2 Click the Lock button To unlock the system you must enter your password Using Sleep Mode When the HP Firebird is in Sleep mode it goes into a reduced power state The monitor is blank as if it were turned off By using Sleep mode You save time because you do not have to wait for the system to go through the normal startup routine when you wake it again The next time that you use...

Страница 18: ...e system is in Hibernate mode it saves to the hard disk drive everything that is in computer memory turns off the monitor and the hard disk drive and then turns itself off When you turn on the system again your programs folders and documents are restored to the screen To put the HP Firebird into Hibernate mode manually 1 Click the Windows Vista start button on the taskbar 2 Click the Arrow button ...

Страница 19: ...tings b Click the plus sign next to Sleep c Click an item and make selections and then click Apply d Click OK Connecting to the Internet The HP Firebird can connect to the Internet through a cable or telephone DSL modem or using a local area network LAN Check with your Internet Service Provider ISP for specific information on the connection To make the hardware connections see Setting Up Your HP F...

Страница 20: ...rator Is allowed to change account types for other users change passwords change system wide settings access all files on the computer and install software and drivers that are compatible with Windows Vista Limited Standard User Is not allowed to change other user settings or passwords A Limited account may not be able to install or run some software Is allowed to change the limited account pictur...

Страница 21: ...nd data from a variety of risks by using Passwords Antivirus software Firewall software Critical security updates NOTE Security solutions are designed to act as deterrents but they may not be able to prevent software attacks or to prevent the system from being mishandled or stolen Computer risk Security feature Unauthorized use of the computer or user account User password Computer viruses Norton ...

Страница 22: ...ords unless you store them in a secure place away from the computer Do not store passwords in a file on the computer You can use the same password for more than one Windows Vista security feature A password can have any combination of up to eight letters and numbers and it is not case sensitive A password must be set and entered with the same keys For example if you set the password with number ke...

Страница 23: ...date the system weekly or even monthly the time required for download is minimal To configure Automatic Updates 1 Click the Windows Vista start button on the taskbar 2 Click Control Panel 3 Click Security 4 Click Windows Update 5 Click Change settings 6 Select the desired configuration Install updates automatically recommended This is the default setting and it enables you to specify a day and tim...

Страница 24: ...u have a stable set of settings to use For information on System Restore go to the Microsoft Web site at http www microsoft com worldwide Choose software that is compatible with the computer check the operating system memory and other requirements listed for the new software Install the new software according to the directions provided by the software manufacturer If you need help check the manufa...

Страница 25: ...ystem software programs or computer utilities Antivirus software can detect most viruses remove them and in most cases repair any damage that they have caused To provide ongoing protection against newly discovered viruses you must keep antivirus software up to date Norton Internet Security an antivirus software program is preinstalled on your computer and includes a free trial subscription of prot...

Страница 26: ...n your computer this may take several minutes 6 When the scan is complete click Finish Setting a Full System Scan time To schedule a time for a Norton Internet Security Full System Scan 1 Double click the Norton Internet Security icon on the desktop 2 Click the Norton Internet Security tab 3 Click the Tasks Scans bar 4 Click Configure a Scan 5 Click Schedule Full System Scan 6 Click New 7 Set the ...

Страница 27: ...6 Click Create Custom Scan and then click Next 7 Click Add Folders or Add Files Place a check mark next to the files and folders that you want to scan click Add and then click Next 8 Type a name for your customized scan and then click Finish 9 Click Schedule next to the customized scan that you just created 10 Click New 11 Set the frequency and time that you want the scan to run 12 When you are do...

Страница 28: ...24 HP Firebird Desktop Essentials Features may vary by model ...

Страница 29: ...turn the disc to the case when you are finished using it Handle the disc by its outside edges or center hole only Do not touch the unlabeled side of a disc or place the unlabeled side down on a desk Doing so could scratch the surface of the disc Store discs at room temperature Allows you to DVD RW R Blu ray DVD RW R Read data from CDs Play music CDs Read DVDs Record burn data or music to discs Pla...

Страница 30: ... DVDs that you create are compatible with some DVD video players and with most computer DVD ROM drives CD R discs are more compatible with home and car stereos than CD RW discs are Blu ray disc drives are required to play Blu ray discs Blu ray disc drives can read Blu ray discs and record to Blu ray discs HD disc drives are capable of playing HD discs but not recording HD data to disc The DVD Writ...

Страница 31: ... Music Yes Yes Varies by model Varies by model DVD ROM Data No Yes No No DVD movie No Yes No Yes DVD RAM Data Yes Varies by model No No DVD movie Yes Varies by model No Varies by model DVD R and DVD R Data Yes Yes No No DVD movie Yes Yes No Varies by model Double layer DVD R DVD R Data Yes Varies by model No Varies by model DVD movie Yes Varies by model No Varies by model DVD RW and DVD RW Data Ye...

Страница 32: ...lity information for your computer go to the HP Support Web site at http www hp com support 1 GB is defined as 1 billion bytes 1 GB 1 billion bytes when referring to hard disk drive capacity Actual formatted capacity is less Optical drive can CD ROM CD RW DVD ROM DVD RAM DVD RW R DVD RW R Double layer DVD Combo CD RW DVD Light Scribe DVD RW R BD HD DVD RW R Read CDs CD Rs and CD RWs Yes Yes Yes Ye...

Страница 33: ...ge such as video music pictures and other data This program enables you to record data to Blu ray HD DVD and other recordable DVD discs Play games Yes Yes Yes No Yes Yes Yes Yes Yes Create LightScribe label No No No No No No No Yes Yes Play Blu ray DVD No No No No No No No No Yes Record data to Blu ray disc No No No No No No No No Yes Record HD data to DVD No No No No No No No No No NOTE The Blu r...

Страница 34: ...30 HP Firebird Desktop Essentials Features may vary by model ...

Страница 35: ...orming this task does not harm your system Virus Scan Performing a full virus scan every week can catch anything that may have slipped through unnoticed Most anti virus products have a scheduling feature to keep track of this automatically Monthly Hardware Cleanup Thoroughly clean the inside and outside of your computer Software Updates Using Windows Updates can fix operating system bugs and impro...

Страница 36: ...32 HP Firebird Desktop Essentials Features may vary by model ...

Страница 37: ...ecommends that you use software that includes write verification functionality This feature compares the data on your hard disk drive with the data copied to the backup media ensuring that it is an exact copy If you encounter recording issues with discs try alternate media different types or brands Also use the Windows Explorer tool to view your files and verify that all content was copied To open...

Страница 38: ...the Disk Cleanup Program The Disk Cleanup software program frees up space on your hard disk drive by removing temporary and unused files including temporary Internet files and files in the Recycle Bin Either run Disk Cleanup manually or set it up to run automatically Manual Disk Cleanup 1 Click the Windows Vista start button All Programs Accessories System Tools and then click Disk Cleanup Disk Cl...

Страница 39: ...rl Alt and Delete keys simultaneously 3 Click Start Task Manager 4 On the Applications tab select all the programs that are listed and then click End Task Close the Task Manager 5 Click the Windows Vista start button All Programs Accessories System Tools and then click Disk Defragmenter 6 Click Defragment Now If Disk Defragmenter repeatedly starts a background program is still accessing the hard d...

Страница 40: ...tem can overheat causing automatic shutdown To clean the HP Firebird you will need A clean dry lint free cloth Isopropyl or rubbing alcohol optional Small battery operated vacuum cleaner Can of compressed air with small sprayer tube NOTE The hard disk drive on HP computers with the Windows Vista operating system preinstalled may appear to be smaller than what is stated in the product specification...

Страница 41: ...and a lint free cloth to remove it 6 Use a clean cloth to dry the computer Cleaning vents Air vents keep the system cool To maintain efficient air flow keep these vents clean by using a small battery operated vacuum cleaner A battery operated vacuum cleaner eliminates the risk of electric shock 1 Ensure the HP Firebird is off and unplugged 2 Run the vacuum cleaner over all the vents in the compute...

Страница 42: ...rd drives by pressing the two latches at the same time 4 Blow compressed air to remove dust from the fan on the left of the disk drive area the fan is visible only when the drives are removed 5 Remove the fan tray by pressing the two latches and blow the dust through the radiators from the inside out 6 Blow off the dust from all other fans 7 Vacuum all bottom surfaces on the computer inside 8 Clos...

Страница 43: ...s the Mute button on the keyboard to see whether the Mute feature is enabled Or 1 Click the Windows Vista start button and then click Control Panel 2 Click Hardware and Sound and then click Adjust system volume 3 If programs are muted click the Mute button to unmute them Click the Volume icon on the task bar or use the keyboard controls to increase the volume Ensure that powered active speakers ar...

Страница 44: ...igured to automatically download codecs If the correct codec is available the file will play Note that you must be connected to the Internet to download codec files If the correct codec is not available check whether an update is available for Windows Media Player For more information open Windows Media Player Help and search for codec Volume is very low or unsatisfactory Detached non powered spea...

Страница 45: ...click Eject I cannot record burn a disc Ensure that the disc is inserted into the drive with the label facing left Verify that you are using the correct disc type media for the drive Try a different brand of disc Ensure that the disc is clean and undamaged If recording stopped during a recording session the disc may be damaged use a different disc Use the correct type of disc for the type of files...

Страница 46: ...d then record them to disc Close all programs and windows and then restart your computer I cannot add data to a DVD Ensure that you set the correct recording option append or add data files in your DVD recording software Titles of music tracks are not displayed for the CD For the artist title and track information to appear when you play music CDs the computer must be connected to the Internet Thi...

Страница 47: ...play Video Are Missing or Corrupt 1 Click the Windows Vista start button right click Computer and then click Properties 2 Under Tasks click Device Manager 3 Click the plus sign next to Sound video and game controllers 4 Right click TV tuner select models only and then click Update Driver Software 5 Select Search automatically for updated driver software 6 Follow the instructions to update the driv...

Страница 48: ...em is making strange beeping sounds This beeping is called a POST Power On Self Test error code Record the pattern of beeping ex 3 short 1 long repeating Error codes vary from system to system with the exception of a few codes outlined in the following list Some motherboards are equipped with a small character display that prints out a code accompanying these beeps Record this code if available 1 ...

Страница 49: ... and then click End Task If closing programs does not work restart the computer 1 Press the Ctrl Alt and Delete keys on the keyboard simultaneously 2 Click the arrow next to the red Shut Down button and then click Restart Or 1 Press the Power button on the left side of the badge to turn off the computer 2 Press the Power button on the left side of the badge to start the computer Error message Hard...

Страница 50: ...t the pins in the cable or connector are not bent Turn off the computer turn on the external device and then turn on the computer to integrate the device with the computer Restart the computer and then follow the onscreen instructions to accept the changes Disable the automatic settings in the operating system for the card and choose a basic configuration that does not cause a resource conflict Yo...

Страница 51: ...working properly 4 If you have removed a hardware device and the device driver is listed in the Device Manager this may be causing the device conflict To uninstall the old driver so that the new device driver works properly right click the device click Uninstall and then click OK 5 Double click the name of the device and then select Properties 6 Click the Resources tab to verify that there is a de...

Страница 52: ...tion about connecting to the Internet press the Help button on the keyboard to open the Help and Support Center Verify that the Web browser is installed and set up to work with your ISP Try moving the computer chassis Try to connect again later or contact your ISP for assistance I cannot automatically start Internet programs Log in to your ISP and start the desired program Web pages load slowly Ve...

Страница 53: ...ograms if you are not sure they come from reputable companies Check the company Web site carefully for information about what is included with the program Do not automatically click Yes when a download window asks if it is OK to install a program on your computer Read the message in the window and ensure that it is a software program that you really want Unwanted pop up advertisements display on m...

Страница 54: ...he keyboard shortcut for Save on most not all programs 3 After saving changes in all open programs press the Ctrl and Esc keys on the keyboard simultaneously to display the Windows Start Menu 4 Use the arrow keys to select the Arrow button next to the Lock button Select Shut Down and then press the Enter key on the keyboard 5 After the shutdown is complete reconnect the mouse connector to the back...

Страница 55: ...onitor entry in this guide for more details Test the wall outlet by connecting a different electrical device to it Incompatible memory RAM may have been installed Reinstall the old memory to return the computer to its original state Reseat the hard disk drive data and power cables Error message Invalid system disk or Non System disk or disk error When drive activity stops remove the disk and press...

Страница 56: ...lick the Date and Time tab and then click Change Date and Time If you are prompted to enter an administrator password or confirmation type the password or provide confirmation 4 In the Date and Time settings Set the hour minute and seconds by highlighting the number you want to change and typing in the desired time You may also use the arrows to increase or decrease the hours minutes or seconds Se...

Страница 57: ...rd 1 Close all open programs and windows 2 Click the Windows Vista start button click the Arrow button next to the Lock button and then click Restart Turn off your HP Firebird When you turn off your HP Firebird and then turn it on again you force the system to reload the operating system into its memory which clears some tracking information This may eliminate some problems that can remain after y...

Страница 58: ... cleanup 3 Place a check mark in the check box next to the file types that you want to delete 4 Click OK and then click OK to permanently delete the files Run the Disk Defragmenter program to group fragmented files together on your hard disk drive to improve performance This does not affect the location of files and folders on your computer NOTE The Disk Defragmenter program may take a long time t...

Страница 59: ...w 6 If desired place a check mark in the Automatically fix file system errors and Scan for and attempt recovery of bad sectors check boxes 7 Click Start If you are prompted to restart the computer click Yes System shuts down on its own When the computer or its parts get overheated the system shuts down Clean the computer at least every 2 to 3 months and more if it is a dusty environment See Keepin...

Страница 60: ...d installing additional memory System starts but blue screens appear randomly in Windows and system reboots This can be caused by a bad memory module Run a memory test using System Recovery Try to get an error code from the blue screen by disabling automatic restart Reboot your PC Press F8 after the memory count but before Windows loads Select Safe Mode and then press Enter On the desktop right cl...

Страница 61: ...then click Properties 2 Under Tasks click Device Manager 3 Click the plus sign to expand the type of device for which you want to update or roll back the driver for example DVD CD ROM drives 4 Double click the specific item for example HP DVD Writer 640b 5 Click the Driver tab 6 To update a driver click Update Driver and then follow the onscreen instructions Or To revert to an earlier version of a...

Страница 62: ...58 HP Firebird Desktop Essentials Features may vary by model ...

Страница 63: ...tains the operating system and software files originally installed on your computer at the factory Creating the recovery file First you create a recovery file that you record or burn to a disc 1 Click the Windows Vista start button and then click All Programs 2 Click HP Tools and Support and then click Create Recovery DVD A window opens showing a progress bar The creation process can take up to 15...

Страница 64: ...omatically With a permanent pen mark it clearly as your system recovery disc and place it in a secure storage place System Recovery After you try restarting your computer and reinstalling problem software you can run system recovery as a last resort to reinstall the factory installed operating system software programs and hardware drivers The system recovery process completely erases and reformats...

Страница 65: ...rogress 6 In the registration window type your product key number found on the Certificate of Authenticity sticker inside the front cover of your computer and then click Next A window opens asking where you want to install Windows 7 If it is not already highlighted select System Drive 8 Click Drive Options in the lower right area of the window 9 Ensure that System Drive is highlighted and the Reco...

Страница 66: ...now be highlighted and then press Enter on the keyboard A window opens showing file download progress 6 In the registration window type your product key number found on the Certificate of Authenticity sticker inside the front cover of your computer and then click Next A window opens asking where you want to install Windows 7 If it is not already highlighted select System Drive by using the up arro...

Страница 67: ...DROM Press Enter Note that 1st Boot Device is now associated with CDROM 3 Press F10 on the keyboard 4 Ensure Yes is selected and press Enter to save configuration changes The system automatically restarts from the disc drive 5 Press 3 on the keyboard to select Disaster Recovery and then press Enter A window opens showing file loading progress 6 In the registration window type your product key numb...

Страница 68: ... button on the left side of the badge to turn on the computer 4 When the HP logo screen appears press the Delete key on the keyboard repeatedly until the logo screen disappears 5 From the main menu at the top of the window use the left arrow and right arrow keys on your keyboard to select Boot 6 Use the up arrow and down arrow keys to select Boot Device Priority and then press Enter on the keyboar...

Страница 69: ...s the desktop 18 It is critical now to install custom software programs and hardware drivers next Follow the instructions in the next procedure using the Application and Driver Recovery disc included with your computer Using the Application and Driver Recovery disc Use the Application and Driver Recovery disc you received with your computer to install custom software programs and hardware drivers ...

Страница 70: ...dure After system recovery your computer is as it was when it left the factory Configure the system now to your needs 1 Turn off the computer reconnect all devices that were originally connected to it and then turn on the computer 2 Configure your Internet connection 3 Reinstall the software that originally came in the box with the computer and any additional software you purchased If you installe...

Страница 71: ...nnection wired network 9 connector computer 2 monitor 3 creating a recovery file 59 Creating System Recovery Discs 33 D data backing up with external hard drives backing up with CD or DVD 33 discs drive compatibility 26 features and compatibility 27 Display 44 DVDs High Definition 28 DVI connector using with SLI technology 6 E eSATA hard disk drive connector 3 Ethernet connection 9 ExpressCard 54 ...

Страница 72: ...59 Recovery partition Hard disk drive 61 repetitive strain injury RSI see Safety Comfort Guide Running the Disk Cleanup Program 34 S Safety Comfort Guide 16 safety warnings 16 Scalable Link Interface SLI using 6 scan running a computer scan manual scan 22 Security 33 setting up computer 1 shutting down computer 12 sleep mode 13 SLI technology using 6 Support for HP Firebird 11 surge protector 5 Sy...

Отзывы: