background image

Library Operations

56

ESL E-Series Tape Library User’s Guide

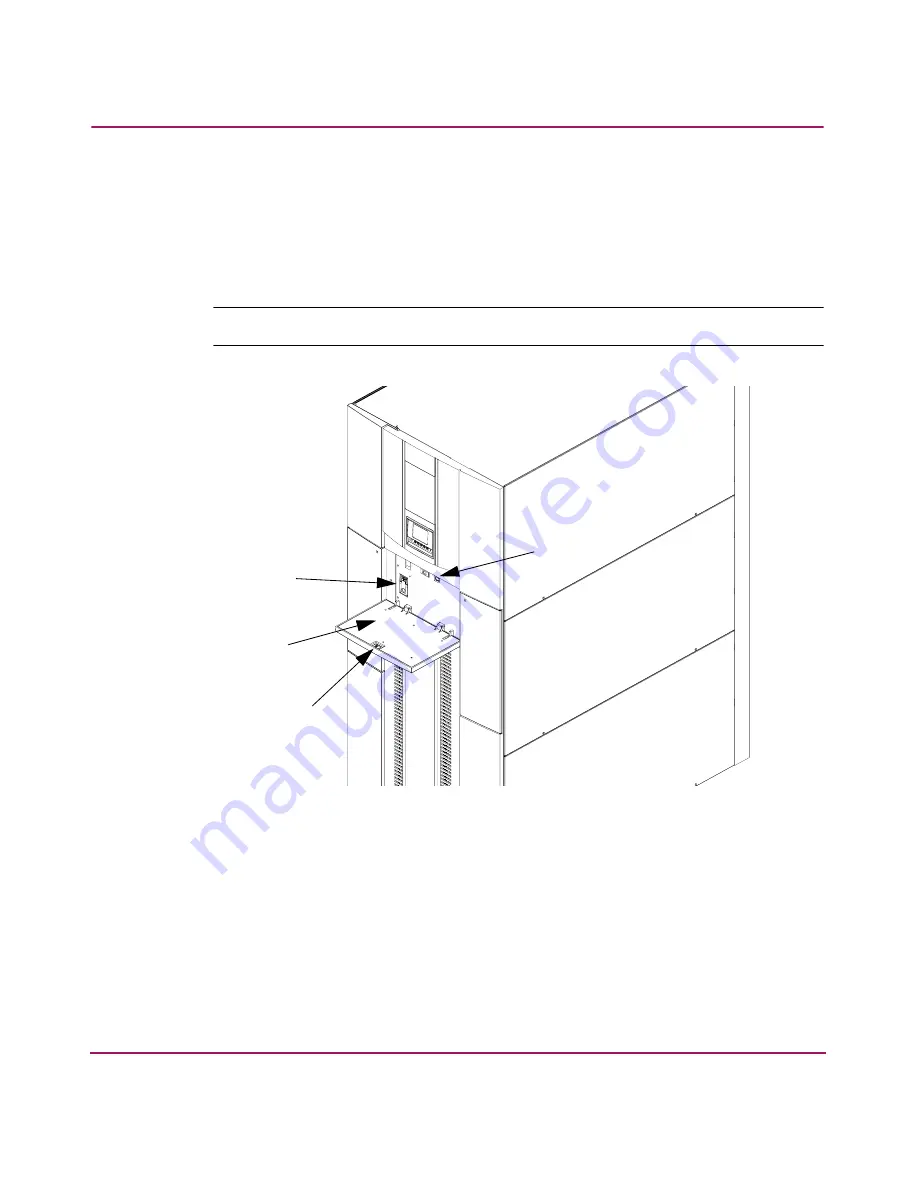
Closing the cabinet doors and access panels

The library has one front door and one back door.

1. Close and lock the front door using the key provided in the accessory kit (see 

Figure 22

).

Note:  

The laptop tray must be lowered to access the front door latch.

Figure 22:  Closing the front door

1

Power button 

2

Front door latch

3

Laptop tray

4

Laptop latch

1

2

3

4

Содержание ESL E-Series

Страница 1: ...e hp StorageWorks ESL E Series Tape Library Second Edition May 2004 Part Number 350799 002 This guide describes procedures for operating relocating and troubleshooting the HP StorageWorks ESL E Series Tape Library ...

Страница 2: ...cument may be photocopied reproduced or translated into another language without the prior written consent of Hewlett Packard Microsoft is a U S registered trademark of Microsoft Corporation Hewlett Packard Company shall not be liable for technical or editorial errors or omissions contained herein The information is provided as is without warranty of any kind and is subject to change without notic...

Страница 3: ...orized reseller 13 1 Library Overview 15 Library components 16 Library cabinet 16 Front panel 16 Back panel 18 Operator control panel OCP 19 Library robotics 21 Tape drives 22 Cleaning cartridges 22 Ultrium 460 and 460 FC tape drives 23 SDLT 320 tape drives 23 Tape cartridges 23 Ultrium 460 tape cartridges 23 SDLT 320 tape cartridges 25 Load ports and magazines 26 Card cage and controllers 28 e240...

Страница 4: ...ng tape cartridges 49 Ultrium bar code labels 50 SDLT bar code labels 51 Media label identifiers 52 Setting the write protect switch 53 Write protecting Ultrium tape cartridges 53 Write protecting SDLT tape cartridges 54 Inserting tape cartridges 55 Closing the cabinet doors and access panels 56 Powering the library on and off 58 Powering on the library 58 Placing the library on line or off line 5...

Страница 5: ...Windows NT 91 Verifying the interface controller configuration 91 Verifying devices 91 Verifying the host configuration 92 Verifying HBA device driver information 92 Verifying serial port configuration 92 Maintaining tape cartridges 93 Cleaning tape drives 95 Cleaning SDLT tape drives 95 Cleaning Ultrium tape drives 95 A Library Characteristics 97 Physical specifications and requirements 98 Perfor...

Страница 6: ...2 ATTENTION 122 Notice for USA and CANADA only 123 ATTENTION 123 REMARQUE 123 Laser statement 124 Class 1 laser product 124 Laser klasse 1 124 Appareil à laser de classe 1 124 Producto láser de clase 1 124 Luokan 1 laserlaite 125 Battery statement 126 LET OP 126 VAROITUS 126 ATTENTION 126 ACHTUNG 126 Attenzione 127 PRECAUCIÓN 127 VARNING 127 D Sense Data Values 129 E Event Reporting 143 Informatio...

Страница 7: ...ut this Guide About this Guide This user s guide provides information to help you Operate the tape library Relocate the tape library Troubleshoot the tape library About this Guide topics include Related documentation page 8 Conventions page 9 Getting help page 13 ...

Страница 8: ... Related documentation In addition to this guide HP provides corresponding information HP StorageWorks ESL E Series Tape Library Site Survey HP StorageWorks ESL E Series Unpacking and Installation Guide HP StorageWorks ESL E Series Tape Library Service Manual ...

Страница 9: ...ections in the warning could result in bodily harm or death Caution Text set off in this manner indicates that failure to follow directions could result in damage to equipment or data Table 1 Document conventions Convention Element Blue text Figure 1 Cross reference links Bold Menu items buttons and key tab and box names Italics Text emphasis and document titles in body text Monospace font User in...

Страница 10: ...presence of electrical shock hazards Enclosed area contains no operator serviceable parts WARNING To reduce the risk of personal injury from electrical shock hazards do not open this enclosure Any RJ 45 receptacle marked with these symbols indicates a network interface connection WARNING To reduce the risk of electrical shock fire or damage to the equipment do not plug telephone or telecommunicati...

Страница 11: ...cal shock remove all power cords to completely disconnect power from the power supplies and systems Any product or assembly marked with these symbols indicates that the component exceeds the recommended weight for one individual to handle safely WARNING To reduce the risk of personal injury or damage to the equipment observe local occupational health and safety requirements and guidelines for manu...

Страница 12: ... equipment be sure that The leveling jacks are extended to the floor The full weight of the rack rests on the leveling jacks In single rack installations the stabilizing feet are attached to the rack In multiple rack installations the racks are coupled Only one rack component is extended at any time A rack may become unstable if more than one rack component is extended for any reason ...

Страница 13: ...lowing information available before calling Technical support registration number if applicable Product serial numbers Product model names and numbers Applicable error messages Operating system type and revision level Detailed specific questions HP storage web site The HP web site has the latest information on this product as well as the latest drivers Access storage at http www hp com country us ...

Страница 14: ...About this Guide 14 ESL E Series Tape Library User s Guide ...

Страница 15: ... Library User s Guide 1 Library Overview This chapter describes both the ESL E Series tape library and its components The chapter consists of Library components page 16 Library storage locations and slot numbering page 35 ...

Страница 16: ...supply and distribution equipment Tape drives Card cage with Fibre Channel FC interface controllers and robotics controller Interface Manager card You can access these components through the front and back doors of the library cabinet Front panel The front of the library cabinet see Figure 1 provides the following The front doors provide easy access to the media picker and the storage array The vi...

Страница 17: ...iew 17 ESL E Series Tape Library User s Guide Figure 1 Library cabinet front view 1 Viewing windows 2 Left load port 3 OCP 4 Laptop tray in closed position 5 Right load port 6 Ventilation and air filters 1 2 3 4 5 6 ...

Страница 18: ...er drive and 1 per card cage 5 Cluster 0 6 Cluster controller card 1 per drive cluster 7 Interface manager Tape drives Power supplies Tape drive communication 4 drives per cluster 2 per drive cluster 1 per drive cluster Clus ACT LNK ACT LNK PORT 1 PORT 0 ETHERNET SERIAL PWR FIBRE CHANNEL FIBRE CHANNEL ACT LNK ACT LNK PORT 1 PORT 0 ETHERNET SERIAL PWR FIBRE CHANNEL FIBRE CHANNEL ACT LNK ACT LNK POR...

Страница 19: ...ary User s Guide Operator control panel OCP The OCP features a menu system for determining library status configuring the library and performing certain diagnostic functions see Figure 3 Figure 3 OCP initial screen 1 OCP buttons 2 Green LED 1 2 ...

Страница 20: ...tion and allows you to access the library menus These menus allow you to view or change the library settings run demonstration programs or run diagnostic tests The OCP is discussed in Using the OCP on page 60 OCP buttons Use these buttons in combination with the OCP to scroll through screens and select options or commands The functionality of these buttons changes depending on the currently displa...

Страница 21: ... the library robotics forward to make contact with the desired cartridge and then retracts the library robotics to remove the cartridge from a bin or drive The library robotics includes the optical scanner that reads bar code labels 7 characters for Super Digital Linear Tape SDLT and 8 characters for Ultrium The scanner is used to maintain an inventory of the tape cartridges within the library A f...

Страница 22: ...ropriate media is used in tape drives Tape cartridges and cleaning cartridges are not included with the library and must be ordered in addition to the library Cleaning cartridges Note By default Autoclean is disabled Ensure your application software supports this feature before enabling it If a drive experiences read write errors when the Autoclean function is enabled the library issues an error m...

Страница 23: ...tored on a tape An SDLT 320 tape drive is capable of storing up to 160 GB native of data per cartridge and has a sustained data transfer rate of 16 MBps 57 6 GBph Access the HP StorageWorks SDLT Tape Drive Reference Guide from http www hp com support for more information about its features and capabilities Tape cartridges Note Tape cartridges are not included in the purchase of a tape library Purc...

Страница 24: ...B Ultrium 230 HP Ultrium 460 prelabeled data cartridge C7972L 400 GB Europe Only Ultrium 460 C7972AL 400 GB Americas Only Ultrium 460 C7971L 200GB Europe Only Ultrium 230 C7971AL 200 GB Americas Only Ultrium 230 HP Ultrium bar code label pack Q2002A Ultrium 460 Q2001A Ultrium 230 HP Ultrium universal cleaning cartridge C7978A Caution Do not bulk erase Ultrium formatted cartridges This destroys pre...

Страница 25: ...h your media for more information The following tape cartridges and label packs are approved for the library s SDLT tape drives capacity listed assumes 2 1 compression HP SDLT Data Cartridge C7980A 220 320 GB HP SDLT Prelabeled Data Cartridge C7980L 220 320 GB Europe Only C7980AL 220 320 GB Americas Only HP SDLT Cleaning Cartridge C7982A HP SDLT Bar Code Label Pack Q2003A Caution SDLT tape drives ...

Страница 26: ...g drive replacement Note For information on ordering tape cartridges and bar code labels refer to the ordering sheet that shipped with your library Load ports and magazines The load ports are mechanical devices in the front panel of the library that enable you to import or export tape cartridges to and from the library via three tape cartridge magazines without interrupting library operations Ther...

Страница 27: ...Library Overview 27 ESL E Series Tape Library User s Guide Figure 6 Load ports left and right 1 Left load port 16 SDLT or 18 Ultrium 2 Right load port 32 SDLT or 36 Ultrium 1 2 ...

Страница 28: ...el Protocol FCP to and from the SCSI protocol if necessary It transfers commands data and status information to and from FC controllers and FC and SCSI devices Supported devices include Initiator devices FC hosts Sequential access devices tape drives Changer devices tape libraries The e2400 160 FC interface controller provides bidirectional connectivity for Ultra 3 SCSI buses in a Fibre Channel Sw...

Страница 29: ... FC interface controller Figure 9 illustrates the I O panel of the e2400 FC 2G interface controller Figure 9 e2400 FC 2G interface controller 1 Reset button 2 Serial port 3 Ethernet port 4 FC port 1 5 FC port 2 6 SCSI bus port 0 7 SCSI bus port 1 8 SCSI bus port 2 9 SCSI bus port 3 1 Reset button 2 Serial port 3 Ethernet port 4 FC port 0 external connection 5 FC port 1 external connection 6 Tape d...

Страница 30: ...rently transferring through the FC interface controller by visually inspecting the Activity LEDs of all I O ports on the FC interface controller Power indicator The interface controller has one power LED Green Power has been applied to this module Yellow Power On Self Test POST in process or processor problems Serial port The interface controller is equipped with one serial port See Figure 8 and F...

Страница 31: ...igure 8 for the location of the SCSI buses Green SCSI bus activity on corresponding port Internal FC ports e2400 FC 2G interface controller only The native FC interface controller has 6 native FC ports with LED indicators 2ports FC0 and FC1 connect to the SAN 4 ports TD0 through TD3 connect to drives in the corresponding cluster See Figure 9 for the location of these ports Green ACT FC port activi...

Страница 32: ...ard designed to consolidate and simplify the management of multiple FC interface controllers installed in the library It also provides SAN related diagnostics and management for library components including interface controllers drives and robotics The Interface Manager card in conjunction with HP StorageWorks Command View ESL software provides remote management of the library via a serial telnet ...

Страница 33: ... a utility that provides diagnostics and management by accessing devices through a LAN infrastructure For more information on Command View ESL go to http www hp com support cvesl Note HP StorageWorks Library and Tape Tools L TT is a diagnostic utility that can access devices across a FC infrastructure For more information on L TT go to http www hp com support tapetools The Interface Manager commun...

Страница 34: ... single management station Each Interface Manager card can communicate with only one management station but the management station can communicate with multiple Interface Manager cards see Figure 12 Figure 12 Multiple libraries connected to a single management station Tip HP recommends that you install Command View ESL on a single dedicated server management station on the LAN However it is possib...

Страница 35: ...e drives and up to 718 Ultrium 460 tape cartridges or 636 SDLT 320 tape cartridges The library stores tape cartridges in the following locations Left panels Right panels Back panels Note The number of tape cartridge slots depends on the drive technology used The number of back panel slots depends on how many drive clusters are in the library See Model 712e on page 40 and Model 630e on page 41 for ...

Страница 36: ... slot panels out of the cabinet press the slot panel latches down and pull the slot panel out of the cabinet see Figure 13 Figure 13 Sliding the slot panels out of the cabinet 1 Upper load port panel latch 2 Middle load port panel latch 3 Lower load port panel latch 1 2 3 ...

Страница 37: ...User s Guide Figure 14 shows the left panel bins Begin with panel 1 and load top to bottom and left to right Continue with panel 2 in the same manner and finally panel 3 Figure 14 Bin shelf numbering left panels 1 Panel 1 2 Panel 2 3 Panel 3 1 2 3 ...

Страница 38: ...ser s Guide Figure 15 shows the right panel bins Begin with panel 4 and load top to bottom and left to right Continue with panel 5 in the same manner and finally panel 6 Figure 15 Bin shelf numbering right panels 1 Panel 4 2 Panel 5 3 Panel 6 1 2 3 ...

Страница 39: ... top with the panel corresponding to cluster 0 and load top to bottom and left to right Continue loading each sequential cluster top to bottom and left to right Note The number of slots located in the back panel varies with the number of drive clusters installed Figure 16 Bin shelf numbering back panel 1 Cluster 0 2 Back panel pins 1 2 ...

Страница 40: ... Load port capacity User slots 1 4 0 0 718 1 4 Left only 18 700 1 4 Right only 36 682 1 4 Both 54 664 5 8 0 0 704 5 8 Left only 18 686 5 8 Right only 36 668 5 8 Both 54 650 9 12 0 0 690 9 12 Left only 18 672 9 12 Right only 36 654 9 12 Both 54 636 13 16 0 0 676 13 16 Left only 18 658 13 16 Right only 36 640 13 16 Both 54 622 17 20 0 0 662 17 20 Left only 18 644 17 20 Right only 36 626 17 20 Both 5...

Страница 41: ...oad port capacity User slots 1 4 0 0 636 1 4 Left only 16 620 1 4 Right only 32 604 1 4 Both 48 588 5 8 0 0 624 5 8 Left only 16 608 5 8 Right only 32 592 5 8 Both 48 576 9 12 0 0 612 9 12 Left only 16 596 9 12 Right only 32 580 9 12 Both 48 564 13 16 0 0 600 13 16 Left only 16 584 13 16 Right only 32 568 13 16 Both 48 552 17 20 0 0 588 17 20 Left only 16 572 17 20 Right only 32 556 17 20 Both 48 ...

Страница 42: ...Library Overview 42 ESL E Series Tape Library User s Guide ...

Страница 43: ... basic library operating procedures Taking ESD precautions page 44 Preparing tape cartridges page 49 Inserting tape cartridges page 55 Closing the cabinet doors and access panels page 56 Powering the library on and off page 58 Using the OCP page 60 Inserting tape cartridges into the load port page 73 ...

Страница 44: ...ctor ampacity that could result in overheating with potential personal injury and or property damage and 3 fracturing resulting in the internal contacts being exposed which potentially could subject the user to a shock hazard HP disclaims all liability in the event a non HP approved power cord is used ce produit ne peut être utilisé qu avec un cordon d alimentation approuvé par HP pour votre zone ...

Страница 45: ...HP zugelassenes Netzkabel verwendet wird übernimmt HP keinerlei Haftung VORSICHT Il presente prodotto può essere utilizzato esclusivamente con un cavo di alimentazione approvato da HP specifico per la regione geografica dell utente L utilizzo di un cavo di alimentazione non approvato da HP potrebbe comportare 1 la non conformità alle normative locali in materia di antinfortunistica 2 l insufficien...

Страница 46: ...dgekeurd WAARSCHUWING ADVERTENCIA este producto sólo puede utilizarse con un cable de alimentación aprobado por HP para su región geográfica específica El uso de un cable de alimentación no aprobado por HP puede provocar lo siguiente 1 el incumplimiento de requisitos de seguridad específicos del país 2 insuficiente corriente permanente admisible de conductor que puede provocar un sobrecalentamient...

Страница 47: ... Avoid touching connectors and discrete components Close cabinet door and access panel when not working on the cabinet Be careful when installing the cabinet or handling components in dry climates or environments where cold weather heating is used Environments such as these with lower relative humidity have greater potential to produce static electricity Evitare il contatto con alimentatori filtri...

Страница 48: ...perations 48 ESL E Series Tape Library User s Guide Note In environments with high potential for static electricity take additional precautions such as the use of an antistatic smock or a grounded antistatic mat ...

Страница 49: ... information refer to the order form provided with the library as well as the Bar Code Label Requirements Compatibility and Usage white paper available from http www hp com support Note For information on ordering tape cartridges and bar code labels refer to the ordering sheet that shipped with your library Attaching a bar code label to each tape cartridge enables the library and application softw...

Страница 50: ... the adhesive backed bar code label see Figure 17 Do not apply labels onto the cartridge except in this designated area Caution The bar code label should be applied as shown in Figure 20 page 53 with the alphanumeric portion facing the hub side of the cartridge Never apply multiple labels onto a cartridge because extra labels can cause the cartridge to jam inside a tape drive Figure 17 Attaching a...

Страница 51: ...ee Figure 18 Figure 18 Proper Ultrium bar code label placement SDLT bar code labels SDLT cartridges have a front slide slot located on the face of the cartridge next to the write protect switch see Figure 19 Inserting the bar code label by sliding it into the slot Caution Do not apply labels to the top bottom sides or back of the cartridge as this may cause damage to the tape drive or interfere wi...

Страница 52: ...ion To ensure that your bar codes meet HP s quality standards always purchase them from an approved supplier and never print bar code labels yourself For more information refer to the order form provided with the library as well as the Bar Code Label Requirements Compatibility and Usage white paper available from http www hp com support Table 5 Media label identifiers Cartridge Type Density Label ...

Страница 53: ...r whether data on the tape cartridge is protected from being erased or overwritten write protected Write protecting Ultrium tape cartridges By moving the switch to the left Figure 20 the tape cartridge is write enabled By moving the switch to the right the tape cartridge is write protected Figure 20 Write protecting Ultrium tape cartridges 1 Write enabled 2 Write protected 3 Write protect switch 4...

Страница 54: ... the tape cartridge is write protected orange indicator is visible By moving the switch to the right the tape cartridge is write enabled orange indicator is not visible Figure 21 Write protecting SDLT tape cartridges 1 Barcode label 2 Orange indicator 3 Write protect slide left 4 Write enabled default slide right 5 Insertion arrow 1 2 3 4 5 ...

Страница 55: ...orage locations and slot numbering on page 35 for detailed installation procedures Be sure all cartridges are properly positioned with the barcode facing you and fully seated in the bins Caution Handle tape cartridges with care Do not drop or bang them or place them near sources of electromagnetic interference Rough handling can displace the tape leader making the cartridge unusable and potentiall...

Страница 56: ...e library has one front door and one back door 1 Close and lock the front door using the key provided in the accessory kit see Figure 22 Note The laptop tray must be lowered to access the front door latch Figure 22 Closing the front door 1 Power button 2 Front door latch 3 Laptop tray 4 Laptop latch 1 2 3 4 ...

Страница 57: ... Operations 57 ESL E Series Tape Library User s Guide 2 Close and lock the back door using the key provided in the accessory kit see Figure 23 Figure 23 Closing the back door 1 Back door 2 Back door latch 1 2 ...

Страница 58: ...e bottom right side of the library cabinet 2 Verify that power cables are firmly in place 3 Close all library doors 4 Power on the power switch located behind the laptop tray see Figure 22 page 56 Note The library requires several minutes to power on Nothing displays on the OCP for the first few minutes of this process Placing the library on line or off line To place the library on or off line 1 W...

Страница 59: ...rify that no backups are in process 5 Turn off the power switch located on the front of the library see Figure 22 on page 56 6 Wait for the library to complete the shutdown process This usually takes 30 seconds but may take up to two minutes 7 Open the back door of the library cabinet and flip the breaker switches to the off position left The breaker switches are on the power distribution unit loc...

Страница 60: ...e screen page 60 OCP buttons page 60 Home screen The first screen the OCP displays after library initialization is the home screen This screen displays library status and provides information on the IP address number of bins tape drives ports and date see Figure 24 Figure 24 Home screen OCP buttons At the bottom of each OCP screen are up to five button labels These labels indicate the functions of...

Страница 61: ... the Start button The following sections provide information on each function available from the library OCP Menu screen page 62 Load Ports screen page 67 Operations screen page 69 Home Screen Menu Screen Ports Screen Ops Screen Diags Screen Status display Library Name IP Address Slots Drives Ports Date Menu items Library Cabinet Setup Load ports Open Left Load Port Open Right Load Port Open Both ...

Страница 62: ... cabinet information as well as providing a way to setup library information To access the Menu screen press Menu from the Home screen The OCP displays the Menu screen see Figure 25 Figure 25 Menu screen The Menu screen provides the following choices Viewing library information page 63 Viewing cabinet information page 64 Viewing and editing setup information page 65 ...

Страница 63: ...o highlight Library then press Select The Library screen displays see Figure 26 Figure 26 Library screen The Library screen displays the following information about the library Software software version currently loaded on the library Serial number serial number of the library 2 When you are finished viewing library information press Back to return to the Menu screen ...

Страница 64: ...ing information about the library cabinet Cabinet name of the cabinet Model model number of the cabinet Serial Number serial number of the cabinet IEEE ID internal network identification of the cabinet that includes the date of manufacture product type and serial number Slots number of slots configured in the cabinet Drives number of drives configured in the cabinet Load Ports number of load port ...

Страница 65: ...arrows to highlight Setup then press Select 2 The library prompts you for your password Enter the 6 digit password and wait for validation The response may not be immediate Note The default password is 001122 The Setup screen displays see Figure 28 Figure 28 Setup screen The Setup screen displays the following information IP Address IP Subnet Mask IP Gateway DHCP Change Password ...

Страница 66: ...word When prompted re enter the password to confirm To enable autoclean use the up and down arrows to select Autoclean and press Select The default is disabled To configure the number of tape drives in the cabinet use the up and down arrows to select the number of drives and press Select Caution If you have a partially filled drive cluster change the number of tape drives to reflect the number of ...

Страница 67: ...creen Load Ports screen The Load Ports screen allows you to lock or unlock a load port To access the Load Ports screen press Ports from the Home screen The OCP displays the Load Ports screen see Figure 29 Figure 29 Load Ports screen 1 To open a load port open the appropriate load port door left or right Caution When the load port opens be careful not to damage or remove the foam on the top of the ...

Страница 68: ...torage bins 5 When you are done push the load port back into the cabinet until you hear it click into place 6 Close the load port door An unload message appears 7 Select Yes to move the tape from the load port to the first available slot once a full inventory has been completed Select No to return to the Load Ports menu 8 When you are finished viewing the load port status press Back to return to t...

Страница 69: ...e Operations screen The Operations screen allows you to view the status and issue commands to the cabinet and tape drives To access the Operations screen press Ops from the Home screen The Operations screen is displayed see Figure 30 Figure 30 Operations screen ...

Страница 70: ... it to the bottom of the library with the optical sensor facing the back Calibrate Cabinet Checks the position of all panels and columns checks that the picker is aligned with the slots Sequential Slot Test Performs an inventory of the library then checks each slot in the library sequentially to determine whether there is free movement of the tapes in and out of the slots Sequential Drive Test Per...

Страница 71: ... times it will test 1 25 1 25 then 1 10 To access the Diagnostics screen press Diags from the Home screen The OCP displays the Diagnostics screen see Figure 31 Figure 31 Diagnostics screen To perform a diagnostic test 1 Take the library off line a Press the OPS button on the OCP to access the Operations screen b Select Cabinet c Use the up and down arrows to take the library off line 2 Use the up ...

Страница 72: ...he diagnostic test executes and the OCP displays a status screen indicating the test progress When the test completes the test result is shown next to the completed test 5 When you are finished performing diagnostic tests press Back to return to the Menu screen Stop button The Stop button located in the bottom right portion of the OCP is available from every OCP screen This button stops the cabine...

Страница 73: ...xing a bar code label and write protecting or write enabling each cartridge as desired For more information about these procedures refer to Inserting tape cartridges on page 55 2 With the load port door open place the tape cartridges in any available load magazine slot The proper orientation for tape cartridge insertion is shown in Ultrium 460 tape cartridges on page 23 and SDLT 320 tape cartridge...

Страница 74: ...Library Operations 74 ESL E Series Tape Library User s Guide ...

Страница 75: ...olve the problems Start up problems page 76 OCP problems page 77 Robotics problems page 78 Operating problems page 80 Tape drive problems page 82 Interface Manager card problems page 83 FC interface controller problems page 88 Maintaining tape cartridges page 93 Cleaning tape drives page 95 Note Also see Sense data values Hexadecimal on page 130 for information on values appearing in library error...

Страница 76: ...the Interface Manager or Command View ESL software Verify cable connections and termination Verify the cabling Verify that the drives and library are powered on and ready Ensure that the interface controllers are powered on and ready During initialization the library reports not ready Determine the failure type by checking any previous error codes returned to the host computer or by getting a libr...

Страница 77: ...terface Manager s command line interface to check for errors on the OCP The OCP does not respond to buttons Use Command View ESL software or the Interface Manager s command line interface to check for errors on the OCP Contact an authorized field service engineer An error message is displayed Write down the details of the error message including the SK ASC and ASCQ numeric values Look up the code ...

Страница 78: ...tware to move the cartridge from the picker to an empty storage bin If the problem continues contact a field service engineer The barcode reader fails Verify that nothing obstructs the reader Make sure that approved bar code labels are being used and are correctly applied Then restart the library If the problem continues contact your service provider The robot times out or hang Verify that nothing...

Страница 79: ...of the manually placed cartridge A cartridge is in the picker at start up when a move command is requested or after a place command is executed If possible initiate a Move Cartridge command from the picker to a storage slot using your application software If the problem continues contact a field service engineer The picker does not have a cartridge after completing a pick command Make sure a cartr...

Страница 80: ...ponents Verify cable connections and termination Verify that the FC port link LEDs show good status Restart the host and the library If the host and library still are not communicating verify that there is not a zoning issue A tape cartridge medium is reported not present This indicates that the picker could not sense a tape cartridge in a particular storage bin even though the inventory reports t...

Страница 81: ...d the Stop button is released Retry the command A flash memory error is reported Contact your service provider A maximum temperature exceeded warning is displayed Turn off the library and allow it to cool down Lower the room temperature if possible and increase ventilation around the library The air filters may need to be changed If the operating temperature is too high the library automatically s...

Страница 82: ... a Drive Communication Time out error Reseat the drive Verify that the drive is set to On from the OCP The tape drive does not eject a cartridge Attempt the operation from the application software Open the front door and press and hold the eject button on the drive in question Reset the drive from the OCP then attempt unload If unsuccessful power off the library disconnect the FC cables power the ...

Страница 83: ...les were not found Neither the current nor the previous image was found Blinks 4x per 5 second interval Off Load or execute command failed boot code remains at end of process This indicates that load decompress or execution failed on both the current and previous image files Off Blinks 1x per 5 second interval Normal state Load or execute command succeeded Boot code successfully loaded decompresse...

Страница 84: ...th Interface Manager card not powered on or in ready state Power on the library Observe status and link LEDs Interface Manager must be at firmware I120 or higher on an ESL E series library Interface Manager must be at firmware I130 or higher if connected to an e2400 FC 2G Incorrect IP address Verify that the correct IP address of the Interface Manager card is entered in Command View ESL See the HP...

Страница 85: ...red firmware Make sure that the e2400 160 interface controller has lettering to the side of the ports If lettering is above or below the ports then the wrong controller type was installed Contact your service provider Note If you have the wrong controller type it might still work if the firmware level is at least 5 3 06 the controller is set to DHCP and its defaults are restored Update the firmwar...

Страница 86: ...ination not set properly Check the SCSI settings for the device Check that the SCSI bus is properly terminated and ensure the terminator LEDs indicate a normal state green Timing issues Reset the corresponding FC interface controller Drive not powered on or in ready state Make sure the drive isn t set to off Troubleshoot the drive Table 15 Common Interface Manager issues Continued Symptom Possible...

Страница 87: ... connections are good contact your network administrator Ping the management station If pinging fails and the IP address is correct contact your network administrator Wrong IP address Check the IP address of the management station On the management station open a command shell and enter ipconfig You must use this IP address or the network name of the management station in the URL to access Command...

Страница 88: ...y it may indicate a problem with the SCSI bus configuration Verify the SCSI bus configuration FC port LEDs indicate FC activity ACT and link LNK status If the link LED does not light it may indicate a problem with a FC link Verify the FC port configuration and cabling Ethernet LEDs indicate activity and link status If one of these indicators does not light or stays continuously lit it may indicate...

Страница 89: ...g includes verifying the setup and the connections including Verifying SCSI bus configuration Verifying FC port connection Verifying FC and SCSI devices in Windows NT Verifying the interface controller configuration Verifying devices Verifying host configuration Verifying HBA device driver information Verifying serial port configuration Each of these topics is discussed in the following sections 1...

Страница 90: ...I Devices Verify that the SCSI devices on a particular SCSI bus can be seen in the Configuration Menu of the FC interface controller If the FC interface controller cannot see the devices verify SCSI configuration cabling and termination Verifying FC port connection If SCSI devices are recognized on the SCSI buses but do not appear to the FC host it may be that the FC link is not properly establish...

Страница 91: ...d to be rebooted with all SCSI devices and the FC interface controller powered on before recognizing the devices To verify the FC and SCSI devices 1 Navigate to the Windows NT Control Panel and select SCSI Adapters 2 Double click the FC HBA The SCSI devices should be listed If no devices are listed verify the FC interface controller configuration FC HBA configuration and cabling If devices are lis...

Страница 92: ...an 15 16 and higher To resolve this situation in a direct attach configuration configure the FC interface controller to use hard addressing and set the AL_PA to a value that the HBA will be able to map with an ID less than 16 Verifying HBA device driver information Review the HBA device driver Readme txt file for configuration specifics An HBA may require a different configuration HBAs typically c...

Страница 93: ...tridge at room temperature for the same amount of time it was exposed for up to 24 hours Keep cartridges out of direct sunlight and do not place tape cartridges near electromagnetic interference sources such as terminals motors and video or X ray equipment Doing so may cause data on the tape cartridge to be altered or erased Do not touch the tape medium or open the tape door unnecessarily Dust and...

Страница 94: ...er inside the cartridge To do this open the door on the rear of the tape cartridge by releasing the door lock The tape leader should be visible at the top left of the tape cartridge Caution Do not touch the tape leader or the tape medium Dust or skin oils can contaminate the tape impact performance and cause damage ...

Страница 95: ... contact your authorized service provider Note Do not use a DLT DLT1 or VS cleaning tape almond in color in an SDLT drive SDLT cleaning tapes are gray and use a 7 or 8 character bar code label CLNxxxS or CLNxxxS1 To clean the tape heads 1 Move a cleaning cartridge into the drive using your application software The tape drive automatically loads the cartridge and cleans the heads During the cleanin...

Страница 96: ...mmediately then it has expired or is not an Ultrium cleaning cartridge Discard it and use a new one To clean the tape heads 1 Move a cleaning cartridge into the drive using your application software The tape drive automatically loads the cartridge and cleans the heads The cleaning cycle can take up to five minutes 2 Move the cleaning cartridge back to the proper storage bin using your application ...

Страница 97: ...ifications of the library These characteristics and specifications are categorized as follows Physical specifications and requirements page 98 Performance and reliability characteristics page 99 Environmental specifications page 100 Note Tape drive and media specifications are described in Tape drives on page 22 ...

Страница 98: ...th your controller Library Dimensions and Weight Width 30 in 76 cm Depth 48 in 122 cm Footprint 30 x 48 in 76 x 122 cm Height 75 in 191 cm Weight Fully loaded library 1350 lbs 612 kg Drives 13 5 lbs 6 12 kg each Cartridges 7 7 oz 2 18 kg each Tape Drives and Cartridges Tape Drives Max No Up to 24 tape drives Cartridges Max No 630 SDLT tapes 712 Ultrium tapes Host to Library Interfaces Software SCS...

Страница 99: ...ibrary Table 19 Performance characteristics Table 20 Reliability characteristics Note Tape drive and media specifications are described in Tape drives on page 22 Average Swap Time 18 to 20 seconds consisting of two Move Medium commands Inventory Less than 3 minutes fully loaded with labeled cartridges MTBF 250 000 power on hours MSBF 1 million load unload cycles MTTR Less than 30 minutes ...

Страница 100: ... Wet bulb 25o C 77o F maximum Thermal transition 11o C per hour Temperature shipping and storage Dry bulb 40oC to 66oC 40oF to 151oF Wet bulb 46o C 115o F maximum Thermal transition 30o C 54o F per hour Relative humidity Operating 20 to 80 non condensing Shipping and storage 5 to 95 non condensing Altitude Operating Sea Level to 10 000 ft 3 048 m Shipping and storage Sea Level to 12 000 ft 3 657 m...

Страница 101: ...ed fields per IEC 801 3 Unmodulated 27 MHz to 500 MHz 3 V m Fast transients EFT or Burst per IEC801 4 Data cables 0 5kV Power cables 1 0kV Sound power level Operating 7 6 Bel Idle 7 8 Bel Sound pressure operator Operating 5 5db Table 21 Environmental specifications Continued ...

Страница 102: ...Library Characteristics 102 ESL E Series Tape Library User s Guide ...

Страница 103: ...e page 104 Preparing the library for relocation page 105 Crating the library page 115 Preparing the library for operation page 118 To ship the library or move it using a motor vehicle for example truck or forklift follow all of the instructions in this appendix To move the library to a new location within the same building or facility follow all instructions in this appendix except for those found...

Страница 104: ...g the new installation site Check the new installation site for the library using the guidelines found in the HP StorageWorks ESL E Series Pre Installation Site Survey Instructions Make sure the new location meets all applicable clearance environmental and power requirements ...

Страница 105: ... prepare the library for relocation before any move Removing tape cartridges To remove tape cartridges 1 Unload all tape cartridges from the tape drives using your application software 2 Press Stop on the OCP to stop all library operation This places the library off line after the completion of any currently executing operations 3 Power the library off 4 Unlock and open both front doors 5 Remove a...

Страница 106: ...nd packing To install internal shipping restraints 1 Remove the six panel shipping restraints three sets on each side from their storage location on the lower cabinet frame see Figure 35 Figure 35 Retrieving the panel shipping restraints Left storage position shown Panel restraint storage locations ...

Страница 107: ...ch side with a 1 4 in nut driver see Figure 36 Figure 36 Attaching the panel shipping restraints Panels shown outside of library for clarity Load port latching mechanism Upper shipping restraint Upper shipping restraint Middle shipping restraint Lower shipping restraint Lower shipping restraint Middle shipping restraint ...

Страница 108: ... storage location under the left cartridge bin panel see Figure 37 Figure 37 Shipping restraints storage location 4 If the picker is not in the far right position gently move it along the horizontal carriage until it is as far front as possible Shipping restraints Spare screws Shipping restraints in storage position ...

Страница 109: ...Library 109 ESL E Series Tape Library User s Guide 5 Install the robotic shipping restraints see Figure 38 Figure 38 Installing the robotic shipping restraint Robot Vertical axis shipping restraint shipping restraint ...

Страница 110: ...Relocating the Library 110 ESL E Series Tape Library User s Guide 6 Install the counterweight see Figure 39 Figure 39 Installing the counterweight shipping restraint Nuts Shipping restraint ...

Страница 111: ...nal library frame restraint and insert them as shown in Figure 40 Figure 40 Installing the internal library frame restraint 8 Attach the two pieces together using four 1 4 inch hex nuts 9 Secure the restraint to the frame with two 1 4 inch bolts one at the top and one at the bottom of the library frame Bolt Bolt Hex nuts ...

Страница 112: ...y User s Guide 10 From the front of the library add the foam to the Y axis cover plate to the left front door and also to the back door frame see Figure 41 Figure 41 Adding the shipping foam inside the library Foam Foam Back of library Front of library ...

Страница 113: ...ect library cables 1 Disconnect the FC cables connecting from the library to the host 2 Disconnect the Ethernet cable connecting to the local network 3 Disconnect the power cord from the library to its power source 4 Pack the cables removed in step 1 through step 3 with other library accessories 5 Disconnect the following cables but leave them routed in the channel Drive cluster and card cage powe...

Страница 114: ... SCSI cables not present on Ultrium 460 FC drives Cabinet controller SCSI cable Robotics controller card e1200 160 Ethernet cable e2400 160 or e2400 FC 2G interface controller Ethernet cables Interface Manager card Ethernet cable Drive FC cables not present on SCSI drives ...

Страница 115: ...g Use at least two people to perform any steps that involve lifting or guiding the library Die Library wiegt ca 612 kg 1 350 lb Daher müssen alle Schritte die das Anheben oder das Führen der Tape Library erfordern von mindestens zwei Personen durchgeführt werden VORSICHT La libreria pesa circa 612 KG Utilizzare almeno due persone per eseguire qualsiasi operazione di sollevamento o di spostamento d...

Страница 116: ...43 Figure 43 Crating the library 1 Prepare the shipping pallet for the library by attaching the ramp to the pallet 2 Place the library on the pallet a Raise the library support feet b With the help of at least one person roll the library to a position in front of the pallet ramp c Roll the library onto the pallet ...

Страница 117: ...to the pallet c Remove the ramp from the pallet and lean it against the side of the library with a cardboard sheet between the library and the ramp 4 Place the accessory kits onto the pallet 5 Place the foam cap over the library 6 Wrap the cardboard crate around the library and fasten it using the plastic restraining clips 7 Place the top onto the crate 8 Secure the crate with two steel restrainin...

Страница 118: ...Works ESL E Series Pre Installation Site Survey Instructions and the HP StorageWorks ESL E Series Unpacking and Installation Guide to Prepare the new installation site Receive the library Uncrate the library Position the library Install and configure the library Note The ESL E Series library must be unpacked and installed by authorized HP service personnel only ...

Страница 119: ... in accordance with the instruction manual may cause harmful interference to radio communications Any changes or modifications made to this equipment may void you s authority to operate this equipment Operation of this equipment in a residential area may cause interference in which case you at your own expense will be required to take whatever measures may be required to correct the interference T...

Страница 120: ...Regulatory Statements 120 ESL E Series Tape Library User s Guide BSMI statement ...

Страница 121: ...Regulatory Statements 121 ESL E Series Tape Library User s Guide Japan statement VCCI ...

Страница 122: ...CISPR 22 WARNING This is a Class A product In a domestic environment this product may cause radio interference in which case the user may be required to take adequate measures ACHTUNG Dieses ist ein Gerät der Funkstörgrenzwertklasse A In Wohnbereichen können bei Betrieb dieses Gerätes Rundfunkstörungen auftreten in welchen Fällen der Benutzer für entsprechende Gegenmassnahmen verantwortlich ist AT...

Страница 123: ...WG 1 0 mm2 wires Length Maximum 15 feet 4 5m Rating Minimum 25 A 125 V ATTENTION LIRE LA REMARQUE DANS LE MODE D EMPLOI REMARQUE CETTE REMARQUE NE CONCERNE QUE LES ÉTATS UNIS ET LE CANADA En cas d envoi aux États Unis utiliser le cordon d alimentation CERTIFIÉ UL et convenant pour 200 240 V En cas d envoi au Canada utiliser le cordon d alimentation CERTIFIÉ CSA et convenant pour 200 240 V Fiche Br...

Страница 124: ... VERMEIDEN SIE jeden Blickkontakt und direkten körperlichen Kontakt mit diesen Strahlen VORSICHT Ein nicht ordnungsgemäßer siehe hier enthaltene Anweisungen Einsatz bzw Änderungen der Betriebsleistung können einen Gesundheit gefährdenden Kontakt zur Folge haben Appareil à laser de classe 1 ATTENTION Ce produit émet de la classe laser II Rayonnement laser NE PAS fixer des yeux le rayon Éviter les e...

Страница 125: ...kan 1 laserlaite ATTENZIONE Questo prodotto emette una luce laser di Classe II NON guardare il facsio di luce ed evitare di esporsi alla fonte del laser Il fascio di luce laser h emesso dal dispositivo di scansione del codice a barre ATTENZIONE L uso di comandi o regolazioni per eseguire le procedure che non siano quelli specificati in questa documentazione pur causare rischi all incolumit delle p...

Страница 126: ...a on litiumparisto Emolevyllä oleva Dallas Semiconductor DS12B887 sisältää litiumpariston Litium saattaa olla luokiteltu vaaralliseksi aineeksi Hävitä tämä paristo paikallisten lakien ja määräysten mukaisesti ATTENTION Ce produit contient une batterie au lithium Le composant Dallas DS12B887 de la carte mère contient une batterie au lithium Le lithium peut être considéré comme un produit dangereux ...

Страница 127: ...tive vigenti PRECAUCIÓN Este producto contiene una batería de litio El modelo Dallas Semiconductor DS12B887 de la placa base contiene una batería de litio El litio puede ser considerado un material peligroso Deseche la batería conforme a la normativa vigente de aplicación VARNING Denna produkt innehåller ett litiumbatteri Dallas Semiconductor DS12B887 på moderkortet innehåller ett litiumbatteri Li...

Страница 128: ...Regulatory Statements 128 ESL E Series Tape Library User s Guide ...

Страница 129: ... Sense Key Additional Sense Code ASC Additional Sense Code Qualifier ASCQ Message name description and potential recovery action Valid Interfaces SCSI host computer DIAG diagnostic port computer Both SCSI and DIAG port Table 23 lists message information for hardware failures ASCQ values The table is sorted by the data in the ASCQ column and lists the following information ASCQ Message name descrip...

Страница 130: ...ermine failure type by checking any previous error code returned to host Reinitialize element status through backup package or command line interface 5 04 07 DRIVE FW UPDATE IN PROGRESS The drive can not perform indicated request because it is in the process of updating it s firmware B 08 00 LOGICAL UNIT COMMUNICATION FAILURE Check cables Ensure library unit is powered on Retry command B 08 01 LIB...

Страница 131: ...rt door has been closed 6 29 00 POWER ON RESET OR BUS DEVICE RESET OCCURRED Informational message If power on occurs the host user should assume the inventory may have changed and should ask the library for that information again 6 29 01 POWER ON RESET OCCURRED Informational message If power on occurs the host user should assume the inventory may have changed and should ask the library for that in...

Страница 132: ...g cartridge cannot be removed from a drive because it is being used in a cleaning operation A cartridge cannot be placed into the drive because the drive is being cleaned A cartridge cannot be placed into an empty storage element because it is reserved for a cleaning cartridge that is currently in use in a drive cleaning operation 5 39 00 SAVING PARAMETERS NOT SUPPORTED Verify Save Parameter field...

Страница 133: ...on software B 43 00 SCSI MESSAGE ERROR Detected message error in message processing on the SCSI BUS B 47 00 SCSI PARITY ERROR SCSI Parity Error detected Check cable connections and cable length 5 4E 00 OVERLAPPED COMMANDS ATTEMPTED Due to a second command being sent from the same host before a previous command has completed the previous command has been aborted This may also occur when executing o...

Страница 134: ...cleaning Clean the tape drive This is returned with element status data which has no sense key 5 80 01 TRANSFER FULL COMMAND CAN NOT BE EXECUTED Picker has cartridge in it Move cartridge to empty storage element using Move Medium command via your application software Retry command B 80 01 TRANSFER FULL AT END OF PLACE Picker has cartridge in it at end of a place operation Move Medium with a target...

Страница 135: ... alignment If the problem continues drive may need servicing 4 80 0A CONFIGURATION SETTINGS CORRUPTED Reconfigure the library If problem persists call Technical Support B 80 0B COMMAND ABORTED BY USER Informational message No action is necessary B 80 0D CARTRIDGE PARTIALLY GRIPPED Issue a Move Medium command using your application software to move the cartridge from the transfer element to an empt...

Страница 136: ...in either a bin or a tape drive 5 81 E0 PICKER INVALID START CONDITION Picker hardware condition is unknown Issue a Rezero Unit command 5 81 F0 PICKER INVALID COMMAND Picker hardware commanded to position out of system mechanical limits Issue a Rezero Unit command 4 82 See Table 23 ROTARY HARDWARE FAILURE Rotary hardware failure Call Technical Support 5 82 E0 ROTARY INVALID START CONDITION Rotary ...

Страница 137: ... of system mechanical limits Issue a Rezero Unit command If the problem persists calibrate the library 4 85 See Table 23 HORIZONTAL HARDWARE FAILURE Horizontal hardware failure Call Technical Support 5 85 E0 HORIZONTAL INVALID START CONDITION Horizontal hardware condition is unknown Issue a Rezero Unit command 5 85 F0 HORIZONTAL INVALID COMMAND Horizontal hardware commanded to position out of syst...

Страница 138: ...DWARE FAILURE Vision internal failure Call Technical Support 5 8A 02 UNCALIBRATED POSITION System requires calibration 6 8A 02 CALIBRATION FAILURE Check slots cartridges all internal elements 4 8B See Table 23 CLM HARDWARE FAILURE CLM failure Call Technical Support 5 8B E0 CLM INVALID START CONDITION CLM hardware condition is unknown Issue a Rezero Unit command 5 8B F0 CLM INVALID COMMAND CLM hard...

Страница 139: ...ic controller B 8F 00 LIBRARY UNIT COMMAND TIMED OUT Verify that communications to library still exists by issuing another command 4 F3 02 DRIVE COMMUNICATION TIMEOUT The library is unable to communicate with a drive 4 F3 20 DRIVE UNLOAD FAILED OR TIMED OUT The command to the drive to unload the tape failed to complete or timed out 4 F3 21 DRIVE EJECT FAILED OR TIMED OUT The command to the drive t...

Страница 140: ...tion Retry command If the failure recurs run self test 40 4F TIMEOUT Hardware did not reach desired position The axis rail lubrication may be insufficient The axis belt may be too tight The motor pulley may be loose Retry the command If the failure reoccurs then run selftest 50 5F OVER CONTROL The hardware is obstructed Determine the cause of the obstruction Retry the command If the failure reoccu...

Страница 141: ... SENSOR FAILURE A sensor transition did not occur as expected or an extra transition occurred during calibration inventory or pick place Retry the command If the failure recurs contact Technical Support B0 BF ELECTRONICS NOT PRESENT Electronics necessary for hardware to function is not present Install necessary hardware Table 23 Hardware failure ASCQ values Continued ASCQ Description ...

Страница 142: ...Sense Data Values 142 ESL E Series Tape Library User s Guide ...

Страница 143: ...occur within the cabinet An event is defined as any occurrence that requires user attention and possible intervention These events are either report through the OCP or through E mail alerts Library events are broken up into the following sections Information events page 144 Warning events page 146 Critical events page 148 ...

Страница 144: ...inet number door state changed Load Port opened Load Port closed Mode parameters for cabinet changed Mode parameters for partition changed Cabinet has been stopped Cabinet has been started Cabinet is now offline Cabinet state change to online Partition state change to online Cabinet state change to going online Drive drive added Drive drive removed Drive drive power on Drive drive power off Partit...

Страница 145: ...ted domain Updated default gateway Updated email server Updated DNS address Library Name changed Library shutdown requested from remote GUI Library reboot requested from remote GUI Contract number updated Upload file complete Upgrade firmware complete Updated OCP Password Updated Subnet Mask Updated Default Gateway Updated IP address indicates a variable character This will change depending on the...

Страница 146: ...arning Tape Alert Flag 2 Write Warning Tape Alert Flag 3 Hard Error Tape Alert Flag 7 Media Life Tape Alert Flag 8 Not Data Grade Tape Alert Flag 15 Memory in Cartridge Failure Tape Alert Flag 17 Read Only Format Tape Alert Flag 18 Tape Directory Corrupted Tape Alert Flag 21 Clean Periodic Tape Alert Flag 29 Drive Maintenance Tape Alert Flag 32 Interface Tape Alert Flag 34 Download Fault Tape Aler...

Страница 147: ...is stopped Logical unit is turned off line panelname sensor name may need attention Drive drive number sensor name may need attention Logical unit is not ready Load Port unload error Software Socket Failure Software Socket Failure No Matching Frame Name Found Software Communication Failure No data read for event System Test Error indicates a variable character This will change depending on the spe...

Страница 148: ...d Failure Tape Alert Flag 6 Write Failure Tape Alert Flag 9 Write Protect Tape Alert Flag 13 Recoverable Snapped Tape Tape Alert Flag 14 Unrecoverable Snapped Tape Tape Alert Flag 16 Forced Eject Tape Alert Flag 20 Clean Now Tape Alert Flag 22 Expired Cleaning Media Tape Alert Flag 23 Invalid Cleaning Cartridge Tape Alert Flag 30 Hardware A Reset Needed Tape Alert Flag 31 Hardware B Power Cycle Ne...

Страница 149: ...pick cartridge Rotary timeout Rotary front failed Rotary back failure Rotary home not found Rotary axis internal failure Rotary invalid command Extension timeout Extension current feedback failure Extension mechanical position error Vertical home not found Vertical test failure Vertical encoder failure Vertical mapping failure Horizontal timeout Horizontal mechanical position error Horizontal home...

Страница 150: ...nication failure Rotary invalid start condition Extension invalid start condition Depth hardware failure Vision hardware failure CLM hardware failure CLM invalid start condition CLM invalid command Transport full Load port door open Cabinet controller unable to upload Robotic controller unable to upload Library unit timed out Drive communication timeout Drive unload failed or timed out Drive eject...

Страница 151: ...ure Software Socket Died Software Socket Failure Software Socket Died Cabd unable to start new thread Cabinet Not Found Software Pipe Failure Software Communication Error Software Socket Failure Software Socket Failure indicates a variable character This will change depending on the specific item within the cabinet Table 26 Critical events Continued Critical Events ...

Страница 152: ...Event Reporting 152 ESL E Series Tape Library User s Guide ...

Страница 153: ...ndition reported in the sense key field ASCQ Additional Sense Code Qualifier is part of the SCSI 2 specification The additional sense code qualifier ASCQ indicates detailed information related to the additional sense code Autoclean A user defined mode made on the touch screen GUI by which the library automatically performs drive cleaning tasks Bit The basic unit of data in a binary numbering syste...

Страница 154: ...to equipment whose primary function is radio transmission or reception as defined by the International Telecommunications Union ITU Radio Regulations The object of the standard is to establish uniform requirements for the conducted and radiated disturbance levels of the equipment covered by the standard Disturbance limits are established for Class A and Class B equipment and measurement methods op...

Страница 155: ...library is connected IEC The International Electrotechnical Commission is based in Geneva Switzerland Load port The revolving assembly on a front door of enterprise libraries that incorporates a revolving drum and tape cartridge bins for loading and unloading tape cartridges LTO 2 Linear Tape Open is a tape drive specification backed by HP IBM and Seagate Ultrium 460 tape drives LTO 2 are HP s sec...

Страница 156: ...holds a tape cartridge in transit Reports Refers to the report options on the touch screen graphical user interface Service screen Robotics As used in the context of automated tape libraries the X axis Y axis and Z axis mechanical assemblies inside the library used to move tape cartridges RS 232C Short for Recommended Standard 232C a standard interface approved by the Electronic Industries Associa...

Страница 157: ... beginning of a tape in a cartridge Tape drive controllers A device that controls the transfer of data from a host to a tape drive and vice versa Terabyte A unit of measure for digital data equal to approximately 1 000 gigabytes or 1 099 511 627 776 bytes Terminator Special electrical resistors terminators are installed in the SCSI devices at each end of the SCSI bus and are not installed in other...

Страница 158: ...Glossary 158 ESL E Series Tape Library User s Guide ...

Страница 159: ...9 equipment symbols 10 text symbols 9 D devices supported 28 troubleshooting 91 diagnostics 70 document conventions 9 related documentation 8 E e2400 160 FC interface controller 28 e2400 FC 2G interface controller 28 elements 155 EMI 155 environmental specifications 100 equipment symbols 10 ESD 155 ESD precautions 44 Ethernet port LED indicators 30 location of 30 external features e2400 160 FC int...

Страница 160: ...y 83 link speed 83 LED indicators defined 88 Ethernet port 30 FC 31 power supply 30 SCSI bus 31 types of 88 left panel 35 library robotics 21 library relocating 103 link activity LED 83 link speed LED 83 load port 155 DLT SDLT 26 LTO 26 tape cartridge magazines 26 load slots 35 LTO 2 155 LVD 155 M media picker 21 messages from library to host 129 Model 630e 41 Model 712e 40 moving the library 103 ...

Страница 161: ...130 asc 04 130 asc 08 130 asc 1A 130 asc 20 130 asc 21 130 asc 24 130 asc 25 131 asc 26 131 asc 28 131 asc 29 131 asc 2A 132 asc 30 132 asc 39 132 asc 3A 132 asc 3B 133 asc 43 133 asc 47 133 asc 4E 133 asc 53 133 asc 5A 134 asc 80 134 to 136 asc 81 136 asc 82 136 asc 83 136 asc 84 137 asc 85 137 asc 88 138 asc 8A 138 asc 8B 138 asc 8C 139 asc 8E 139 serial port configuration troubleshooting of 92 ...

Страница 162: ...tor 157 text symbols 9 troubleshooting 75 to 82 basic steps listed 89 devices verifying 91 FC connection verifying 90 FC interface controller problems 88 HBA device driver verifying 92 host configuration verifying 92 Interface Manager card problems 83 OCP problems 77 operating problems 80 robotics problems 78 SCSI bus configuration 90 SCSI devices verifying 91 serial port configuration verifying 9...

Отзывы: