background image

Audio

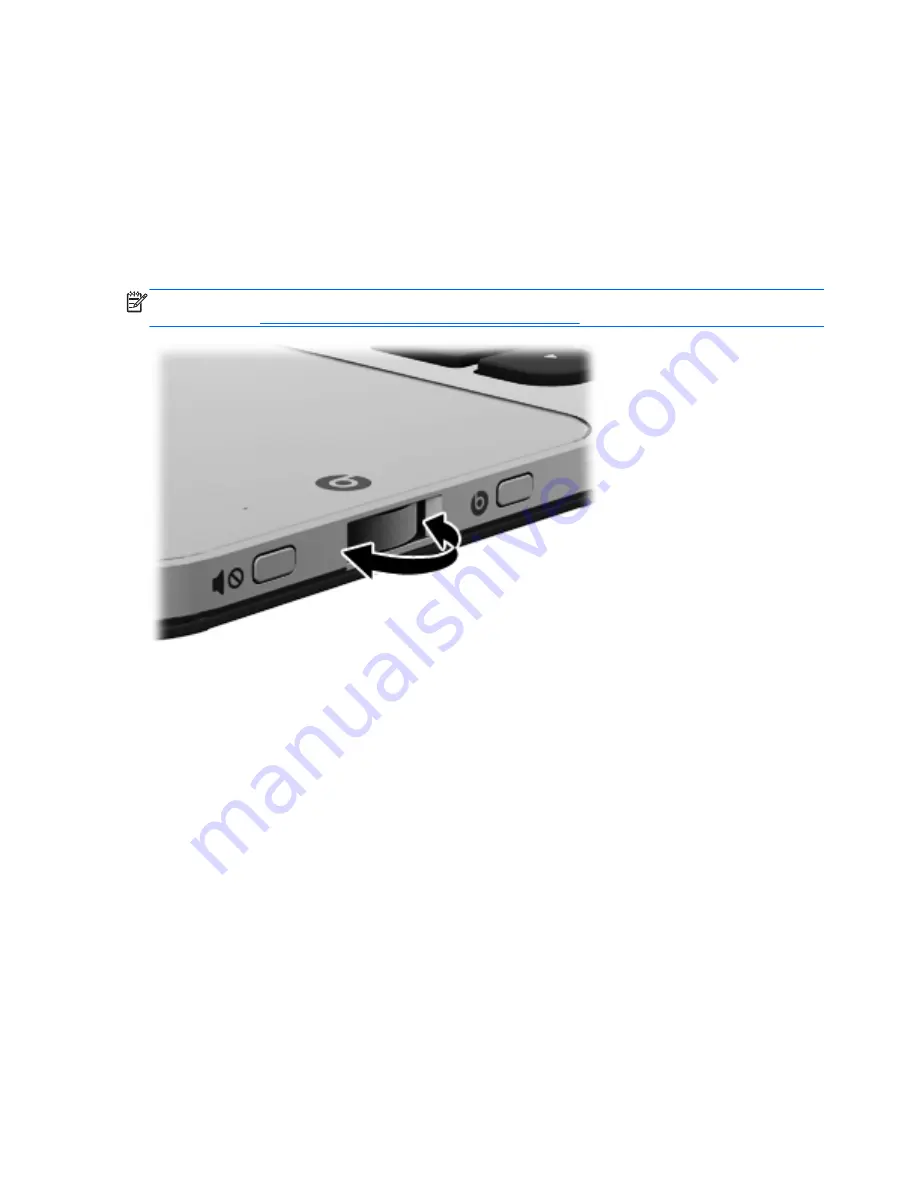
Volume dial

Like the dial on a stereo, the integrated volume dial controls speaker volume on the computer.

To increase speaker volume, rotate the dial clockwise.

– or –

To decrease speaker volume, rotate the dial counter-clockwise.

NOTE:

You can manually adjust the volume settings in Beats Audio Control Panel. For more

information, see 

Accessing Beats Audio Control Panel on page 5

.

4

Chapter 1   Welcome

Содержание ENVY 14-3100

Страница 1: ...GETTING STARTED ...

Страница 2: ...Getting Started ...

Страница 3: ...tional warranty HP shall not be liable for technical or editorial errors or omissions contained herein First Edition April 2012 Document Part Number 687270 001 Product notice This guide describes features that are common to most models Some features may not be available on your computer Software terms By installing copying downloading or otherwise using any software product preinstalled on this co...

Страница 4: ...ucing the environmental impact of our products As part of this effort we provide user guides and learning centers on your computer hard drive in Help and Support Additional support and updates to the user guides are available on the web ...

Страница 5: ......

Страница 6: ...allow another hard surface such as an adjoining optional printer or a soft surface such as pillows or rugs or clothing to block airflow Also do not allow the AC adapter to contact the skin or a soft surface such as pillows or rugs or clothing during operation The computer and the AC adapter comply with the user accessible surface temperature limits defined by the International Standard for Safety ...

Страница 7: ...vi Safety warning notice ...

Страница 8: ... Beats Audio Control Panel 5 Enabling and Disabling Beats Audio 6 HP Wireless Audio select models only 7 HP Wireless Audio Manager 7 Refreshing your software content with Intel Smart Connect Technology select models only 8 Radiance backlight keyboard and proximity sensor 8 Power 9 Factory sealed battery 9 AC adapter 9 HP CoolSense 9 Intel Wireless Display 9 TPM Embedded Security device 10 Finding ...

Страница 9: ... Setting pointing device preferences 30 Using the Imagepad 30 Turning the Imagepad off or on 30 Navigating 31 Selecting 31 Using Imagepad gestures 32 Scrolling 33 Pinching Zooming 33 Rotating 34 Flicking 34 5 Backing up restoring and recovering 35 Creating backups 35 Creating recovery media to recover the original system 35 What you need to know 36 Creating the recovery media 36 Creating system re...

Страница 10: ... and Restore 39 Recovering the original system using HP Recovery Manager 39 What you need to know 40 Recovering using HP Recovery partition 40 Recovering using the recovery media 41 Changing the computer boot order 41 6 Customer support 42 Contacting customer support 42 Labels 43 Identifying the labels 43 Locating the labels 44 7 Specifications 45 Input power 45 Operating environment 46 Index 47 i...

Страница 11: ...x ...

Страница 12: ... instructions After you set up and register the computer it is important to take the following steps 1 Set up your wired or wireless network For more information see Networking on page 24 2 Create recovery discs or a recovery flash drive For instructions see Backing up restoring and recovering on page 35 3 Get to know your computer See Getting to know your computer on page 13 and Keyboard and poin...

Страница 13: ...S is installed on your phone Setting up Touch to Share If you have an Android 2 3 phone follow these steps 1 On your phone go to Settings Wireless and Networks and then tap the NFC checkbox to enable 2 On your computer select Start All Programs HP HP Touch to Share and then follow the on screen instructions to download and install the HP Touch to Share for Android app on your phone 3 Open the webs...

Страница 14: ... NFC radio antenna on your computer on or off To turn the NFC antenna on or off follow these steps 1 Select Start All Programs HP HP Touch to Share 2 Click the Gear icon on the HP Touch to Share screen and then click On or Off or Click the Touch to Share icon in the notification area at the far right of the taskbar and then click Turn NFC Radio On or Turn NFC Radio Off Accessing settings Select St...

Страница 15: ... the computer To increase speaker volume rotate the dial clockwise or To decrease speaker volume rotate the dial counter clockwise NOTE You can manually adjust the volume settings in Beats Audio Control Panel For more information see Accessing Beats Audio Control Panel on page 5 4 Chapter 1 Welcome ...

Страница 16: ...sing Beats Audio Control Panel Beats Audio Control Panel allows you to view and manually control audio and bass settings To open Beats Audio Control Panel do one of the following Press the Beats Audio button on the right side of the computer or Select Start Control Panel Hardware and Sound Beats Audio Control Panel What s new 5 ...

Страница 17: ...ats Audio press the fn key 1 and the b key 2 The following table explains the meaning of the Beats Audio icons that appear on the screen when you press the Beats Audio hot key fn b Icon Meaning Beats Audio is enabled Beats Audio is disabled 6 Chapter 1 Welcome ...

Страница 18: ...reless enabled devices in your home audio system NOTE Before you start HP Wireless Audio Manager be sure that the wireless device is turned on the wireless light on the f12 key is white To access HP Wireless Audio Manager do one of the following Right click the HP Wireless Audio icon in the notification area at the far right of the taskbar and then click Launch Manager NOTE If you want to conserve...

Страница 19: ...d applications see the software Help Radiance backlight keyboard and proximity sensor The radiance backlight keyboard feature turned on at the factory uses proximity sensor technology to automatically light up the keyboard when the sensors detect your presence in front of the computer The proximity sensors also turned on at the factory automatically turn the radiance backlight keyboard feature on ...

Страница 20: ...h as cell phones and MP3 players The USB port provides only charging functionality it does not power USB devices HP CoolSense HP CoolSense automatically detects when the computer is not in a stationary position and adjusts performance and fan settings to keep the surface temperature of your computer at the optimum level of comfort When HP CoolSense is off the position of the computer is not detect...

Страница 21: ...Hidden this entry is hidden This value reflects the current physical state for the TPM The state is enabled or disabled by the Embedded Security State setting Embedded Security State select models only No Operation Disabled Enabled If the administrator password is not set or if TPM Security Device is set to Hidden this entry is hidden You can enable or disable the TPM function The next time the co...

Страница 22: ... range of how to information and troubleshooting tips Regulatory Safety and Environmental Notices To access this guide select Start Help and Support User guides Important regulatory notices including proper battery disposal information Safety Comfort Guide To access this guide select Start Help and Support User guides or go to http www hp com ergo Proper workstation setup Guidelines for posture an...

Страница 23: ...ou may request a printed copy from http www hp com go orderdocuments or write to North America Hewlett Packard MS POD 11311 Chinden Blvd Boise ID 83714 USA Europe Middle East Africa Hewlett Packard POD Via G Di Vittorio 9 20063 Cernusco s Naviglio MI Italy Asia Pacific Hewlett Packard POD P O Box 200 Alexandra Post Office Singapore 911507 When you request a printed copy of your warranty please inc...

Страница 24: ...2 Getting to know your computer The following sections are included in this chapter Top Front Right side Left side Display Bottom 13 ...

Страница 25: ...Imagepad off or on 3 Left Imagepad button The bottom left corner of the Imagepad functions like the left button on an external mouse 4 Imagepad zone Moves the pointer and selects or activates items on the screen 5 Right Imagepad button The bottom right corner of the Imagepad functions like the right button on an external mouse 14 Chapter 2 Getting to know your computer ...

Страница 26: ...ight action key Press the key to turn the keyboard backlight on or off 4 Wireless light White An integrated wireless device such as a wireless local area network WLAN device is enabled NOTE Wireless devices are enabled at the factory Amber All wireless devices are disabled 5 Imagepad light Amber The Imagepad is off Off The Imagepad is on 6 Beats Audio light Red Beats Audio is enabled Off Beats Aud...

Страница 27: ...n press the button briefly to exit Hibernation CAUTION Pressing and holding down the power button will result in the loss of unsaved information If the computer has stopped responding and Windows shutdown procedures are ineffective press and hold the power button for at least 5 seconds to turn off the computer To learn more about power settings select Start Control Panel System and Security Power ...

Страница 28: ...en the key is pressed in combination with the b key Beats Audio is enabled or disabled 3 Windows logo key Displays the Windows Start menu 4 Action keys Execute frequently used system functions 5 t key Opens the Twitter website when pressed in combination with the fn key 6 b key Enables or disables Beats Audio when pressed in combination with the fn key 7 Windows applications key Displays a shortcu...

Страница 29: ...Front Component Description Stereo speakers 2 Produce enhanced Beats Audio sound 18 Chapter 2 Getting to know your computer ...

Страница 30: ...temporarily parked the hard drive NOTE For information about HP ProtectSmart Hard Drive Protection see the HP Notebook Reference Guide 5 Power light White The computer is on Blinking white The computer is in the Sleep state Off The computer is off or in Hibernation 6 Security cable slot Attaches an optional security cable to the computer NOTE The security cable is designed to act as a deterrent bu...

Страница 31: ...0 charging port can also charge select models of cell phones and MP3 players even when the computer is off NOTE USB charging is enabled at the factory To disable this setting follow the instructions in the Setup Utility BIOS and System Diagnostics chapter in the HP Notebook Reference Guide 5 USB 2 0 charging port Connects an optional USB 1 0 or USB 2 0 device The USB 2 0 charging port can also cha...

Страница 32: ...e putting on headphones earbuds or a headset For additional safety information refer to the Regulatory Safety and Environmental Notices NOTE When a device is connected to the jack the computer speakers are disabled NOTE Be sure that the device cable has a 4 conductor connector that supports both audio out headphone and audio in microphone 7 Digital Media Slot Supports the following digital card fo...

Страница 33: ...g ambient noise and providing echo cancellation 5 Webcam light On The webcam is active 6 HP TrueVision HD Webcam Records video and captures still photographs To access the webcam select Start All Programs CyberLink CyberLink YouCam The antennas and proximity sensors are not visible from the outside of the computer For optimal transmission keep the areas immediately around the antennas and proximit...

Страница 34: ...ent Enables airflow to cool internal components NOTE The computer fan starts up automatically to cool internal components and prevent overheating It is normal for the internal fan to cycle on and off during routine operation 3 Battery cover lock Locks the battery cover into place Bottom 23 ...

Страница 35: ...support one or both of the following types of Internet access Wireless For mobile Internet access you can use a wireless connection See Connecting to an existing WLAN on page 26 or Setting up a new WLAN network on page 26 Wired You can access the Internet by connecting to a wired network For information about connecting to a wired network see the HP Notebook Reference Guide 24 Chapter 3 Networking...

Страница 36: ...ve an account with an ISP You do not have an Internet account and want to select an ISP from the list provided within the wizard The list of ISP providers is not available in all regions You have selected an unlisted ISP and the ISP has provided you with information such as a specific IP address and POP3 and SMTP settings To access the Windows Connect to the Internet Wizard and instructions for us...

Страница 37: ...ther DSL or cable 1 and high speed Internet service purchased from an Internet service provider ISP A wireless router purchased separately 2 Your new wireless computer 3 NOTE Some modems have a built in wireless router Check with your ISP to determine what type of modem you have The illustration shows an example of a completed WLAN network installation that is connected to the Internet As your net...

Страница 38: ...p a new network Then follow the on screen instructions NOTE It is recommended that you initially connect your new wireless computer to the router by using the network cable provided with the router When the computer successfully connects to the Internet you can disconnect the cable and then access the Internet through your wireless network Protecting your WLAN When you set up your WLAN always turn...

Страница 39: ... fn key and one of the function keys to activate the assigned function For instructions on disabling the action key feature see the Setup Utility BIOS and System Diagnostics chapter in the HP Notebook Reference Guide CAUTION Use extreme care when making changes Errors can prevent the computer from operating properly Icon Key Description f1 Opens Help and Support which provides information about th...

Страница 40: ...lays f5 Turns the radiance backlight keyboard feature off or on NOTE To conserve battery power turn off this feature To switch between low medium or high brightness levels press and hold the keyboard backlight action key f5 in combination with either the up or down arrow key f6 Plays the previous track of an audio CD or the previous section of a DVD or a BD f7 Plays pauses or resumes an audio CD a...

Страница 41: ...ect Mouse settings Using the Imagepad The advanced Imagepad is a high precision gesture friendly mouse alternative To move the pointer slide one finger across the Imagepad in the direction you want the pointer to go Use the left and right Imagepad buttons like the corresponding buttons on an external mouse Turning the Imagepad off or on To turn the Imagepad off or on quickly double tap the Imagepa...

Страница 42: ...the pointer slide one finger across the Imagepad in the direction you want the pointer to go Selecting Use the left and right Imagepad buttons like the corresponding buttons on an external mouse Using pointing devices 31 ...

Страница 43: ...ation of a gesture 1 Select Start Control Panel Hardware and Sound Synaptics ClickPad 2 Click a gesture to activate the demonstration To turn the gestures off or on 1 Select Start Control Panel Hardware and Sound Synaptics ClickPad 2 To turn a gesture on select the check box next to the gesture To turn a gesture off clear the check box next to the gesture 3 Click Apply and then click OK 32 Chapter...

Страница 44: ...tion NOTE Scrolling speed is controlled by finger speed NOTE Scrolling is enabled at the factory Pinching Zooming Pinching allows you to zoom in or out on images or text Zoom in by placing two fingers together on the Imagepad and then moving them apart Zoom out by placing two fingers apart on the Imagepad and then moving them together NOTE Pinching zooming is enabled at the factory Using pointing ...

Страница 45: ...ect to the right NOTE Rotating is enabled at the factory Flicking Flicking allows you to quickly perform the following functions Browse the Internet Scroll through photos in a photo viewer Navigate through screens Scroll through documents Enter or exit the slide show mode in your photo viewer To flick use three fingers to touch the Imagepad in a light quick flicking motion up down left or right NO...

Страница 46: ...ints 3 As you add photos video music and other personal files create a backup of your system and personal information Creating recovery media to recover the original system After you successfully set up the computer you should create recovery discs or a recovery flash drive using HP Recovery Manager You will need these recovery discs or recovery flash drive to perform a system recovery should the ...

Страница 47: ...ore you have finished creating the recovery media The next time you open HP Recovery Manager you will be prompted to continue the process Creating the recovery media 1 Select Start and type recovery in the search field Select Recovery Manager from the list Allow the action to continue if prompted 2 Click Recovery Media Creation 3 Follow the on screen instructions to continue To recover see Recover...

Страница 48: ...s files emails and photos and you will want to keep that information even if you download a virus or the system stops working properly How completely you are able to recover your files depends on how recent your backup is As you add new software and data files you should create backups on a regular basis Tips for a successful backup Number backup discs before inserting them into the optical drive ...

Страница 49: ... information that is hard to replace such as pictures videos music project files or data records Creating a backup using Windows Backup and Restore Windows allows you to back up files using Windows Backup and Restore You can select the level you want to back up from individual folders to drives The backups are compressed to save space To back up 1 Select Start Control Panel System and Security Bac...

Страница 50: ... if files become corrupt restoring specific files is useful Restoring specific files is also useful if you ever choose to recover the original system using HP Recovery Manager You can only restore specific files that you have backed up before Restoring specific files using Windows Backup and Restore Windows allows you to restore files that were backed up using Windows Backup and Restore 1 Select S...

Страница 51: ...t other software applications are not Do not interrupt the process until it is complete otherwise the recovery will fail Recovering using HP Recovery partition The HP Recovery partition allows you to restore your system without the need for recovery discs or a recovery flash drive This type of recovery can only be used if the hard drive is still working To check for the presence of a recovery part...

Страница 52: ...boot order on page 41 3 Press f9 at system bootup 4 Select the optical drive or the flash drive 5 Follow the on screen instructions Changing the computer boot order To change the boot order for recovery discs 1 Restart the computer 2 Press esc while the computer is restarting and then press f9 for boot options 3 Select Internal CD DVD ROM Drive from the boot options window To change the boot order...

Страница 53: ...ou can contact HP Customer Support For U S product support go to http www hp com go contactHP For worldwide product support go to http welcome hp com country us en wwcontact_us html Here you can Chat online with an HP technician NOTE When technical support chat is not available in a particular language it is available in English E mail HP Customer Support Find HP Customer Support worldwide telepho...

Страница 54: ...iod 5 Model description Have this information available when you contact technical support Microsoft Certificate of Authenticity Contains the Windows Product Key You may need the Product Key to update or troubleshoot the operating system Regulatory label Provides regulatory information about the computer Wireless certification label or labels select models only Provide information about optional w...

Страница 55: ...lease the battery cover 2 Slide the battery cover 3 away from the computer and then remove the battery cover To replace the battery cover 1 Slide the battery cover 1 to the rear of the computer until it is seated 2 Slide the right battery cover lock 2 to lock the battery cover into place NOTE The left battery cover release latch automatically locks into place 44 Chapter 6 Customer support ...

Страница 56: ...ed from a standalone DC power source it should be powered only with an AC adapter or a DC power source supplied and approved by HP for use with this computer The computer can operate on DC power within the following specifications Input power Rating Operating voltage and current 19 5 V dc 3 33 A 65W DC plug of external HP power supply NOTE This product is designed for IT power systems in Norway wi...

Страница 57: ...5 F Nonoperating 20 C to 60 C 4 F to 140 F Relative humidity noncondensing Operating 10 to 90 10 to 90 Nonoperating 5 to 95 5 to 95 Maximum altitude unpressurized Operating 15 m to 3 048 m 50 ft to 10 000 ft Nonoperating 15 m to 12 192 m 50 ft to 40 000 ft 46 Chapter 7 Specifications ...

Страница 58: ... plug of external HP power supply 45 deleted files restoring 39 dial volume 19 Digital Media Slot identifying 21 display image switching 29 DisplayPort identifying 20 E esc key identifying 17 F flicking Imagepad gesture 34 fn key identifying 17 H hard drive light identifying 19 HDMI port identifying 20 headphone jack identifying 21 Help and Support key 28 hotkeys Beats Audio 17 Twitter 17 HP Recov...

Страница 59: ...ager 39 recovery discs 35 recovery media 35 recovery system 39 regulatory information regulatory label 43 wireless certification labels 43 restore points 36 restoring the original system creating recovery media 35 RJ 45 network jack identifying 20 rotating Imagepad gesture 34 S screen brightness keys identifying 28 screen image switching 29 scrolling Imagepad gesture 33 security cable slot identif...

Страница 60: ......

Отзывы: