background image

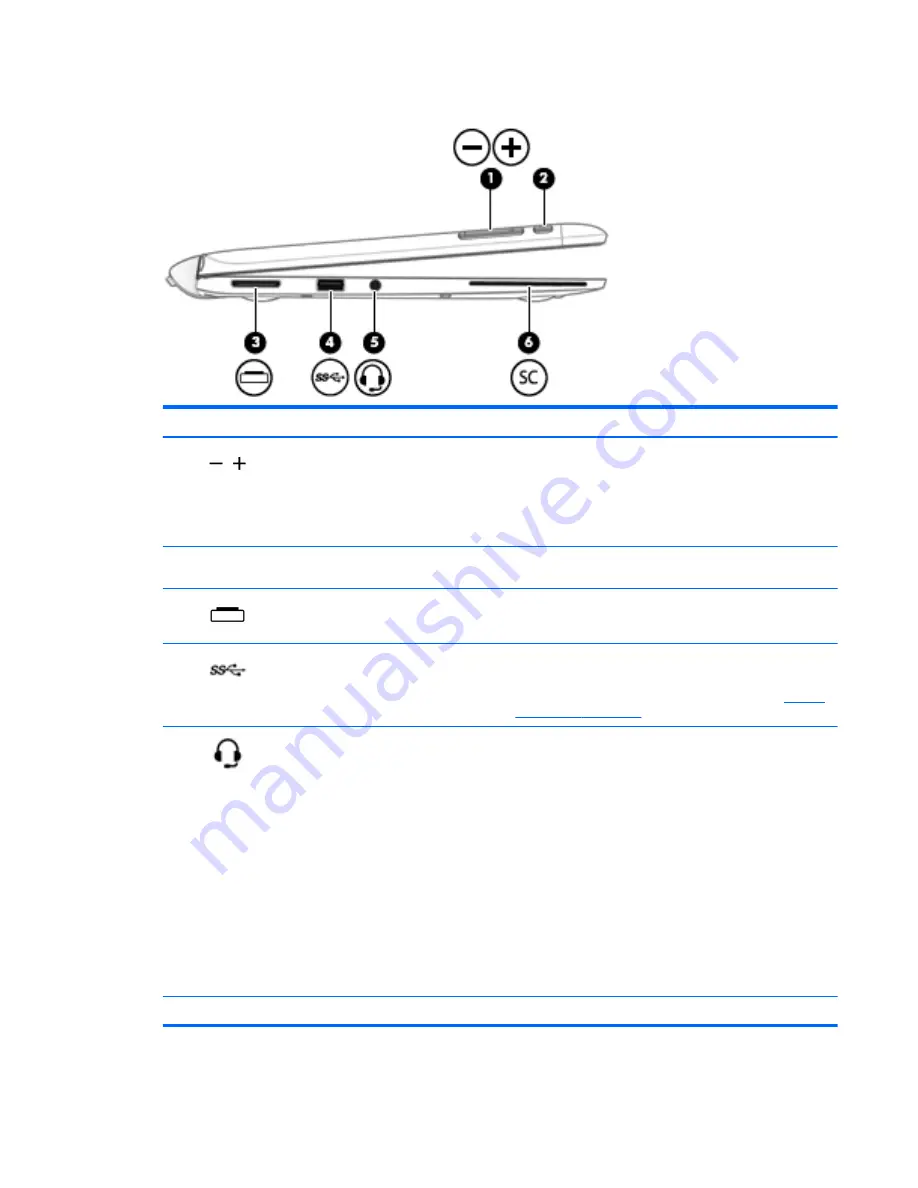
Left

Component

Description

(1)

Volume button

Controls speaker volume on the tablet.

To increase speaker volume, press the + edge of the 

button.

To decrease speaker volume, press the – edge of the 

button.

(2)


LCD rotation lock button

Locks orientation of the display, preventing automatic 

rotation.

(3)

Docking/adapter port

Connects the tablet to the keyboard, or as a tablet only, 

connects an optional adapter.

(4)

USB 3.0 port

Connects an optional USB device, such as a keyboard, 

mouse, external drive, printer, scanner or USB hub.

For details about different types of USB ports, see 

Using a 

USB device on page 56

.

(5)

Audio-out (headphone)/Audio-in 

(microphone) jack

Connects optional powered stereo speakers, headphones, 

earbuds, a headset, or a television audio cable. Also 

connects an optional headset microphone. This jack does 

not support optional microphone-only devices.

WARNING!

To reduce the risk of personal injury, adjust 

the volume before putting on headphones, earbuds, or a 

headset. For additional safety information, see the 

Regulatory, Safety, and Environmental Notices. To access 

this guide, from the Start screen, type 

support

, and then 

select the HP Support Assistant app.

NOTE:

When a device is connected to the jack, the 

computer speakers are disabled.

NOTE:

Be sure that the device cable has a 4-conductor 

connector that supports both audio-out (headphone) and 

audio-in (microphone).

(6)


Smart card reader

Supports optional Smart cards.

keyboard 15

Содержание Elite x2 1011 G1

Страница 1: ...User Guide ...

Страница 2: ... This user guide describes features that are common to most models Some features may not be available on your computer Not all features are available in all editions of Windows This computer may require upgraded and or separately purchased hardware drivers and or software to take full advantage of Windows functionality Go to http www microsoft com for details To access the latest user guide go to ...

Страница 3: ...llow another hard surface such as an adjoining optional printer or a soft surface such as pillows or rugs or clothing to block airflow Also do not allow the AC adapter to contact the skin or a soft surface such as pillows or rugs or clothing during operation The computer and the AC adapter comply with the user accessible surface temperature limits defined by the International Standard for Safety o...

Страница 4: ...iv Safety warning notice ...

Страница 5: ...reen brightness 17 3 Connecting to a network 18 Connecting to a wireless network 18 Using the wireless controls 18 Using the wireless button 19 Using operating system controls 19 Using Intel Wireless Gigabit Dock Manager 19 Using a WLAN 19 Using an Internet service provider 20 Setting up a WLAN 21 Configuring a wireless router 21 Protecting your WLAN 21 Connecting to a WLAN 22 Using HP Mobile Broa...

Страница 6: ... screen gestures 36 Setting touch screen preferences 36 Using the digitizer pen select models only 36 Identifying the pen components 36 Holding the pen 37 Storing the pen 37 Using the keyboard 37 Using Windows shortcut keys 37 Identifying the hot keys 37 Using keypads 37 Using the embedded numeric keypad 37 Turning the embedded numeric keypad on and off 38 Switching key functions on the embedded n...

Страница 7: ...ry power 48 Factory sealed battery select models only 48 Finding additional battery information 48 Using Battery Check 49 Displaying the remaining battery charge 49 Maximizing battery discharge time 49 Managing low battery levels 49 Identifying low battery levels 49 Resolving a low battery level 50 Conserving battery power 50 Using external AC power 50 Testing an AC adapter 51 7 External cards and...

Страница 8: ...us software 67 Using firewall software 67 Installing critical security updates 67 Using HP Client Security 68 Using the fingerprint reader select models only 68 Locating the fingerprint reader 68 9 Maintenance 69 Cleaning your computer 69 Cleaning procedures 69 Cleaning the display All in Ones or Notebooks 69 Cleaning the sides or cover 69 Cleaning the TouchPad keyboard or mouse 70 Updating progra...

Страница 9: ...using the f9 prompt 80 Setting a MultiBoot Express prompt 80 Entering MultiBoot Express preferences 80 Using HP PC Hardware Diagnostics UEFI 81 Downloading HP PC Hardware Diagnostics UEFI to a USB device 81 12 Support 83 Contacting support 83 Labels 84 13 Specifications 85 Input power 85 Operating environment 85 Appendix A Traveling with the computer 86 Appendix B Troubleshooting 87 Troubleshootin...

Страница 10: ...Appendix C Electrostatic discharge 90 Index 91 x ...

Страница 11: ...ses The software is preinstalled on the computer For more information see Using antivirus software on page 67 Get to know your computer Learn about your computer features See Getting to know your computer on page 4 and Navigating using the keyboard touch gestures and pointing devices on page 28 for additional information Find installed software Access a list of the software preinstalled on the com...

Страница 12: ...ort information Ordering parts and finding additional help Accessories available for the device Safety Comfort Guide To access this guide From the Start screen type support and then select the HP Support Assistant app or Go to http www hp com ergo Proper workstation setup posture health and work habits Electrical and mechanical safety information Regulatory Safety and Environmental Notices To acce...

Страница 13: ...Packard POD P O Box 200 Alexandra Post Office Singapore 911507 When you request a printed copy of your warranty please include your product number warranty period found on your service label name and postal address IMPORTANT Do NOT return your HP product to the addresses above For U S support go to http www hp com go contactHP For worldwide support go to http welcome hp com country us en wwcontact...

Страница 14: ...line using streaming video For information on using the webcam access HP Support Assistant To access HP Support Assistant from the Start screen select the HP Support Assistant app 4 Camera flash Provides light for rear webcam photos 5 Rotate lock button When the tablet is on press the rotate lock button to lock the autorotate feature of the display To unlock the autorotate feature press the button...

Страница 15: ... NOTE When a device is connected to the jack the computer speakers are disabled NOTE Be sure that the device cable has a 4 conductor connector that supports both audio out headphone and audio in microphone 11 SIM SD card release access A pinhole for use in ejecting the door covering the SIM and SD card slots 12 SIM Card slot select models only A slot for a SIM card NOTE This feature is available o...

Страница 16: ...pid Start Technology feature is enabled at the factory Rapid Start Technology allows your computer to resume quickly from inactivity For more information see Using power saving states on page 46 To learn more about your power settings see your power options From the Start screen type power select Power and sleep settings and then select Power and sleep from the list of applications 6 Chapter 2 Get...

Страница 17: ... from the Start screen select the HP Support Assistant app 5 WiGig antenna Sends and receives wireless signals 6 Ambient light sensor Automatically adjusts the display brightness based on the lighting conditions in your environment 7 Internal microphone Records sound 8 Speakers 2 Produce sound 9 Windows button Returns you to the Start screen from an open app or the Windows desktop NOTE Pressing th...

Страница 18: ...Component Description Environmental Notices that applies to your country or region To access the user guides select Start Help and Support User Guides 8 Chapter 2 Getting to know your computer ...

Страница 19: ...eyboard CAUTION To prevent damage to the docking connector do not touch the connector when the tablet is detached from the keyboard 3 Release latch Releases the tablet from the keyboard To release the tablet press the release latch 4 Fingerprint reader select models only Allows a fingerprint logon to Windows instead of a password logon keyboard 9 ...

Страница 20: ...screen NOTE The TouchPad also supports edge swipe gestures For more information see Edge swipes select models only on page 34 2 Left TouchPad button Functions like the left button on an external mouse 3 Right TouchPad button Functions like the right button on an external mouse 10 Chapter 2 Getting to know your computer ...

Страница 21: ...ber Computer sound is off Off Computer sound is on 4 Microphone mute light Amber microphone sound is off Off microphone sound is on 5 Wireless light On An integrated wireless device such as a wireless local area network WLAN device and or a Bluetooth device is on NOTE On some models the wireless light is amber when all wireless devices are off 6 Num lock light On Num lock is on keyboard 11 ...

Страница 22: ...combination with the fn key 4 fn key Executes frequently used system functions when pressed in combination with a function key the num lock key or the esc key 5 Windows key Returns you to the Start screen from an open app or the Windows desktop NOTE Pressing the Windows key again will return you to the previous screen 6 Embedded numeric keypad When the keypad is turned on it can be used like an ex...

Страница 23: ...least 5 seconds to turn off the computer NOTE For select models the Intel Rapid Start Technology feature is enabled at the factory Rapid Start Technology allows your computer to resume quickly from inactivity For more information see Using power saving states on page 46 To learn more about your power settings see your power options From the Start screen type power select Power and sleep settings a...

Страница 24: ...orts can also charge select models of cell phones and MP3 players even when the computer is off For details about different types of USB ports see Using a USB device on page 56 7 Dual Mode DisplayPort Connects an optional digital display device such as a high performance monitor or projector 8 AC adapter Battery light White The computer is connected to external power and the battery is charged Amb...

Страница 25: ...dphone Audio in microphone jack Connects optional powered stereo speakers headphones earbuds a headset or a television audio cable Also connects an optional headset microphone This jack does not support optional microphone only devices WARNING To reduce the risk of personal injury adjust the volume before putting on headphones earbuds or a headset For additional safety information see the Regulato...

Страница 26: ... keyboard follow these steps CAUTION To prevent damage to the docking connector do not touch the connector when the tablet is detached from the keyboard 1 Press the release latch on the keyboard 1 2 Lift and remove the tablet 2 16 Chapter 2 Getting to know your computer ...

Страница 27: ...ock the autorotate feature press the button again or 1 Swipe from the right edge of the TouchPad or touch screen to display the charms and then tap Settings 2 Tap the Screen icon at the bottom right Tap the Autorotate Lock icon to lock your current tablet screen in place and to prevent rotation The icon displays a lock symbol when autorotate lock is active To turn off the autorotate lock tap the A...

Страница 28: ...install base stations similar to cell phone towers throughout large geographic areas effectively providing coverage across entire states regions or even countries Wireless Dock WiDock select models only Allows the computer to connect via its WiGig connection to devices that are attached to the dock such as keyboards monitors and other displays and wired network connections Bluetooth device Creates...

Страница 29: ...Wireless Gigabit Dock Manager Intel Wireless Dock Manager provides information and notifications on connection status and power status Status information and notifications are provided in the notification area at the far right of the taskbar To open Wireless Dock Manager Click the Wireless Dock Manager icon in the taskbar or Select Start All Programs Intel WiDock Connection Utility WiGig Connectio...

Страница 30: ...urchase Internet service and a modem contact a local ISP The ISP will help set up the modem install a network cable to connect your wireless computer to the modem and test the Internet service NOTE Your ISP will give you a user ID and a password to use for Internet access Record this information and store it in a safe place 20 Chapter 3 Connecting to a network ...

Страница 31: ...ter successfully connects to the Internet disconnect the cable and access the Internet through your wireless network Protecting your WLAN When you set up a WLAN or access an existing WLAN always enable security features to protect your network from unauthorized access WLANs in public areas hotspots like coffee shops and airports may not provide any security If you are concerned about the security ...

Страница 32: ...f a wireless router or access point NOTE If you do not see the WLAN you want to connect to from the Windows desktop right click the network status icon and then select Open Network and Sharing Center Click Set up a new connection or network A list of options is displayed allowing you to manually search for and connect to a network or to create a new network connection 6 Follow the on screen instru...

Страница 33: ...ased on the code division multiple access CDMA telecommunications standard LTE Long Term Evolution which provides access to networks supporting LTE technology You may need the HP Mobile Broadband Module serial number to activate mobile broadband service The serial number is printed on a label on the bottom of the keyboard or the edge of the tablet Some mobile network operators require the use of a...

Страница 34: ...s allowing access to the SIM and MicroSD memory cards 6 Insert the SIM into the SIM slot and gently push the SIM into the slot until it is firmly seated NOTE The SIM in your computer may look slightly different from the illustration in this section 7 Replace the SIM MicroSD slot cover 8 Reconnect external power 9 Reconnect external devices 10 Turn on the computer To remove a SIM press in on the SI...

Страница 35: ... up a personal area network PAN of Bluetooth devices For information about configuring and using Bluetooth devices see the Bluetooth software Help Using the Wireless Dock WiDock The HP Wireless Dock WiDock allows the computer to connect via its WiGig connection to devices that are attached to the dock such as keyboards monitors and other displays and wired network connections NOTE The WiDock and t...

Страница 36: ... LAN connection uses a network cable and is much faster than a modem which uses a telephone cable Both cables are sold separately WARNING To reduce the risk of electric shock fire or damage to the equipment do not plug a modem cable or telephone cable into an RJ 45 network jack 26 Chapter 3 Connecting to a network ...

Страница 37: ... RJ45 adapter To connect the network cable follow these steps 1 Connect the USB to RJ45 adapter to the USB port on the computer and then plug the network cable into the network jack end 1 of the adapter 2 Plug the other end of the network cable into a network wall jack 2 or router NOTE If the network cable contains noise suppression circuitry 3 which prevents interference from TV and radio recepti...

Страница 38: ... the USB ports on the computer Setting pointing device preferences Use Mouse Properties in Windows to customize settings for pointing devices such as button configuration click speed and pointer options You can also view demonstrations of TouchPad gestures To access Mouse Properties From the Start screen type mouse click Settings and then select Mouse Using the TouchPad and gestures The TouchPad a...

Страница 39: ...Tapping To make an on screen selection use the Tap function on the TouchPad Tap one finger on the TouchPad zone to make a selection Double tap an item to open it Using pointing devices 29 ...

Страница 40: ...ful for moving up down or sideways on a page or image Place two fingers slightly apart on the TouchPad zone and then drag them up down left or right 30 Chapter 4 Navigating using the keyboard touch gestures and pointing devices ...

Страница 41: ...o zoom out or in on images or text Zoom in by placing two fingers together on the TouchPad zone and then moving your fingers apart Zoom out by placing two fingers apart on the TouchPad zone and then moving your fingers together Using pointing devices 31 ...

Страница 42: ...dels only Rotating allows you to turn items such as photos Anchor the forefinger of your left hand in the TouchPad zone Using your right hand slide your forefinger in a sweeping motion from 12 o clock to 3 o clock To reverse the rotation move your forefinger from 3 o clock to 12 o clock NOTE Rotating is intended for specific apps where you can manipulate an object or image It may not be functional...

Страница 43: ...only Flicking allows you to navigate through screens or quickly scroll through documents Place three fingers on the TouchPad zone and flick your fingers in a light quick motion up down left or right Using pointing devices 33 ...

Страница 44: ...ging settings and finding or using apps Right edge swipe The right edge swipe reveals the charms which let you search share start apps access devices or change settings Swipe your finger gently from the right edge to reveal the charms 34 Chapter 4 Navigating using the keyboard touch gestures and pointing devices ...

Страница 45: ... switch between recently opened apps Swipe from the left edge of the TouchPad to switch between apps Top edge swipe The top edge swipe displays app command options that allow you to customize apps IMPORTANT When an app is open the top edge gesture varies depending on the app Gently swipe your finger from the top edge to reveal the app command options Using pointing devices 35 ...

Страница 46: ...Start screen type control panel and then select Control Panel 2 Select Hardware and Sound select Pen and Touch and then follow the on screen instructions These preferences are specific to the touch screen and the computer Using the digitizer pen select models only You can write with the pen in pen specific programs in all Microsoft Office programs and in many other Windows programs and utilities T...

Страница 47: ...ll return you to the previous screen NOTE Depending on the country or region your keyboard may have different keys and keyboard functions than those discussed in this section Using Windows shortcut keys Windows provides shortcuts so that you can perform actions quickly Press the Windows key alone or in combination with a specific key to perform a designated action Identifying the hot keys A hot ke...

Страница 48: ...n the embedded numeric keypad Press fn num lock again to turn off the keypad NOTE The embedded numeric keypad is turned off while an external keyboard or numeric keypad is connected to the computer 38 Chapter 4 Navigating using the keyboard touch gestures and pointing devices ...

Страница 49: ...n uppercase Using an optional external numeric keypad Keys on most external numeric keypads function differently according to whether num lock is on or off Num lock is turned off at the factory For example When num lock is on most keypad keys type numbers When num lock is off most keypad keys function like the arrow page up or page down keys When num lock on an external keypad is turned on the num...

Страница 50: ... your computer or on select models using an external optical drive you can play music CDs download and listen to music stream audio content from the web including radio record audio or mix audio and video to create multimedia To enhance your listening enjoyment attach external audio devices such as speakers or headphones Connecting speakers You can attach wired speakers to your computer by connect...

Страница 51: ...ns WARNING To reduce the risk of personal injury lower the volume setting before putting on headphones earbuds or a headset For additional safety information see the Regulatory Safety and Environmental Notices To access this guide from the Start screen type support and then select the HP Support Assistant app Checking audio functions on the computer NOTE For best results when recording speak direc...

Страница 52: ...ur HP computer is a powerful video device that enables you to watch streaming video from your favorite websites and download video and movies to watch on your computer without needing to connect to a network To enhance your viewing enjoyment use the video port on the computer to connect an external monitor projector or TV Your computer has the following external video port DisplayPort IMPORTANT Be...

Страница 53: ...t port on the computer 2 Connect the other end of the cable to the digital display device 3 Press fn f4 to alternate the computer screen image between 4 display states PC screen only View the screen image on the computer only Duplicate View the screen image simultaneously on both the computer and the external device Extend View the screen image extended across both the computer and the external de...

Страница 54: ... display choices include Duplicate which mirrors your computer screen on all enabled displays or Extend which extends the screen image across all enabled displays NOTE Be sure that each external device is connected to the correct port on the hub For more information from the Start screen type screen resolution or press fn f4 and then follow the on screen instructions Discovering and connecting to ...

Страница 55: ...the Windows shutdown command NOTE If the computer is in the Sleep state or in Hibernation you must first exit Sleep or Hibernation before shutdown is possible by briefly pressing the power button 1 Save your work and close all open programs 2 From the Start screen point to the upper right or lower right corner of the screen 3 Click Settings click the Power icon and then click Shut down or Right cl...

Страница 56: ...fly Hibernation Rapid Start Technology initiates Hibernation after a period of inactivity while in the Sleep state when running on battery power or on external power or when the battery reaches a critical level After Hibernation is initiated press the power button to resume your work NOTE Rapid Start Technology can be disabled in Setup Utility BIOS If you want to be able to initiate the Hibernatio...

Страница 57: ...and the current power plan on the Windows desktop point over the power meter icon To use Power Options or to change the power plan click the power meter icon and select an item from the list From the Start screen you can also type power options and then select Power Options Different power meter icons indicate whether the computer is running on battery or external power The icon also reveals a mes...

Страница 58: ...holding a charge run Battery Check in Help and Support To access battery information from the Start screen type support select the HP Support Assistant app and then select Battery and performance If Battery Check indicates that your battery should be replaced contact support The battery ies in this product cannot be easily replaced by users themselves Removing or replacing the battery could affect...

Страница 59: ...y Remove the battery on the computer when it is not being used or charged if the computer contains a user replaceable battery Store the user replaceable battery in a cool dry location Select the Power saver setting in Power Options Managing low battery levels The information in this section describes the alerts and system responses set at the factory Some low battery alerts and system responses ca...

Страница 60: ...work initiate Sleep or shut down the computer Using external AC power WARNING Do not charge the computer battery while you are onboard aircraft WARNING To reduce potential safety issues use only the AC adapter provided with the computer a replacement AC adapter provided by HP or a compatible AC adapter purchased from HP NOTE For information on connecting to AC power see the Setup Instructions post...

Страница 61: ...ot turn on The power lights are off To test the AC adapter NOTE The following instructions apply to computers with user replaceable batteries 1 Shut down the computer 2 Remove the battery on the computer 3 Connect the AC adapter to the computer and then plug it into an AC outlet 4 Turn on the computer If the power lights turn on the AC adapter is working properly If the power lights remain off the...

Страница 62: ...your computer see Getting to know your computer on page 4 Inserting a memory card CAUTION To reduce the risk of damage to the memory card connectors use minimal force to insert a memory card 1 Hold the card label side up with the connectors facing the computer 2 Insert the card into the memory card reader and then press in on the card until it is firmly seated You will hear a sound when the device...

Страница 63: ...nformation and close all programs associated with the memory card 2 Click the remove hardware icon on the Windows desktop in the notification area at the far right of the taskbar Then follow the on screen instructions 3 Press in on the card 1 and then remove it from the slot 2 NOTE If the card does not eject pull the card out of the slot Using memory card readers 53 ...

Страница 64: ... have an operating system to manage input and output and they include security features to protect against tampering Industry standard smart cards are used with the smart card reader select models only A PIN is needed to gain access to the contents of the microchip For more information about smart card security features access HP Support Assistant To access HP Support Assistant on the Start screen...

Страница 65: ... into the smart card reader until the card is seated 2 Follow the on screen instructions for logging on to the computer using the smart card PIN Removing a smart card Grasp the edge of the smart card and then pull it out of the smart card reader Using smart cards keyboard only 55 ...

Страница 66: ...e information about device specific software see the manufacturer s instructions These instructions may be provided with the software on disc or on the manufacturer s website The computer has at least 1 USB port that supports USB 1 0 1 1 2 0 or 3 0 devices Your computer may also have a USB charging port that provides power to an external device An optional docking device or USB hub provides additi...

Страница 67: ...e risk of loss of information or an unresponsive system use the following procedure to safely remove the USB device 1 To remove a USB device save your information and close all programs associated with the device 2 Click the remove hardware icon on the Windows desktop in the notification area at the far right of the taskbar and then follow the on screen instructions 3 Remove the device Using optio...

Страница 68: ...it from the computer and then unplug the AC power cord Using optional external drives Removable external drives expand your options for storing and accessing information A USB drive can be added by connecting the drive to a USB port to the computer NOTE HP external USB optical drives should be connected to the powered USB port to the computer USB drives include the following types 1 44 megabyte di...

Страница 69: ...er HP Client Security in combination with a password smart card contactless card registered fingerprints or other authentication credential Unauthorized access to Computer Setup f10 BIOS administrator password in Computer Setup Unauthorized access to the contents of a hard drive DriveLock password or Automatic DriveLock password in Computer Setup Unauthorized startup from an optional external opti...

Страница 70: ... also use the same password for more than one Computer Setup feature Use the following tips for creating and saving passwords When creating passwords follow requirements set by the program Do not use the same password for multiple applications or websites and do not reuse your Windows password for any other application or website Use HP Client Security s Password Manager to store your user names a...

Страница 71: ...trator password To set change or delete this password follow these steps Setting a new BIOS administrator password 1 Turn on or restart the computer and then press esc or hold down the volume button while the Hold the Volume Down button to enter the BIOS Startup Menu message is displayed at the bottom of the screen 2 Press or tap f10 to enter Computer Setup 3 Use a pointing device arrow keys or th...

Страница 72: ...een instructions 8 To save your changes and exit Computer Setup click the Save icon in the lower left corner of the screen and then follow the on screen instructions or Select Main Save Changes and Exit and then follow the on screen instructions Your changes go into effect when the computer restarts Entering a BIOS administrator password At the BIOS administrator password prompt type your password...

Страница 73: ...Press or tap f10 to enter Computer Setup 3 Use a pointing device arrow keys or the touch screen to select Security Hard Drive Tools DriveLock and then follow the on screen instructions 4 Click Set DriveLock Password global 5 Enter the BIOS Administrator password and then follow the on screen instructions 6 Use a pointing device arrow keys or the touch screen to select the hard drive you want to pr...

Страница 74: ...rrow keys or the touch screen to select an internal hard drive and then follow the on screen instructions 7 Use a pointing device arrow keys or the touch screen to select Change Password 8 When prompted type your current password and then follow the on screen instructions 9 When prompted type a new password and then follow the on screen instructions 10 When prompted type the new password again to ...

Страница 75: ...d to unlock the drive NOTE A BIOS Administrator password must be set before you can access the Automatic DriveLock features Entering an Automatic DriveLock password To enable an Automatic DriveLock password in Computer Setup follow these steps 1 Turn on or restart the computer and then press esc or hold down the volume button while the Hold the Volume Down button to enter the BIOS Startup Menu mes...

Страница 76: ...he on screen instructions 4 Enter the BIOS Administrator password and then follow the on screen instructions 5 Use a pointing device arrow keys or the touch screen to select an internal hard drive and then follow the on screen instructions 6 Use a pointing device arrow keys or the touch screen to select Disable protection 7 To save your changes and exit Computer Setup click the Save icon in the lo...

Страница 77: ...on Network based firewalls Installed between your DSL or cable modem and your home network to protect all the computers on the network When a firewall is installed on a system all data sent to and from the system is monitored and compared with a set of user defined security criteria Any data that does not meet those criteria is blocked Your computer or networking equipment may already have a firew...

Страница 78: ...nt reader you must enroll your fingerprints in the HP Client Security s Credential Manager Refer to the HP Client Security software Help After you enroll your fingerprints in Credential Manager you can use HP Client Security s Password Manager to store and fill in your user names and passwords in supported websites and applications Locating the fingerprint reader The fingerprint reader is a small ...

Страница 79: ...d in the scratches Cleaning procedures Follow the procedures in this section to safely clean your computer WARNING To prevent electric shock or damage to components do not attempt to clean your computer while it is turned on Turn off the computer Disconnect AC power Disconnect all powered external devices CAUTION To prevent damage to internal components do not spray cleaning agents or liquids dire...

Страница 80: ...tPaq Download Manager SDM is a tool that provides quick access to SoftPaq information for HP business computers without requiring the SoftPaq number Using this tool you can easily search for SoftPaqs and then download and unpack them SoftPaq Download Manager works by reading and downloading from the HP FTP site a published database file containing computer model and SoftPaq information SoftPaq Dow...

Страница 81: ... a system failure is as good as your most recent backup You should create system repair media and your initial backup immediately after initial system setup As you add new software and data files you should continue to back up your system on a regular basis to maintain a reasonably current backup For more information on the Windows backup features see Windows Help and Support Performing a system r...

Страница 82: ...ion From the Start screen type file and then click File Explorer or From the Start screen type pc and then select This PC NOTE If the Windows partition and the Recovery Image partition are not listed you must recover your operating system and programs using the Windows operating system DVD and the Driver Recovery media both purchased separately For additional information see Using Windows operatin...

Страница 83: ...e Press F11 for recovery message is displayed on the screen 5 Follow the on screen instructions Using Windows operating system media purchased separately To order a Windows operating system DVD contact support See the Worldwide Telephone Numbers booklet included with the computer You can also find contact information from the HP website Go to http www hp com support select your country or region a...

Страница 84: ...your computer or remove personal information before you give away or recycle your computer For more information on these features see Windows Help and Support Using HP Software Setup HP Software Setup can be used to reinstall drivers or select software that has been corrupted or deleted from the system 1 From the Start screen type HP Software Setup 2 Open HP Software Setup 3 Follow the on screen d...

Страница 85: ...n 2 Press or tap f10 to enter Computer Setup Navigating and selecting in Computer Setup To navigate and select in Computer Setup follow these steps 1 Turn on or restart the computer and then press esc or hold down the volume button while the Hold the Volume Down button to enter the BIOS Startup Menu message is displayed at the bottom of the screen NOTE You can use either a pointing device TouchPad...

Страница 86: ...the values that were set at the factory follow these steps 1 Turn on or restart the computer and then press esc or hold down the volume button while the Hold the Volume Down button to enter the BIOS Startup Menu message is displayed at the bottom of the screen 2 Press or tap f10 to enter Computer Setup 3 Select Main Restore Defaults 4 Follow the on screen instructions 5 To save your changes and ex...

Страница 87: ... the risk of damage to the computer or an unsuccessful installation download and install a BIOS update only when the computer is connected to reliable external power using the AC adapter Do not download or install a BIOS update while the computer is running on battery power docked in an optional docking device or connected to an optional power source During the download and installation follow the...

Страница 88: ...seconds before the tablet restarts and attempts to synchronize again NOTE The Embedded Controller firmware will only synchronize if the tablet or keyboard battery is more than 50 charged or if your tablet is connected to AC power Using MultiBoot About the boot device order As the computer starts the system attempts to boot from enabled devices The MultiBoot utility which is enabled at the factory ...

Страница 89: ... on or restart the computer and then press esc or hold down the volume button while the Hold the Volume Down button to enter the BIOS Startup Menu message is displayed at the bottom of the screen 2 Press or tap f10 to enter Computer Setup 3 Select one of the following options and then follow the on screen instructions Advanced Boot Options UEFI Boot Order UEFI Hybrid Advanced Boot Options UEFI Boo...

Страница 90: ...dvanced Boot Options MultiBoot Express Boot Popup Delay Sec and then follow the on screen instructions 4 In the MultiBoot Express Popup Delay Sec field enter the length of time in seconds that you want the computer to display the startup location menu before it defaults to the current MultiBoot setting When 0 is selected the Express Boot startup location menu is not displayed 5 To save your change...

Страница 91: ...stic tool opens use the keyboard arrow keys or the touch screen to select the type of diagnostic test you want to run and then follow the on screen instructions NOTE If you need to stop a diagnostic test press esc or tap anywhere on the touch screen Downloading HP PC Hardware Diagnostics UEFI to a USB device NOTE Instructions for downloading HP PC Hardware Diagnostics UEFI are provided in English ...

Страница 92: ...Click Download and then select Run 82 Chapter 11 Computer Setup BIOS MultiBoot and HP PC Hardware Diagnostics UEFI ...

Страница 93: ...ort For U S support go to http www hp com go contactHP For worldwide support go to http welcome hp com country us en wwcontact_us html Here you can Chat online with an HP technician NOTE When support chat is not available in a particular language it is available in English Find support telephone numbers Locate an HP service center Contacting support 83 ...

Страница 94: ...icate of Authenticity label select models only prior to Windows 8 Contains the Windows Product Key You may need the Product Key to update or troubleshoot the operating system HP platforms preinstalled with Windows 8 or Windows 8 1 do not have the physical label but have a Digital Product Key electronically installed NOTE This Digital Product Key is automatically recognized and activated by Microso...

Страница 95: ...t Power Rating Operating voltage and current 19 5 V dc 2 31 A 45 W 19 5 V dc 3 33 A 65 W 19 5 V dc 4 62 A 90 W 19 5 V dc 10 25 A Slim 200 W 19 5 V dc 11 79 A Slim 230 W NOTE This product is designed for IT power systems in Norway with phase to phase voltage not exceeding 240 V rms NOTE The computer operating voltage and current can be found on the system regulatory label Operating environment Fact...

Страница 96: ...t check with the airline in advance If the computer will be unused and disconnected from external power for more than 2 weeks remove the battery and store it separately If you are shipping the computer or a drive use suitable protective packaging and label the package FRAGILE If the computer has a wireless device or an HP Mobile Broadband Module installed such as an 802 11b g device a Global Syste...

Страница 97: ...nguage it is available in English Find HP support worldwide telephone numbers Locate an HP service center Resolving issues The following sections describe several common issues and solutions The computer is unable to start up If the computer does not turn on when you press the power button the following suggestions may help you determine why the computer does not start up If the computer is plugge...

Страница 98: ...r is on but not responding If the computer is turned on but is not responding to software or keyboard commands try the following emergency shutdown procedures in the sequence provided until shutdown occurs CAUTION Emergency shutdown procedures result in the loss of unsaved information Press and hold the power button for at least 14 seconds Disconnect the computer from external power and remove the...

Страница 99: ...ions To enable or disable a wireless or wired network device right click the Network Connection icon on the Windows desktop in the notification area at the far right of the taskbar To enable devices select the check box from the menu option To disable the device clear the check box Be sure that the wireless device is turned on Be sure that the computer wireless antennas are free from obstructions ...

Страница 100: ...structions direct you to unplug the computer unplug it after being properly grounded and before removing a cover Keep components in their electrostatic safe containers until you are ready to install them Avoid touching pins leads and circuitry Handle electronic components as little as possible Use nonmagnetic tools Before handling components discharge static electricity by touching an unpainted me...

Страница 101: ... restoring factory settings 76 computer traveling 86 connecting to a WLAN 22 connector power 14 conservation power 50 corporate WLAN connection 22 critical battery level 46 critical updates software 67 D DisplayPort identifying 14 DisplayPort connecting 43 drive media 46 DriveLock password changing 64 description 62 entering 64 removing 64 setting 63 drives external 58 hard 58 optical 58 E electro...

Страница 102: ...ional external devices using 57 P passwords administrator 60 BIOS administrator 61 DriveLock 62 user 60 pointing devices setting preferences 28 ports DisplayPort 14 43 Miracast 44 USB 3 0 charging powered 14 power battery 48 conserving 50 options 46 power button 45 power button identifying 5 13 power connector identifying 14 power switch 45 power saving states 46 product name and number computer 8...

Страница 103: ...dentifying 4 video 42 volume adjusting 41 buttons 41 keys 41 volume button identifying 5 15 W webcam 4 7 42 webcam identifying 4 7 WiGig antenna identifying 7 Windows Refresh 74 Reset 74 Windows button identifying 7 Windows key identifying 12 Windows operating system DVD 73 wireless antennas identifying 7 wireless button 18 wireless certification label 84 wireless controls button 18 operating syst...

Отзывы: