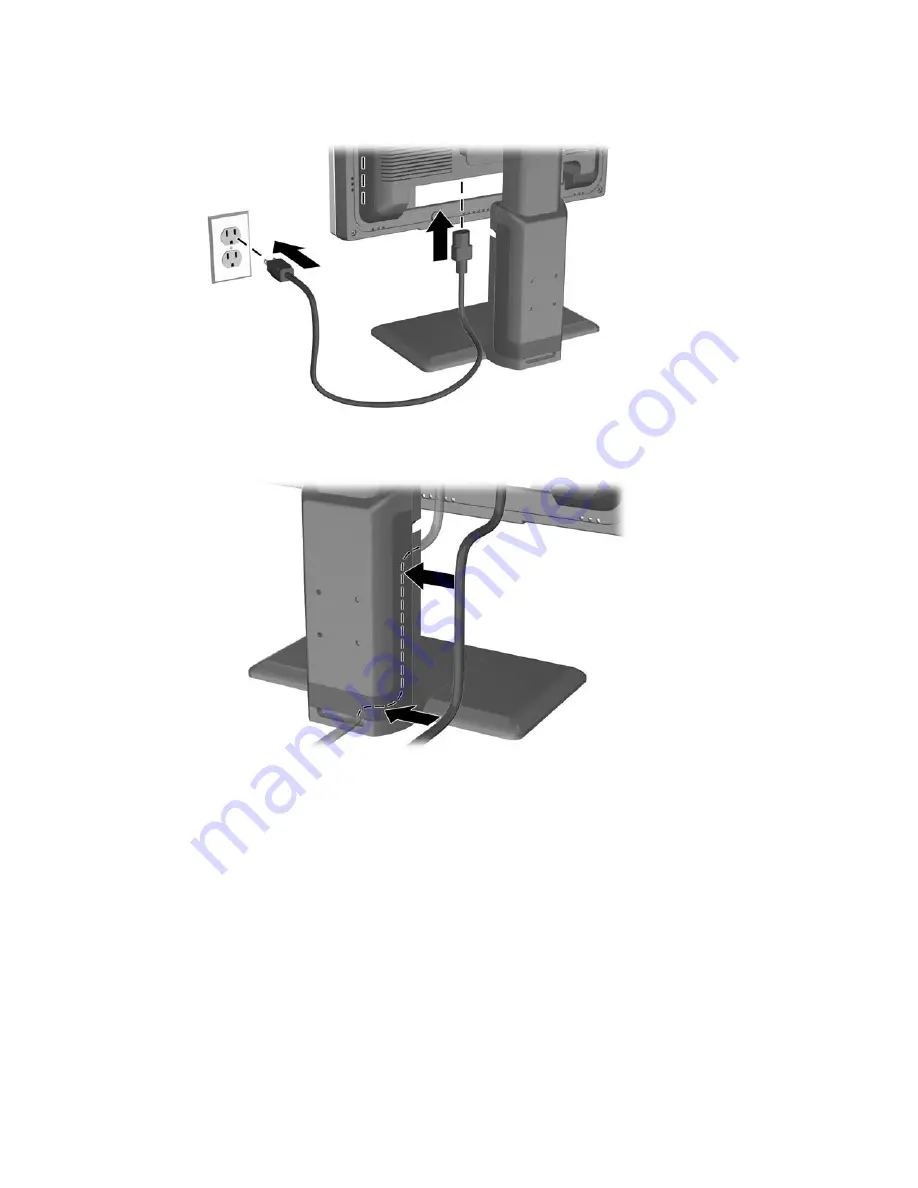
HP EF224A4 Скачать руководство пользователя страница 15

3. 

Connect one end of the power cable to the AC power connector on the back of the monitor, and 
the other end to an electrical wall outlet. 

Figure 3-6

 Connecting the Power Cable 

4. 

Place the cables through the cable management channel on the back of the monitor base. 

Figure 3-7

  Using the Cable Management Feature 

Connecting the Monitor 

Содержание EF224A4

Страница 1: ...HP LP1965 19 LP2065 20 and LP2465 24 LCD Monitors User Guide ...

Страница 2: ...s document is provided as is without warranty of any kind including but not limited to the implied warranties of merchantability and fitness for a particular purpose and is subject to change without notice The warranties for Hewlett Packard products are set forth in the express limited warranty statements accompanying such products Nothing herein should be construed as constituting an additional w...

Страница 3: ...al specifications WARNING Text set off in this manner indicates that failure to follow directions could result in bodily harm or loss of life CAUTION Text set off in this manner indicates that failure to follow directions could result in damage to equipment or loss of information NOTE Text set off in this manner provides important supplemental information iii ...

Страница 4: ...ENWW iv About This Guide ...

Страница 5: ...s 13 Using the Accessory Rails 14 Removing the Monitor Pedestal Base 14 Mounting the Monitor 15 Locating the Rating Labels 17 4 Operating the Monitor Software and Utilities 19 The Information File 19 The Image Color Matching File 19 Installing the INF and ICM Files 20 Installing from the CD 20 Downloading from the Worldwide Web 20 Using the Auto Adjustment Function 21 Front Panel Controls 22 Adjus...

Страница 6: ...rgy Saver Feature 42 Appendix C Agency Regulatory Notices Federal Communications Commission Notice 43 Modifications 43 Cables 43 Declaration of Conformity for Products Marked with the FCC Logo United States Only 43 Canadian Notice 44 Avis Canadien 44 European Union Regulatory Notice 44 German Ergonomics Notice 45 Japanese Notice 45 Korean Notice 45 Power Cord Set Requirements 45 Japanese Power Cor...

Страница 7: ...sm and VESA 100 mm mounting holes for flexible mounting solutions Video inputs support DVI analog and digital signal inputs Two DVI I to VGA signal cables and two DVI D signal cables included LP2065 and LP2465 models One DVI I to VGA signal cable and one DVI D signal cable included LP1965 model only USB 2 0 hub with one upstream connects to the computer and four downstream connects to USB devices ...

Страница 8: ...ENWW AssetControl Compliant with the following regulated specifications European Union CE Directives Swedish MPR II 1990 Swedish TCO Requirements Chapter 1 Product Features 2 ...

Страница 9: ...over them Do not pull on a cord or cable When unplugging from the electrical outlet grasp the cord by the plug To reduce the risk of serious injury read the Safety and Comfort Guide It describes proper workstation setup posture and health and work habits for computer users and provides important electrical and mechanical safety information This guide is located on the Web at http www hp com ergo a...

Страница 10: ...an substantially increase the life expectancy of the monitor by using a screen saver program and turning off the monitor when not in use Slots and openings in the cabinet are provided for ventilation These openings must not be blocked or covered Never push objects of any kind into cabinet slots or other openings Do not drop the monitor or place it on an unstable surface Do not allow anything to re...

Страница 11: ... or other mounting fixture instead see the section on Mounting the Monitor in this chapter 1 Using both hands position the monitor over the pedestal base CAUTION Do not touch the surface of the LCD panel Pressure on the panel may cause non uniformity of color or disorientation of the liquid crystals If this occurs the screen will not recover to its normal condition 2 Press down firmly on the monit...

Страница 12: ...ector Connects the AC power cord to the monitor 4 DVI I Connectors Connects the DVI I to VGA signal cable or DVI D signal cable to the monitor 5 USB Upstream Connector Connects the monitor USB hub to a host USB port hub 6 USB Downstream Connectors Connects optional USB devices to the monitor 7 USB Downstream Connectors side panel Connects optional USB devices to the monitor Chapter 3 Setting Up th...

Страница 13: ...to the DVI connector on the computer For analog operation use the DVI I to VGA signal cable provided Connect the DVI I to VGA signal cable to a DVI I connector on the monitor and the other end to the VGA connector on the computer The monitor will automatically determine which inputs have valid video signals The inputs can be selected through the On Screen Display OSD feature by pressing the Input ...

Страница 14: ...uipment Do not disable the power cord grounding plug The grounding plug is an important safety feature Plug the power cord into a grounded earthed electrical outlet that is easily accessible at all times Disconnect power from the equipment by unplugging the power cord from the electrical outlet For your safety do not place anything on power cords or cables Arrange them so that no one may accidenta...

Страница 15: ...on the back of the monitor and the other end to an electrical wall outlet Figure 3 6 Connecting the Power Cable 4 Place the cables through the cable management channel on the back of the monitor base Figure 3 7 Using the Cable Management Feature Connecting the Monitor 9 ...

Страница 16: ...ackward to set it to a comfortable eye level Figure 3 8 Tilting the Monitor NOTE The 24 model has a tilt range of 5 to 25 degrees 2 Swivel the monitor to the left or right for the best viewing angle Figure 3 9 Swiveling the Monitor 10 Chapter 3 Setting Up the Monitor ...

Страница 17: ... If the display head is locked in the lowest height position a Make sure that the monitor is safely positioned on a stable surface b Gently push down on the display head c While pushing down the display head press the lock down release button on the front of the column d Guide the display head up to the desired height Figure 3 10 Adjusting the Height LP2065 and LP2465 models NOTE The 19 model has ...

Страница 18: ...witch to turn on the computer 2 Press the master power switch on the rear of the monitor 3 Press the power button on the front of the monitor CAUTION Burn in image damage may occur on monitors that display the same static image on screen for a prolonged period of time To avoid burn in image damage on the monitor screen you should always activate a screen saver application or turn off the monitor w...

Страница 19: ...e rear panel used to connect devices such as a digital camera USB keyboard or USB mouse NOTE You must connect the USB hub cable from the monitor to the computer to enable the USB 2 0 ports on the monitor Refer to Step 2 in Connecting the Monitor Figure 3 12 Connecting USB Devices Connecting USB Devices 13 ...

Страница 20: ...base to mount the panel on a wall a swing arm or other mounting fixture This monitor has a Quick Release mechanism that allows you to easily remove and replace the monitor panel to the pedestal base CAUTION Before beginning to disassemble the monitor be sure the monitor is turned off and the power and signal cables are both disconnected If the monitor has a connected audio cable disconnect it 1 Di...

Страница 21: ...industry standard 100 mm mounting holes To attach a third party mounting solution to the monitor four 4 mm 0 7 pitch and 10 mm long screws are required not provided with the monitor Longer screws should not be used because they may damage the monitor It is important to verify that the manufacturer s mounting solution is compliant with the VESA standard and is rated to support the weight of the mon...

Страница 22: ...a wall HP recommends that you consult with a qualified engineering architectural or construction professional to determine the appropriate type and quantity of mounting fasteners required for your application and to ensure that the mounting solution is properly installed to support applied loads 4 Insert the monitor panel into the Quick Release and then press down firmly on the monitor to lock it ...

Страница 23: ...de the spare part number product number and serial number You may need these numbers when contacting HP about the monitor model The rating labels are located on the rear panel of the monitor display head Figure 3 18 Locating the Rating Labels Locating the Rating Labels 17 ...

Страница 24: ...ENWW 18 Chapter 3 Setting Up the Monitor ...

Страница 25: ...This monitor is Microsoft Windows Plug and Play compatible and the monitor will work correctly without installing the INF file Monitor Plug and Play compatibility requires that the computer s graphic card is VESA DDC2 compliant and that the monitor connects directly to the graphics card Plug and Play does not work through separate BNC type connectors or through distribution buffers boxes The Image...

Страница 26: ... Ensure that the proper resolution and refresh rates appear in the Windows Display control panel NOTE You may need to install the digitally signed monitor INF and ICM files manually from the CD in the event of an installation error Refer to the Monitor Driver Software Readme file on the CD Downloading from the Worldwide Web To download the latest version of INF and ICM files from the HP monitors s...

Страница 27: ...enter picture To use the auto adjustment feature 1 Allow the monitor to warm up for 20 minutes before adjusting 2 Press the Auto button on the monitor front panel You can also press the Menu Select button then select Auto Adjustment from the OSD Main Menu Refer to Adjusting the Monitor Settings in this chapter If the result is not satisfactory continue with the procedure 3 Insert the CD in the dis...

Страница 28: ...djustment levels When the OSD menu is inactive activates the auto adjustment feature to optimize the screen image 3 Plus Navigates forward through the OSD menu and increases adjustment levels 4 Input Select Selects the video input DVI I 1 or DVI I 2 5 Power LED Fully powered Green Sleep mode Amber Sleep Timer mode Flashing Amber 6 Power Turns the monitor on or off 22 Chapter 4 Operating the Monito...

Страница 29: ...SD Menu press the Plus button on the monitor s front panel to scroll up or the Minus Auto button to scroll in reverse 4 To select an item from the OSD Menu use the or buttons to scroll to and highlight your selection then press the Menu Select button to select that function 5 Adjust the item using the or buttons on the front panel to adjust the scale 6 After adjusting the function select Save and ...

Страница 30: ...Custom Scaling not available on LP1965 model Selects the method on how displayed information on the monitor will be formatted Select Fill to Screen image fills the entire screen and may look distorted or elongated because of non proportional scaling of height and width Fill to Aspect Ratio image is sized to fit the screen and maintains proportional image One to one disables video scaling displays ...

Страница 31: ...ts the power management features of the monitor Power Saver Enables the power saving feature Select On Off The factory default is On Power On Recall Restores power to the monitor following an unexpected removal of power Select On Off The factory default is On Mode Display Power On Status Display Displays the resolution refresh rate and frequency information on the screen each time the OSD Main Men...

Страница 32: ...e factory default range is 50 OSD Timeout Sets the time duration in seconds that the OSD is visible after the last button is pressed The factory default is 30 seconds OSD Transparency Adjust to view the background information through the OSD Information Selects and displays important information about the monitor Current Settings Provides the current input video mode Recommended Settings Provides ...

Страница 33: ...Auto Automatically returns the monitor s video input to the default Switching auto switching mode This menu selection is visible if the video input control is set to Disable Input Auto switching Factory Reset Returns all OSD menu settings and Power On Status Display for LP2465 model settings to the factory default setting except the Language and Power On Status Display for LP1965 and LP2065 models...

Страница 34: ...n the on screen display Using the HP Display Assistant Utility HP Display Assistant included on the software and documentation CD is a software utility that guides you through the tuning process with easy to understand instructions and background patterns designed for each monitor control It provides Accurate screen calibration through the use of step by step instruction Wizards to obtain the best...

Страница 35: ...active Monitor Going to Sleep Indicates the screen display is entering a sleep mode Check Video Cable Indicates the video cable is not properly connected to the computer OSD Lock The OSD can be enabled or disabled by pressing and holding the Menu button on the front panel for 10 seconds If the OSD is locked the warning message OSD Lock Out displays for ten seconds If the OSD is locked press and ho...

Страница 36: ...or backlights off immediately and stays in sleep mode until the next On Time activates or a monitor button is pressed HP Display LiteSaver HP Display LiteSaver is a software application available on the CD that increases monitor life and saves energy It allows you to place the monitor into its low power sleep mode at predefined times by shutting down or reducing power to most internal circuits Thi...

Страница 37: ...f by HP Display LiteSaver OK Stores the current settings and minimizes HP Display LiteSaver to the System Tray Cancel Restores the previous settings and minimizes HP Display LiteSaver to the System Tray HP Display LiteSaver will continue to run Help Opens the online help file Exit Exits and closes the HP Display LiteSaver It will no longer control the monitor power until it is next run View HP Dis...

Страница 38: ...nd Windows NT operating systems 1 Click the Display icon in the Control Panel 2 In the Display Properties windows select the Settings tab then click the Advanced button 3 Select the Color Management tab then click the Add button to open the Add Profile Association dialog box 4 Select the sRGB Color Space Profile icm file then click the Add button 5 To activate a color profile for the monitor you m...

Страница 39: ...heck Video Cable is displayed on screen Monitor video cable is disconnected Connect the DVI D signal cable to the DVI I connector on the computer or the VGA to DVI I cable to the DVI I connector on the computer Be sure that the computer power is off while connecting the video cable Out of Range Set Monitor to 1280 1024 60Hz is displayed on screen LP1965 19 model Video resolution and or refresh rat...

Страница 40: ...ff Display from the menu The monitor screen should turn off if the system is compatible To turn the monitor back on wait 5 seconds and move the mouse NOTE If the monitor did not turn off then the computer graphics driver is not compatible with the HP Display LiteSaver software The monitor is off but it did The monitor s power saving Check the monitor s OSD menu setting for power saving not seem to...

Страница 41: ...ENWW Hardware configuration Hardware and software you are using Preparing to Call Technical Support 35 ...

Страница 42: ...ENWW 36 Appendix A Troubleshooting ...

Страница 43: ... LCD Viewable Image Size 19 inch diagonal 48 3 cm Tilt 5 to 30 Swivel 45 to 45 Maximum Weight Unpacked 17 2 lbs 7 8 kg Dimensions include base Height Depth Width 14 85 inches 8 78 inches 15 90 inches 377 16 mm 223 00 mm 403 90 mm Maximum Graphic Resolution 1280 1024 75 Hz analog input 1280 1024 75 Hz digital input Text Mode 720 400 Dot Pitch 0 294 H 0 294 W mm Horizontal Frequency 24 to 83 kHz Ver...

Страница 44: ...t Unpacked 20 3 lbs 9 2 kg Dimensions include base Height Depth Width 16 7 inches 8 7 inches 17 4 inches 425 0 mm 220 0 mm 443 0 mm Maximum Graphic Resolution 1600 1200 75 Hz analog input 1600 1200 60 Hz digital input Text Mode 720 400 Dot Pitch 0 258 H 0 258 W mm Horizontal Frequency 30 to 94 kHz Vertical Refresh Rate 48 to 85 Hz Environmental Requirements Temperature Operating Temperature Storag...

Страница 45: ... 0 inches 440 0 mm 232 0 mm 558 4 mm Maximum Graphic Resolution 1920 1200 60Hz analog input 1920 1200 60Hz digital input Text Mode 720 400 Dot Pitch 0 270 H 0 270 W mm Horizontal Frequency 30 to 94 kHz Vertical Refresh Rate 48 to 85 Hz Environmental Requirements Temperature Operating Temperature 41 to 95 F 5 to 35 C Storage Temperature 4 to 140 F 20 to 60 C Relative Humidity 20 to 80 Power Source ...

Страница 46: ... 480 37 5 75 0 4 720 400 31 5 70 0 5 800 600 37 9 60 0 6 800 600 48 1 72 0 7 800 600 46 9 75 0 8 832 624 49 7 75 0 9 1024 768 48 4 60 0 10 1024 768 56 5 70 0 11 1024 768 60 0 75 0 12 1152 870 68 7 75 0 13 1152 900 71 7 76 0 14 1280 1024 64 0 60 0 15 1280 1024 80 0 75 0 Table B 5 LP2065 Model Factory Preset Modes Preset Pixel Format Horz Freq kHz Vert Freq Hz 1 640 480 31 5 59 9 2 640 480 37 5 75 0...

Страница 47: ...q kHz Vert Freq Hz 1 640 480 31 5 59 9 2 640 480 37 5 75 0 3 720 400 31 5 70 1 4 800 624 37 9 60 3 5 800 600 46 9 75 0 6 832 624 49 7 74 6 7 1024 768 48 4 60 0 8 1024 768 60 0 75 0 9 1024 768 68 7 85 0 10 1152 720 44 9 60 0 11 1152 870 68 7 75 1 12 1152 900 61 8 66 0 13 1280 768 47 4 60 0 14 1280 960 60 0 60 0 15 1280 1024 64 0 60 0 16 1280 1024 80 0 75 0 17 1280 1024 91 2 85 0 18 1600 1200 61 7 6...

Страница 48: ...er or 55 watts of power LP2065 and LP2465 models and the Power light is green The monitor also supports a reduced power state The reduced power state will be entered into if the monitor detects the absence of either the horizontal sync signal and or the vertical sync signal Upon detecting the absence of these signals the monitor screen is blanked the backlight is turned off and the power light is ...

Страница 49: ...ent or relocate the receiving antenna Increase the separation between the equipment and the receiver Connect the equipment into an outlet on a circuit different from that to which the receiver is connected Consult the dealer or an experienced radio or television technician for help Modifications The FCC requires the user to be notified that any changes or modifications made to this device that are...

Страница 50: ...reil numérique de la classe B respecte toutes les exigences du Règlement sur le matériel brouilleur du Canada European Union Regulatory Notice This product complies with the following EU Directives Low Voltage Directive 73 23 EEC EMC Directive 89 336 EEC Compliance with these directives implies conformity to applicable harmonized European standards European Norms which are listed on the EU Declara...

Страница 51: ...you purchased the equipment If you need to obtain a power cord for a different country you should purchase a power cord that is approved for use in that country The power cord must be rated for the product and for the voltage and current marked on the product s electrical ratings label The voltage and current rating of the cord should be greater than the voltage and current rating marked on the pr...

Страница 52: ...t is your responsibility to dispose of your waste equipment by handing it over to a designated collection point for the recycling or waste electrical and electronic equipment The separate collection and recycling of your waste equipment at the time of disposal will help to conserve natural resources and ensure that it is recycled in a manner that protects human health and the environment For more ...

Страница 53: ...ground or it is always off a dark spot on a bright background The first is the more visible of the two A defective sub pixel dot defect is less visible than a defective whole pixel and is small and only visible on a specific background The HP display does not have more than 3 bright dots 5 dark dots 5 total bright and dark dots No more than two adjacent less than 2 5 mm edge to edge defective pixe...

Страница 54: ...ENWW 48 Appendix D LCD Monitor Quality and Pixel Policy ...

Отзывы: