background image

Terminal Module Connections

Each channel has four output lines; HI, LO, HS (Hi Sense), and LS (Low
Sense).  When using a channel in the voltage output mode, you can use the
sense lines to increase accuracy or to compensate for long lead lengths.  The
sense leads are not used in the current output mode. 

Voltage and

Current Output

Connections

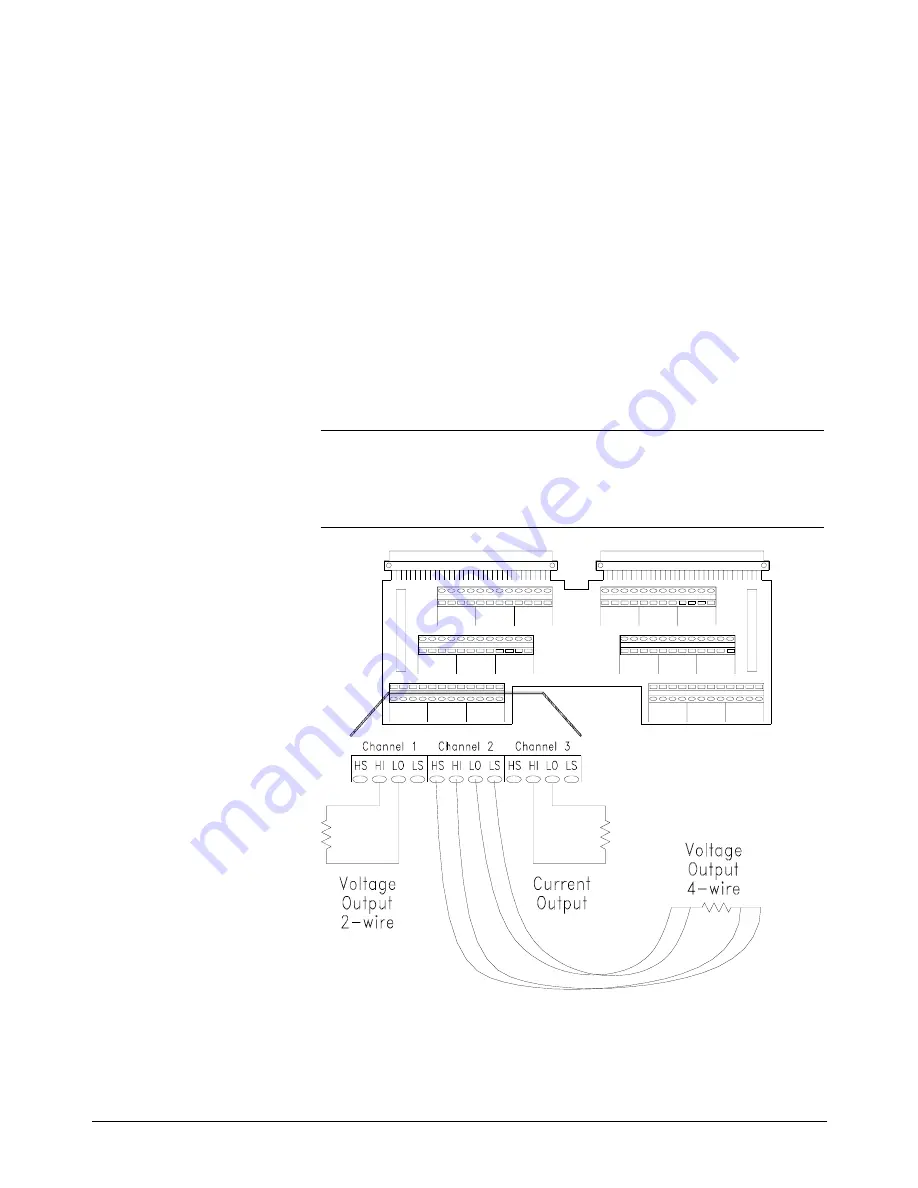
Figure 1-14 shows connections for three types of output.  Channel 1 is
connected in the 2-wire voltage output mode, the sense leads are not used
(and the sense connections need not be made).  Channel 2 is connected in
the 4-wire voltage output mode.  Use this connection for the highest voltage
accuracy and to compensate for long lead lengths.  Channel 3 is connected
for current output mode (sense is not used for current output).

Note

The sense leads are internally disconnected for current output.  External
wiring may be left connected to the sense outputs on the terminal module
with no effect.

Options A3E and A3H

Terminals

HI, HS, LO, and LS connections are shown on the diagram on page 30.

Figure 1-14.  Typical Output Connections

Chapter  1

Module Setup and Installation    33

Содержание E1418A

Страница 1: ... Module Installation 20 Installation in a Mainframe 20 Terminal Modules 22 Screw Type Terminal Module Standard 22 Wiring the Terminal Module 23 Attaching the Terminal Module 25 Removing the Terminal Module 26 Terminal Module Options 27 Option A3E 27 Option A3H 29 Option 135 29 Terminal Module Connectors 30 Configuring the Terminal Module 31 P J Jumper 31 V I Jumper 31 Terminal Module Connections 3...

Страница 2: ...nds 61 SCPI Command Reference 61 ABORt 62 APPLy 63 APPLyn CURRent 63 APPLyn VOLTage 64 CALibration 65 CALibration CONDition 66 CALibration CONFigure RESistance 67 CALibration RESet 67 CALibration STORe 68 CALibration TEST 68 CALibration VALue RESistance 69 CALibrationn CONFigure CURRent 70 CALibrationn CONFigure VOLTage 71 CALibrationn VALue CURRent 72 CALibrationn VALue VOLTage 73 DIAGnostic 75 D...

Страница 3: ...OPERation CONDition 95 STATus OPERation ENABle 95 STATus OPERation ENABle 96 STATus OPERation EVENt 96 STATus PRESet 96 STATus QUEStionable CONDition 97 STATus QUEStionable ENABle 97 STATus QUEStionable ENABle 98 STATus QUEStionable EVENt 98 SYSTem 99 SYSTem ERRor 99 SYSTem VERSion 99 TEST 100 TEST NUMBer 100 TEST TST RESults 101 TST 102 TRIGger 103 TRIGger IMMediate 103 TRIGger SOURce 104 TRIGger...

Страница 4: ...r Register 138 Channel Trigger Register 139 Channel Mode Register 140 Channel Relay Control Register 140 Card Control Register 141 Main_DAC Immediate Registers 142 Main_DAC Triggered Registers 142 Offset_DAC Registers 143 Gain_DAC Registers 143 Undefined Registers 144 Channel Voltage Offset Calibration Registers 144 Channel Voltage Gain Calibration Registers 145 Channel Current Offset Calibration ...

Страница 5: ...ustment 161 Current Adjustment 163 Storing the Adjustments 166 Return the Module to Use 167 Example Program 167 Appendix E Configuration and Disassembly 171 Using This Appendix 171 Configuration 171 Checking Configuration 171 Changing Configuration 172 Adding 8 Channels 173 Installing Isolated Non Isolated Plug on Modules 176 Troubleshooting 178 Isolating an Assembly Self Test 178 Assembly Exchang...

Страница 6: ...Notes 6 Contents HP E1418A 8 16 Channel D A Converter Module ...

Страница 7: ...try or malfunctions of HP products that result from the Buyer s circuitry In addition HP does not warrant any damage that oc curs as a result of the Buyer s circuit or any defects that result from Buyer supplied products NO OTHER WARRANTY IS EXPRESSED OR IMPLIED HP SPECIFICALLY DISCLAIMS THE IMPLIED WARRANTIES OF MERCHANTABILITY AND FITNESS FOR A PARTICULAR PURPOSE Exclusive Remedies THE REMEDIES ...

Страница 8: ...overs or shields Procedures involving the removal of covers or shields are for use by service trained personnel only Under certain conditions dangerous voltages may exist even with the equipment switched off To avoid dangerous electrical shock DO NOT perform procedures involving cover or shield removal unless you are qualified to do so DO NOT operate damaged equipment Whenever it is possible that ...

Страница 9: ...N55011 1991 Group 1 Class A IEC 801 2 1991 EN50082 1 1992 4 kVCD 8 kVAD IEC 801 3 1984 EN50082 1 1992 3 V m IEC 801 4 1988 EN50082 1 1992 1 kV Power Line 5 kV Signal Lines Supplementary Information The product herewith complies with the requirements of the Low Voltage Directive 73 23 EEC and the EMC Directive 89 336 EEC inclusive 93 68 EEC and carries the CE marking accordingly Tested in a typical...

Страница 10: ...Notes 10 HP E1418A User s Manual ...

Страница 11: ...O O O O O Instructions are easy to understand O O O O O The documentation is clearly written O O O O O Examples are clear and useful O O O O O Illustrations are clear and helpful O O O O O The documentation meets my overall expectations O O O O O Please write any comments or suggestions below be specific cut along this line fold here Your Name Company Name Job Title Address City State Province Cou...

Страница 12: ...12 HP E1418A User s Manual ...

Страница 13: ... HP E1418A is an 8 or 16 channel digital to analog converter module for use in a VXIbus C size mainframe The module is a register based device The module can be programmed via direct register access or with the appropriate driver by high level commands This manual describes programming the module using SCPI Standard Commands for Programmable Instruments and the SCPI driver Each HP E1418A module is...

Страница 14: ...tput or a non isolated output Channel configuration to isolated or non isolated is made by individual plug on modules for each channel Figure 1 1 shows the module Figure 1 1 The HP E1418A 8 16 Channel D A Converter with Terminal Module 14 Module Setup and Installation Chapter 1 ...

Страница 15: ...d configuration kits are available Description Use HP E1523A Single Channel Isolated plug on module To change a single channel from non isolated to isolated output HP E1524A Expansion kit 8 Channel Non Isolated Outputs To add 8 additional non isolated channels to an existing 8 channel module HP E1525A Expansion kit 8 Channel Isolated Outputs To add 8 additional isolated channels to an existing 8 c...

Страница 16: ... configurations and how the module is structured A functional block diagram is shown in Figure 1 2 Each channel MUST have either an isolated or non isolated plug on module installed Channels may be configured using any combination of Isolated and Non Isolated plug on modules Figure 1 2 A Functional Block Diagram 16 Module Setup and Installation Chapter 1 ...

Страница 17: ...les for channels 9 16 connect to this assembly Isolated or Non isolated plug on modules are required for every channel Eight plug on modules mount to the main board and 8 plug on modules mount to the expansion board Any combination of isolated or non isolated plug on modules may be used but every channel must have a plug on module installed The Terminal Module shown in Figure 1 2 is the standard s...

Страница 18: ...Front Panel Connectors Figure 1 3 shows the connections at the front panel connectors of the main module Figure 1 3 HP E1418A Front Panel Connector Pinout 18 Module Setup and Installation Chapter 1 ...

Страница 19: ...s when using HP IB and a Command Module For example the module address may be 7 09 09 where 7 is the HP IB interface address 09 is the command module address and 09 is the HP E1418A address The HP E1418A supports dynamic address configuration When you set the logical address to 255 the resource manager sets the logical address programmatically Note When using an HP C size mainframe with the HP E14...

Страница 20: ... Verify or set the logical address switch as shown in Figure 1 4 3 Install the module in a mainframe as shown in Figure 1 5 Installation in a Mainframe The HP E1418A may be installed in any slot except slot 0 in a C size VXIbus mainframe To install in a mainframe 1 Set the extraction levers out Slide the module into any slot except slot 0 until the backplane connectors touch 2 Seat the module by m...

Страница 21: ... will detach from the backplane connectors 4 Slide the module out Note The extraction levers will not seat and unseat the backplane connectors on older HP VXIbus mainframes and non HP mainframes You must manually seat the connectors by pushing the module into the mainframe until the front panel is flush with the front of the mainframe The extraction levers may be used to guide or remove the module...

Страница 22: ... type and an empty terminal housing without a PC board or connectors Screw Type Terminal Module Standard The standard terminal module uses screw type terminals to make connections Figure 1 6 may be photocopied and used for wiring layout Figure 1 6 Screw Type Terminal Module Layout 22 Module Setup and Installation Chapter 1 ...

Страница 23: ...ing the Terminal Module Figure 1 7 shows how to open and wire the HP E1418A terminal module Figure 1 7 Wiring the HP E1418A Terminal Module continued on next page Chapter 1 Module Setup and Installation 23 ...

Страница 24: ...Figure 1 7 Wiring the HP E1418A Terminal Module continued from previous page 24 Module Setup and Installation Chapter 1 ...

Страница 25: ...Attaching the Terminal Module Figure 1 8 shows how to attach the HP E1418A terminal module Figure 1 8 Attaching the HP E1418A Terminal Module Chapter 1 Module Setup and Installation 25 ...

Страница 26: ...Removing the Terminal Module Figure 1 9 shows how to remove the HP E1418A terminal module Figure 1 9 Removing the HP E1418A Terminal Module 26 Module Setup and Installation Chapter 1 ...

Страница 27: ...le is desired This allows you to crimp connectors onto wires which are then inserted directly into the HP E1418A faceplate connector Refer to the pin out diagram on page 30 to make the connections The crimp and insert connector is shown in Figure 1 10 Note The pin numbering on the crimp and insert connector may not agree with the pin numbering on the HP E1418 s faceplate connector Use the pin numb...

Страница 28: ... jumper wire This jumper is typically used to tie two pins together in a single crimp and insert connector Order HP 91512A Crimp and Insert Contacts These contacts may be crimped onto a conductor and then inserted into a crimp and insert connector The crimp tool kit is required to crimp the contacts onto a conductor and remove the contact from the connector Order HP 91515A Crimp and Insert Tools T...

Страница 29: ...d with 64 pin 0 05 inch center ribbon cables not provided Use Figure 1 12 to make the connections Note In Figure 1 12 the center row of each connector is not used in the ribbon cable The center row of both connectors is module ground GND Option 135 The Terminal Module Housing Option provides a terminal housing with no connectors of any type The user supplied connector must be a DIN 41612 type C fe...

Страница 30: ...Terminal Module Connectors Figure 1 12 shows the connections at the terminal module connectors Figure 1 12 HP E1418A Terminal Module Connector Pinout 30 Module Setup and Installation Chapter 1 ...

Страница 31: ...ctable When the jumper is in the program selectable position the channel output mode can be set via programming commands In the jumper selectable position the channel output mode is set via the V I jumper V I Jumper The V I jumper sets the channel output mode to either voltage or current when the P J jumper is set to the Jumper Selectable position When the P J jumper is set to Program Selectable t...

Страница 32: ... Program Selectable mode Shorting this pin to GND will set the Jumper Selectable mode for channel X When CH X PRGM JMPR is shorted to GND the CH X MODE JMPR pin corresponding to the V I Jumper sets the output mode for channel X If the pin is open voltage output mode is selected If the pin is shorted to GND current output mode is selected for channel X 32 Module Setup and Installation Chapter 1 ...

Страница 33: ...he sense leads are not used and the sense connections need not be made Channel 2 is connected in the 4 wire voltage output mode Use this connection for the highest voltage accuracy and to compensate for long lead lengths Channel 3 is connected for current output mode sense is not used for current output Note The sense leads are internally disconnected for current output External wiring may be left...

Страница 34: ... MUST NOT exceed 42 Vdc 42 Vpeak Channels in Parallel Channels may be either Isolated or Non Isolated Up to 16 channels may be combined Figure 1 15 shows how to combine voltage channels in series and current channels in parallel CAUTIONS All SERIES CONNECTED output channels MUST be configured as ISOLATED OUTPUTS When combining output voltage channels be sure not to exceed the maximum module isolat...

Страница 35: ...nal Trigger uses TTL levels The trigger occurs when the EXT TRIGn connection is pulled low for at least 1 µS Typical connections to the external trigger is shown in Figure 1 16 Options A3E and A3H Terminals The external trigger line is located on the upper connector and is labeled EXT TRIGn in the diagram on page 30 Figure 1 16 External Trigger Connections Chapter 1 Module Setup and Installation 3...

Страница 36: ...age 157 The CAL output terminals are available on the terminal module There are four lines HI LO HS Hi Sense and LS Low Sense Typical CAL output terminal connections are shown in Figure 1 17 Options A3E and A3H Terminals The CAL Output Terminals are located on the upper connector and are labeled CAL HI CAL HS CAL LO and CAL LS in the diagram on page 30 Figure 1 17 Calbus Connections 36 Module Setu...

Страница 37: ... driver VXIplug play drivers example programs and HP VIC VXI Installation Consultant Follow the instructions contained on the CD to properly install the device driver The following example shows how to query the command module and verify that the correct device driver is installed 10 DIM A 256 20 OUTPUT 70900 DIAG DRIV LIST 30 ENTER 70900 A 40 PRINT A 50 END In this example the command module is l...

Страница 38: ...ed to be installed for this example to work This example queries the module for the identification string 10 DIM A 256 20 OUTPUT 70909 IDN 30 ENTER 70909 A 40 PRINT A 50 END The response should be similar to one of the following HEWLETT PACKARD E1418A_8CH xxxxAxxxx A 01 00 or HEWLETT PACKARD E1418A_16CH xxxxAxxxx A 01 00 The xxxxAxxxx portion of the response string is the module serial number 38 M...

Страница 39: ...ge 47 SOURce Output Page 50 Setting the Output Mode Page 52 Controlling the Output Relay Page 53 Triggering Page 54 Using OPC Page 56 Combining Output Channels Page 57 Program Examples Example programs in ANSI C format are included on the driver CD supplied with the HP E1418A Most examples in this chapter are included The examples are ASCII files with the c extension Note The int data type is syst...

Страница 40: ...module for the identification string and determine the module configuration The module identification is obtained using the IEEE 488 Command IDN Send query to the module IDN Enter a string The string returned should be similar to one of the following HEWLETT PACKARD E1418A_8CH xxxxAxxxxx A 01 00 or HEWLETT PACKARD E1418A_16CH xxxxAxxxxx A 01 00 The xxxxAxxxxx portion of the response string is the ...

Страница 41: ...t State A bit set to 0 indicates the channel output relay is closed A bit set to 1 indicates the channel output relay is open Bits 0 15 correspond to channels 1 16 respectively 6th Channel Mode Programmable State P J Jumper A bit set to 0 indicates a channel is not mode programmable A bit set to 1 indicates a channel is mode programmable Bits 0 15 correspond to channels 1 16 respectively For 8 cha...

Страница 42: ...iStatus err ViSession defaultRM cmd dac void main void int i num_chan result 0 config 6 0 char buf 256 0 Check the module identification err viPrintf dac IDN n request id from the module err viScanf dac t buf enter string returned printf Module is identified as a s n buf print the result Get the module configuration err viPrintf dac DIAG CONF n request module configuration err viScanf dac 6d confi...

Страница 43: ... upper 8 bits for i num_chan i 0 i if result 0x8000 printf Channel d is configured for non isolated output n i else printf Channel d is configured for isolated output n i result result 1 Decode the fourth integer result config 3 Output Mode Voltage or Current if num_chan 9 result result 8 strip upper 8 bits for i num_chan i 0 i if result 0x8000 printf Channel d is set to voltage output mode n i el...

Страница 44: ...disabled n i else printf Channel d output is enabled n i result result 1 Decode the sixth integer result config 5 P J Jumper position if num_chan 9 result result 8 strip upper 8 bits for i num_chan i 0 i if result 0x8000 printf Channel d output mode is programmable n i else printf Channel d output mode is fixed and jumper selected n i result result 1 44 Programming Examples Chapter 2 ...

Страница 45: ...ge or current Sets the output value volts or amps Enables the outputs closes the output relay The output channel remains enabled and outputs the last programmed voltage or current value unless you take explicit action to turn off the output For example if you send two APPLyn commands to the same channel the first command sets an output value and closes the output relay The second command changes o...

Страница 46: ...alue programmed the output can be turned on or off as needed with the OUTPutn STATe command It is also possible with the APPLyn commands to change the channel output mode from voltage to current Set channel 1 for 5 0 Volt output APPLy1 VOLTage 5 000 Channel 1 is set to voltage output and 5 000 V applied Now set channel 1 for 20 mA current output APPLy1 CURRent 0200 Channel 1 is set to current outp...

Страница 47: ...L errors and is declared as a global variable of the ViStatus type defined in visa h I O error checking is illustrated in the following program example The VTL error checking function is named error_handler Errors found are reported to the standard output device SCPI Error Checking You must also check for errors reported by the SCPI driver The SCPI driver reports errors in response to the SYSTem E...

Страница 48: ...resource manager command module and dac sessions viOpenDefaultRM defaultRM viOpen defaultRM CMD_ADDRESS VI_NULL VI_NULL cmd viOpen defaultRM DAC_ADDRESS VI_NULL VI_NULL dac Set the timeout for the dac viSetAttribute dac VI_ATTR_TMO_VALUE 10000 10 second timeout err viPrintf dac RST n reset the dac if err VI_SUCCESS err_handler dac err VTL error check sys_err dac SCPI error check VTL Error handling...

Страница 49: ...r_no buf get error number and string if err VI_SUCCESS err_handler resource err while err_no 0 printf nCommand Error d s n err_no buf err viPrintf resource SYST ERR n query error queue if err VI_SUCCESS err_handler resource err err viScanf resource d t err_no buf get error number and string if err VI_SUCCESS err_handler resource err return End of SCPI error check Chapter 2 Programming Examples 49 ...

Страница 50: ...hannel 1 is set to output 5 000 Volts Turn on the output OUTPut1 ON Channel 1 output is enabled The SOURcen subsystem contains two types of commands to set current or voltage output The type used in the above examples has the form SOURcen CURRent LEVel IMMediate AMPLitude value SOURcen VOLTage LEVel IMMediate AMPLitude value The implied commands enclosed in brackets are not shown in the examples T...

Страница 51: ...voltage SOURce1 VOLTage 15 000 Changing the output mode with the SOURcen commands opens the output relay Set channel 1 voltage mode SOURce1 FUNCtion MODE VOLTage Set channel 1 voltage output SOURce1 VOLTage 5 000 Turn on the output OUTPut1 ON Channel 1 output is enabled and 5 volts applied Send a new output mode SOURce1 FUNCtion MODE CURRent Channel 1 output is disabled Set channel 1 output curren...

Страница 52: ...with the SCPI commands and the output mode is set by the V I jumper also on the terminal module see page 31 For example if on the terminal module channel 1 P J jumper is set to Jumper Selectable and the V I jumper is set to current mode the following command will each generate an error SOURce1 FUNCtion MODE VOLT The error returned is 3012 Channel cannot be programmed to this mode check jumpers App...

Страница 53: ... not change the output mode if the P J jumper is set to Jumper Selectable Send the DIAGnostic OUTPut ALL OFF command to open all output relays without changing the programmed mode or output value The output relay will also be opened and then closed by a change of output mode using the APPLy commands An APPLyn VOLTage value followed by an APPLyn CURRent value command or vice versa will open and the...

Страница 54: ...rs the output External Trigger an input on the terminal module see page 35 Use this source to synchronize the outputs to an external event The SOURcen VOLTage LEVel TRIGgered AMPLitude and SOURcen CURRent LEVel TRIGgered AMPLitude commands program a channel output value when the trigger conditions are met The INITiate IMMediate command places the trigger system in the wait for trigger state The tr...

Страница 55: ...em is set back to the trigger idle state New triggered channel output values can be programmed and the trigger system put in the wait for trigger state The triggering process is illustrated below Note Once an output is enabled and a voltage or current output that value remains on the output Sending subsequent SOURn VOLT TRIG or SOURn CURR TRIG commands will not change the output value until the tr...

Страница 56: ...program can wait for the response before executing additional statements The returned value is unimportant always a 1 Set channel 1 voltage mode SOURce1 FUNCtion MODE VOLTage Set channel 1 voltage output SOURce1 VOLTage 5 000 Turn on the output OUTPut1 ON OPC enter the response OPC is used to synchronize the program with the module since program execution waits for the response The command may be ...

Страница 57: ... output SOURce9 CURRent TRIGgered MAX SOURce10 CURRent TRIGgered MAX SOURce11 CURRent TRIGgered 0100 Put the trigger system in the wait for trigger state INITiate Wait for the trigger event When the trigger occurs output 50 mA When combining channels in parallel for increased current output channels may be configured with either isolated or non isolated plug on modules When combining channels in s...

Страница 58: ...ST Subsystem Page 100 TRIGger Subsystem Page 103 IEEE 488 2 Common Command Quick Reference Page 106 HP E1418A Command Quick Reference Page 107 Command Types Commands are separated into two types IEEE 488 2 Common Commands and SCPI Commands Common Command Format The IEEE 488 2 standard defines the common commands that perform functions like reset self test status byte query etc Common commands are ...

Страница 59: ...evel FUNCtion MODE and so forth Abbreviated and Short Commands The command syntax shows most commands as a mix of upper and lower case letters The upper case letters indicate an abbreviated spelling for the command For shorter program lines send only the abbreviated form For better program readability use the entire command The instrument will accept either the abbreviated form or the entire comma...

Страница 60: ...planations and examples of parameter types you might see later in this chapter Parameters must always be separated from the keywords by a space Parameter Type Explanations and Examples Numeric Accepts all commonly used decimal representations of numbers including optional signs decimal points and scientific notation 123 123E2 123 1 23E2 123 1 23E 2 1 23000E 01 Special cases include MIN MAX and DEF...

Страница 61: ...example SOURce2 FUNCtion MODE VOLT SOURce2 VOLTage 10 SCPI Command Reference The following sections describe the Standard Commands for Programmable Instruments SCPI commands for the HP E1418A D A Converter Module Commands are listed alphabetically by subsystem and within each subsystem A command guide is printed in the top margin of each page The guide indicates the current subsystem on that page ...

Страница 62: ...ABORt Parameters None Comments Following this command the trigger system is in the idle state Sending an INITiate command after ABORt returns the trigger system to the wait for trigger state Triggering is described in more detail on page 54 Related Commands INITiate IMMediate ABORt Chapter 3 HP E1418A SCPI Command Reference 62 ...

Страница 63: ...rror The value parameter can range from 0 02 to 0 02 Amps MIN sets 0 02 Amps output MAX sets 0 02 Amps output DEF sets 0 Amps output This command is affected by the state of the P J jumper for this channel on the terminal module To use the APPLyn CURRent command the P J jumper must be set to program selectable or if set to jumper selectable the V I jumper must be set to the current mode These jump...

Страница 64: ... sets 16 Volts output DEF sets 0 Volts output This command is affected by the state of the program jumper on the terminal module for this channel To use the APPLyn VOLT command the P J jumper must be set to program selectable or if set to jumper selectable the V I jumper must be set to the voltage mode This jumper is described on page 31 Equivalent Commands SOURcen FUNCtion MODE VOLT SOURcen VOLTa...

Страница 65: ...f this manual beginning on page 157 You should review Appendix D before using any of these commands Subsystem Syntax CALibration CONDition CONFigure RESistance RESet STORe TEST VALue RESistance value CALibrationn CONFigure CURRent VOLTage VALue CURRent value VOLTage value CALibration 65 HP E1418A SCPI Command Reference Chapter 3 ...

Страница 66: ...sion board contains channels 9 16 2 2nd 16 bit value indicates how the channels are configured isolated or non isolated A bit set to 0 indicates an isolated channel a bit set to 1 indicates a non isolated channel Bits 0 15 correspond to channels 1 16 respectively 3 3rd 16 bit value indicates the current calibration status for each channel A bit set to 0 indicates the channel is not calibrated for ...

Страница 67: ... This query is used together with the CALibration VALue RESistance command to calibrate the current calibration resistor Refer to Appendix D Voltage Current Output Adjustment starting on page 157 for additional information about this command Related Commands CALibration VALue RESistance CALibration RESet CALibration RESet reloads for module use the calibration constants stored in non volatile memo...

Страница 68: ...o Appendix D Voltage Current Output Adjustment starting on page 157 for additional information about this command Related Commands CALibration RESet CALibration TEST CALibration TEST performs an internal rough check of the calibration of each channel and returns an integer indicating the channel calibration condition Calibration is checked to approximately 2 Parameters Returns unsigned 16 bit inte...

Страница 69: ...nt calibration resistor The internal calibration resistor should be calibrated before calibrating channels in current mode When calibrating at the CAL connections and using the internal calibration resistor the value need only be entered once to calibrate all channels If using an external resistor to calibrate current mode you must calibrate at each channel output External resistances in the range...

Страница 70: ...ation current to the CAL output terminals and opens all channel output terminals When the DIAG CAL OUTP MODE CHANnel command is used the output relay routes the calibration current to the channel terminals the CAL terminals are not connected The DIAG CAL OUTP MODE command must be sent to the module before the CALibrationn CONFigure CURRent query This query will generate an error if the trigger sys...

Страница 71: ...e to the CAL output terminals and opens all channel output terminals When the command DIAG CAL OUTP MODE CHANnel is used the output relay routes the calibration voltage to the channel terminals the CAL terminals are not connected The DIAGnostic CALibration OUTPut MODE command must be sent to the module before the CALibrationn CONFigure VOLTage query This query will generate an error if the trigger...

Страница 72: ...Librationn CONFigure CURRent query to perform voltage mode calibration Following the CALn CONF CURR query this command is used repetitively until the return value indicates that the calibration is complete The value parameter is the measured output voltage A minimum of 9 measurements must be taken to calibrate a channel for current mode output a maximum of 50 measurements may be required This quer...

Страница 73: ...on STORe CALibrationn CONFigure CURRent CALibrationn VALue VOLTage CALibrationn VALue VOLTage value enters a measured calibration value and returns a value indicating the present state of the voltage calibration process Parameters Parameter Name Parameter Type Range of Values Default CALibrationn keyword 1 to 8 or 1 to 16 1 value numeric float 32 0 to 19 2 V none Returns unsigned 16 bit integer ui...

Страница 74: ...ntered more than 50 values without a successful calibration When the channel voltage calibration is completed the new calibration constants are used by the module but not stored in non volatile memory If a voltage calibration is interrupted before completion that is by another command being received no constants are changed Refer to Appendix D Voltage Current Output Adjustment starting on page 157...

Страница 75: ...ut terminals or at each output channel Parameters Parameter Name Parameter Type Range of Values Default path discrete CALBus or CHANnel none Comments The typical calibration mode for the module is through the CAL output terminals Following RST or power on the default calibration mode is through the CAL output terminals and this command is not needed This command with the CHANnel parameter sets cal...

Страница 76: ...ated channel A bit set to 1 indicates a non isolated channel or no plug on module installed DO NOT operate the module without a plug on module Bits 0 15 correspond to channels 1 16 respectively 4th Channel Mode A bit set to 0 indicates a current output channel A bit set to 1 indicates a voltage output channel Bits 0 15 correspond to channels 1 16 respectively 5th Channel Output State A bit set to ...

Страница 77: ...tion 001 E1418A Option 003 Values of n outside these ranges will generate an error Use this command with caution The output voltage or current is not predictable during the mode change and transients will occur This command performs the same function as the SOURcen FUNCtion MODE command but does not disable the output during the mode change This command can reduce the settling time required to dis...

Страница 78: ...t integer uint16 Comments This query returns a 16 bit word indicating the trigger status of each channel A bit is set to 0 to indicate the channel is not waiting for a trigger A bit is set to 1 to indicate the channel is in the wait for trigger state Bits 0 15 correspond to channels 1 16 respectively Related Commands TRIGger SOURce DIAGnostic Chapter 3 HP E1418A SCPI Command Reference 78 ...

Страница 79: ...ger state Parameters None Comments If this command is received and the trigger system is not idle an error is generated If this command is received and no channels are waiting for a trigger event an error is generated Triggering is described in more detail on page 54 Related Commands TRIGger SOURce SOURcen VOLTage TRIGgered SOURcen CURRent TRIGgered ABORt INITiate 79 HP E1418A SCPI Command Referen...

Страница 80: ...F ON 0 1 0 Comments VXIbus TTLTRG lines are numbered from 0 to 7 Only one line can be enabled at a time If a different line is already enabled when this command is received a settings conflict error is reported This command sources a trigger from the module The TRIGger SOURce TTLTn command programs the module to accept triggers from the VXIbus TTLTRG lines The module can be programmed to both acce...

Страница 81: ... OUTPutn STATe state opens or closes the specified channel output relay Parameters Parameter Name Parameter Type Range of Values Default OUTPutn keyword 1 to 8 or 1 to 16 none state boolean OFF ON 0 1 none Comments In the keyword OUTPutn the valid range of n is 1 to 8 for E1418A E1418A Option 002 1 to 16 for E1418A Option 001 E1418A Option 003 Values of n outside these ranges will generate an erro...

Страница 82: ... integer uint16 Comments In the keyword OUTPutn the valid range of n is 1 to 8 for E1418A E1418A Option 002 1 to 16 for E1418A Option 001 E1418A Option 003 Values of n outside these ranges will generate an error The query returns a 0 if the specified channel output relay is open The query returns a 1 if the specified channel output relay is closed Related Commands OUTPutn STATe OUTPut Chapter 3 HP...

Страница 83: ...yntax SOURcen CURRent LEVel IMMediate AMPLitude value MIN MAX DEF AMPLitude TRIGgered AMPLitude value MIN MAX DEF AMPLitude FUNCtion MODE mode MODE VOLTage LEVel IMMediate AMPLitude value MIN MAX DEF AMPLitude TRIGgered AMPLitude value MIN MAX DEF AMPLitude SOURce 83 HP E1418A SCPI Command Reference Chapter 3 ...

Страница 84: ...2 1 to 16 for E1418A Option 001 E1418A Option 003 Values of n outside these ranges will generate an error The value parameter is a floating point 32 bit number in the range of 0 02 A to 0 02 A MIN sets 0 02 Amps MAX sets 0 02 Amps DEF sets 0 Amps This command immediately programs the specified current on channel n The output state of the channel must be enabled for the current to appear at the out...

Страница 85: ... to 16 for E1418A Option 001 E1418A Option 003 Values of n outside these ranges will generate an error If no parameter is given this query returns the source current set on channel n by the last SOURcen CURRent LEVel IMMediate AMPLitude command The value returned is the value last programmed on that channel not an actual measurement of the hardware output value If a parameter is given MIN returns ...

Страница 86: ...is a floating point 32 bit number in the range of 0 02 A to 0 02 A MIN sets 0 02 Amps MAX sets 0 02 Amps DEF sets 0 Amps This command sets channel n to output the current specified following a valid trigger condition Following this command the trigger system must be enabled using an INITiate command See the TRIGger subsystem discussion on page 54 for additional information If the module is in a wa...

Страница 87: ... 1 to 16 for E1418A Option 001 E1418A Option 003 Values of n outside these ranges will generate an error If no parameter is given this query returns the last value set on channel n by the last SOURcen CURRent LEVel TRIGgered AMPLitude or SOURcen CURRent LEVel IMMediate AMPLitude command The value returned is the value last programmed on that channel not an actual measurement of the hardware output...

Страница 88: ... A or 0 V If the module is in the wait for trigger state when this command is received an error is generated This command is affected by the state of the P J jumper for this channel on the terminal module If the P J jumper is not set to program selectable this command will return an error This jumper is described on page 31 RST Condition If the P J jumper is set to program selectable output mode i...

Страница 89: ...s Default SOURcen keyword 1 to 8 or 1 to 16 1 Returns string Comments In the keyword SOURcen the valid range of n is 1 to 8 for E1418A E1418A Option 002 1 to 16 for E1418A Option 001 E1418A Option 003 Values of n outside these ranges will generate an error This query returns CURR or VOLT Related Commands SOURcen FUNCtion MODE SOURce 89 HP E1418A SCPI Command Reference Chapter 3 ...

Страница 90: ...02 1 to 16 for E1418A Option 001 E1418A Option 003 Values of n outside these ranges will generate an error The value parameter is a floating point 32 bit number in the range of 16 Volts to 16 Volts MIN sets 16 Volts MAX sets 16 Volts DEF sets 0 Volts This command immediately programs the specified voltage on channel n The output relay for that channel must be closed for the voltage to appear at th...

Страница 91: ...02 1 to 16 for E1418A Option 001 E1418A Option 003 Values of n outside these ranges will generate an error If no parameter is given this query returns the last value set on channel n with the last SOURcen VOLTage LEVel IMMediate AMPLitude command The value returned is the value last programmed on that channel not an actual measurement of the hardware output value If a parameter is given MIN return...

Страница 92: ...error The value parameter is a floating point 32 bit number in the range of 16 Volts to 16 Volts MIN sets 16 Volts MAX sets 16 Volts DEF sets 0 Volts This command sets channel n to output the voltage specified following a valid trigger condition Following this command the trigger system must be enabled using an INITiate command See the TRIGger subsystem discussion page 54 for additional informatio...

Страница 93: ...ion 002 1 to 16 for E1418A Option 001 E1418A Option 003 Values of n outside these ranges will generate an error If no parameter is given this query returns the last value set on channel n by the SOURcen VOLTage LEVel IMMediate AMPLitude or SOURcen VOLTage LEVel TRIGgered AMPLitude command The value returned is the value last programmed on that channel not an actual measurement of the hardware outp...

Страница 94: ...ard Event Register Each is comprised of a Condition Register an Event Register and an Enable mask The SCPI Status System is shown in the figure below Subsystem Syntax STATus OPERation CONDition ENABle mask ENABle EVENt PRESet QUEStionable CONDition ENABle mask STATus Chapter 3 HP E1418A SCPI Command Reference 94 ...

Страница 95: ...o not affect bits in the Status Operation Condition Register STATus OPERation ENABle STATus OPERation ENABle mask specifies which bits of the Operational Status Event Register are OR d together to create the Operational Status bit bit 7 in the Summary Register of the Status Byte Parameters Parameter Name Parameter Type Range of Values Default mask numeric int16 or non decimal numeric 32768 to 3276...

Страница 96: ...nly defined bit in this register This bit is set if the CALibration CONFigure RESistance CALibrationn CONFigure VOLTage or CALibrationn CONFigure CURRent command has been received and the calibration process is not yet complete RST Condition no effect CLS clears the contents of the Operation Status Register STATus PRESet does not affect the contents of the Operation Status Register but does disabl...

Страница 97: ...ent Register are OR d together to create the Questionable Data bit bit 3 in the Status Byte Summary Register Parameters Parameter Name Parameter Type Range of Values Default mask numeric int16 or non decimal numeric 32768 to 32767 or H0000 to HFFFF none Comments Only bits 8 and 9 of the Questionable Data Register are used or defined Bit 8 indicates a questionable calibration and bit 9 indicates a ...

Страница 98: ...signed integer int16 Comments Bit 8 of this register decimal 256 is set when either A channel is set to an output mode that has not been calibrated or A channel fails the CALibration TEST query Bit 9 of this register decimal 512 is set when a trigger ignored event occurs RST Condition no effect CLS clears the contents of the Questionable Status Register STATus PRESet does not affect the contents o...

Страница 99: ...rror string from the queue When no errors are in the error buffer the query returns 0 No error CLS clears the error queue RST has no effect on the error queue SYSTem VERSion SYSTem VERSion returns the SCPI version the driver complies with not the driver version Parameters Returns string or float32 Comments Returns a decimal value in the form YYYY R where YYYY is the year and R is the revision numb...

Страница 100: ... none Comments Following the completion of this command all outputs are disabled and set to either 0 A or 0 V If the module is in the wait for trigger state when this command is received an error is generated Complete descriptions of each test and specific codes returned in the Test Info field are contained in the HP E1418A Service Manual A successful self test returns 0 A failure of a self test r...

Страница 101: ...test results are needed Complete descriptions of each test and specific codes returned in the Test Info and A24 fields are contained in the HP E1418A Service Manual This query returns an array of 100 16 bit integers int16 The first array element corresponds to test 1 Array elements above 75 are unused Each 16 bit integer in the array is in the form BIT 15 14 13 12 11 10 9 8 7 6 5 4 3 2 1 0 Meaning...

Страница 102: ... 15 14 13 12 11 10 9 8 7 6 5 4 3 2 1 0 Meaning Test Number A24 Test Info Test number is the internal self test number of the first failure found The Test Info and A24 fields contain information related to the failure in Test Number Test Number Tested Area 1 25 Register Read and Writes 26 41 Trigger Control for each Channel test 26 corresponds to channel 1 test 41 corresponds to channel 16 42 43 VX...

Страница 103: ...t to either BUS or HOLD Parameters None Comments To use this command to trigger outputs the trigger source must be set to either BUS or HOLD An error is generated if other trigger sources are set If this command is received and the module is not in the wait for trigger state an error is generated Triggering is described in more detail on page 54 Related Commands TRIGger SOURce SOURcen VOLTage LEVe...

Страница 104: ... the EXTernal trigger line on the terminal module If this command is received when the module is in the wait for trigger state an error is generated This command set the source for the trigger in to the module The module can also output a trigger on the VXIbus TTLTrg lines using the OUTPut TTLTrgn command Triggering is described in more detail on page 54 Related Commands TRIGger SOURce RST Conditi...

Страница 105: ...TRIGger 105 HP E1418A SCPI Command Reference Chapter 3 ...

Страница 106: ...ions are complete RST Reset Disables all outputs Rewrites calibration data from FLASH to RAM Sets all outputs to 0 Sets if not jumpered all outputs to voltage mode Enables trigger with source IMM SRE mask Service request enable Sets the Service Request Enable bits and corresponding Serial Poll Status Byte Register bits to generate a service request SRE Service request enable query Queries the Serv...

Страница 107: ...r constant used by the module for current output CALibrationn CONFigure CURRent Configures the channel for current mode calibration and returns a 0 or 1 to indicate the channel s readiness for calibration CONFigure VOLTage Configures the channel for voltage mode calibration and returns a 0 or 1 to indicate the channel s readiness for calibration VALue CURRent value Enters a measured calibration va...

Страница 108: ...Command Description TRIGgered Returns a 16 bit word indicating the present trigger status of the module HP E1418A Command Quick Reference Chapter 3 HP E1418A SCPI Command Reference 108 ...

Страница 109: ...tions are satisfied and the output relay is closed CURRent LEVel TRIGgered AMPLitude MIN MAX DEF Queries the last value written by either SOURn CURR TRIG or SOURn CURR IMM FUNCtion MODE CURRent VOLTage Configures channel n for either current or voltage output FUNCtion MODE Queries channel n for current or voltage output mode The query returns a string VOLTage LEVel IMMediate AMPLitude value MIN MA...

Страница 110: ...the Event Register and the unmasked bits QUEStionable ENABle Returns the mask set for the Questionable Status Enable Register QUEStionable EVENt Returns the value of the Questionable Status Event Register Reading the register clears all bits in the register SYSTem ERRor Returns an error number and message from the instrument s error queue VERSion Returns the SCPI version with which the driver comp...

Страница 111: ...Notes HP E1418A Command Quick Reference 111 HP E1418A SCPI Command Reference Chapter 3 ...

Страница 112: ...at 16 Volts Short Circuit Current 60 mA Differential Ripple and Noise 2 mV rms 20 Hz to 250 kHz into 10 kΩ load DC Current Range 0 02 Amps to 0 02 Amps Resolution 16 bits 610 nA steps Monotonic to 2 5 µA Accuracy of value amps After calibration and at a temperature within 5 C of calibration temperature 90 day 0 09 5 0 µA Output Voltage Compliance Voltage 12 V Maximum Open Circuit Voltage 18 V Diff...

Страница 113: ...er Requirements Current Required Amps Configuration 5 V DC 5 V Dynamic 12 V DC 12 V Dynamic 24 V DC 24 V Dynamic 24 V DC 24 V Dynamic 8 Channel Non Isolated 0 70 0 01 0 04 0 01 0 44 0 01 0 44 0 01 8 Channel Isolated 0 75 0 01 0 04 0 01 0 88 0 01 0 00 0 00 16 Channel Non Isolated 1 25 0 01 0 04 0 01 0 88 0 01 0 88 0 01 16 Channel Isolated 1 40 0 01 0 04 0 01 1 60 0 01 0 00 0 00 Cooling Requirements...

Страница 114: ...unction calls to driver libraries that perform register based programming Note If SCPI commands or other high level driver based commands are used to program this module with a command module then register programming is not recommended The SCPI driver maintains an image of the module state The driver will be unaware of changes made to the module by register access Register based programming is a ...

Страница 115: ...e HP E1405 E1406 Command Module the A16 space location starts at 1F000016 The A16 space is divided so that the VXI modules are addressed only at locations above 1FC00016 within A16 Every VXI module is allocated 64 bytes for register addresses 4016 The address of a module is determined by its logical address set by the address switches on the module or by a write to the logical address register tim...

Страница 116: ...r later accesses must use the new address A24 Registers The HP E1418A requires 256 kbytes of A24 address space The resource manager determines the location in A24 space of the 256 kbytes assigned to the HP E1418A and writes the most significant address lines into the A16 VXI_Offset Register base 0616 Figure B 2 Register Locations in A24 Address Space Appendix B HP E1418A Register Based Programming...

Страница 117: ...ing into A16 space In practice four bits A24_Window Value in the A16 Card Control Register base 1E16 control which A24 registers map to the A16 space For example if the A24_Window Value is set to 0010 the 16 Main_DAC Write Immediate Registers are mapped to the A16 space The Card Control Register is described in more detail on page 140 Figure B 3 A24 Windowing into the A16 Registers 117 HP E1418A R...

Страница 118: ... using dynamic addressing and 64 is the number of address bytes per VXI device For example the HP E1418A s factory set logical address is 72 4816 therefore it will have a base address of C00016 4816 4016 C00016 120016 D20016 or decimal 49 152 72 64 49 152 4608 53760 A16 Address Space Inside the Command Module or Mainframe When the A16 address space is inside the HP E1405 E1406 Command Module Figur...

Страница 119: ...1FC00016 4816 4016 1FC00016 120016 1FD20016 or 2 080 768 72 64 2 080 768 4608 2 085 376 119 HP E1418A Register Based Programming Appendix B ...

Страница 120: ...cess System Typical Commands Base Address External Computer over HP IB to E1405 E1406 Command Module VXI READ logical_address offset VXI WRITE logical_address offset data DIAG PEEK Base_addr offset width DIAG POKE Base_addr offset width data width must be either 8 or 16 logical_address LADDR offset register number Base_addr 1FC00016 LADDR16 4016 or 2 080 768 LADDR 64 offset register number V 382 E...

Страница 121: ...annels FFFF16 or to the position of the P J jumper described on page 31 The Channel Relay Control Register base 1C16 is set to open all channel relays FFFF16 The Isolation Status Register base 1416 reflects the isolated non isolated configuration of each channel The Calibration Control Register base 0816 is set to calibrate voltage with the cal mux disabled 200016 Channel Trigger Register base 181...

Страница 122: ...egister Base 0C16 Software Trigger Register Base 0E16 Trigger Control Register Base 1016 Interrupt Control Register Not Supported Base 1216 Interrupt Status Register Not Supported Base 1416 Isolation Status Register Base 1616 Chan Prog_Jumper Register Channel Control Registers Base 1816 Chan_Trigger Register Base 1A16 Chan_Mode Register Base 1C16 Chan Relay Control Register Base 1E16 Card Control ...

Страница 123: ... Ch 14 Main_DAC Immediate Base 5C16 Ch 15 Main_DAC Immediate Base 5E16 Ch 16 Main_DAC Immediate Base 6016 Ch 01 Main_DAC Triggered Channel Main DAC Triggered Registers New output values appear after the next trigger event when the output relay is closed Base 6216 Ch 02 Main_DAC Triggered Base 6416 Ch 03 Main_DAC Triggered Base 6616 Ch 04 Main_DAC Triggered Base 6816 Ch 05 Main_DAC Triggered Base 6...

Страница 124: ...ffset_DAC Base 9A16 Ch 14 Offset_DAC Base 9C16 Ch 15 Offset_DAC Base 9E16 Ch 16 Offset_DAC Base A016 Ch 01 Gain_DAC Channel Gain DAC Registers Base A216 Ch 02 Gain_DAC Base A416 Ch 03 Gain_DAC Base A616 Ch 04 Gain_DAC Base A816 Ch 05 Gain_DAC Base AA16 Ch 06 Gain_DAC Base AC16 Ch 07 Gain_DAC Base AE16 Ch 08 Gain_DAC Base B016 Ch 09 Gain_DAC Base B216 Ch 10 Gain_DAC Base B416 Ch 11 Gain_DAC Base B6...

Страница 125: ...t_Cal Base 11A16 Ch 14 Voltage Offset_Cal Base 11C16 Ch 15 Voltage Offset_Cal Base 11E16 Ch 16 Voltage Offset_Cal Base 12016 Ch 01 Voltage Gain_Cal Channel Voltage Gain Cal Storage Registers non volatile Base 12216 Ch 02 Voltage Gain_Cal Base 12416 Ch 03 Voltage Gain_Cal Base 12616 Ch 04 Voltage Gain_Cal Base 12816 Ch 05 Voltage Gain_Cal Base 12A16 Ch 06 Voltage Gain_Cal Base 12C16 Ch 07 Voltage G...

Страница 126: ...t_Cal Base 15A16 Ch 14 Current Offset_Cal Base 15C16 Ch 15 Current Offset_Cal Base 15E16 Ch 16 Current Offset_Cal Base 16016 Ch 01 Current Gain_Cal Channel Current Gain Cal Storage Registers non volatile Base 16216 Ch 02 Current Gain_Cal Base 16416 Ch 03 Current Gain_Cal Base 16616 Ch 04 Current Gain_Cal Base 16816 Ch 05 Current Gain_Cal Base 16A16 Ch 06 Current Gain_Cal Base 16C16 Ch 07 Current G...

Страница 127: ...e 18C16 Calibration checksum Base 18E16 SERIAL NUMBER Module Serial Number Registers 10 byte serial number non volatile Base 19016 Base 19216 Base 19416 Base 19616 Base 19816 Undefined calibration memory Undefined Calibration Storage Registers non volatile Base 19A16 Base 19C16 Base 19E16 Base 1A016 Base 1A216 Base 1A416 Base 1A616 Base 1A816 Base 1AA16 Base 1AC16 Base 1AE16 Base 1B016 Base 1B216 ...

Страница 128: ...fies Hewlett Packard as the device manufacturer Logical Address Register The module supports Dynamic Configuration The module s logical address is set in bits 0 through 7 of the Logical Address Register Address Base 0016 Bit Position 15 14 13 12 11 10 09 08 07 06 05 04 03 02 01 00 Setting Undefined 0016 FF16 WRITE Undefined Logical Address Setting Logical Address Setting Bits 0 through 7 of this r...

Страница 129: ...mory Model Codes Required Memory The HP E1418A requires 256 kbytes of A24 address space Model Codes The model codes for the HP E1418A are shown in the table below Configuration Model Code Value Register Read Value 16 channel DAC 23016 523016 8 channel DAC 23716 523716 VXI Status Control Register The VXI Status Control Register is a VXIbus required register As a READ register the value returned ind...

Страница 130: ...bles access to the A24 address space via A24 addressing Writing a zero 0 to this field disables access to the A24 address space SYSINH Writing a one 1 to this field disables the module from driving the VXIbus SYSFAIL line Writing a zero 0 enables the module to drive SYSFAIL RESET Writing a one 1 and then a zero 0 to this field performs a module reset Writing a one 1 to this field forces the module...

Страница 131: ...he state of the last write to Cal Mode Sel field Cal Mux En A one 1 in this field indicates the Cal Mux is enabled A zero 0 in this field indicates the Cal Mux is disabled high impedance This bit reflects the state of the last write to Cal Mux En field Cal Mux Chan Address This field returns the channel selected for calibration This bit reflects the state of the last write to Cal Mux Chan Address ...

Страница 132: ...is set to one 1 A D Scale This bit changes the A D scaling When set to 0 normal A D scaling is used When set to 1 A D scaling is divided by 13 7 This bit is used by self test to test gain and offset DACs Card Configuration Register The Card Configuration Register returns information about the module configuration and terminal module in use Address Base 0A16 Bit 15 14 13 12 11 10 09 08 07 06 05 04 ...

Страница 133: ...any value desired by shorting the line to ground Refer to the diagram on page 30 for the line locations 133 HP E1418A Register Based Programming Appendix B ...

Страница 134: ...ize channels programmed for triggered operation Address Base 0E16 Bit 15 14 13 12 11 10 09 08 07 06 05 04 03 02 01 00 READ Trig Syst En Unused Trigger Out Trigger Mode Trigger Source WRITE Trig Syst En Writing a one 1 to this field enables the trigger system Writing a zero 0 disables the trigger system Trigger Out This field selects which VXIbus trigger line will be driven when the trigger mode is...

Страница 135: ...135 HP E1418A Register Based Programming Appendix B ...

Страница 136: ...e of the VXI backplane TTL trigger lines To set the VXIbus SYNC trigger mode the Trigger Mode field is set to SYNC 00 and the Trigger Source field is set to one of the TTLTRIG lines The Trigger Out field is not used OUTPUT mode This mode allows the card to receive a trigger from one TTL trigger line and also source a trigger on another TTL trigger line The output mode is not a VXIbus defined trigg...

Страница 137: ...06 05 04 03 02 01 00 READ Ch 16 ISO Ch 15 ISO Ch 14 ISO Ch 13 ISO Ch 12 ISO Ch 11 ISO Ch 10 ISO Ch 09 ISO Ch 08 ISO Ch 07 ISO Ch 06 ISO Ch 05 ISO Ch 04 ISO Ch 03 ISO Ch 02 ISO Ch 01 ISO Ch XX ISO Each field will return a one 1 if the channel has a non isolated plug on installed A zero 0 indicates an isolating plug on is installed Notes A channel will not function without a plug on module installed...

Страница 138: ... in a field indicates that the P J jumper is in the program selectable position A zero 0 indicates the P J jumper is set to the jumper selectable position When the P J jumper is in the program selectable position 1 the channel can be programmed to either the voltage or current mode from the VXIbus backplane When the P J jumper is in the jumper selectable position 0 the voltage or current output mo...

Страница 139: ... 0 in a field indicates a trigger will have no effect on the channel The trigger events are set in the Trigger Control Register Notes You can output an immediate value on a channel that has been set for triggered operation by writing a value to the Main_DAC Immediate Register The trigger mode for that channel is changed to the immediate write thru mode You can set a value on a channel to be applie...

Страница 140: ...jumper programming on the terminal module Note Channels 09 through 16 will return ones 1 if the module is configured as an 8 channel device Channel Relay Control Register The Channel Relay Control Register programs and reports the state of each channel relay Address Base 1C16 Bit 15 14 13 12 11 10 09 08 07 06 05 04 03 02 01 00 READ Ch 16 Relay Ch 15 Relay Ch 14 Relay Ch 13 Relay Ch 12 Relay Ch 11 ...

Страница 141: ...n before the contents of the non volatile memory can be altered A24 Window Writing a value to this field sets which 16 register wide portion of A24 registers can be accessed via A16 registers 2016 to 3E16 The registers mapped for each value are shown below and in Figure B 3 on page 117 A24 Window Value A24 Registers Mapped 016 A16 0016 through 1E16 116 A16 2016 through 3E16 216 Main_DAC Immediate ...

Страница 142: ...Base 5E16 Bit 15 14 13 12 11 10 09 08 07 06 05 04 03 02 01 00 WRITE Output Value Output Value Writing a 16 bit value to this field outputs the value on the channel selected by the base address The 16 bit value is a 2 s complement number Scaling is based upon 16 V maximum for voltage mode and 020 Amps for current mode Main_DAC Triggered Registers The Main_DAC Triggered Registers are used to program...

Страница 143: ... the base address Values are in the range 00016 maximum positive offset 80016 nominal zero offset FFF16 maximum negative offset Note A different offset value is required for voltage and current output operation Gain_DAC Registers The Gain_DAC Registers are used to program the next gain value on a channel There are 16 registers one for each output channel The register at base A016 programs channel ...

Страница 144: ...tage Offset Calibration Constant Voltage Offset Calibration Constant Writing a 12 bit value to this field stores a new constant used to calibrate the channel output Values are in the range 00016 maximum positive offset 80016 nominal zero offset FFF16 maximum negative offset Notes Registers 0010016 through 001BE16 are located in non volatile FLASH memory Writing to this memory requires a complicate...

Страница 145: ...lue to this field stores a new constant used to calibrate the channel output The 16 bit value is a 2 s compliment number Values are in the range 00016 minimum gain 80016 nominal gain FFF16 maximum gain Notes Registers 0010016 through 001BE16 are located in non volatile FLASH memory Writing to this memory requires a complicated sequence of register accesses not documented here It is recommended tha...

Страница 146: ...a 16 bit value to this field sets a new constant used to calibrate the channel output Values are in the range 00016 maximum positive offset 80016 nominal zero offset FFF16 maximum negative offset Notes Registers 0010016 through 001BE16 are located in non volatile FLASH memory Writing to this memory requires a complicated sequence of register accesses not documented here It is recommended that cali...

Страница 147: ...t Writing a 16 bit value to this field sets a new constant used to calibrate the channel output Values are in the range 00016 minimum gain 80016 nominal gain FFF16 maximum gain Notes Registers 0010016 through 001BE16 are located in non volatile FLASH memory Writing to this memory requires a complicated sequence of register accesses not documented here It is recommended that calibration be performe...

Страница 148: ...2 01 00 READ Ch 16 Volt Cal Stat Ch 15 Volt Cal Stat Ch 14 Volt Cal Stat Ch 13 Volt Cal Stat Ch 12 Volt Cal Stat Ch 11 Volt Cal Stat Ch 10 Volt Cal Stat Ch 09 Volt Cal Stat Ch 08 Volt Cal Stat Ch 07 Volt Cal Stat Ch 06 Volt Cal Stat Ch 05 Volt Cal Stat Ch 04 Volt Cal Stat Ch 03 Volt Cal Stat Ch 02 Volt Cal Stat Ch 01 Volt Cal Stat WRITE Ch XX Cal Stat This field is set to a one 1 when the channel ...

Страница 149: ...rr Cal Stat WRITE Ch XX Curr Cal Stat This field is set to a one 1 when the channel has been successfully current calibrated This field is set to a zero 0 when the channel is not current calibrated Notes This register is not set or used by the hardware The HP E1418A SCPI driver if used to calibrate the module automatically sets the bits in this register If you use register programming to calibrate...

Страница 150: ...annel was performed with the channel configured as non isolated This field is set to a zero 0 when the channel was last calibrated in the isolated configuration Notes This register is not set or used by the hardware The HP E1418A SCPI driver if used to calibrate the module automatically sets the bits in this register If you use register programming to calibrate this module you may wish to use this...

Страница 151: ... Status Register the Current Calibration Status Register the Calibration Isolation Status Register and the Calibration Card Configuration Register are used together to maintain the overall calibration status of the module Changes in the values of the configuration field indicate a change in the module configuration and may indicate the need to recalibrate the module This register is non volatile a...

Страница 152: ...t register access to set a calibrated voltage output The example is in HP BASIC and uses a command module controlled via HP IB 679 Reg_offset 0 0 ID Logical Address Register 680 Reg_offset 1 2 Device Type Register 681 Reg_offset 2 4 Status Control Register 682 Reg_offset 3 6 VXI Offset Register 683 Reg_offset 4 8 Calibration Control Register 684 Reg_offset 5 10 Card Configuration Register 685 Reg_...

Страница 153: ...on channel 3 1000 1001 Write_a16 Reg_offset 15 8 Map A 24 voltage offset cal registers 1002 Off_con FNRead_a16 Reg_offset 18 Get the channel 3 voltage offset cal 1003 Write_a16 Reg_offset 15 4 Map A 24 channel offset registers 1004 Write_a16 Reg_offset 18 Off_con Put in the offset constant 1005 Write_a16 Reg_offset 15 9 Map A 24 voltage gain cal registers 1006 Gain_con FNRead_a16 Reg_offset 18 Get...

Страница 154: ... HP E1405 E1406 Command Module User s Manual for a description of these errors 299 to 200 Execution Errors instrument driver detected errors See Table C 2 for these values also see the HP E1405 E1406 Command Module User s Manual for further details 399 to 300 Device Specific Errors instrument driver errors that are not command or execution errors See Table C 2 for these values also see the HP E140...

Страница 155: ...le configuration For example n is set to 11 on an 8 channel configuration 3000 Trigger too fast The trigger was received before the module completed the last command 3002 Self Test Failed A hardware failure was detected during power up self test Additional self test information is given in Appendix E beginning on page 169 3004 Multiple attempts to erase non volatile Memory failed Attempts to erase...

Страница 156: ...ibration Memory Calibration constants in RAM are corrupted Recalibration is needed 3012 Channel cannot be programmed to this mode check jumpers An attempt to set the channel output mode when the P J jumper is set to Jumper selectable and the mode is set by the V I jumper 3013 Waiting for Trigger An attempt to change a channel output value or mode was made after the trigger system in the wait for t...

Страница 157: ...Notes 156 HP E1418A Error Messages Appendix C ...

Страница 158: ... Packard Sales and Service Office for additional information The HP E1418A Specifications Appendix A require that the operation temperature is within 5 C of the calibration temperature The module temperature is affected by both the ambient temperature and the cooling performance of the mainframe Because VXI mainframes have significantly different cooling capabilities the most accurate calibration ...

Страница 159: ...ly daily for example write the new calibration constants into RAM but do not write to non volatile memory The adjustment procedures shown in this appendix demonstrate both methods of writing calibration constants Equipment Required The following equipment is recommended for calibration and adjustment Key specifications are listed to allow for equipment substitutions Model Requirements Digital Mult...

Страница 160: ... or permanent refer to the discussion on page 158 If Permanent 1 Turn off the mainframe 2 Remove the terminal module see page 26 3 Remove the module from the mainframe see page 21 4 Set the Cal Store Enable Jumper to the CAL position as shown in Figure D 1 5 Reinstall the module in the mainframe 6 Make the CAL output terminal connections on the terminal module 7 Install the terminal module 8 Apply...

Страница 161: ... a 0 7 Repeat steps 1 through 6 for each channel The first query CALibrationn CONFigure VOLTage sets the channel to the calibration mode and returns a 1 when the channel is ready for calibration When a 1 is returned the channel output voltage is set to the first adjustment point Read the output voltage on the DMM and return the value obtained using the CALibrationn VALue VOLTage query This query r...

Страница 162: ...Figure D 2 Voltage Calibration Connections CAL Figure D 3 Voltage Calibration Connections CHAN Appendix D Voltage Current Output Adjustment 161 ...

Страница 163: ...or external is not stored When using the internal resistor value the general procedure is 1 Make the connections shown in Figure D 4 2 Send the CALibration CONFigure RESistance query to the module and read the response until a 1 is returned typically the first query response 3 Read the resistance on the DMM 4 Send the DMM value read to the module using the CALibration VALue RESistance command The ...

Страница 164: ...Figure D 4 Resistance Calibration Connections CAL Appendix D Voltage Current Output Adjustment 163 ...

Страница 165: ...two of the CALibration subsystem queries Current adjustment requires voltage measurements Figure D 5 Current Calibration Connections CAL Figure D 6 Current Calibration Connections CHAN 164 Voltage Current Output Adjustment Appendix D ...

Страница 166: ... DMM and return the value obtained using the CALn VAL CURR value query This query returns an integer indicating the calibration state of the channel A value other than 0 or 2 from this query indicates additional values are needed Each channel will require multiple iterations of the CALn VAL CURR value query A minimum of 9 queries to a maximum of 50 queries will be required at each channel During t...

Страница 167: ...ary FUNCTION PROTOTYPES void main void void err_handler ViSession vi ViStatus x VTL error routine void sys_err ViSession resource Checks for SCPI programming errors void pause Waits for a keystroke to continue program execution int config_check Checks and reports the module configuration returns the number of channels in module float get_voltage Obtains the measured voltage float get_resistance Ob...

Страница 168: ...I_SUCCESS err_handler dac err meas_res get_resistance err viPrintf dac CAL VAL RES f n meas_res Send the resistance value if err VI_SUCCESS err_handler dac err channel current output adjustment for i 1 i num_chan 1 i result 0 while result 1 err viPrintf dac CAL d CONF CURR n i Configure for calibration if err VI_SUCCESS err_handler dac err err viScanf dac d result Enter integer returned returns a ...

Страница 169: ...ON CONSTANTS err viPrintf dac CAL STOR OPC n Store the new cal constants if err VI_SUCCESS err_handler dac err err viScanf dac d result if err VI_SUCCESS err_handler dac err sys_err dac 168 Voltage Current Output Adjustment Appendix D ...

Страница 170: ...Notes Appendix D Voltage Current Output Adjustment 169 ...

Страница 171: ...ections describe how to check or change this configuration Checking Configuration Use the following SCPI command to check the configuration of a module You can also use this command to verify changes you make to the configuration Additional programming information is given Chapter 2 and Chapter 3 An example of checking the configuration is shown on page 40 Check the configuration by sending this q...

Страница 172: ...16 bits are set to 1 4th Value Returned Indicates the state of the V I jumper on the terminal module as either current or voltage when the P J jumper is in the jumper selectable position See page 76 for additional information 5th Value Returned Indicates the state of the channel output relay See page 76 for additional information 6th Value Returned Indicates the state of the P J jumper on the term...

Страница 173: ...atic safe workstations Tools Needed T10 Torx Driver one is provided in the kit Static Safe Workstation Static Wrist Strap Procedure Refer to Figures E 1 and E 2 during these procedures 1 Remove the top cover Refer to Figure E 1 2 Remove the screw holding the sheet metal spacer and save the screw Remove and discard the sheet metal spacer 3 Place expansion board over the main board component sides f...

Страница 174: ...Figure E 1 8 Channel Disassembly 172 Configuration and Disassembly Appendix E ...

Страница 175: ...Figure E 2 16 Channel Disassembly Appendix E Configuration and Disassembly 173 ...

Страница 176: ...er to Figures E 1 and E 2 during these procedures 1 Remove the top cover 2 Remove the screw holding the sheet metal spacer Figure E 1 or expansion board Figure E 2 Remove the spacer or expansion board 3 Refer to Figure E 3 for the locations of the isolated non isolated plug on modules Each channel must have a plug on module Remove the screw securing the plug on module s 4 Use Figure E 4 to identif...

Страница 177: ...Figure E 3 Plug on Channel Locations Figure E 4 Installing Plug on Modules Appendix E Configuration and Disassembly 175 ...

Страница 178: ...escribed in this manual The test number is the number of the first test to fail This number can be used to isolate a failing assembly The possible test numbers and probable failing assembly are shown below Test Number Failing Assembly Indicated Notes 0 None All Self tests passed 1 Main Board 2 through 9 Main Board or Plug On Modules Test 2 channel 1 Test 3 channel 2 etc 10 through 17 Expansion Boa...

Страница 179: ...a 16 channel device you must remove the expansion board before sending the exchange part CAUTION Almost all electrical components can be damaged by electrostatic discharge ESD during handling Component damage can occur at electrostatic discharge voltages as low as 50 volts Disassemble and reconfigure only in a static free work area Minimize handling of assemblies and components Keep all assemblies...

Страница 180: ...not send plug on modules with the exchange assembly 4 Package the assembly in static safe packaging material 5 Include a description of the problem encountered as well as your phone number and return address 178 Configuration and Disassembly Appendix E ...

Страница 181: ...9 logical 19 115 registers 115 118 120 space defined 115 118 space inside command module 118 space outside command module 118 window addressing 117 Adjustments 158 170 current output 163 165 166 equipment required 159 procedure 160 voltage output 161 162 ANSI C 39 APPLy Subsystem 45 46 63 64 APPLyn CURRent 45 46 53 63 APPLyn VOLTage 45 46 53 64 Assembly Exchange 179 Attaching terminal module 25 B ...

Страница 182: ...nt offset calibration registers 146 current output connections 33 current output connections combining 34 current output connections querying 85 87 current output connections specifying 63 84 86 current output mode 13 45 88 140 gain value 143 isolated output 14 15 isolated plug on module 15 17 mode change 46 mode register 121 140 non isolated output 14 15 non isolated plug on module 17 output line...

Страница 183: ... 40 106 INITiate subsystem 79 linking 61 LMC 106 OPC 106 OPC 56 106 167 OUTPut subsystem 46 80 82 PMC 106 quick reference 106 111 quick reference IEEE common commands 106 quick reference SCPI commands 107 111 RMC 106 RST 53 106 121 SCPI format 59 60 SOURce subsystem 50 52 83 93 SRE 97 106 SRE 106 STATus subsystem 94 98 STB 106 SYSTem subsystem 99 TEST subsystem 100 102 TRG 106 TRIGger subsystem 10...

Страница 184: ...84 86 channel output mode 13 45 88 DC specifications 112 gain calibration constant 147 mode calibration 70 72 73 offset calibration constant 146 output adjustment D DC Current Specifications 112 DC Voltage Specifications 112 Declaration of Conformity 9 Description 13 functional 16 registers 128 132 134 136 152 Device driver 37 ID register 121 type register 129 DIAGnostic Subsystem 75 78 DIAG CAL O...

Страница 185: ...ion for isolated channels 113 rating maximum 34 57 113 status of each channel 150 status register 121 137 J Jumper CAL store enable 20 160 channel program jumper register 121 138 output mode 31 P J 17 31 52 121 138 program selectable 31 V I 17 31 52 L LADDR 19 LMC 106 LO Channel Output Line 33 Logical Address 19 115 Logical Address register 128 LS Channel Output Line 33 M Main_DAC immediate regist...

Страница 186: ...15 29 ordering 15 terminal module 15 Output accuracy 112 113 CAL terminals 36 70 71 75 159 changing value 51 channel current 13 45 88 channel current connections 33 channel current connections combining 34 channel current connections querying 85 87 channel current connections specifying 63 84 86 channel isolated 14 15 channel non isolated 14 15 channel voltage 13 45 88 channel voltage connections ...

Страница 187: ...ice identification 40 44 error queue 47 event register contents 96 98 operation status register 96 output relay state 82 questionable status register 98 self test results 101 trigger source 104 TTLTRG line state 81 voltage calibration path 76 voltage calibration process 73 74 Questionable Data Bit 97 Questionable Status condition register 97 event register 97 register 94 98 Quick Reference common ...

Страница 188: ...ediate registers 142 Main_DAC triggered registers 142 manufacturer ID 121 manufacturer ID register 128 map 117 maps A16 A24 122 maps A24 123 126 128 module serial number registers 152 offset 120 Offset_DAC registers 143 operation status register 94 96 questionable status register 94 98 reset states 121 software trigger register 134 standard event register 94 status byte register 97 summary registe...

Страница 189: ...m 94 98 STAT OPER CONDition 95 STAT OPER ENABle 95 STAT OPER ENABle 96 STAT OPER EVENt 96 STAT PRESet 96 STAT QUES CONDition 97 STAT QUES ENABle 97 STAT QUES ENABle 98 STAT QUES EVENt 98 STB 106 Subsystems SCPI Commands ABORt 62 APPLy 45 46 63 64 CALibration 65 74 DIAGnostic 75 78 INITiate 79 OUTPut 46 80 82 SOURce 50 52 83 93 STATus 94 98 SYSTem 99 TEST 100 102 TRIGger 103 105 Summary Register 95...

Страница 190: ...l output connections 33 channel output connections combining 34 57 channel output connections querying 91 93 channel output connections specifying 64 90 92 channel output mode 13 45 88 DC specifications 112 gain calibration constant 145 mode calibration 71 73 74 offset calibration constant 144 output adjustment 158 170 VTL 40 47 VXI offset register 130 status control register 129 130 VXIbus 13 bac...

Страница 191: ...volatile FLASH memory 144 147 159 Offset_DAC registers 143 software trigger register 134 trigger control register 134 136 voltage calibration status register 148 VXI offset register 130 VXI status control register 130 HP E1418A 8 16 Channel D A Converter Module Index 191 ...

Страница 192: ...Notes 192 HP E1418A 8 16 Channel D A Converter Module Index ...

Отзывы: