background image

Removal and Replacement Procedures 

Dual Port Fibre Channel Adapter 

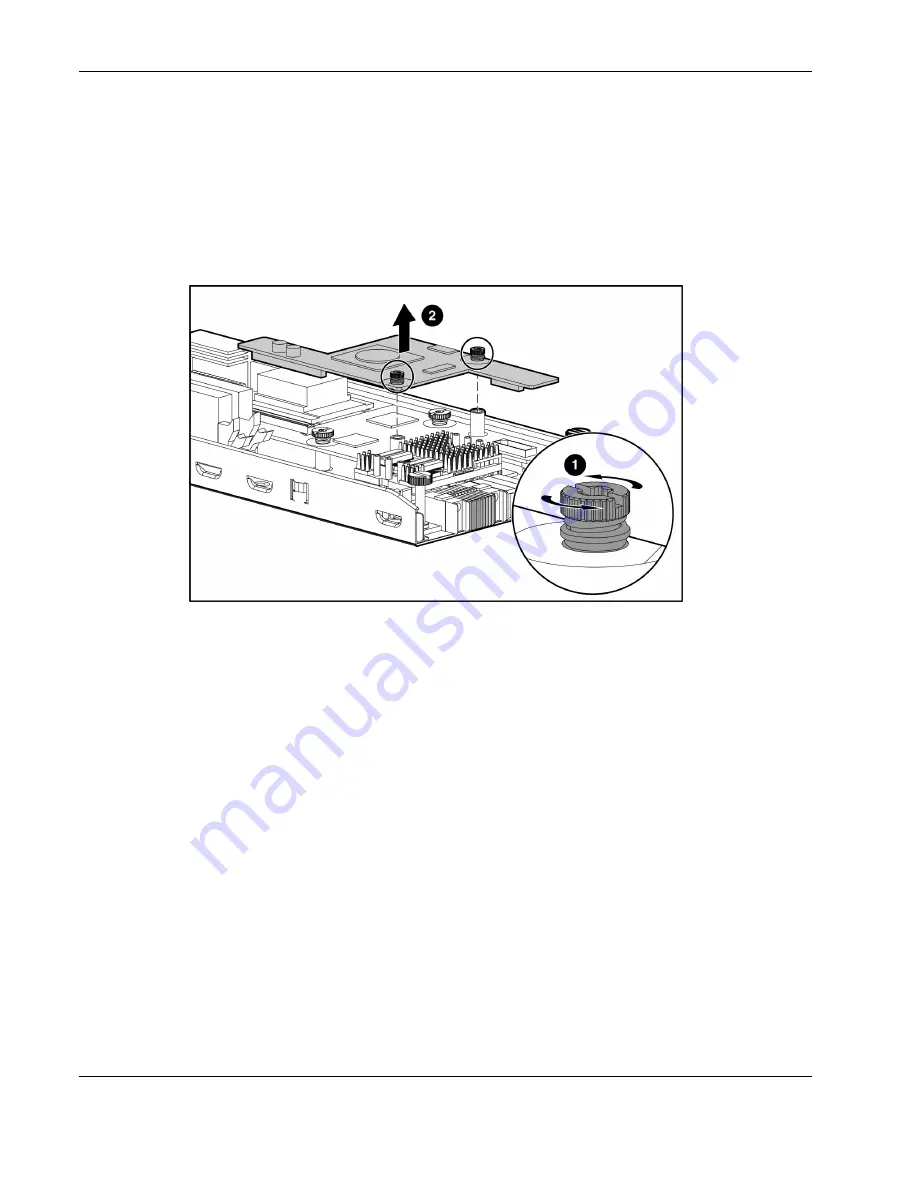
To remove the Dual Port Fibre Channel (FC) adapter: 

1.  Power down the server blade and remove it from the server blade enclosure. Refer to the 

“Server Blad e Preparation” section in this chapter. 

2.  Loosen the thumbscrews (1). 

3.  Remove the FC Adapter (2). 


Figure 2-20:  Removing the Dual Port Fibre Channel adapter 

Reverse steps 1 through 3 to replace the FC adapter. 

2-18


HP ProLiant BL30p Server Blade Maintenance and Service Guide 


Содержание BL30p - ProLiant - 1 GB RAM

Страница 1: ...HP ProLiant BL30p Server Blade Maintenance and Service Guide May 2004 First Edition Part Number 354537 001 ...

Страница 2: ...herein should be construed as constituting an additional warranty HP shall not be liable for technical or editorial errors or omissions contained herein Microsoft and Windows are U S registered trademarks of Microsoft Corporation Intel and Xeon are trademarks or registered trademarks of Intel Corporation or its subsidiaries in the United States and other countries HP ProLiant BL30p Server Blade Ma...

Страница 3: ...tatic Discharge Information 2 1 Server Blade Warnings and Cautions 2 1 Rack Warnings and Cautions 2 2 Symbols on Equipment 2 3 Server Blade Components 2 3 Server Blade Preparation 2 4 Hard Drives 2 6 DIMMs 2 11 Processors and Heatsinks 2 12 Fan Assembly 2 17 Dual Port Fibre Channel Adapter 2 18 NIC Riser Board 2 19 Power Converter Module 2 20 Power Button LED Cable 2 21 Server Blade Handle 2 22 Sy...

Страница 4: ...hes Connectors 4 1 ProLiant BL30p Server Blade 4 1 Local I O Cable 4 5 LEDs 4 8 ProLiant BL30p Server Blade Front Panel 4 8 Switches and Buttons 4 10 Power On Standby Button 4 10 System Switches 4 11 Chapter 5 Server Blade Specifications ProLiant BL30p Server Blade 5 1 ATA Hard Drive 5 2 Index iv HP ProLiant BL30p Server Blade Maintenance and Service Guide ...

Страница 5: ...ir Because of the complexity of the individual boards and subassemblies no one should attempt to make repairs at the component level or to make modifications to any printed wiring board Improper repairs can create a safety hazard WARNING To reduce the risk of personal injury from electric shock and hazardous energy levels do not exceed the level of repairs specified in these procedures Because of ...

Страница 6: ...tem Common Practices Guide HP ProLiant BL p Class System Setup and Installation Guide HP ProLiant BL p Class System Hardware Installation and Configuration Instructions HP ProLiant Servers Troubleshooting Guide Altiris eXpress Deployment Server for HP ProLiant Servers User Guide HP Integrated Lights Out User Guide ROM Based Setup Utility User Guide White Paper HP ProLiant BL p Class System Overvie...

Страница 7: ...reseller In the United States call 1 800 345 1518 In Canada call 1 800 263 5868 For HP technical support In the United States and Canada call 1 800 633 3300 Outside the United States and Canada refer to www hp com HP ProLiant BL30p Server Blade Maintenance and Service Guide vii ...

Страница 8: ...s chapter provides illustrated parts and spare parts lists for the HP ProLiant BL30p server blade components Refer to Table 1 1 for the names of referenced spare parts HP ProLiant BL30p Server Blade Maintenance and Service Guide 1 1 ...

Страница 9: ...Illustrated Parts Catalog ProLiant BL30p Server Blade Components System Exploded View Figure 1 1 System exploded view 1 2 HP ProLiant BL30p Server Blade Maintenance and Service Guide ...

Страница 10: ...Illustrated Parts Catalog BL30p Server Blade Sleeve and Blanks Exploded View Figure 1 2 Sleeve and blanks exploded view HP ProLiant BL30p Server Blade Maintenance and Service Guide 1 3 ...

Страница 11: ...ith 2 MB cache includes one heatsink 360316 001 Reserved 3 Fan assembly 361748 001 4 NIC riser board 361745 001 5 Power converter module 361752 001 Miscellaneous 6 Hardware kit 361750 001 6a Server blade blank 6b Drive cage assembly 6c Processor blank 7 Cable kit 361749 001 7a LED cable 7b Hard drive cable 8 Replacement battery 3 V lithium 234556 001 9 Local I O cable 355935 001 10 Heatsink 361747...

Страница 12: ...on Spare Part Number Options 12 Dual Port Fibre Channel Adapter 361744 001 13 Hard drive 60 GB 361751 001 14 RJ 45 Patch Panel 2 with Fibre Channel support 322299 001 15 Transceiver 2 GB Fibre Channel 229204 001 16 GbE2 Interconnect Switch 321148 001 17 ProLiant BL30p blade sleeve cover 361881 001 18 ProLiant BL30p blade sleeve board 361746 001 Not shown ...

Страница 13: ...atic damage observe the following precautions Transport products in static safe containers such as conductive tubes bags or boxes Keep electrostatic sensitive parts in their containers until they arrive at static free stations Cover workstations with approved static dissipating material Use a wrist strap connected to the work surface and properly grounded tools and equipment Keep the work area fre...

Страница 14: ...erson MUST assist with aligning the enclosure with the rails while the other two people support the weight of the enclosure WARNING To reduce the risk of personal injury or damage to the equipment be sure that The leveling jacks of the rack are extended to the floor The full weight of the rack rests on the leveling jacks The stabilizers are attached to the rack if it is a single rack installation ...

Страница 15: ...NG To reduce the risk of personal injury or damage to the equipment observe local occupational health and safety requirements and guidelines for manual material handling Any surface or area of the equipment marked with these symbols indicates the presence of a hot surface or hot component WARNING To reduce the risk of injury from a hot component allow the surface to cool before touching it To redu...

Страница 16: ...n and off The standby position removes power from most electronics and the drives but portions of the power supply and some internal circuitry remain active To service internal server blade components 1 Identify the proper server blade in the server blade enclosure 2 Remove power from the server blade in one of the following ways Use the Virtual Power Button feature in iLO to power down the server...

Страница 17: ...the server blade on a flat level surface CAUTION Always populate server blade enclosure bays with either a server blade or server blade blank Operating the enclosure without a server blade or server blade blank results in improper airflow and improper cooling that can lead to thermal damage Reverse steps 1 through 3 to install and power up a server blade Server blades are set to power up automatic...

Страница 18: ...blade data 2 Remove the server blade from the server blade enclosure Refer to Server Blad e Preparation in this chapter Figure 2 2 Removing the drive cage assembly Figure 2 3 Removing the cover plate from the drive cage assembly 2 6 HP ProLiant BL30p Server Blade Maintenance and Service Guide ...

Страница 19: ...eplacement Procedures Figure 2 4 Removing a hard drive from the drive cage assembly Figure 2 5 Removing the center plate from the drive cage assembly HP ProLiant BL30p Server Blade Maintenance and Service Guide 2 7 ...

Страница 20: ... Removing a second hard drive IMPORTANT Be sure the hard drive label is on the top side of the hard drive when installed in the drive cage assembly Figure 2 7 Replacing a hard drive 2 8 HP ProLiant BL30p Server Blade Maintenance and Service Guide ...

Страница 21: ... the following figure The pins must be pointed down when being installed into the main cage Figure 2 9 Replacing cover plate on the drive cage assembly IMPORTANT Be sure to connect the hard drive in the primary bottom bay to the primary bottom connector on the hard drive cable and connect the hard drive in the secondary top bay to the secondary top connector on the hard drive cable HP ProLiant BL3...

Страница 22: ...Removal and Replacement Procedures Figure 2 10 Reinstalling the drive cage assembly 2 10 HP ProLiant BL30p Server Blade Maintenance and Service Guide ...

Страница 23: ... 3 Remove the DIMM from the slot 2 Figure 2 11 Removing a DIMM IMPORTANT For proper DIMM configuration refer to the HP ProLiant BL30p Server Blade Setup and Installation Guide CAUTION Use only HP DIMMs DIMMs from other sources may adversely affect data integrity IMPORTANT DIMMs do not seat fully if turned the wrong way Reverse steps 1 through 3 to replace a DIMM NOTE Installing DIMMs in pairs allo...

Страница 24: ...nly one processor in the server blade be sure to install a processor blank in processor socket 2 A processor blank may need to be removed before installing an additional processor Figure 2 12 Removing a processor blank 2 12 HP ProLiant BL30p Server Blade Maintenance and Service Guide ...

Страница 25: ...e a processor 1 Remove the heatsink 3 CAUTION The heatsink is not reusable and must be discarded if removed from the processor after application Figure 2 13 Removing the heatsink HP ProLiant BL30p Server Blade Maintenance and Service Guide 2 13 ...

Страница 26: ...AUTION When installing the processor into the socket be sure that the locking lever is raised to avoid damaging pins 1 Align the processor and install the processor into the socket 1 2 Close the processor locking lever 2 Figure 2 15 Replacing the processor 2 14 HP ProLiant BL30p Server Blade Maintenance and Service Guide ...

Страница 27: ...ge to the processor and its socket requiring replacement of the system board 3 Remove the thermal interface media cover from the heatsink Figure 2 16 Removing the thermal interface media cover CAUTION After the cover is removed do not touch the thermal interface media IMPORTANT The heatsink is not reusable and must be discarded if removed from the processor after application HP ProLiant BL30p Serv...

Страница 28: ...5 Close the heatsink brace 2 6 Close the heatsink locking lever 3 Figure 2 17 Replacing the heatsink CAUTION If installing only one processor in the server blade be sure to install a processor blank in processor socket 2 2 16 HP ProLiant BL30p Server Blade Maintenance and Service Guide ...

Страница 29: ...apter 2 Lay the server blade on a flat stable surface 3 Disconnect the two fan cables from the system board Figure 2 18 Disconnecting fan cables 4 Squeeze the retaining clips on the fan assembly 1 and lift the fan assembly from the retaining brackets 2 Figure 2 19 Removing the fan assembly Reverse steps 1 through 4 to replace the fan assembly HP ProLiant BL30p Server Blade Maintenance and Service ...

Страница 30: ...blade and remove it from the server blade enclosure Refer to the Server Blad e Preparation section in this chapter 2 Loosen the thumbscrews 1 3 Remove the FC Adapter 2 Figure 2 20 Removing the Dual Port Fibre Channel adapter Reverse steps 1 through 3 to replace the FC adapter 2 18 HP ProLiant BL30p Server Blade Maintenance and Service Guide ...

Страница 31: ...er to the Server Blad e Preparation section in this chapter 2 Remove the FC adapter Refer to Dual Port Fibre Channel Adapter in this chapter 3 Loosen the thumbscrews 1 4 Remove the NIC riser board 2 Figure 2 21 Removing the NIC riser board Reverse steps 1 through 4 to replace the NIC riser board HP ProLiant BL30p Server Blade Maintenance and Service Guide 2 19 ...

Страница 32: ...e the FC adapter Refer to Dual Port Fibre Channel Adapter in this chapter 3 Remove the NIC riser board Refer to NIC Rise r Board in this chapter 4 Release the two clips securing the power converter module to the system board 1 5 Remove the power converter module 2 Figure 2 22 Removing the Power Converter Module Reverse steps 1 through 5 to replace the power converter module 2 20 HP ProLiant BL30p ...

Страница 33: ...1 Power down the server blade and remove it from the server blade enclosure Refer to the Server Blad e Preparation section in this chapter 2 Remove the cable Figure 2 23 Removing the power button LED cable Use the same connectors in the illustration to replace the power button LED cable HP ProLiant BL30p Server Blade Maintenance and Service Guide 2 21 ...

Страница 34: ...ver blade and remove it from the server blade enclosure Refer to Server Blad e Preparation in this chapter 2 Remove the screw attaching the handle to the server blade 3 Remove the handle Be sure to keep the screw and the spring that is underneath the handle for replacement onto the new system board assembly Figure 2 24 Removing the server blade handle To replace the server blade handle 1 Place the...

Страница 35: ...nd Heatsinks in this chapter 5 Remove the fan assembly Refer to Fan Assembly in this chapter 6 Remove the dual port Fibre Channel adapter Refer to Dual Port Fibre Channel Adapter in this chapter 7 Remove the NIC riser board Refer to NIC Rise r Board in this chapter 8 Remove the server blade handle Refer to Server Bla de Handle in this chapter IMPORTANT The server blade handle must be retained The ...

Страница 36: ...emble crush puncture short external contacts or dispose of in fire or water Replace only with the spare designated for this product CAUTION Loss of BIOS settings occurs if the lithium battery is removed BIOS settings must be reconfigured whenever the battery is replaced CAUTION Batteries battery packs and accumulators should not be disposed of along with general household waste In order to forward...

Страница 37: ...e Preparation in this chapter 2 Locate the battery holder on the system board 3 Remove the existing battery by pushing the tab aside and pulling the battery straight up Figure 2 25 Removing the system board battery To install the system board battery push it into the socket until the tab locks in place HP ProLiant BL30p Server Blade Maintenance and Service Guide 2 25 ...

Страница 38: ... server blade or sleeve in an enclosure without enhanced backplane components can damage the power subsystem The blade sleeve is released from the enclosure when both BL30p server blades are removed from it To remove a blade sleeve 1 Remove any server blades Refer to Ser ver Blade Preparation in this chapter 2 Remove the blade sleeve using the grip hole Figure 2 26 Removing the blade sleeve 2 26 H...

Страница 39: ... blade sleeve Figure 2 27 Removing the blade sleeve access panel 2 Loosen the thumbscrews on the outside of the blade sleeve 1 3 Remove the screws from the blade sleeve board 2 and remove the blade sleeve 3 Figure 2 28 Removing the blade sleeve board Reverse steps 1 through 3 to replace the blade sleeve board HP ProLiant BL30p Server Blade Maintenance and Service Guide 2 27 ...

Страница 40: ...lanks exist for the HP ProLiant BL p Class System A 6U blank is installed in the server blade enclosure in place of a 6U server blade or blade sleeve and a 3U server blade blank is installed in the blade sleeve in place of a 3U server blade To remove a server blade blank from the enclosure or a blade sleeve press the release buttons simultaneously and slide out the server blade blank Figure 2 29 R...

Страница 41: ...roLiant BL30p Server Blade Maintenance and Service Guide 2 29 Figure 2 30 Removing a 3U server blade blank from a blade sleeve To replace a server blade blank align the blank with the empty bay and slide it in until the blank is fully seated ...

Страница 42: ...very logs the error information to the IML resets the server blade and tries to restart the operating system Run RBSU and set ASR to enable this tool HP Diagnostics HP Diagnostics tests and verifies operation of HP hardware If HP Diagnostics finds a hardware failure it isolates the replaceable part if possible Access HP Diagnostics when POST detects a system configuration error For a complete list...

Страница 43: ...tility from the HP website www hp com Survey Utility Survey Utility gathers critical hardware and software information on server blades If a significant change occurs between data gathering intervals the Survey Utility marks the previous information and overwrites the survey text files to reflect the latest changes in the configuration The Survey Utility is available on the HP ProLiant Essentials ...

Страница 44: ...tation that ships with the software ROM Based Setup Utility RBSU RBSU configures the hardware installed in the server blade This utility enables users to perform the following functions Store configuration information in nonvolatile memory Manage memory installation processor upgrades network interface cards and mass storage devices Assist in installing an operating system Configure ports and IRQs...

Страница 45: ...s The server blade has one front panel connector for configuration and troubleshooting purposes Figure 4 1 ProLiant BL30p I O port NOTE The rear iLO port is disabled when iLO is accessed through the I O port on the front panel HP ProLiant BL30p Server Blade Maintenance and Service Guide 4 1 H ...

Страница 46: ...y ProLiant BL30p server blade rear panel connectors Figure 4 2 ProLiant BL30p server blade rear panel connectors Table 4 1 ProLiant BL30p Server Blade Rear Panel Connectors Item Description 1 Signal connector 2 Power connector 4 2 HP ProLiant BL30p Server Blade Maintenance and Service Guide ...

Страница 47: ...Ds and Switches System Board Components and Connectors Use Figure 4 3 and Table 4 2 to identify ProLiant BL30p system board components and connectors HP ProLiant BL30p Server Blade Maintenance and Service Guide 4 3 ...

Страница 48: ...Connectors LEDs and Switches Figure 4 3 ProLiant BL30p system board components and connectors 4 4 HP ProLiant BL30p Server Blade Maintenance and Service Guide HP ...

Страница 49: ...onnector do not provide permanent connections CAUTION Disconnect the local I O cable when not in use The port and connector do not provide a permanent connection Rear iLO connector performance degrades when the local I O cable is in use even when the iLO connector on the cable is not in use CAUTION Always match the I O cable labeled with the I O icon to the I O port also labeled with the I O icon ...

Страница 50: ...hes Refer to Figure 4 4 to identify the I O icon Refer to Figure 4 5 and Table 4 3 to identify local I O cable connectors Figure 4 4 Local I O cable and I O icon 4 6 HP ProLiant BL30p Server Blade Maintenance and Service Guide ...

Страница 51: ...al connector 5 iLO RJ 45 10 100 Ethernet connector IMPORTANT Completely log out of the current iLO session before removing the local I O cable Removing the cable before logging out of the current iLO session or while the UID LED is blinking will result in a 5 to 7 minute delay while the iLO NIC re establishes a connection HP ProLiant BL30p Server Blade Maintenance and Service Guide 4 7 H ...

Страница 52: ...ront Panel Six LEDs on the front of the server blade indicate server status Use Figure 4 6 and Table 4 4 to identify LED locations and functions Figure 4 6 ProLiant BL30p server blade front panel LEDs 4 8 HP ProLiant BL30p Server Blade Maintenance and Service Guide ...

Страница 53: ...cal status 3 Server Blade NIC 1 LED 4 Server Blade NIC 2 LED Green Linked to network Green flashing Network activity Off No activity 5 Server Blade Hard Drive Activity LED Green Flashing Activity Off No activity 6 Power On Standby Green On Amber Standby power available Off Unit off The NIC 1 and NIC 2 numeration provided in this table is for general purpose only Actual numeration depends on factor...

Страница 54: ...utton and system switches Power On Standby Button Setting the server blade Power On Standby button to the standby position removes power from most areas of the server blade This process may take 30 seconds during which time some internal circuitry remains active 4 10 HP ProLiant BL30p Server Blade Maintenance and Service Guide ...

Страница 55: ...d diagnostic procedures Use Figure 4 7 to identify the system maintenance switch location Figure 4 7 Server blade system switches Refer to the HP ProLiant BL30p Setup and Installation Guide or to the hood label on the server blade for the switch functions HP ProLiant BL30p Server Blade Maintenance and Service Guide 4 11 ...

Страница 56: ... may instruct you to perform the following procedures Clear the system configuration Access the redundant ROM Clearing the System Configuration To clear the system configuration 1 Power down the server blade Press the Power On Standby button on the front of the server blade Use the virtual power button feature in the iLO remote console 2 Disconnect the server blade from all power sources Remove th...

Страница 57: ... 9 Repeat steps 5 through 7 IMPORTANT When the server blade boots after NVRAM is cleared a delay of up to 2 minutes is normal During this delay the system appears non functional Do not attempt any procedures during the delay HP ProLiant BL30p Server Blade Maintenance and Service Guide 4 13 ...

Страница 58: ...Disconnect the server blade from the diagnostic station 3 Change positions 1 5 and 6 of SW1 to on 4 Connect the server blade to system power Install the server blade in the enclosure Connect the server blade to the diagnostic station 5 Power up the server blade Press the Power On Standby button on the front of the server blade Use the virtual power button feature in the iLO remote console 6 As soo...

Страница 59: ... operating 1 Shipping Storage 40 to 60 C 40 to 140 F 20 to 60 C 4 to 140 F Relative humidity 2 noncondensing Operating 2 10 to 90 Non operating 2 Shipping Storage 10 to 90 10 to 95 Maximum wet bulb temperature 30 C 86 F 1 Operating temperature has an altitude derating of 1 C per 304 8 m 1 8 F per 1 000 ft No direct sunlight Upper operating limit is 3 048 m 10 000 ft or 70 Kpa 10 1 psia Upper non o...

Страница 60: ...fications Feature 60 GB 5400 RPM Hard Drive Capacity 60 000 MB Height 9 5 mm 0 37 in Size Width Height Diameter 70mm 2 76 in 9 5mm 37 in 100mm 3 94 in Interface ATA 5 IDE 100 MB s Transfer rate 17 5 31 MB s Rotation Speed 5 400 RPM Bytes per sector 512 Logical blocks 117 210 240 LBA Operating temperature 10 C to 35 C 50 F to 95 F Ambient ...

Страница 61: ...nfiguring 2 24 blade sleeve board removing 2 27 F replacing 2 27 fan assembly blade sleeve board spare part number 1 5 removing 2 17 blade sleeve cover spare part number 1 5 replacing 2 17 blade sleeve removing 2 26 spare part number 1 4 blank fan assembly connectors location 4 5 processor 2 12 2 16 fan assembly location 4 5 server blade 2 28 buttons Power On Standby 2 4 4 10 G C GbE2 Interconnect...

Страница 62: ...ical support vii powering down server blade 2 4 processor assembly I removing 2 13 replacing 2 14 icon I O 4 6 processor blank 2 12 2 16 iLO RBSU See Integrated Lights Out ROM Based Setup Utility iLO RBSU processor sockets location 4 5 processors replacing 2 15 IML See Integrated Management Log IML installing See replacing R Integrated Lights Out ROM Based Setup Utility iLO RBSU rack access 3 2 ca...

Страница 63: ... powering down 2 4 removing 2 5 replacing 2 5 spare parts list 1 4 specifications 5 1 system switches 4 11 warnings 2 1 server blade blank removing 2 28 replacing 2 29 specifications hard drive 5 2 server blade 5 1 Survey Utility access 3 2 description 3 2 switches NMI 4 12 server blade system 4 11 symbols on equipment 2 3 system board assembly 2 23 system maintenance switch location 4 5 T technic...

Отзывы: