background image

5.

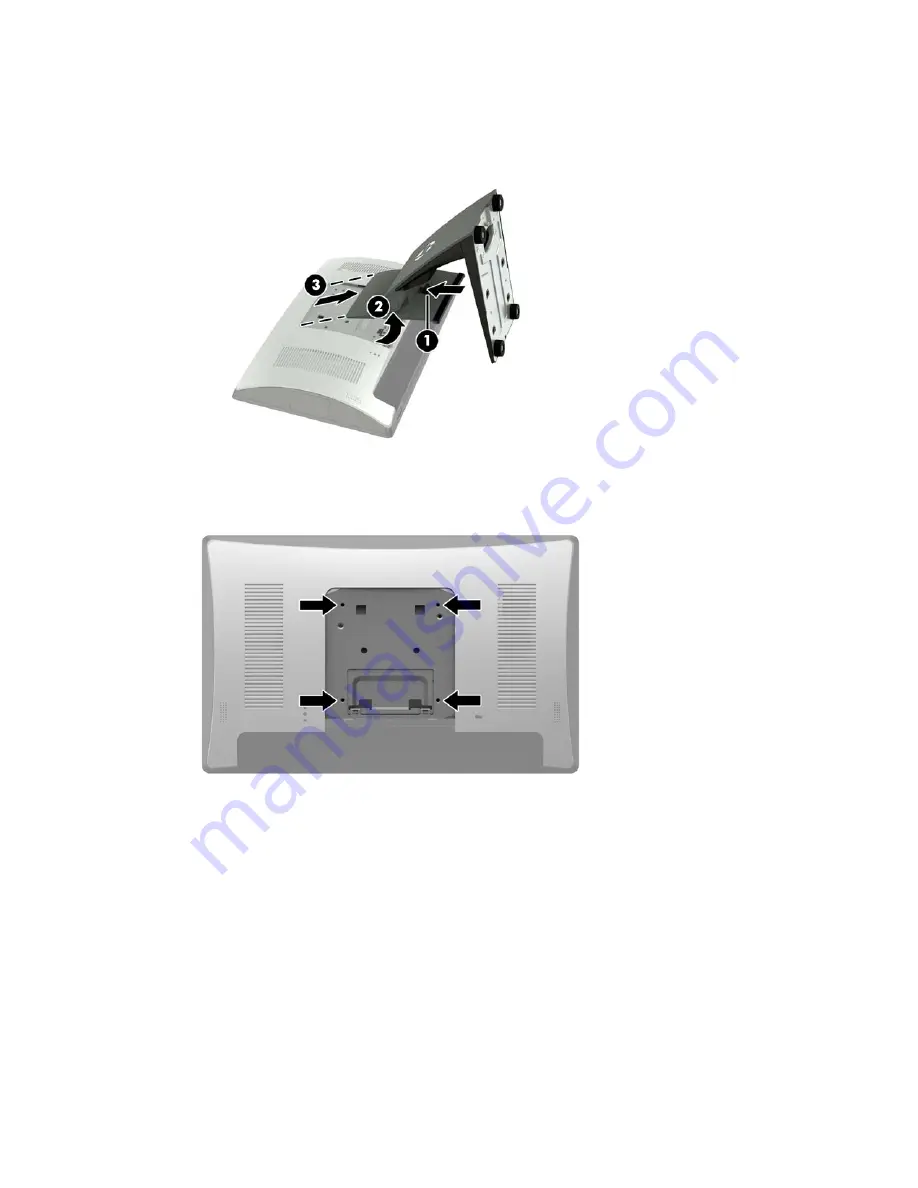
To remove the compact stand, lay the RP9 face down on a flat surface covered by a soft clean cloth. Push 

up the release latch on the rear of the display head (1), tilt the stand back (2), and then lift up from the 

display (3).

6.

To mount the display head to a wall or swing arm, use the 100 mm x 100 mm VESA mounting holes on 

the rear of the display head.

Removing and attaching the ergonomic and compact stands

7

Содержание 9015

Страница 1: ...Hardware Reference Guide HP RP9 G1 Retail System ...

Страница 2: ...atures are available in all editions of Windows 8 This computer may require upgraded and or separately purchased hardware drivers and or software to take full advantage of Windows 8 functionality See http www microsoft com for details This computer may require upgraded and or separately purchased hardware and or a DVD drive to install the Windows 7 software and take full advantage of Windows 7 fun...

Страница 3: ...s manner indicates that failure to follow directions could result in bodily harm or loss of life CAUTION Text set off in this manner indicates that failure to follow directions could result in damage to equipment or loss of information NOTE Text set off in this manner provides important supplemental information iii ...

Страница 4: ...iv About This Book ...

Страница 5: ...rcode scanner on the bottom of the display head 17 Installing a 2 x 20 LCD or 7 LCD customer facing display CFD 18 Installing a top mount CFD 18 Installing a bottom mount CFD 20 Installing memory 22 DDR4 SDRAM SODIMMs 22 Removing and installing a SODIMM 22 Removing and installing a 2 5 inch hard drive 26 Removing and installing an M 2 storage device 29 Replacing the battery 34 Installing a port co...

Страница 6: ... or webcam 42 Configuring powered serial ports 42 Appendix A Electrostatic discharge 43 Preventing electrostatic damage 43 Grounding methods 43 Appendix B Computer operating guidelines routine care and shipping preparation 44 Computer operating guidelines and routine care 44 Touch screen maintenance 44 Shipping preparation 45 Index 46 vi ...

Страница 7: ...Optional Integrated HP peripherals Integrated magnetic strip reader left mount or right mount options encryption capable 2 x 20 LCD customer facing display rear top mount or bottom mount with extension arm 7 LCD customer facing display rear top mount or bottom mount with extension arm Two integrated barcode scanners one with left mount or right mount options and one bottom mount only Integrated we...

Страница 8: ...bit Windows 7 Professional Edition 64 bit Windows 8 1 Pro 64 bit One M 2 slot for optional WLAN Two USB 2 0 ports and two USB 3 0 ports One 24V powered USB port and three 12V powered USB ports two powered serial ports and one cash drawer port Audio line in and line out ports One DisplayPort for secondary display One 2 5 internal storage bay for SATA HDD or SSD Two M 2 internal storage bays Cable m...

Страница 9: ...ystem is shipped with the stand in the folded position Follow the steps below to unfold the stand 1 Unfold the stand to the desired position 2 Route the DC power cord through the cable retainer and connect the cord to the rear I O power connector Unfolding the ergonomic stand 3 ...

Страница 10: ...Powered serial port COM A 15 USB 3 0 ports 7 Powered serial port COM B 16 RJ 45 network connector 8 DisplayPort for secondary display 17 Audio line in connector 9 Powered USB 12V A 18 Audio line out connector NOTE The powered serial ports can be configured for 0V 5V or 12V NOTE The 24 volt Powered USB connector and the 12 volt Powered USB connector are keyed differently as a precaution to prevent ...

Страница 11: ...read the Safety Comfort Guide It describes proper workstation setup posture and health and work habits for computer users and provides important electrical and mechanical safety information This guide is located on the Web at http www hp com ergo WARNING Energized and moving parts inside Disconnect power to the equipment before removing the enclosure Replace and secure the enclosure before turning...

Страница 12: ...liant with the VESA standard and is rated to support the weight of the system Follow the steps below to remove the stand mount the RP9 to a wall mount or swing arm and to install the stand 1 Shut down the computer properly through the operating system then turn off any external devices 2 Disconnect the power cord from the power outlet CAUTION Regardless of the power on state voltage is always pres...

Страница 13: ...Push up the release latch on the rear of the display head 1 tilt the stand back 2 and then lift up from the display 3 6 To mount the display head to a wall or swing arm use the 100 mm x 100 mm VESA mounting holes on the rear of the display head Removing and attaching the ergonomic and compact stands 7 ...

Страница 14: ...e the bottom of the stand mount down onto the display head so that it snaps in place 2 8 To attach the compact stand lay the RP9 face down on a flat surface covered by a soft clean cloth Slide the tabs on the top of the stand mount into the slots on the display head 1 and then rotate the bottom of the stand mount down onto the display head so that it snaps in place 2 8 Chapter 2 Hardware upgrades ...

Страница 15: ...base and out the underside of the base 2 5 Reconnect the power cord and press the power button Routing cables compact stand 1 Shut down the computer properly through the operating system then turn off any external devices 2 Disconnect the power cord from the power outlet CAUTION Regardless of the power on state voltage is always present on the system board as long as the system is plugged into an ...

Страница 16: ...om the power outlet CAUTION Regardless of the power on state voltage is always present on the system board as long as the system is plugged into an active AC outlet You must disconnect the power cord and wait approximately 30 seconds for the power to drain to avoid damage to the internal components of the computer 3 Unplug the DC power cable from the connector on the rear of the display head 4 Pul...

Страница 17: ...pward 6 Lay the RP9 face down on a flat surface covered by a soft clean cloth Lift the pull tab and loosen the screw on the bottom plate of the stand 1 then lift the bottom of the plate up 2 and then pull the plate off the stand 3 Removing and replacing the power supply ergonomic stand 11 ...

Страница 18: ... the new power supply s power cord through the hole in the center of the base and connect it to the DC power connector on the rear panel 1 Place the new power supply into the stand s base 2 and then connect the AC power cord to the side of the power supply 3 and route the cord through the retainer slot on the base 12 Chapter 2 Hardware upgrades ...

Страница 19: ...ase plate into the slots on the base 1 rotate the plate onto the base 2 and then tighten the base plate screw 3 10 Snap the right side cover back onto the stand s base Removing and replacing the power supply ergonomic stand 13 ...

Страница 20: ... that can be installed on the bottom of the display head Installing an optional HP integrated USB module on the sides or top of the display head The procedure for installing a module is the same for all modules whether it is on the left side the right side or the top of the display head 1 Shut down the computer properly through the operating system then turn off any external devices 2 Disconnect t...

Страница 21: ...ve the two screws that secure the port cover 1 and then pull the port cover off the display head 2 NOTE You may need to gently loosen the port cover from inside of the screw holes with a flat screwdriver Installing an optional HP integrated USB barcode scanner magnetic strip reader MSR biometric reader or webcam 15 ...

Страница 22: ...viously removed 2 7 Align the tabs on the rear cover with the slots on the display head while placing the cover on the display head and then slide the cover down so that it snaps in place 8 Reconnect all cables to the rear I O connectors 9 Reconnect the power cord and press the power button 16 Chapter 2 Hardware upgrades ...

Страница 23: ...roximately 30 seconds for the power to drain to avoid damage to the internal components of the computer 3 Disconnect all cables from the rear I O connectors 4 Slide the cover on the barcode scanner down and then lift the cover up to remove it 1 Plug the barcode scanner into the rear I O Powered USB 12V B connector 2 and then secure the barcode scanner with the screw provided 3 Replace the barcode ...

Страница 24: ...stem then turn off any external devices 2 Disconnect the power cord from the power outlet CAUTION Regardless of the power on state voltage is always present on the system board as long as the system is plugged into an active AC outlet You must disconnect the power cord and wait approximately 30 seconds for the power to drain to avoid damage to the internal components of the computer 3 Disconnect a...

Страница 25: ...eed to gently loosen the port cover from inside of the screw holes with a flat screwdriver 6 Align the tabs on the rear cover with the slots on the display head while placing the cover on the display head and then slide the cover down so that it snaps in place Installing a 2 x 20 LCD or 7 LCD customer facing display CFD 19 ...

Страница 26: ...mount CFD 1 Shut down the computer properly through the operating system then turn off any external devices 2 Disconnect the power cord from the power outlet CAUTION Regardless of the power on state voltage is always present on the system board as long as the system is plugged into an active AC outlet You must disconnect the power cord and wait approximately 30 seconds for the power to drain to av...

Страница 27: ...hen secure the bracket with the screw 2 6 Route the CFD cable up through the center hole in the base and connect it to a USB port on the rear I O 7 Reconnect the power cord and press the power button Installing a 2 x 20 LCD or 7 LCD customer facing display CFD 21 ...

Страница 28: ... NOTE The system will not operate properly if you install unsupported SODIMMs Removing and installing a SODIMM CAUTION You must disconnect the power cord and wait approximately 30 seconds for the power to drain before replacing the memory module Regardless of the power on state voltage is always supplied to the memory module as long as the computer is plugged into an active AC outlet Adding or rem...

Страница 29: ...ways supplied to the memory module as long as the computer is plugged into an active AC outlet Adding or removing a memory module while voltage is present may cause irreparable damage to the memory module or system board 3 Disconnect all cables from the rear I O connectors 4 Press the two rear cover latches outward 1 Slide the rear cover up and then lift it off the display head 2 5 Use the finger ...

Страница 30: ...hat the latches lock it in place NOTE A memory module can be installed in only one way Match the notch on the module with the tab on the memory socket 8 To replace the rear metal shield slide the outer tabs on each side of the bottom of the shield under the metal framework on the display head and the center tab on each side above the metal framework 1 and then rotate the top of the shield onto the...

Страница 31: ...r on the display head and then slide the cover down so that it snaps in place 10 Reconnect all cables to the rear I O connectors 11 Reconnect the power cord and press the power button The computer automatically recognizes the additional memory when you turn on the computer Installing memory 25 ...

Страница 32: ... voltage is always present on the system board as long as the system is plugged into an active AC outlet You must disconnect the power cord and wait approximately 30 seconds for the power to drain to avoid damage to the internal components of the computer 3 Disconnect all cables from the rear I O connectors 4 Press the two rear cover latches outward 1 Slide the rear cover up and then lift it off t...

Страница 33: ...he drive back and lift it out of the drive bay 3 7 If replacing the drive remove the four mounting screws from the drive and install them in the new drive NOTE If you need mounting screws for the drive four extra mounting screws are installed on the drive bay frame Removing and installing a 2 5 inch hard drive 27 ...

Страница 34: ... 9 To replace the rear metal shield slide the outer tabs on each side of the bottom of the shield under the metal framework on the display head and the center tab on each side above the metal framework 1 and then rotate the top of the shield onto the display head so that it snaps in place 2 28 Chapter 2 Hardware upgrades ...

Страница 35: ...ted under the 2 5 drive bay 1 Shut down the computer properly through the operating system then turn off any external devices 2 Disconnect the power cord from the power outlet CAUTION Regardless of the power on state voltage is always present on the system board as long as the system is plugged into an active AC outlet You must disconnect the power cord and wait approximately 30 seconds for the po...

Страница 36: ...es outward 1 Slide the rear cover up and then lift it off the display head 2 5 Use the finger slots on the rear metal shield to pull the top of the shield up and then lift the shield off the display head 30 Chapter 2 Hardware upgrades ...

Страница 37: ...e back and lift it out of the drive bay 3 7 To remove an M 2 storage device remove the screw that secures the device to the system board 1 so that the end pops up 2 and then slide the device out of the connector 3 NOTE Due to the small size of the screw a magnetized screwdriver may be helpful to remove the screw Removing and installing an M 2 storage device 31 ...

Страница 38: ...ngle 1 Rotate the other end of the device down 2 and then secure the device with the screw that was either previously removed or preinstalled in the screw hole 3 9 Replace the 2 5 drive if it was removed Place the drive down into the drive bay slide the drive forward 1 and then connect the cable to the rear of the drive 2 32 Chapter 2 Hardware upgrades ...

Страница 39: ...then rotate the top of the shield onto the display head so that it snaps in place 2 11 Align the tabs on the rear cover with the slots on the display head while placing the cover on the display head and then slide the cover down so that it snaps in place 12 Reconnect all cables to the rear I O connectors 13 Reconnect the power cord and press the power button Removing and installing an M 2 storage ...

Страница 40: ...uipment Before beginning these procedures ensure that you are discharged of static electricity by briefly touching a grounded metal object NOTE The lifetime of the lithium battery can be extended by plugging the computer into a live AC wall socket The lithium battery is only used when the computer is NOT connected to AC power HP encourages customers to recycle used electronic hardware HP original ...

Страница 41: ...from its holder squeeze the metal clamp that extends above one edge of the battery When the battery pops up lift it out 1 7 To insert the new battery slide one edge of the replacement battery under the lip of the holder with the positive side up Push the other edge down until the clamp snaps over the other edge of the battery 2 Replacing the battery 35 ...

Страница 42: ...rk 1 and then rotate the top of the shield onto the display head so that it snaps in place 2 9 Align the tabs on the rear cover with the slots on the display head while placing the cover on the display head and then slide the cover down so that it snaps in place 10 Reconnect all cables to the rear I O connectors 11 Reconnect the power cord and press the power button 36 Chapter 2 Hardware upgrades ...

Страница 43: ...ower outlet CAUTION Regardless of the power on state voltage is always present on the system board as long as the system is plugged into an active AC outlet You must disconnect the power cord and wait approximately 30 seconds for the power to drain to avoid damage to the internal components of the computer 3 If securing an ergonomic stand there are two screw holes accessible through the center of ...

Страница 44: ... off the neck of the stand 1 and then slide the base cover forward and lift it off the base 2 5 Fasten the compact stand to the counter top using the appropriate fastening devices not provided by HP for your surface 38 Chapter 2 Hardware upgrades ...

Страница 45: ... and then snap the neck cover onto the neck of the stand 2 7 Reconnect the power cord and press the power button Installing an external security lock Cable lock A cable lock can be used to secure the RP9 to an external object Installing an external security lock 39 ...

Страница 46: ...the base of the loop into the slots on the rear panel 1 and then secure the loop to the rear panel with the screw 2 NOTE The padlock security loop and screw are provided with the RP9 2 Connect a cable that is attached to an external object to the padlock and insert the padlock into the security loop 40 Chapter 2 Hardware upgrades ...

Страница 47: ...sional and Embedded 8 1 Industry Pro Retail 1 Launch the Control Panel You can type Control Panel in the Search box to access it 2 In the Control Panel type calibrate in the Search box Under Tablet PC Settings tap the Calibrate the screen for pen or touch input link In the Tablet PC Settings dialog box tap the Calibrate button then proceed to step 3 3 Follow the on screen instructions to press the...

Страница 48: ...ed serial port If the serial port is configured as a powered port devices that support a powered serial interface do not require an external power source CAUTION The system must be powered off before connecting or disconnecting serial port devices NOTE The computer ships with all serial ports configured in standard non powered serial mode 0 Volts by default The serial ports can be configured using...

Страница 49: ... several methods for grounding Use one or more of the following methods when handling or installing electrostatic sensitive parts Use a wrist strap connected by a ground cord to a grounded workstation or computer chassis Wrist straps are flexible straps with a minimum of 1 megohm 10 percent resistance in the ground cords To provide proper ground wear the strap snug against the skin Use heelstraps ...

Страница 50: ...f the following Wipe the exterior of the computer with a soft damp cloth as needed Using cleaning products may discolor or damage the finish Occasionally clean the fins on the rear panel to keep them free of lint dust and other foreign matter that may inhibit heat dissipation from the fins NOTE For more information on your retail system care and maintenance refer to Retail Point of Sales Systems R...

Страница 51: ... system power is turned off 2 Remove and store all removable media 3 Turn off the computer and external devices 4 Disconnect the power cord from the electrical outlet then from the computer 5 Disconnect the system components and external devices from their power sources then from the computer 6 Pack the system components and external devices in their original packing boxes or similar packaging wit...

Страница 52: ...replacing 6 routing cables 9 securing to counter top 37 unfolding 3 F features 1 H hard drive removing and installing 26 I installation guidelines 5 integrated USB peripherals configuring 42 installing 14 18 M M 2 storage device removing and installing 29 magnetic strip reader MSR installation 14 memory removing and installing 22 specifications 22 P port cover 37 R rear components 4 S security loc...

Отзывы: