background image

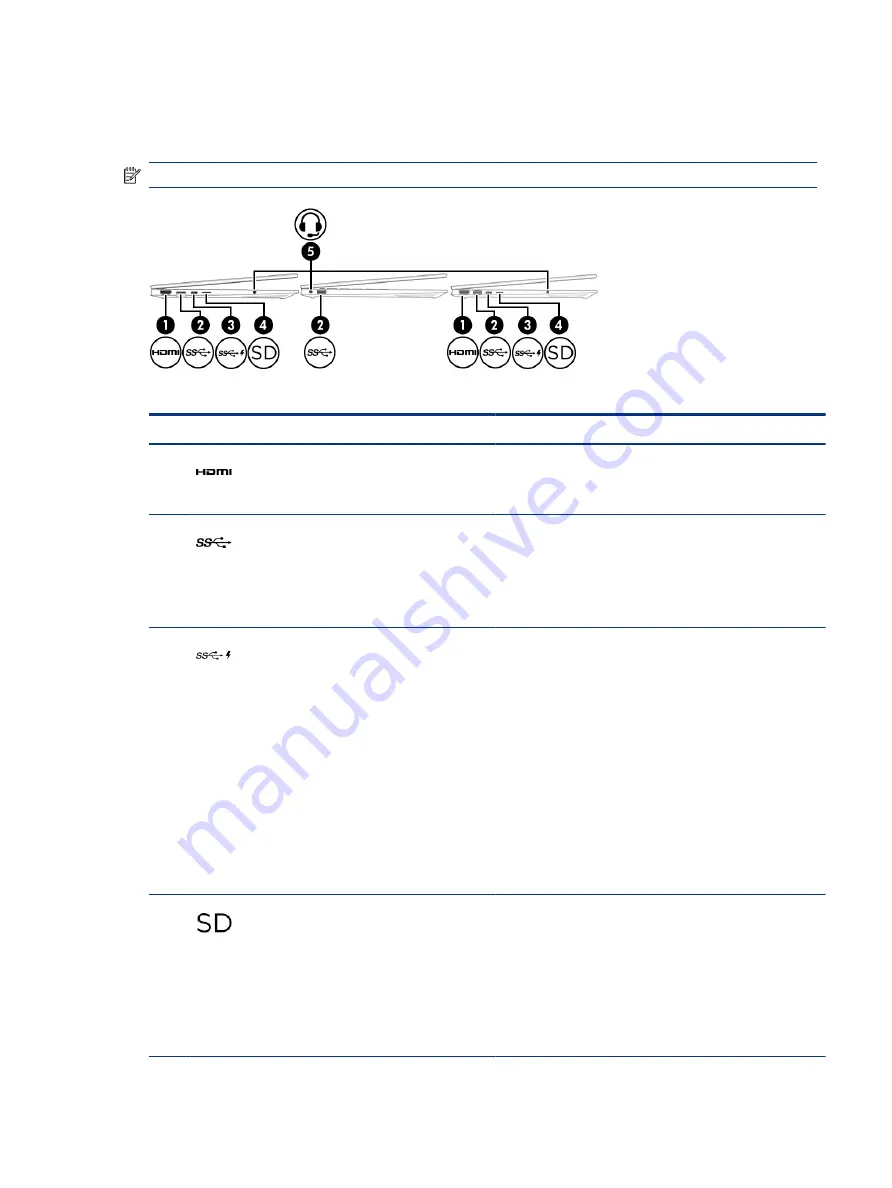
Left side

Identify the components on the left side of the computer.

NOTE:

Refer to the illustration that most closely matches your computer.

Table 2-2

Left-side components and their descriptions

Component

Description

(1)

HDMI port 

Connects an optional video or audio device, such as a high­

definition television, any compatible digital or audio component, 

or a high-speed High-Definition Multimedia Interface (HDMI) 

device.

(2)

USB SuperSpeed 5 Gbps port

Connects a USB device, provides high-speed data transfer, 

and (for select products) charges small devices (such as a 

smartphone) when the computer is on or in Sleep mode.

NOTE:

Use a standard USB Type-A charging cable or cable 

adapter (purchased separately) when charging a small external 

device.

(3)

USB Type-C power connector and SuperSpeed 

10 Gbps port with DisplayPort output 

Connects an AC adapter that has a USB Type-C connector, 

supplying power to the computer and, if needed, charging the 

computer battery.

– and –

Connects a USB device, provides high-speed data transfer, 

and (for select products) charges small devices (such as a 

smartphone) when the computer is on or in Sleep mode.

NOTE:

Use a standard USB Type-C charging cable or cable 

adapter (purchased separately) when charging a small external 

device.

– and –

Connects a display device that has a USB Type-C connector, 

providing DisplayPort output.

(4)

microSD memory card reader (select products 

only)

Reads optional memory cards that enable you to store, manage, 

share, or access information.

To insert a card:

1.

Hold the card label-side up, with connectors facing the 

computer.

2.

Insert the card into the memory card reader, and then 

press in on the card until it is firmly seated.

Left side

5

Содержание 597Y5EA

Страница 1: ...User Guide SUMMARY This guide provides information about components network connection power management security backing up and more ...

Страница 2: ...or omissions contained herein First Edition August 2021 Document Part Number M76350 001 Product notice This guide describes features that are common to most products Some features might not be available on your computer Not all features are available in all editions or versions of Windows Systems might require upgraded and or separately purchased hardware drivers software or BIOS update to take fu...

Страница 3: ...ct the computer air vents Use the computer only on a hard flat surface Do not allow another hard surface such as an adjoining optional printer or a soft surface such as pillows or rugs or clothing to block airflow Also do not allow the AC adapter to come into contact with the skin or a soft surface such as pillows or rugs or clothing during operation The computer and the AC adapter comply with the...

Страница 4: ...eron N28xx N29xx N30xx N31xx series processor and a Windows operating system If your computer is configured as described do not change the processor configuration setting in msconfig exe from 4 or 2 processors to 1 processor If you do so your computer will not restart You will have to perform a factory reset to restore the original settings iv Processor configuration setting select products only ...

Страница 5: ...n vent and fingerprint reader 9 Special keys 11 Action keys 12 Bottom 14 Labels 14 3 Connecting to a network 17 Connecting to a wireless network 17 Using the wireless controls 17 Airplane mode key 17 Operating system controls 17 Connecting to a WLAN 18 Using HP Mobile Broadband select products only 18 Using eSIM select products only 19 Using GPS select products only 19 Using Bluetooth wireless dev...

Страница 6: ...e finger tap touchpad and precision touchpad 29 Four finger tap touchpad and precision touchpad 30 Three finger swipe touchpad and precision touchpad 30 Four finger swipe precision touchpad 30 One finger slide touch screen 31 Using an optional keyboard or mouse 31 Using an on screen keyboard select products only 31 6 Managing power 32 Using Sleep and Hibernation 32 Initiating and exiting Sleep 32 ...

Страница 7: ...asswords 44 Setting Windows passwords 44 Setting Setup Utility BIOS passwords 45 Using Windows Hello select products only 46 Using internet security software 46 Using antivirus software 46 Using firewall software 46 Installing software updates 47 Using HP TechPulse select products only 47 Securing your wireless network 47 Backing up your software applications and information 47 Using an optional s...

Страница 8: ... Remote HP PC Hardware Diagnostics UEFI 56 Downloading the latest Remote HP PC Hardware Diagnostics UEFI version 56 Downloading Remote HP PC Hardware Diagnostics UEFI by product name or number 56 Customizing Remote HP PC Hardware Diagnostics UEFI settings 56 11 Backing up restoring and recovering 58 Backing up information and creating recovery media 58 Using Windows tools for backing up 58 Using t...

Страница 9: ...Legislation and regulations 67 Useful accessibility resources and links 67 Organizations 67 Educational institutions 67 Other disability resources 68 HP links 68 Contacting support 68 Index 69 ix ...

Страница 10: ...x ...

Страница 11: ...P Support Assistant app select products only HP Support Assistant optimizes computer performance and resolves problems using the latest software updates diagnostic tools and guided assistance Select the Search icon in the taskbar type support in the search box and then select HP Support Assistant More HP resources To locate resources that provide product details how to information and more use thi...

Страница 12: ...ct the Search icon in the taskbar type support in the search box and then select HP Documentation or Go to http www hp com go orderdocuments IMPORTANT You must be connected to the internet to access the latest version of the user guide Specific warranty information about this computer You can find your HP Limited Warranty located with the user guides on your product and or on the CD or DVD provide...

Страница 13: ...your computer right click the Start button and then select Apps and Features Right side Identify the components on the right side of the computer NOTE Refer to the illustration that most closely matches your computer Table 2 1 Right side components and their descriptions Component Description 1 USB SuperSpeed 5 Gbps port Connects a USB device provides high speed data transfer and for select produc...

Страница 14: ...t with DisplayPort output Connects an AC adapter that has a USB Type C connector supplying power to the computer and if needed charging the computer battery and Connects a USB device provides high speed data transfer and for select products charges small devices such as a smartphone when the computer is on or in Sleep mode NOTE Use a standard USB Type C charging cable or cable adapter purchased se...

Страница 15: ... 3 USB Type C power connector and SuperSpeed 10 Gbps port with DisplayPort output Connects an AC adapter that has a USB Type C connector supplying power to the computer and if needed charging the computer battery and Connects a USB device provides high speed data transfer and for select products charges small devices such as a smartphone when the computer is on or in Sleep mode NOTE Use a standard...

Страница 16: ...elect HP Documentation NOTE When a device is connected to the jack the computer speakers are disabled Display The computer display can include essential components such as speakers antennas cameras and microphones Low blue light mode select products only Your computer display is shipped from the factory in low blue light mode for improved eye comfort and safety Also blue light mode automatically a...

Страница 17: ...4 Camera light On The camera is in use The antennas are not visible from the outside of the computer For optimal transmission keep the areas immediately around the antennas free from obstructions For wireless regulatory notices see the section of the Regulatory Safety and Environmental Notices that applies to your country or region To access this guide Select the Search icon in the taskbar type HP...

Страница 18: ... button If you are not using an external mouse press the Tab key repeatedly until the pointer rests on the touchpad button Then press the spacebar to select the button Touchpad components Identify the touchpad components Table 2 4 Touchpad components and their descriptions Component Description 1 Touchpad zone Reads your finger gestures to move the pointer or activate items on the screen NOTE For ...

Страница 19: ... 3 Power light On The computer is on Blinking select products only The computer is in the Sleep state a power saving state The computer shuts off power to the display and other unnecessary components Off Depending on your computer model the computer is off in Hibernation or in Sleep Hibernation is the power saving state that uses the least amount of power Button vent and fingerprint reader Identif...

Страница 20: ...l fan to cycle on and off during routine operation 2 Power button When the computer is off press the button briefly to turn on the computer When the computer is on press the button briefly to initiate Sleep When the computer is in the Sleep state press the button briefly to exit Sleep select products only When the computer is in Hibernation press the button briefly to exit Hibernation IMPORTANT Pr...

Страница 21: ...r descriptions Component Description 1 esc key Displays system information when pressed in combination with the fn key 2 fn key Executes specific functions when pressed in combination with another key 3 Windows key Opens the Start menu NOTE Pressing the Windows key again will close the Start menu 4 Action keys Execute frequently used system functions as defined by the icon symbols on f1 through f1...

Страница 22: ...ric keypad A separate keypad to the right of the alphabet keyboard When num lock is pressed the keypad can be used like an external numeric keypad NOTE If the keypad function is active when the computer is turned off that function is reinstated when the computer is turned back on Action keys Identify the action keys The action keys execute frequently used system functions as defined by the icon sy...

Страница 23: ... you adjust the keyboard backlight setting the backlight will revert to your previous setting each time you turn on the computer The keyboard backlight will turn off after 30 seconds of inactivity To turn the keyboard backlight back on press any key or tap the touchpad select products only To conserve battery power turn off this feature Plays the previous track of an audio CD or the previous secti...

Страница 24: ... with the computer Labels can be in paper form or imprinted on the product IMPORTANT Check the following locations for the labels described in this section the bottom of the computer inside the battery bay under the service door on the back of the display or on the bottom of a tablet kickstand Service label Provides important information to identify your computer When contacting support you might ...

Страница 25: ...t ID 3 HP product name and model number Table 2 11 Service label components Component 1 HP product name 2 Model number 3 Product ID 4 Serial number 5 Warranty period Table 2 12 Service label components Component 1 HP product name 2 Model number 3 Warranty period Labels 15 ...

Страница 26: ...latory labels Provide regulatory information about the computer Wireless certification labels Provide information about optional wireless devices and the approval markings for the countries or regions in which the devices have been approved for use 16 Chapter 2 Getting to know your computer ...

Страница 27: ...ire states regions or even countries Bluetooth device Creates a personal area network PAN to connect to other Bluetooth enabled devices such as computers phones printers headsets speakers and cameras In a PAN each device communicates directly with other devices and devices must be relatively close together typically within 10 m approximately 33 ft of each other Using the wireless controls You can ...

Страница 28: ...er the Advanced network settings section select Network and Sharing Center 3 Select Set up a new connection or network A list of options is displayed which allows you to manually search for and connect to a network or to create a new network connection 3 Follow the on screen instructions to complete the connection After the connection is made right click the network status icon at the far right of...

Страница 29: ...le operator for personal use If you travel you can connect in more places by finding mobile operators with plans in that area You can implement eSIMs in two ways The eSIM chip can be embedded eUICC The notebook then operates as a dual SIM one as eUICC and the second as standard micro or nano SIM card on a SIM card tray Only one SIM can be active at a time A removable physical eSIM is placed on a S...

Страница 30: ...t appear in the list be sure that Bluetooth on that device is turned on Some devices might have additional requirements see the documentation provided with the device Connecting to a wired network LAN select products only Use a LAN connection if you want to connect the computer directly to a router in your home instead of working wirelessly or if you want to connect to an existing network at your ...

Страница 31: ...Connecting to a wired network LAN select products only 21 ...

Страница 32: ...rn the camera back on press the key again To use your camera select the Search icon in the taskbar type camera in the search box and then select Camera from the list of applications NOTE The first time you select the Camera app you must select whether Camera can access your precise location Using audio You can download and listen to music stream audio content including radio from the web record au...

Страница 33: ... then select HP Documentation To connect wireless headsets to your computer follow the device manufacturer s instructions Using sound settings Use sound settings to adjust system volume change system sounds or manage audio devices Sound settings To view or change sound settings follow these steps Select the Search icon in the taskbar type control panel in the search box select Control Panel select...

Страница 34: ...ed separately 1 Connect one end of the USB Type C cable to the USB SuperSpeed port and DisplayPort connector on the computer 2 Connect the other end of the cable to the external DisplayPort device 3 Press the Windows key p to cycle through one of four display states PC screen only View the screen image on the computer only Duplicate View the screen image simultaneously on both the computer and the...

Страница 35: ...y p to cycle through one of four display states PC screen only View the screen image on the computer only Duplicate View the screen image simultaneously on both the computer and the external device Extend View the screen image extended across both the computer and the external device Second screen only View the screen image on the external device only Each time you press the Windows key p the disp...

Страница 36: ...the taskbar type connect in the search box and then select Connect to a wireless display 2 Under Display select Connect to a wireless display 3 Select a setting and then follow the on screen instructions Using data transfer Your computer is a powerful entertainment device that enables you to transfer photos videos and movies from your USB devices to view on your computer To enhance your viewing en...

Страница 37: ... Connect one end of the USB Type C cable to the USB Type C port on the computer 2 Connect the other end of the cable to the external device Connecting devices to a USB Type C port select products only 27 ...

Страница 38: ...ures and see videos of how they work select the Search icon in the taskbar type control panel in the search box select Control Panel and then select Hardware and Sound Under Devices and Printers select Mouse Some products include a precision touchpad which provides enhanced gesture functionality To determine if you have a precision touchpad and find additional information select Start select Setti...

Страница 39: ...he touchpad zone to open the options menu for the selected object NOTE The two finger tap performs the same function as right clicking with a mouse Three finger tap touchpad and precision touchpad By default the three finger tap opens the taskbar search box Tap three fingers on the touchpad zone to perform the gesture To change the function of this gesture on a precision touchpad select Start sele...

Страница 40: ...oward you to show the desktop Swipe 3 fingers left or right to switch between open windows To change the function of this gesture on a precision touchpad select Start select Settings select Devices and then select Touchpad Under Three finger gestures in the Swipes box select a gesture setting Four finger swipe precision touchpad By default the four finger swipe switches between open desktops Swipe...

Страница 41: ...type select items scroll and perform the same functions as you do using touch gestures The keyboard also allows you to use action keys and hot keys to perform specific functions Using an on screen keyboard select products only Select products have an on screen keyboard 1 To display an on screen keyboard tap the keyboard icon in the notification area at the far right of the taskbar 2 Begin typing N...

Страница 42: ...ternal media card Sleep The Sleep state is automatically initiated after a period of inactivity Your work is saved to memory allowing you to resume your work very quickly You can also initiate Sleep manually For more information see Initiating and exiting Sleep on page 32 Hibernation The Hibernation state is automatically initiated if the battery reaches a critical level or the computer has been i...

Страница 43: ...d settings wording might vary by product select When I close the lid and then select Hibernate Power menu Select Change Settings that are currently unavailable and then under Shutdown settings select the Hibernate check box The Power menu can be accessed by selecting the Start button 4 Select Save changes To initiate Hibernation use the method that you enabled in step 3 To exit Hibernation briefly...

Страница 44: ...then select Power Options Running on battery power When a charged battery is in the computer and the computer is not plugged into external power the computer runs on battery power When the computer is off and unplugged from external power the battery in the computer slowly discharges The computer displays a message when the battery reaches a low or critical battery level WARNING To reduce potentia...

Страница 45: ...about battery types specifications life cycles and capacity Conserving battery power Be sure to conserve battery power and maximize battery life Lower the brightness of the display Turn off wireless devices when you are not using them Disconnect unused external devices that are not plugged into an external power source such as an external hard drive connected to a USB port Stop disable or remove a...

Страница 46: ...el is low and you cannot bring the computer out of Hibernation connect the AC adapter 1 Connect the AC adapter to the computer and to external power 2 Exit Hibernation by pressing the power button Factory sealed battery To monitor the status of the battery or if the battery is no longer holding a charge run HP Battery Check in the HP Support Assistant app select products only 1 Select the Search i...

Страница 47: ... aircraft Connect the computer to external power under any of the following conditions When charging or calibrating a battery When installing or updating system software When updating the system BIOS When writing information to a disc select products only When running Disk Defragmenter on computers with internal hard drives When performing a backup or recovery When you connect the computer to exte...

Страница 48: ...nd Optimize Drives 3 Follow the on screen instructions For additional information access the Disk Defragmenter software Help Using Disk Cleanup Use Disk Cleanup to search the hard drive for unnecessary files that you can safely delete to free up disk space and help the computer run more efficiently To run Disk Cleanup 1 Select the Search icon in the taskbar type disk in the search box and then sel...

Страница 49: ...Updating programs only on page 39 Updating drivers only on page 39 Updating both programs and drivers Use this procedure to update both programs and drivers 1 Select the Search icon in the taskbar type support in the search box and then select the HP Support Assistant app or Select the question mark icon in the taskbar 2 Under My notebook select Updates The Software and Drivers window opens and Wi...

Страница 50: ... dirt and debris from your computer on page 40 for the recommended steps to clean the high touch external surfaces on your computer After you remove the dirt and debris you can also clean the surfaces with a disinfectant See Cleaning your computer with a disinfectant on page 41 for guidelines to help prevent the spread of harmful bacteria and viruses Removing dirt and debris from your computer Her...

Страница 51: ...aces with a disinfectant A disinfectant that is within HP s cleaning guidelines is an alcohol solution consisting of 70 isopropyl alcohol and 30 water This solution is also known as rubbing alcohol and is sold in most stores Follow these steps when disinfecting high touch external surfaces on your computer 1 Wear disposable gloves made of latex or nitrile gloves if you are latex sensitive when cle...

Страница 52: ...for the recommended steps to clean the high touch external surfaces on your computer After you remove the dirt and debris you can also clean the surfaces with a disinfectant See Cleaning your computer with a disinfectant on page 41 for sanitizing guidelines to help prevent the spread of harmful bacteria and viruses Traveling with or shipping your computer If you must travel with or ship your compu...

Страница 53: ...urn it on If you are traveling internationally follow these suggestions Check the computer related customs regulations for each country or region on your itinerary Check the power cord and adapter requirements for each location in which you plan to use the computer Voltage frequency and plug configurations vary WARNING To reduce the risk of electric shock fire or damage to the equipment do not att...

Страница 54: ... password for a Setup Utility BIOS feature and for a Windows security feature To create and save passwords use the following tips To reduce the risk of being locked out of the computer record each password and store it in a secure place away from the computer Do not store passwords in a file on the computer When creating passwords follow requirements set by the program Change your passwords at lea...

Страница 55: ...To set change or delete an administrator or power on password in Setup Utility BIOS IMPORTANT Use extreme care when making changes in Setup Utility BIOS Errors can prevent the computer from operating properly 1 Start Setup Utility BIOS Computers or tablets with keyboards Turn on or restart the computer quickly press esc and then press f10 Tablets without keyboards a Turn on or restart the tablet a...

Страница 56: ...online threats To help protect your computer internet security software that includes antivirus and firewall features may be preinstalled on your computer as a trial offer To provide ongoing protection against newly discovered viruses and other security risks security software must be kept up to date HP strongly recommends that you upgrade the security software trial offer or purchase the software...

Страница 57: ...n select Update Security 2 Select Windows Update and then follow the on screen instructions 3 To schedule a time for installing updates select Advanced options and then follow the on screen instructions Using HP TechPulse select products only HP TechPulse is a cloud based IT solution that enables businesses to effectively manage and secure their company assets HP TechPulse helps protect devices ag...

Страница 58: ...ble purchased separately is designed to act as a deterrent but it may not prevent the computer from being mishandled or stolen To connect a security cable to your computer follow the device manufacturer s instructions 48 Chapter 8 Securing your computer and information ...

Страница 59: ...press esc and then press f10 when the Start menu is displayed Updating Setup Utility BIOS Updated versions of Setup Utility BIOS might be available on the HP website Most BIOS updates on the HP website are packaged in compressed files called SoftPaqs Some download packages contain a file named Readme txt which contains information regarding installing and troubleshooting the file Determining the B...

Страница 60: ... you can check for and download BIOS updates 1 Select the Search icon in the taskbar type support in the search box and then select the HP Support Assistant app or Select the question mark icon in the taskbar 2 Select Updates The Checking for Updates window opens and Windows checks for updates 3 Follow the on screen instructions 4 At the download area follow these steps a Identify the most recent ...

Страница 61: ...he file that has an exe extension for example filename exe The BIOS installation begins 5 Complete the installation by following the on screen instructions NOTE After a message on the screen reports a successful installation you can delete the downloaded file from your hard drive Installing a BIOS update 51 ...

Страница 62: ...e Diagnostics Windows detects a failure that requires hardware replacement a 24 digit failure ID code is generated for select component tests For interactive tests such as keyboard mouse or audio and video palette you must perform troubleshooting steps before you can receive a failure ID You have several options after you receive a failure ID Select Next to open the Event Automation Service EAS pa...

Страница 63: ...indows version from HP To download HP PC Hardware Diagnostics Windows from HP follow these steps 1 Go to http www hp com go techcenter pcdiags The HP PC Diagnostics home page is displayed 2 Select Download HP Diagnostics Windows and then select the specific Windows diagnostics version to download to your computer or a USB flash drive The tool downloads to the selected location Downloading the HP P...

Страница 64: ... and a USB flash drive to download and create the HP UEFI support environment because only exe files are provided For more information see Downloading HP PC Hardware Diagnostics UEFI to a USB flash drive on page 55 If your PC does not start in Windows you can use HP PC Hardware Diagnostics UEFI to diagnose hardware issues Using an HP PC Hardware Diagnostics UEFI hardware failure ID code When HP PC...

Страница 65: ...ows computer to download and create the HP UEFI support environment because only exe files are provided Downloading the latest HP PC Hardware Diagnostics UEFI version To download the latest HP PC Hardware Diagnostics UEFI version to a USB flash drive follow this procedure 1 Go to http www hp com go techcenter pcdiags The HP PC Diagnostics home page is displayed 2 Select Download HP Diagnostics UEF...

Страница 66: ... to http www hp com support 2 Select Software and Drivers select your type of product enter the product name or number in the search box that is displayed select your computer and then select your operating system 3 In the Diagnostics section follow the on screen instructions to select and download the Remote UEFI version for the product Customizing Remote HP PC Hardware Diagnostics UEFI settings ...

Страница 67: ...ct Settings 3 Make your customization selections 4 Select Exit then select Save Changes and Exit to save your settings Your changes take effect when the computer restarts Customizing Remote HP PC Hardware Diagnostics UEFI settings 57 ...

Страница 68: ...ckups to avoid information loss NOTE If computer storage is 32 GB or less Microsoft System Restore is disabled by default Using the HP Cloud Recovery Download Tool to create recovery media select products only You can use the HP Cloud Recovery Download Tool to create HP Recovery media on a bootable USB flash drive For details Go to http www hp com support search for HP Cloud Recovery and then sele...

Страница 69: ... see the Get Help app Select the Start button select All apps select the Get Help app and then enter the task you want to perform NOTE You must be connected to the internet to access the Get Help app Recovering using HP Recovery media You can use HP Recovery media to recover the original operating system and software programs that were installed at the factory On select products it can be created ...

Страница 70: ...lume up button and then select f9 or Turn on or restart the tablet quickly press and hold the volume down button and then select f9 3 Select the optical drive or USB flash drive from which you want to boot and then follow the on screen instructions Using HP Sure Recover select products only Select computer models are configured with HP Sure Recover a PC operating system OS recovery solution built ...

Страница 71: ...amage to a drive or loss of information observe these precautions If removal or installation instructions direct you to unplug the computer first be sure that it is properly grounded Keep components in their electrostatic safe containers until you are ready to install them Avoid touching pins leads and circuitry Handle electronic components as little as possible Use nonmagnetic tools Before handli...

Страница 72: ...fications Operating voltage and current varies by platform The voltage and current for your computer is located on the regulatory label Table 13 1 DC power specifications Input power Rating Operating voltage and current 5 V dc 2 A 12 V dc 3 A 15 V dc 3 A 45 W USB C 5 V dc 3 A 9 V dc 3 A 12 V dc 3 75 A 15 V dc 3 A 45 W USB C 5 V dc 3 A 9 V dc 3 A 10 V dc 3 75 A 12 V dc 3 75 A 15 V dc 3 A 20 V dc 2 ...

Страница 73: ... specifications for helpful information when you travel with or store your computer Table 13 2 Operating environment specifications Factor Metric U S Temperature Operating 5 C to 35 C 41 F to 95 F Nonoperating 20 C to 60 C 4 F to 140 F Relative humidity noncondensing Operating 10 to 90 10 to 90 Nonoperating 5 to 95 5 to 95 Maximum altitude unpressurized Operating 15 m to 3 048 m 50 ft to 10 000 ft...

Страница 74: ...The HP accessibility goal is to design produce and market products and services that can be effectively used by everyone including people with disabilities either on a stand alone basis or with appropriate assistive devices To achieve that goal this Accessibility Policy establishes seven key objectives to guide HP actions All HP managers and employees are expected to support these objectives and t...

Страница 75: ...leash your potential Assistive technology removes barriers and helps you create independence at home at work and in the community Assistive technology AT helps increase maintain and improve the functional capabilities of electronic and information technology You can choose from many AT products Your AT assessment should allow you to evaluate several products answer your questions and facilitate yo...

Страница 76: ...d within Mandate 376 as an online toolkit for public procurement of ICT products The standard specifies the accessibility requirements applicable to ICT products and services with a description of the test procedures and evaluation methodology for each requirement Web Content Accessibility Guidelines WCAG Web Content Accessibility Guidelines WCAG from the W3C s Web Accessibility Initiative WAI hel...

Страница 77: ... that provide information about disabilities and age related limitations American Association of People with Disabilities AAPD The Association of Assistive Technology Act Programs ATAP Hearing Loss Association of America HLAA Information Technology Technical Assistance and Training Center ITTATC Lighthouse International National Association of the Deaf National Federation of the Blind Rehabilitati...

Страница 78: ...ort HP offers technical support and assistance with accessibility options for customers with disabilities NOTE Support is in English only Customers who are deaf or hard of hearing who have questions about technical support or accessibility of HP products Use TRS VRS WebCapTel to call 877 656 7058 Monday through Friday 6 a m to 9 p m Mountain Time Customers with other disabilities or age related li...

Страница 79: ...ility 49 updating 49 Bluetooth device 17 19 Bluetooth label 14 boot order changing 60 bottom components 14 buttons left touchpad 8 power 10 11 right touchpad 8 C camera identifying 7 using 22 camera light identifying 7 camera privacy key using 22 caps lock light 9 caring for your computer 40 cleaning your computer 40 caring for wood veneer 42 disinfecting 41 HP Easy Clean 40 removing dirt and debr...

Страница 80: ... side components 5 lights AC adapter and battery 3 camera 7 caps lock 9 mute 9 power 9 touchpad 8 low battery level 35 low blue light mode 6 M maintenance Disk Cleanup 38 Disk Defragmenter 38 updating programs and drivers 39 managing power 32 MEID number 18 Miracast 26 mobile broadband activating 18 IMEI number 18 MEID number 18 mute light identifying 9 mute microphone action key 13 mute volume ac...

Страница 81: ... gestures tap 28 two finger pinch zoom 28 touchpad buttons identifying 8 touchpad components 7 touchpad gestures four finger swipe 30 four finger tap 30 three finger swipe 30 three finger tap 29 two finger slide 29 two finger tap 29 touchpad key 13 touchpad light identifying 8 touchpad settings adjusting 8 touchpad zone identifying 8 transfer data 26 traveling with the computer 14 42 turning off t...

Отзывы: