background image


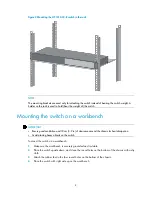
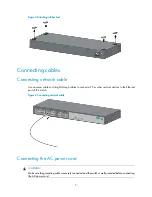
Figure 2


Mounting the HP 1410-24-R switch in the rack 


NOTE: 

The mounting brackets are used only for attaching the switch instead of bearing the switch weight. A 
holder on the rack is used to hold (bear the weight of) the switch. 


Mounting the switch on a workbench 


IMPORTANT: 


Ensure good ventilation and 10 cm (3.9 in) of clearance around the chassis for heat dissipation. 


Avoid placing heavy objects on the switch. 


To mount the switch on a workbench: 

1.


Make sure the workbench is securely grounded and is stable. 

2.


Place the switch upside down, and clean the round holes on the bottom of the chassis with a dry 
cloth. 

3.


Attach the rubber feet to the four round holes on the bottom of the chassis. 

4.


Place the switch with right side up on the workbench. 

Содержание 1410-24-R

Страница 1: ...HP 1410 Switch Series Getting Started Guide HP 1410 24 R Switch JD986B HP 1410 24G R Switch JG708A Part number 5998 4635 Document version 5W100 20130808 ...

Страница 2: ...MATERIAL INCLUDING BUT NOT LIMITED TO THE IMPLIED WARRANTIES OF MERCHANTABILITY AND FITNESS FOR A PARTICULAR PURPOSE Hewlett Packard shall not be liable for errors contained herein or for incidental or consequential damages in connection with the furnishing performance or use of this material The only warranties for HP products and services are set forth in the express warranty statements accompan...

Страница 3: ...ounting brackets 7 Mounting the switch on a workbench 8 Connecting cables 9 Connecting network cable 9 Connecting the AC power cord 9 Verifying the installation 10 Troubleshooting 11 Appendix A Chassis views and technical specifications 12 Chassis views 12 1410 24 R switch 13 Front panel 13 Rear panel 13 1410 24G R switch 13 Front panel 13 Rear panel 14 Technical specifications 14 Appendix B LEDs ...

Страница 4: ...are the industry s first IEEE 802 3az compliant unmanaged Fast Ethernet switches The available green features along with the HP lifetime warranty make the HP 1410 switch series ideal for customers seeking low cost and reliable networking solutions The HP 1410 Switch Series includes the models in Table 1 Table 1 HP 1410 Switch Series models Product code HP description Alias J9559A HP 1410 8G Switch...

Страница 5: ...the recommendations do not cover every possible hazardous condition Do not place the switch on an unstable case or desk The switch might be severely damaged in case of a fall Make sure the ground is dry and flat and anti slip measures are in place Keep the chassis and installation tools away from walk areas Keep the chassis clean and dust free Do not place the switch near water or place it in a da...

Страница 6: ...nt room Lasting high relative humidity can cause poor insulation electric creepage mechanical property change of materials or metal corrosion Lasting low relative humidity can cause washer contraction and ESD and can cause problems including loose captive screws and circuit failure High temperature can accelerate the aging of insulation materials and significantly lower the reliability and lifespa...

Страница 7: ...quipment room Maintain the humidity and temperature at a proper level Always wear an ESD preventive wrist strap Make sure the wrist strap makes skin contact and is well grounded NOTE The ESD preventive wrist strap is not provided with the switch Order it yourself EMI All electromagnetic interference EMI sources from outside or inside of the switch and application system adversely affect the switch...

Страница 8: ...3 F Relative humidity 5 to 95 noncondensing Cleanness Dust concentration 3 104 particles m3 No dust on desk within three days ESD prevention The equipment and rack are well grounded The equipment room is dust proof The humidity and temperature are at a proper level Wear an ESD preventive wrist strap Make sure the wrist strap makes good skin contact and is well grounded EMI prevention Take effectiv...

Страница 9: ...rt the weight of the switch and installation accessories The size of the rack is appropriate for the switch The front and rear of the rack are at least 0 8 m 31 50 in away from walls or other devices Safety precautions The switch is far away from any moist area and heat source You have located the emergency power switch in the equipment room Accessories Accessories shipped with the switch Referenc...

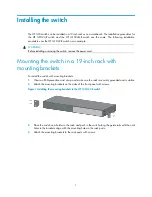
Страница 10: ...ch in a 19 inch rack with mounting brackets To install the switch with mounting brackets 1 Wear an ESD preventive wrist strap and make sure the rack is securely grounded and is stable 2 Attach the mounting brackets on the sides of the front panel with screws Figure 1 Installing the mounting brackets to the HP 1410 24 R switch 3 Place the switch on a holder in the rack and push in the switch along ...

Страница 11: ...NT Ensure good ventilation and 10 cm 3 9 in of clearance around the chassis for heat dissipation Avoid placing heavy objects on the switch To mount the switch on a workbench 1 Make sure the workbench is securely grounded and is stable 2 Place the switch upside down and clean the round holes on the bottom of the chassis with a dry cloth 3 Attach the rubber feet to the four round holes on the bottom...

Страница 12: ...es or straight through cables to connect a PC or other network devices to the Ethernet port of the switch Figure 4 Connecting network cable Connecting the AC power cord WARNING Make sure the grounding cable is securely connected and the switch is well grounded before connecting the AC power cord ...

Страница 13: ...he AC power outlet 4 Check the Power LED If it is ON it means the power connection is correct Verifying the installation After you complete the installation verify that There is enough space for heat dissipation around the switch and the rack or workbench is stable The grounding cable is securely connected The correct power source is used All the interface cables are cabled indoors ...

Страница 14: ...1 Verify that the correct power source is used and the power cords are correctly connected 2 Verify that the power source side provides power supply correctly LAN interface LED off 1 Verify that the network cable is correctly connected to the network port of the switch 2 Plug the two ends of a network cable into two network ports of the switch If the port LEDs are on it indicates that the network ...

Страница 15: ...PORTANT For regulatory identification purposes the HP 1410 Switch Series products are assigned Regulatory Model Numbers RMN The Regulatory Model Numbers for these products are listed below These regulatory numbers should not be confused with the marketing names HP 1410 or product numbers JD986B and JG708A Table 8 Regulatory Model Numbers in the HP 1410 Switch Series Product code RMN HP description...

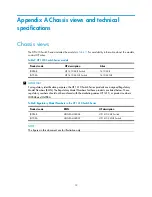
Страница 16: ...panel 1 10 100Base TX port 2 Port LED 3 Power LED Power Rear panel Figure 6 1410 24 R rear panel 1 Grounding screw 2 AC input power receptacle 1410 24G R switch Front panel Figure 7 1410 24G R front panel 1 10 100 1000Base T port 2 Port LED 3 Power LED Power ...

Страница 17: ... mm 1 73 17 32 6 81 in 44 440 173 mm 1 73 17 32 6 81 in Weight 2 5 kg 5 51 lb 3 kg 6 61 lb Ethernet port 24 10 100Base TX ports 24 10 100 1000Base T ports Input AC voltage Rated voltage range 100 VAC to 240 VAC 50 Hz or 60 Hz Power consumption full configuration 6 W 16 W Operating temperature 0 C to 40 C 32 F to 104 F Relative humidity 5 to 95 noncondensing Cooling system No fans for heat ventilat...

Страница 18: ...er port LEDs Table 11 Ethernet copper port LEDs LED Status Description Link Act 10 100BASE TX port Steady green The port is operating at 10 100 Mbps Flashing green The port is sending or receiving data at 10 100 Mbps Off No link is present on the port 10 100 1000BASE T port Steady green The port is operating at 1000 Mbps Flashing green The port is sending or receiving data at 1000 Mbps Steady yell...

Страница 19: ...ng you will receive email notification of product enhancements new driver versions firmware updates and other product resources Related information Documents To find related documents browse to the Manuals page of the HP Business Support Center website http www hp com support manuals For related documentation navigate to the Networking section and select a networking category For a complete list o...

Страница 20: ...3 site humidity 3 site temperature 3 ESD prevention 4 examining installation site 3 G gas installation site 3 grounding EMI prevention 4 ESD prevention 4 lightning protection 5 H hardware rack switch mount 7 switch installation 7 workbench switch mount 8 hardware management maintenance chassis technical specifications 12 chassis views 12 LEDs 15 humidity installation site requirements 3 I installi...

Страница 21: ...EMI prevention 4 ESD prevention 4 general recommendations 2 installation site cleanness 3 installation site dust concentration 3 installation site gas saturation 3 installation site humidity 3 installation site temperature 3 lightning protection 5 site cleanness 3 dust concentration 3 examination 3 gas saturation 3 humidity 3 temperature 3 switch AC power cord connection 9 installation 7 installat...

Отзывы: