manualshive.com logo in svg
background image

2

Installing the Media Card Reader

Accessing the Internal Components of the Computer

CAUTION:

Static electricity can damage the electronic components of the computer or optional

equipment. Before beginning these procedures, ensure that you are discharged of static electricity by
briefly touching a grounded metal object. Refer to the documentation included with your computer for
additional information on preventing electrostatic discharge.

CAUTION:

When the computer is plugged into an AC power source, voltage is always applied to

the system board. You must disconnect the power cord from the power source before opening the
computer to prevent system board damage.

WARNING!

To reduce the risk of personal injury from electrical shock and/or hot surfaces, be sure

to disconnect the power cord on the computer from the wall outlet and allow the internal system
components to cool before touching.

To prepare the computer for installation of the HP 14-in-1 Media Card Reader, refer to the
documentation included with your computer for detailed instructions to:
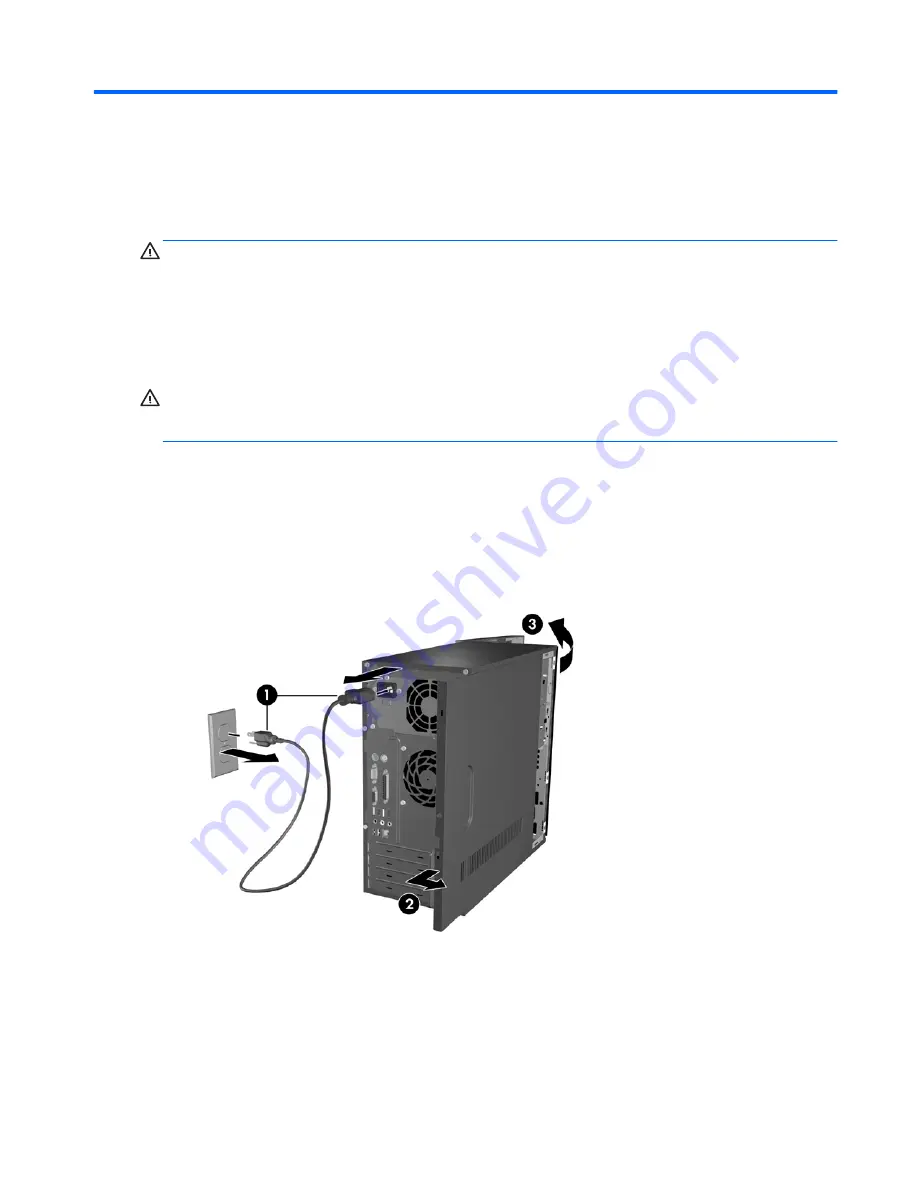
1.

Power off and unplug the computer from the power source.

2.

Remove the computer cover or access panel.

3.

Remove the front bezel.

Figure 2-1

  Accessing the Internal Components

Accessing the Internal Components of the Computer

3

Содержание 14-in-1 Media Card Reader

Страница 1: ...HP 14 in 1 Media Card Reader User Guide ...

Страница 2: ...ation in this document is provided as is without warranty of any kind including but not limited to the implied warranties of merchantability and fitness for a particular purpose and is subject to change without notice The warranties for Hewlett Packard products are set forth in the express limited warranty statements accompanying such products Nothing herein should be construed as constituting an ...

Страница 3: ...ff in this manner indicates that failure to follow directions could result in bodily harm or loss of life CAUTION Text set off in this manner indicates that failure to follow directions could result in damage to equipment or loss of information NOTE Text set off in this manner provides important supplemental information iii ...

Страница 4: ...iv About This Guide ...

Страница 5: ... Media Card Reader 3 Accessing the Internal Components of the Computer 3 Connecting the Media Card Reader USB 3 0 Only 5 Connecting the Media Card Reader USB 2 0 Only 6 Reassembling the Computer 6 3 Identifying Media Slots 7 Front Panel Components 7 Compatible Media Cards 7 Appendix A Troubleshooting 8 Solving Common Problems 8 Using the Worldwide Web 9 Preparing to Call Technical Support 9 v ...

Страница 6: ...vi ...

Страница 7: ...mory cards and the computer Fits conveniently in the 8 9 cm 3 5 inch or 13 3 cm 5 25 inch drive bay with included 13 3 cm 5 25 inch accessory kit HP 14 in 1 USB Media Card Reader Kit Contents The HP 14 in 1 Media Card Reader with USB kit includes 8 9 cm 3 5 inch media card reader with integrated USB 3 0 cable USB 3 0 to USB 2 0 cable adapter to allow use of the media card reader on computers with ...

Страница 8: ...reader into a 13 3 cm 5 25 inch drive bay you must first install the 13 3 cm 5 25 inch accessory kit to the reader 1 Remove the four screws two on each side from the media card reader Figure 1 1 Removing screws from Media Card Reader 2 Assemble the rails and bezel and attach to the media card reader with the four screws removed in step 1 Figure 1 2 Attaching Rails and Bezel 2 Chapter 1 Product Fea...

Страница 9: ...tem board You must disconnect the power cord from the power source before opening the computer to prevent system board damage WARNING To reduce the risk of personal injury from electrical shock and or hot surfaces be sure to disconnect the power cord on the computer from the wall outlet and allow the internal system components to cool before touching To prepare the computer for installation of the...

Страница 10: ...ter documentation for installing additional drives in the drive bays 5 Install the media card reader according to the instructions from your computer model s documentation on installing a drive into a 8 9 cm 3 5 inch or 13 3 cm 5 25 inch drive bay Figure 2 2 Installing in a 8 9 cm 3 5 inch Drive Bay Figure 2 3 Installing in a 13 3 cm 5 25 inch Drive Bay 6 Be sure to use the proper guide screws if ...

Страница 11: ... board Figure 2 4 Connecting to the USB 3 0 System Board CAUTION Some system boards do not have an available USB connector If you unplug the USB cable that is connected to the system board to free up a connector for the HP Media Card Reader the front USB ports on the computer will not function Connecting the Media Card Reader USB 3 0 Only 5 ...

Страница 12: ... unplug the USB cable that is connected to the system board to free up a connector for the HP Media Card Reader the front USB ports on the computer will not function Figure 2 5 Installing the USB 2 0 3 0 Adapter Reassembling the Computer After installing the HP Media Card Reader 1 Replace the front bezel 2 Replace the computer cover or access panel 3 Plug in and power on the computer The HP Media ...

Страница 13: ...er Activity Light 3 MS PRO MS PRO Duo Memory Stick MS Menory Stick Select Memory Stick PRO MS PRO Memory Stick MagicGate Memory Stick Duo MS Duo Memory Stick PRO Duo MS PRO Duo Memory Stick MagicGate Duo Memory Stick PRO HG Duo 4 Compact Flash I II CompactFlash Card Type 1 CompactFlash Card Type 2 MicroDrive Compatible Media Cards To find information on compatible media cards for this product go t...

Страница 14: ...rd to see if it writable Unable to access data on the media card after inserting it into a slot The media card is not inserted properly is inserted in the wrong slot or is not supported Ensure that the card is inserted properly with the gold contact on the correct side The green LED will light if inserted properly Do not know how to remove a media card correctly The computer s software is used to ...

Страница 15: ...sing the troubleshooting tips in this section you can contact Technical Support For U S support go to http www hp com go contactHP For worldwide support go to http welcome hp com country us en wwcontact_us html Have the following information available when you log in Serial number of the computer in which the accessory is installed Purchase date on invoice Condition under which the problem occurre...

Отзывы: