

To clean and condition the vinyl cover:
1. Remove the cover from the spa and gently lean it against a wall or fence.
2. With a garden hose, spray the cover to loosen and rinse away dirt or debris.
3. Using a large sponge and/or a soft bristle brush, and using a very mild soap solution (1 teaspoon dishwashing liquid with 2 gallons (8 liters)
of water) or baking soda (sodium bicarbonate), scrub the vinyl top in a circular motion. Do not let the vinyl dry with a soap film on it before it can be
rinsed clean.
4. Scrub the cover’s perimeter and side flaps. Rinse clean with water.
5. Rinse off the underside of the cover with water only (use no soap), and wipe it clean with a dry rag.
SERVICE NOTE:
To remove tree sap, use cigarette lighter fluid (not charcoal lighter fluid). Use sparingly, and rinse with a saddle soap solution
immediately afterwards, then wipe dry.
Important reminders:
•
DO
remove snow buildup to avoid breakage of the foam core from the additional weight of the snow.
•
DO
lock cover lock straps to secure the cover when the spa is not in use.
•
DO NOT
drag or lift the spa cover using either the flaps or the cover lock straps.
•
DO NOT
walk, stand, or sit on the cover.
•
DO NOT
place any metal or heat transferring object on the cover or place any type of plastic tarp or drop cloth over the cover as this may
result in a melted foam core, which would not be covered under the warranty.
•
DO NOT
use any lifting mechanisms, chemicals or cleaners except those recommended by Watkins
Manufacturing Corporation or its
Authorized Sales and Service Dealer.
CARE OF THE SPA CABINET
The simulated wood cabinet consists of a rigid polymer that combines the durability of plastic, with the beauty of wood. Simulated wood
won’t crack, peel, blister, or delaminate even after prolonged exposure to the elements.
Cleaning of simulated wood consists of simply spraying the cabinet with a mild soap and water solution to remove any stains and residue.
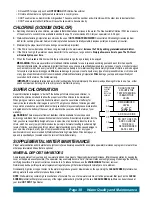
DRAINING YOUR SPA
1. TURN
OFF OR DISCONNECT POWER FROM THE SPA.
2. Locate the drain valve for the spa (lower front of the spa) and remove the drain cap. Attach the inlet of a garden hose to the drain valve (to
avoid flooding of the foundation surrounding the spa) and route the outlet of the hose to an appropriate draining area. Spa water with a high
sanitizer level may harm plants and grass.
3. Open the valve by turning the knob. The spa will drain by gravitational flow.
IMPORTANT:
All
HOT SPOT
spa models will drain almost completely through the main drain valve. Equipment such as the jet pump and
heating system will drain. Any water remaining within the plumbing or equipment after draining will only need to be removed if the spa is
being winterized.
4. After your spa is empty, clean the shell and filter cartridge.
5. After cleaning, close the drain valve, remove garden hose and put drain cap back in place.
NON-OPERATION IN COLD CLIMATE
If the spa is to be left unused for an extended period of time in areas where FREEZING TEMPERATURES
DO NOT
OCCUR, it may be desirable
to turn the heater to the lowest temperature. The automatic filter cycles will keep the spa water clean and sparkling. When preparing the spa for
use, check the water chemistry to assure correct chlorine or bromine and pH levels.
You can keep the water in the spa during the time of year when freezing at the spa location may occur. If a freeze condition is detected, the pump
and heater will be activated automatically to circulate the water in low speed. However, CAUTION must be used with this approach. In the event of
electrical power interruption, regardless of the cause, the heater and pump will stop operating and freeze protection will be lost, possibly resulting in
freeze damage to the spa, spa plumbing and/or components. Such damage is not covered by warranty.
Maintenance and Spa Care
Page 43


