Hotpoint SY22K Скачать руководство пользователя страница 8

Caution: Accessible parts may
be hot when the grill is used,
young children should be kept
away.

Grill ignition
Important: 

The door must be fully

open when the grill is used.  
Open the door.
Push in and turn the grill control knob
clockwise to the “on” position.  Ensure
that the grill burner is alight before
leaving it unattended.
Do not operate the grill between the
“on” setting and the “off” position - use
the “on” setting only.

To switch off

, turn the control knob

anti-clockwise to return it to the “

” off

position.

If for any reason the burner does not
light within 15 seconds turn the control
off and wait for one minute before
beginning a further ignition attempt.

Aluminium foil

Never cover the grill pan or grill trivet
with cooking foil, or allow fat to build
up in the grill pan, as this creates a
fire hazard.

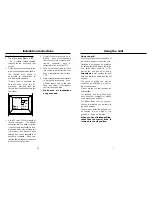
Detachable grill pan handle

Place the handle over the edge of the
grill pan, at the narrow side edges.
Slide the handle to the centre, and
locate between the handle position
indicators.  

The handle should be removed from
the pan during grilling, to prevent
overheating.
The handle is designed for removing /
inserting the grill pan under the grill
when grilling.  
If cleaning the grill pan when it is hot,
use oven gloves to move it.  

Do not

use

the handle to pour hot fats from the
grill pan.
Food for grilling should be positioned
centrally on the trivet.

6

Using the Grill

handle

grill pan

trivet

handle position

indicators

27

Installation Instructions

Step 3: Connect to the electricity
supply
Warning:

This appliance must be

earthed.
The flexible mains lead is supplied
connected to a BS 1363 fused plug,
having a fuse of 

3 amp

capacity.

If this plug does not fit the socket in
your home, it should be replaced with
a suitable plug as outlined below.

The wires in the mains lead are
coloured in accordance with the
following code:
Green and yellow = Earth,
Blue = Neutral,
Brown = Live.

As the colours of the wires in the
mains lead for the appliance may
not correspond with the coloured
markings identifying the terminals in
your plug, proceed as follows:
1. The wire which is coloured green

and yellow must be connected to
the terminal marked 

E

(Earth)

or coloured Green.

2. The wire which is coloured blue

must be connected to the terminal
marked 

N

(Neutral), or coloured

Black.

3. The wire which is coloured brown

must be connected to the terminal
marked 

L

(Live), or coloured Red.

The plug and socket must be
accessible after installation.
Should the mains lead of the
appliance ever require replacing, we
recommend that this is carried out by
a qualified electrician who will
replace it with a lead of the same size
and temperature rating.

Important:

- ensure that you route

all mains and electrical cables and
flexible tubing well clear of any
adjacent heat source.

E

 (Earth)

GREEN / YELLOW

(Live)

BROWN

N

 (Neutral)

BLUE

Содержание SY22K

Страница 1: ...Merloni Elettrodomestici UK Ltd Morley Way Peterborough PE2 9JB 08 25378 00 10 2003 Users Instruction Installation Book for SY22W SY22K 60cm Gas Oven Grill...

Страница 2: ...anisation which protects the interests of gas users If you need advice you will find the telephone number in your local telephone directory under Gas The appliance must be installed and serviced by a...

Страница 3: ...mer Clock 14 Cleaning 19 Installation Instructions 21 27 Regulations Standards Ventilation requirements 21 Step 1 Prepare installation 22 Step 2 Connect to gas supply 24 Step 3 Connect to electricity...

Страница 4: ...e Regulations 1994 the The Gas Safety Installation Use Amendment Regulations 1996 Failure to comply with these Regulations is a criminal offence Corgi registered installers undertake to work to satisf...

Страница 5: ...tric supplies to various components in the event of fan failure If the minute minder and lights do not function and the ignition system stops working the safety device has operated Within an hour the...

Страница 6: ...ging All our packaging materials are recyclable and environmentally friendly Please help us to protect our environment by disposing of all packaging in an environmentally friendly manner Please contac...

Страница 7: ...e over the appliance or the edge of the worktop Keep all flammable materials such as curtains furnishings clothing away from the appliance Parts of the appliance may be hot during or immediately after...

Страница 8: ...grilling should be positioned centrally on the trivet 6 Using the Grill handle grill pan trivet handle position indicators 27 Installation Instructions Step 3 Connect to the electricity supply Warnin...

Страница 9: ...have a temperature rise less than 70 C 6 Rigid connections must be accessible to disconnect for servicing Cut a 150mm square hole in the right hand rear corner of the support shelf for the supply pip...

Страница 10: ...rozen or chilled food and we recommend preheating for yeast mixtures batters souffl s and whisked sponges If you are not preheating the oven the cooking times in the Baking Guide may need to be extend...

Страница 11: ...nto a standard 600mm wide housing unit with minimum internal dimensions as shown 591mm is to the underside of the worktop when the appliance is built under or to the underside of the panel above when...

Страница 12: ...ation regulation Particular attention shall be given to the relevant requirements regarding ventilation In your own interest and that of safety it is the law that all gas appliances be installed and s...

Страница 13: ...rmed skewer inserted into the centre of the cake If the skewer comes out clean then the cake is cooked Do not attempt to make Christmas cakes larger than the oven can cope with you should allow at lea...

Страница 14: ...om 15 20 mins Brandy snaps 4 middle to top 7 18 mins Flapjacks 4 middle to top 20 40 mins Ginger nuts 4 middle to top 10 20 mins Puddings 1l 2 pint dish Rice pudding 2 middle to top 2 21 2 hours Baked...

Страница 15: ...guide The times given in the roasting guide are only approximate because the size and age of the bird will influence cooking times as will the shape of a joint and the proportion of the bone Frozen me...

Страница 16: ...Warm food should never be placed in the oven if there is a delay period Stews prepared by frying the meat and vegetables first should be cooked as soon as possible or refrigerated prior to placing in...

Страница 17: ...lly switch on at the calculated start time of 16 00 hours 4 00 pm 7 A single press of the cook time button shows the cooking time remaining before the oven automatically switches off 8 A U T O A U T O...

Страница 18: ...time of day but you can press the minute minder button and the display will show the minutes remaining The tone will sound at the end of the time set to cancel the tone press the minute minder button...

Отзывы: