


GB
3
PLEASE PHONE US TO REGISTER YOUR APPLIANCE AND ACTIVATE YOUR PARTS GUARANTEE ON 08448 24 24 24
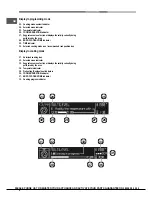
Description of the appliance
Overall view
1. POSITION 1
2. POSITION 2
3. POSITION 3
4. POSITION 4
5. POSITION 5
6. GUIDES for the sliding racks
7. DRIPPING PAN
8. GRILL
9. Control panel
Control panel
10. CONTROL PANEL POWER BUTTON
11. SETTINGS icon
12. MANUAL COOKING MODES icon
13. DISPLAY
14. TEMPERATURE icon
15. DOOR / CONTROL PANEL LOCK icon
16. START / STOP
17. MINUTE MINDER icon
18. TIME icon
19. SELECTOR control dial
20. AUTOMATIC COOKING MODES icon
21. CONFIRM SETTINGS icon
22. LIGHT icon
7
8
9
6
1
2
3
4
5
10
11
12
13
15
14
16
17
18
19
20
21
22


