6
GB
Technical data
Dimensions
ZLGWKFP
KHLJKWFP
GHSWKFP
Capacity
VWDQGDUGSODFHVHWWLQJV
Water supply
pressure
·03D·EDU
±SVL
Power supply voltage
See appliance data plate
Total absorbed power
See appliance data plate
Fuse
See appliance data plate
7KLVGLVKZDVKHUFRQIRUPVWRWKH
IROORZLQJ(XURSHDQ&RPPXQLW\
'LUHFWLYHV
(&/RZ9ROWDJH
(&(OHFWURPDJQHWLF
&RPSDWLELOLW\
(&&RPP5HJ
(FRGHVLJQ
(&/DEHOOLQJ
(8 :DVWH(OHFWULFDO
DQG(OHFWURQLF(TXLSPHQW
:(((
7KH &RPSDQ\ VKDOO QRW EH KHOG UHVSRQVLEOH IRU DQ\
incidents that occur if these regulations are not observed.
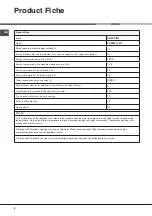
Anti-condensation strip
*
After installing the dishwasher, open the door and stick the
adhesive transparent strip under the wooden shelf in order to
protect it from any condensation which may form.
Connecting the water supplies
&RQQHFWLRQWRWKHZDWHUDQGHOHFWULFLW\VXSSOLHVVKRXOG
only be performed by a qualified technician.
The dishwasher should not stand on top of the water
hoses or the electricity supply cable.
Connecting the water inlet hose
The water inlet and outlet hoses and the electricity supply
cable may be positioned towards the right or the left in order
to achieve the best possible installation.
7RDVXLWDEOHFROGZDWHUFRQQHFWLRQSRLQWEHIRUHDWWDFKLQJ
the hose, run the water until it is perfectly clear so that any
impurities that may be present in the water do not clog the
appliance; after performing this operation, screw the inlet
hose tightly onto a tap with a ¾ gas threaded connection.
7RDVXLWDEOHKRWZDWHUFRQQHFWLRQSRLQW\RXUGLVKZDVKHU
may be provided with hot water from the mains supply (if
you have a central heating system with radiators) provided
WKDWLWGRHVQRWH[FHHGDWHPSHUDWXUHRI&
Screw the hose to the tap as described for connection to
a cold water supply.
If the inlet hose is not long enough, contact a specialist
store or an authorised technician
(see Assistance)
.
The water pressure must be within the values indicated
in the Technical data table
(see Installation).
The hose should not be bent or compressed.
The appliance must be connected to the water supply
network using new hoses.
'RQRWXVHROGKRVHV
Ensure that the new hose supplied is connected and the old
hose is disposed of safely.
'2127RYHUWLJKWHQWKHKRVHFRQQHFWRUKDQGWLJKWLV
sufficient.
Ensure the fill hose is not kinked.
Tap connections*: A range of adaptors are available to
suit your tap.
'2 127 FRQQHFW WKH GLVKZDVKHU WR D VLQJOH RXWOHW
instantaneous water heater or an electric heater.
Sink Waste System
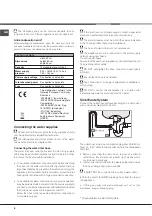
&RQQHFWWKHRXWOHWKRVHZLWKRXWEHQGLQJLWWRDGUDLQGXFW
ZLWKDPLQLPXPGLDPHWHURIPP
7KHRXWOHWKRVHPXVWEHDWDKHLJKWUDQJLQJIURPWRFP
IURP©©WR©©IURPWKHIORRUVXUIDFHZKHUHWKHGLVKZDVKHU
rests (A).
EHIRUH FRQQHFWLQJ WKH GUDLQ KRVH UHPRYH DQ\ LQWHUQDO
restrictions; this will prevent a build up of debris which
could cause a blockage
UHPRYHDQ\UHVWULFWLRQVIURPWKHZDVWHVSLJRWDQGHQVXUH
that the sealing bung is removed (B).
,W0867127EHFRQQHFWHGWRDVXUIDFHZDWHUGUDLQ
8QWLHWKHHQGRIWKH*5(<GUDLQDJHKRVHIURPWKHUHDURI
the appliance.
,I ILWWLQJ DQ XQGHU VLQN ZDVWH GLVSRVDO XQLW FXW RXW WKH
membrane, bung or blanking plug.
*
2QO\DYDLODEOHLQVHOHFWHGPRGHOV
Содержание Smart Tech FDFSM 31011
Страница 19: ...GB 19...
Страница 20: ...20 GB 195118342 00 MN HUR DEULDQR...

