Hotpoint RS778GJ Скачать руководство пользователя страница 11

RIGHT

3. Deep Fat 

 Do not overfill

kettle with fat 

 spill over

when adding food. Frosty foods
bubble vigorously. Watch foods
frying at HIGH temperatures and
keep range and hood clean from
accumulated grease.


 NOT

OVER 1“

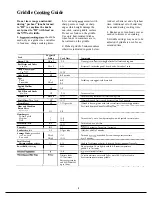
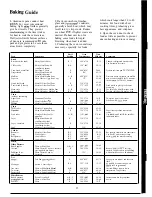
Directions and Setting
to Start Cooking

HI. Melt 

 Switch   MED

HI (7) to brown chicken.

Setting to Complete

Food

Fried Chicken

Cookware

Covered
Skillet

LOW (3). Cover skillet and
cook until tender.
Uncover last few minutes.

For crisp dry chicken, cover only
after switching to LOW (3) for 10
minutes. Uncover and cook, turning

occasionally 10 to 20 minutes.

A more attention-free method
is to start and cook at MED (4).

Parr fried bacon

Uncovered
Skillet

HI.   cold skillet, arrange

 slices. Cook just

until starting to sizzle.

HI. Melt fat. Switch to MED (4)

 brown slowly.

MED HI (7). Cook, turning
over as needed.

Sauteed:  Less tender
thin steaks (chuck,
round, etc.); liver;
thick or whole fish

Simmered or stewed
meat; chicken; corned
beef; smoked pork;
stewing beef; tongue;
etc.

Melting chocolate,
butter, marshmallows

Covered
Skillet

LOW (3). Cover and cook
until tender.

Meat may be breaded or
marinated in sauce before frying.

HI. Cover meat with water

 cover pan   kettle.

Cook until steaming.

LOW (3). Cook until fork
tender. (Water should
slowly boil). For very large
loads, medium heat may
be needed.

Add salt or other seasoning
before cooking if meat 

 not

been smoked or otherwise
cured.

Covered
Dutch Oven,
Kettle or
Large
Saucepan

Small
Uncovered
Saucepan.
Use small
surface unit

WM. 

 10     


melt through. Stir   smooth.

When melting marshmallows, add
milk or water.

 batter takes slightly longer

time. Tam over pancakes when
bubbles rise to surface.

Pancakes or
French toast

Skillet 
Griddle

MED HI (7). Heat skillet 8 

10 minutes. Grease lightly.

 2 to 3 minutes per side.

Noodles or spaghetti

Use large enough kettle to
prevent 

 Pasta doubles

in size when cooked.

Covered
Large Kettle
or Pot

 In covered kettle, bring

salted water to a boil, uncover
and add pasta slowly so
boiling does not stop.

MED HI (7). Cook uncovered
until tender. For large
amounts, HI may be
needed to keep water at
rolling boil throughout

entire 

 time.

 Heat until first jiggle is

heard.

MED HI (7) for foods cooking

10 minutes or 

 MED (4) for

foods over 10 minutes.

LOW (3). To finish cooking.

Cooker 


 2 to 3 times

per minute.

Pressure Cooking

Pressure
Cooker or
Canner

HI. Bring just   boil.

Puddings, Sauces,
Candies. Frostings

Stir frequently to prevent
sticking.

Uncovered pan requires more
water and longer time.

Uncovered
Saucepan

Vegetables
Fresh

Covered
Saucepan

 Measure 1/2 to   inch

water in saucepan. Add
salt and prepared vegetable
[n covered saucepan bring

 boil.

 Measure water and salt

as 

 Add frozen block

of vegetable. In covered
saucepan bring to 

HI. in skillet melt fat.

MED (4). Cook 1 pound 10

to 30 or more minutes,

depending on tenderness
of vegetable.

Break up or stir as needed while
cooking.

Frozen

Covered
Saucepan

LOW (3). Cook according to
time 

 package.

Sauteed: Onions;
green peppers;
mushrooms; celery; 

Rice and Grits

Uncovered
Skillet

MED (4). Add vegetable
Cook until desired

tenderness is reached.

Tam over 

 stir vegetable as

necessary for even browning.

Covered
Saucepan

Triple in volume after cooking.
Time at WM. Rice:   cup rice and

2 cups water-25 minutes. Grits:

1 cup grits and 4 cups 

40 minutes.

HI. Bring salted water to a
boil..

WM. Cover and cook
according   

11

Содержание RS778GJ

Страница 1: ...22 Cookware Tips 10 11 Energy Saving Tips 5 Features 6 7 Griddle 12 16 Grill 17 21 Installation Instructions 5 Leveling 5 Light Bulb Replacement 32 Model and Serial Numbers 2 Oven 23 Problem Solver 36...

Страница 2: ...rvice calls concerning your range If you received a damaged range Immediately contact the dealer or builder that sold you the range Save time and money Before you request service Check the Problem Sol...

Страница 3: ...ents while using theapptice Hammable material could be ignited if brought in contact with hot heating elements and may cause severe burns Q Use only dry pot holders moist or damp pot holders on hot su...

Страница 4: ...ended at high heat se Boilover causes smoking and greasy spillovers that may catch on fire Be sure drip pans and vent ducts are not covered and are in place Their absence during cooking could damage r...

Страница 5: ...king temperature reduce heat immediately to lowest setting that will keep it cooking Use residual heat with surface cooking whenever possible For example when cooking eggs in the shell bring water and...

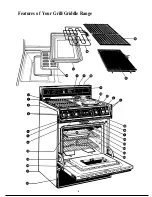
Страница 6: ...Features of Your Grill Griddle Range 6...

Страница 7: ...f cleaning and remains on as long as oven is in use 8 Calrod Module Entire unit can be easily removed for cleaning Plugs into either side for optimum convenience 9 One Piece Chrome Plated Drip Pan Rin...

Страница 8: ...Step 1 Grasp control knob and push in Step 2 Turn either clockwise or counterclockwise to desired heat setting Control must be pushed in to set only from OFF position When control is in any position o...

Страница 9: ...y harm cooktop surfaces surrounding heating units Observe Following Points in Canning 1 Bring water to boil on HIGH heat then after boiling has begun adjust heat to lowest setting to maintain boil sav...

Страница 10: ...r skillet LOW 3 Cook only 3 to 4 minutes for soft cooked 15 minutes for hard cooked Fried sunny side up Covered Skillet Continue cooking at MED HI 7 until whites are just set about 3 to 5 more minutes...

Страница 11: ...ger time Tam over pancakes when bubbles rise to surface Pancakes or French toast Skillet or Griddle MED HI 7 Heat skillet 8 to 10 minutes Grease lightly Cmk 2 to 3 minutes per side Pasta Noodles or sp...

Страница 12: ...Griddle Control The control knob must be pushed into start this prevents surface heating units from being turned on accidentally Push the knob in only when it is in the OFF position Men the knob is i...

Страница 13: ...utes Hors d oeuvres will stay hot for serving up to 1 or ly hours Rearrange or stir foods occasionally if possible Q Why aren t my foods done even though they have cooked the full time A Under low vol...

Страница 14: ...s cut 3 inches long and l 4 inch wide Cut cubes 1 inch 4 5 perside 4 5 2 3 Griddle up to 6 eggs Avoid drain hole 34 17 24 10 12 10 12 Tarn over often Turn to setting 8 after half of total cooking time...

Страница 15: ...dough into 8 equal parts On floured surface roll out each part into a 5 inch circle In mixing bowl stir together tomato sauce salt onion oregano and sugar Set aside Melt butter on griddle add 4 pizza...

Страница 16: ...gg 1 2 cup milk 2 tablespoons butter melted 1 2 cup flour 2 teaspoons baking powder 1 cup cream style corn Preheat griddle then spread oil evenly over griddle In small mixing bowl mix corn meal salt a...

Страница 17: ...heating element Each half of the grill is controlled by one of the surface heating unit control knobs on that side of the range How to Set Grill Controk The control knobs must be pushed in to start t...

Страница 18: ...ats on the grill forks will pierce the meat and release juices Q I follow the cooking times suggested but my foods don t get done properly Is there something wrong with my grill A Probably not Suggest...

Страница 19: ...cooking time HI HI HI Ham Chunks 1 inch precooked 9 17 20 Hot Dogs HI 7 9 total Rearrange often fibobs Meat HI Vegetable HI Lamb Chops to l in HI 20 25 10 15 For less tender vegetables such as tomatoe...

Страница 20: ...teaspoon dry mustard 1 teaspoon brown sugar 1 teaspoon salt 2 teaspoons chili powder 2 tablespoons vinegar 1 tablespoon Worcestershire sauce 1 4 teaspoon pepper 1 2 cup onions finely chopped 1 tables...

Страница 21: ...ning ribs over every 20 minutes Brush with sauce below and continue cooking 15 to 30 minutes turning over every 5 minutes Remove from grill and brush with sauce before serving Barbecue Bourbon Sauce 1...

Страница 22: ...on your range uses the Automatic Timer to set the length of time needed to clean whether you wish to clean immediately or delay the cleaning By setting the Start and or Stop Dials you may choose to b...

Страница 23: ...re settings is speedy rarely more than about 10 minutes Preheat the oven ody when necessary Most foods will cook satisfactorily without preheating If you find preheating is necessary keep an eye on th...

Страница 24: ...ng make sure the range clock shows the correct time of day 6 mmq u w Step 1 To set start time push m knob on START dial and turn pointer to time you wdnt oven to turn on for exdmple 330 Immediate Star...

Страница 25: ...t rolls Shiny Oblong or Muffin Pans B A 350 350 20 30 For thin rolls Shelf B may be used Cakes without shortening Angel food Aluminum Tube Pan Jelly roll A 325 3750 30 55 Two piece pan is convenient M...

Страница 26: ...en on and off automatically Remember that food will continue to cook in the hot oven and therefore should be removti wnen the aeslrea internal temperature has been reached For Frozen Roasts Frozen roa...

Страница 27: ...up and make it easier to carve Internal temperature will rise about 5 to 10 F to compensate for temperature rise if desir d remove roast from oven at 5 to 10 F less than temperature on guide Oven tem...

Страница 28: ...ack may be covered with foil for broiling ALWAYS BE CERTAIN TO MOLD FOIL THOROUGHLY BROILER RACK AND SLIT FOIL CONFORM WITH SLITS IN RACK Broiler rack is designed to minimize smoking and spattering an...

Страница 29: ...slices Ground Beef l lb 4 patties Space evenly Well Done 2 to in thick c 7 4 5 Up to 8 patties take about same time Beef Steaks Rare l inch thick c Medium 1 tO Ifi lbs 7 7 Steaks less than 1 inch cook...

Страница 30: ...be cleaned in the self cleaning oven How to Set Oven for Cleaning Step 1 Turn OWN SET and OWN TE knobs to CLEAN Controls will snap into find position when the CLEAN location is reached Step 2 Slide th...

Страница 31: ...gh temperature bakings or broil ings the LOCKED light may come on The oven door can t be latched for self cleaning while the LOCKED light is on If this happens let the oven cool until the LOCKED light...

Страница 32: ...ft door up and away from hinges To REPLACE grasp door at sides Line up door with hinges and push door firmly into place Oven Vent Duct Your oven is vented through a grill located directly above the ov...

Страница 33: ...in surface units plug in griddle or grill heating units in an automatic Do not immerse plug in surface units in liquids of any kind Do not bend the plug in surface unit plug terminals Mjusting Oven T...

Страница 34: ...hen the unit is heated NOTE Bake unit is hinged and can be lifted gently to clean oven floor Drain fat cool pan and rack slightly Do not let soiled pan and rack stand in oven to cool Sprinkle on deter...

Страница 35: ...en coils are heated After meal remove all cookware from surface units and heat soiled units at HI Let soil burn off about a minute and switch units to OFF Try not to get cleaning materials on coils If...

Страница 36: ...ob not set on BAKE OR BAKE PROPERLY OVEN TEMP knob not set correctly Shelf position is incorrect Check Roasting or Baking Guides Oven shelf is not level Incorrect coo or cookware of improper sti is be...

Страница 37: ...dvanced for long enough Both OVEN SET and OVEN TEMP knobs must be set at CLEAN setting A thick pile of spillover when cleaned leaves a heavy layer of ash in spots which could have insulated the area f...

Страница 38: ...Notes 38...

Страница 39: ...further help FIRST contact the people who serviced your appliance Explain why you are not pleased In most cases this will solve the problem NEXT if you are still not pleased write all the details incl...

Страница 40: ...Read your Use and Care material If you then have any questions about operating the product please contact your dealer or our Consumer Affairs office at the address below or call toll free GE Answer Ce...

Отзывы: