background image

4

EN

Connecting the water supplies


Connection to the water and electricity supplies

should only be performed by a qualified technician.

 The dishwasher should not stand on top of the water

hoses or the electricity supply cable.

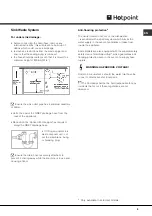
Connecting the water inlet hose

The water inlet (A) and outlet (B) hoses and the

electricity supply cable may be positioned towards the

right or the left in order to achieve the best possible

installation (

see figure

).

• To a suitable cold water connection point: before

attaching the hose, run the water until it is perfectly

clear so that any impurities that may be present in the

water do not clog the appliance; after performing this

operation, screw the inlet hose tightly onto a tap with

a ¾ gas threaded connection.

• To a suitable hot water connection point: your

dishwasher may be provided with hot water from the

mains supply (if you have a central heating system

with radiators) provided that it does not exceed a

temperature of 60°C.

Screw the hose to the tap as described for
connection to a cold water supply.

 If the inlet hose is not long enough, contact a

specialist store or an authorised technician (

see

Assistance

).

 The water pressure must be within the values

indicated in the Technical data table (

see Installation

).

 The hose should not be bent or compressed.

The appliance must be connected to the water

supply network using new hoses.

Do not use old hoses.

Ensure that the new hose supplied is connected and

the old hose is disposed of safely.

 Ensure the fill hose is only fitted to the cold water

supply. DO NOT overtighten the hose connector, hand
tight is sufficient.


Ensure the fill hose is not kinked.


Tap connections*: A range of adaptors are available

to suit your tap.


DO NOT connect the dishwasher to a single outlet

instantaneous water heater or an electric heater.

Standpipe

Ensure that the hose is not pushed too far down the

standpipe.

If the end of your drain hose is fitted with
‘retaining flaps

*

’, ensure they are

inserted fully into the standpipe.  This

will prevent the pipe from jumping out
during installation and use.


DO NOT position the standpipe near an electrical

outlet.


ENSURE that the drain hose is not kinked and it is

routed as shown in the diagram.

The standpipe should have a bore of at least 38mm (11/

2”). It should be installed as shown, have a trap fitted

and must discharge into the same drain system as your
household  sink.

 It MUST NOT be connected to a surface water drain.

*

  Only  available  in  selected  models.

Содержание FDD 914

Страница 1: ...nd refined salt 11 Loading the rinse aid Loading the refined salt Care and maintenance 12 Shutting off the water and electricity supplies Cleaning the dishwasher Preventing unpleasant odours Cleaning...

Страница 2: ...the manual is kept with the machine so that the new owner may benefit from the advice contained within it Please read this instruction manual carefully it contains important information regarding the...

Страница 3: ...with a plug and a 13A fuse If you need to replace the fuse only those rated at 13A and ASTA approved to BS1362 should be used If you lose the fuse cover a replacement may be obtained from your local a...

Страница 4: ...see Assistance The water pressure must be within the values indicated in the Technical data table see Installation The hose should not be bent or compressed The appliance must be connected to the wat...

Страница 5: ...ctions from the waste spigot and ensure that the sealing bung is removed the hose should be routed such that it is raised to a minimum height of 800mm 31 2 Ensure the sink outlet pipe has a minimum di...

Страница 6: ...w rinse aid indicator light Multi functional tablets indicator light ShorTime option indicator light Half load upper and lower rack indicator lights Good Night option button Good Night option indicato...

Страница 7: ...place these on the tip up compartments Tip up compartments with adjustable tilt The tilt feature can be used to increase the space in the upper rack to position wine glasses with different stem length...

Страница 8: ...end of the wash cycle and the text END OF CYCLE appears on the display Switch off the appliance by pressing the ON OFF button shut off the water valve and unplug the appliance from the electricity soc...

Страница 9: ...duces the amount of noise made by the machine and lengthens the wash cycles It is a useful option because it enables users to benefit from the night time energy rate After selecting the wash cycle pre...

Страница 10: ...wash for dishes while awaiting completion of the load with the dishes from the next meal Soaking No No No No A B 0 08 Environmentally friendly wash cycle with low energy consumption levels suitable fo...

Страница 11: ...lay and the set hardness number will also flash slowly on the display the water softening system is set by default to number 3 Press the DELAYED START button of 1 to 5 or the HALF LOAD button of 5 to...

Страница 12: ...od of time let the water run to make sure it is clear and free of impurities before performing the necessary connections If this precaution is not taken the water inlet could become blocked and damage...

Страница 13: ...come a choking or suffocation hazard If your family includes children DO NOT allow children to play with the appliance or tamper with its controls Keep detergents and rinse aids away from children Kee...

Страница 14: ...ties based on the manufacturer s recommendations the hardness of the water and the soil level and quantity of the crockery Even if they are biodegradable detergents contain substances that may alter t...

Страница 15: ...t been arranged well The sprayer arms cannot move freely The wash cycle is too gentle see W ash cycles An excessive amount of foam has been produced the detergent has not been m easured out correctly...

Страница 16: ...rmation Model number Serial number Parts and Accessories We supply a full range of genuine replacement parts as well as accessory products that protect and hygienically clean your appliance to keep it...

Страница 17: ...es batteries light bulbs fluorescent tubes and starters covers and filters Replacement of any removable parts made of glass or plastic THIS GUARANTEE WILL NOT APPLY IF THE APPLIANCE HAS BEEN USED IN C...

Страница 18: ...18 EN Notes...

Страница 19: ...19 EN...

Страница 20: ...20 EN 195076379 00 03 2009 Xerox Fabriano...

Отзывы: