background image


HOTCHKIS PERFORMANCE WARRANTY POLICY 


Effective January 1, 2000. Supersedes all previous policy statements. Policies are subject to change without 

notice. Hotchkis Performance is not responsible for printing errors. 


If you purchased your Hotchkis Performance product from an authorized dealer, you are covered by the terms of this 

policy. All claims however, must be submitted 

THROUGH YOUR DEALER

 not to Hotchkis Performance directly. 

Return Policy: 

We want you to be completely satisfied with your Hotchkis Performance product. In case you’re not, you can exchange 
or return it within 30 days of the purchase date. To obtain a full refund, excluding freight, please contact our Customer 
Service Department at (562) 907-7757. You will be assigned a Returned Goods Authorization Number (RGA). The 
package you return must show the RGA on the outside of the package, include the original invoice and be shipped 
prepaid to our facility. The part has to be in its original packaging materials and be in a sellable condition. For parts 
presenting signs of use, only warranty claims will be accepted. Exchanges or refunds can be made after 30 days with a 
20% restocking charge. 

Warranty Claim: 

Hotchkis Performance warrants its products against materials and workmanship failure for the term of 36 months (3 
year) from the date of purchase and only up to the amount paid. If the product is determined to be defective, Hotchkis 
Performance will repair, replace or refund its value at Hotchkis Performance’s discretion. Any repaired or replaced 
product will be returned to the sender freight prepaid. 

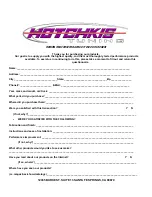
How to File a Warranty Claim: 

The answer to ALL the following questions should be 

YES

 before contacting our Customer Service Department. 

· 

Is the part appropriate to your application? 

· 

Did you carefully and thoroughly read the instructions provided along with the part? 

· 

Do you have the proof of purchase? 

· 

Are you the original purchaser? 

· 

Is the part unmodified and clean? 

· 

Is the return date within 36 months from the purchase date? 

· 

Is the reason for return a legitimate product defect? 

If the answer to all these questions is YES, please contact our Customer Service Department at (562) 907-7757. 

You will be given a Returned Goods Authorization Number (RGA) valid for 60 days. You will also be asked to ship 
the part prepaid to our facility. All shipments MUST be prepaid, include the original invoice and show the RGA on 

the outside of the package, otherwise it will be refused. Please include a brief explanation letter in order to 

expedite the warranty analysis process. 

What doesn’t this Warranty Cover? 

The costs not covered by this warranty include but are not limited to: 
· 

Removal, installation, shipment and insurance costs. 

· 

Improper installation or maintenance. 

· 

Misuse or abuse, negligence, off-road and/or racing applications. 

· 

Damage to related components. 

· 

Normal wear and tear. 

· 

Costs incurred due to down time of vehicle. 

· 

Alterations on the original design or unauthorized repairs. 


Items offered but not manufactured by Hotchkis Performance are warranted according to the  

manufacturers terms and are not the responsibility of Hotchkis Performance. 


All warranties implied by law are limited in duration of this warranty. You have specific rights that may  

vary from state to state.  


12035 BURKE ST. SUITE 13 SANTA FE SPRINGS, CA 90670 

PHONE: (562) 907-7757 FAX: (562) 907-7765 
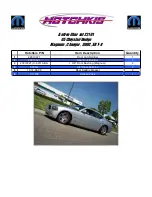
Содержание 22101

Страница 1: ...ar removal and reinstallation Tools Required for this Installation Hydraulic jack jack stands torque wrench 4 post lift or alignment rack preferable The following sockets or wrenches 10mm 13mm 15mm 16mm 18mm 21mm INSTALLATION OF HOTCHKIS FRONT SWAY BAR 1 Secure the rear wheels with blocks and jack the front up Support the front of the vehicle with jack stands on the frame Observe the stock sway ba...

Страница 2: ...nging by it s endlinks at this point Retain all hardware and brackets for reinstallation 4 Detach the endlinks from the sway bar using a 21mm wrench and a 10mm wrench 5 Apply the provided grease to the new Hotchkis polyurethane bushings Once greased install the new bushings onto your new Hotchkis sway bar ...

Страница 3: ...in the same manner as removal Attach the endlinks to the sway bar Do not tighten at this time 7 Install the subframe mounts back onto the vehicle Fully tighten all hardware at this time including the endlink bolts ...

Страница 4: ...S REAR SWAY BAR 1 Secure the front wheels with blocks and jack the rear up until the rear wheels are off the ground Support the rear of the vehicle with jack stands on the factory jack points 2 Remove the rear wheels using a 21mm socket 3 Begin removing the rear shocks by removing the lower nut and bolt using a 18mm wrench and 15mm socket respectively Remove the 2 upper shock bolts using a 16mm so...

Страница 5: ... will need to drop the exhaust system for clearance Unbolt the mid brace removing the 4 bolts using a 13mm socket Spray the rubber hangers in the picture with WD 40 and slide the rubber hanger off the exhaust support Unbolt the remaining rear hangers using a 13mm socket Be careful for the exhaust will drop down once these bolts are out ...

Страница 6: ...ood or a rubber pad to cushion the contact point of the jack and housing Remember the jack stands should still be supporting the rear of the vehicle 7 Once the axle is supported you can unbolt the 4 bolts that secure the rear cradle to the frame using a 18mm socket ...

Страница 7: ...ear brake hardline 9 Detach the endlinks from the sway bar using 15mm wrench on the bolt side and 16mm wrench on the nut side Retain the hardware for reinstallation 10 Unfasten the 2 bolts securing the subframe mounts using a 15 wrench Retain the bolts for reinstallation You may discard the stock bushing brackets ...

Страница 8: ...en removing the sway bar is the brake lines may be in the way If so carefully push the bar around the brake lines 12 Compare the stock bar to your new Hotchkis bar for orientation purposes Lube the bushings with the provided grease and place them onto the bar ...

Страница 9: ...ke sure the bar is oriented as shown in the picture Place the provided bushings mounts over the bushings and make sure the 90 zerk fittings are facing outboard Fully tighten the stock bracket bolts 14 Reattach the endlinks to the sway bar in the same manner as removal Fully tighten all hardware ...

Страница 10: ...oles Start each bolt by hand to ensure proper threading Once thread started fully tighten the cradle bolts using a 18mm socket 14 Perform steps 1 6 in reverse order to finish the installation You are now finished with the rear sway bar installation Make sure that all hardware is fully tightened before driving the vehicle Enjoy your new sport coil spring set ...

Страница 11: ...er 300C SRT 8 Hotchkis P N Item Description Quantity 1 22810321 Front Anti Roll Bar 1 2 22910321 Rear Anti Roll Bar 1 3 21810321 U 62373 BL 1 3 8 Front Bushing Magnum 2 4 5335G 3 4 Rear Bushing 2 5 15 12 06 39 Rear Saddle Bracket 2 6 9 11108 Grease Pack 1 ...

Страница 12: ...ht prepaid How to File a Warranty Claim The answer to ALL the following questions should be YES before contacting our Customer Service Department Is the part appropriate to your application Did you carefully and thoroughly read the instructions provided along with the part Do you have the proof of purchase Are you the original purchaser Is the part unmodified and clean Is the return date within 36...

Страница 13: ...them _______________________________________________________________ Were you satisfied with this transaction Y N If not why ______________________________________________________________________________ WERE YOU SATISFIED WITH THE FOLLOWING Fabrication and finish ______________________________________________________________________ Instructions and ease of installation __________________________...

Страница 14: ...PHONE 562 907 7757 FAX 562 907 7765 ...

Отзывы: