background image

19

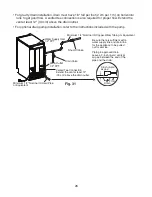
f) Remove hinge (C1) from the top right part of the door, flip it and reattach to the 

bottom left. Remove hinge (C2) from the bottom right part of the door, flip it and 
reattach to the top left. See Fig. 15. Proceed to step 7.

d) Remove hinge (B) from the right side of the appliance and the 2 filler screws from 

the left side. Attach the 2 filler screws to the right side and attach hinge (B) to the 
left side. See Fig. 13.

e) Rotate the top panel 180° from its previous position. This brings the notch that was 

previously in the right rear to the left front. See Fig. 14. Hook the rear part of the 
panel on the body, then secure the front with the 2 bolts removed in step 6a.

6) If you would like to reverse the door hinges, do the following:

a) Contact your local distributor to purchase Hoshizaki Kit HS-0229. The kit contains 

"hinge (A)-left." 

b) Remove the 2 bolts securing the top panel, then lift it off. See Fig. 11.
c) Remove hinge (A)-right and the bracket from the right side of the appliance. Set 

aside hinge (A)-right; it is not needed. Remove the top brace from the left side. 
Fasten hinge (A)-left and the bracket to the left side and the top brace to the right 
side. See Fig. 12. 

Note: When on the proper side, the gasket notch for hinge (A) is to the inside.

Fig. 12

Hinge (A)-Left

Bracket

Screw

Top Brace

Gasket Notch

Screw

Hinge (A)-Right

Not Needed

Fig. 13

Hinge (B)

Filler 

Screws 

Notch

Top Panel

Fig. 14

Screws

Hinge (C1)

Hinge (C2)

Fig. 15

Screws

Screws

Fig. 11

Bolts

Top Panel

Содержание C-8-BAJ-ADDS

Страница 1: ...Models C 80BAJ C 80BAJ DS C 80BAJ AD C 8 BAJ ADDS Self Contained Flaker Instruction Manual Issued 11 14 2017 Revised 12 11 2017 hoshizakiamerica com...

Страница 2: ...per installation is the responsibility of the installer Product failure or property damage due to improper installation is not covered under warranty Hoshizaki provides this manual primarily to assist...

Страница 3: ...DS 8 3 C 80BAJ AD 9 4 C 80BAJ ADDS 10 II Installation Instructions 11 A Checks Before Installation 11 B Location 11 1 General 11 2 Built In Installation Site 12 C Door 13 1 C 80BAJ C 80BAJ AD 13 a Do...

Страница 4: ...roper capacity See the nameplate for electrical specifications Failure to use an independent power supply of proper capacity can result in a tripped breaker blown fuse damage to existing wiring or com...

Страница 5: ...that stays above freezing Normal operating ambient temperature must be within 45 F to 100 F 7 C to 38 C If using the optional drain pump HS 5061 test its operation every time the appliance is cleaned...

Страница 6: ...t Data The nameplate provides electrical and refrigerant data The nameplate is located inside the storage bin For certification marks see the nameplate We reserve the right to make changes in specific...

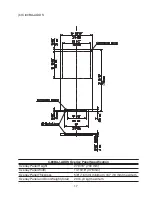
Страница 7: ...7 C Dimensions Connections 1 C 80BAJ Units mm in...

Страница 8: ...8 2 C 80BAJ DS Units mm in...

Страница 9: ...9 Units mm in 3 C 80BAJ AD...

Страница 10: ...10 4 C 80BAJ ADDS Units mm in...

Страница 11: ...nds with the voltage specified on the nameplate B Location 1 General The appliance is approved for indoor or outdoor use NOTICE Normal operating ambient temperature must be within 45 F to 100 F 7 C to...

Страница 12: ...381 mm minimum 24 610 mm minimum C 80BAJ AD C 80BAJ ADDS 32 814 mm minimum C 80BAJ C 80BAJ DS Min 34 864 mm C 80BAJ AD C 80BAJ ADDS Min 32 814 mm Min 15 381 mm Between Two Cabinets Between a Cabinet...

Страница 13: ...ve the door from hinge A See Fig 1 2 Remove the 2 bolts securing the top panel then lift it off See Fig 2 3 Remove hinge A and the bracket from the right side of the appliance and the top brace from t...

Страница 14: ...the body then secure the front with the 2 bolts removed in step 2 6 Remove the 2 screws attaching the door handle and also remove the other 2 screws indicated in the illustration Use 2 of the screws...

Страница 15: ...ality results 1 Parts Ensure that all parts required for the overlay panel assembly are contained in the accessories bag Overlay Panel Parts No Description Part Number Qty 1 Threaded Wood Insert 4A400...

Страница 16: ...ADDS and the directions that follow to prepare your overlay panel a C 80BAJ DS C 80BAJ DS Overlay Panel Specification Overlay Panel Height 29 17 32 750 mm Overlay Panel Width 14 13 16 376 mm Overlay...

Страница 17: ...Panel Specification Overlay Panel Height 27 9 16 700 mm Overlay Panel Width 14 13 16 376 mm Overlay Panel Thickness 5 8 16 mm minimum 3 4 19 mm maximum Overlay Panel and Door Weight total 20 lb 9 kg...

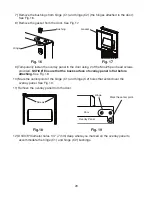
Страница 18: ...bottom of the door slightly and gently remove the door from hinge A See Fig 10 If you are leaving the door right hinged skip to step 7 If you would like to reverse the door hinges proceed to step 6 3...

Страница 19: ...nt with the 2 bolts removed in step 6a 6 If you would like to reverse the door hinges do the following a Contact your local distributor to purchase Hoshizaki Kit HS 0229 The kit contains hinge A left...

Страница 20: ...extend over the overlay panel See Fig 19 11 Remove the overlay panel from the door 7 Remove the bushings from hinge C1 and hinge C2 the hinges attached to the door See Fig 16 8 Remove the gasket from...

Страница 21: ...ee Fig 22 4 Remove the overlay panel from the door and tighten the two M4 8 truss head screws securing the sheet metal bracket to the overlay panel See Fig 23 4 Attachment of Overlay Panel to Door 1 F...

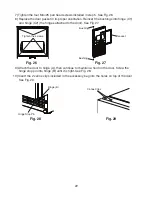
Страница 22: ...es attached to the door See Fig 27 Canoe Clips Fig 26 Tighten the screws Bushing Bushing Gasket Fig 27 9 Attach the door to hinge A then continue to maintain a hold on the door Screw the hinge stop pi...

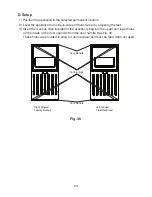
Страница 23: ...feet 3 Insert the 4 canoe clips included in the accessory bag into the upper and lower holes on the inside of the door opposite from the door handle See Fig 30 These holes are provided to allow for d...

Страница 24: ...not remove the ground prong from the power cord and do not use an adapter plug Failure to properly ground the appliance could result in death or serious injury Do not use an extension cord To reduce...

Страница 25: ...ppliance Water hammer can cause appliance damage that may lead to water leakage or flooding A minimum of 1 2 nominal ID hard pipe or equivalent is required for the drain line Installing a smaller diam...

Страница 26: ...nal ID Copper Water Tubing or Equivalent Minimum 1 2 Nominal ID Hard Pipe or Equivalent Be sure there is sufficient extra water supply line and drain line for the appliance to be pulled out for servic...

Страница 27: ...ate and local code and regulation requirements 5 Has the power supply voltage been checked or tested against the nameplate rating Is the power supply a properly grounded independent 3 prong wall outle...

Страница 28: ...ons Wash your hands before removing ice Use the plastic scoop provided Do not place fingers or any other objects into the ice discharge opening The appliance is not intended for use by persons includi...

Страница 29: ...f the appliance and close the water supply line shut off valve Call for service If water seeps from the base of the appliance turn off the appliance and close the water supply line shut off valve Call...

Страница 30: ...er supply line drain line or power cord 3 If required by sanitation code in your area seal the perimeter where the appliance touches the floor with approved caulk compound in a smooth and easily clean...

Страница 31: ...nd warranty coverage To reduce the risk of electric shock do not touch the control switch or plug with damp hands Make sure the control switch is in the OFF position before plugging in or unplugging t...

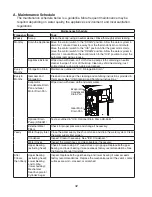
Страница 32: ...Months Icemaker and Storage Bin Clean and sanitize per the cleaning and sanitizing instructions provided in this manual See IV B Cleaning and Sanitizing Instructions Evaporator Condensate Drain Pan a...

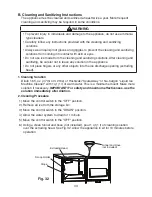
Страница 33: ...ce fingers or any other objects into the ice discharge opening extruding head 1 Cleaning Solution Dilute 1 6 fl oz 47 ml or 3 2 tbs of Hoshizaki Scale Away or Nu Calgon Liquid Ice Machine Cleaner with...

Страница 34: ...pour 1 qt 1 l of sanitizing solution over the extruding head Allow the appliance to sit for 10 minutes before operation 2 Remove the slope from the storage bin by carefully bending it in the center a...

Страница 35: ...torage Bin Drain In some conditions slime may build up inside the storage bin drain and prevent water from draining properly To prevent this buildup perform the following procedure once every 3 months...

Страница 36: ...ntrol switch or plug with damp hands 2 Remove the screws securing the front panel then remove it See Fig 33 3 Remove the screws securing the louver then remove it 4 Use a brush attachment on a vacuum...

Страница 37: ...out properly and the drain pump then de energizes proceed to step 6 If water does not pump out properly and or the drain pump does not de energize the appliance must be serviced by a qualified servic...

Страница 38: ...hut off valve then open the water supply line drain valve See Fig 31 3 Allow the line to drain by gravity 4 Move the control switch to the DRAIN position 5 Allow the water system to drain for 1 minute...

Страница 39: ...pply 16 Move the control switch to the OFF position then unplug the appliance from the electrical outlet 17 Reconnect the reservoir outlet hose to the reservoir then secure with the clamp Make sure al...

Страница 40: ...osal The appliance contains refrigerant and must be disposed of in accordance with applicable national state and local codes and regulations Refrigerant must be recovered by properly certified service...

Страница 41: ...41 618 Hwy 74 South Peachtree City GA 30269 USA P 770 487 2331 F 770 487 3360 hoshizakiamerica com 1A4911 011...

Отзывы: