


EN
Model Assembly
Continued
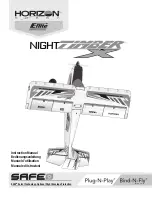
Wing Assembly
1. Insert the wing joiner tube and slide the left and right wing halves together,
as shown.
2. Secure the wing together using the wing bracket (
A
).
3. Connect the fl ap, and aileron connectors to respective Y-harnesses. The left
and right servos can be connected to either side of a Y-harness.
IMPORTANT:
The ailerons must be connected to the receiver’s aileron
port (channel 2) with a Y-harness (included) for the AS3X
®
system to
function properly.
4. Connect the two navigation light connectors (Servo style connector with
exposed pins) to the light harness of the AR637TA.
5. Connect the internal LED light connectors from the wings (two pin connector)
to the LED light harness (
D
) as shown. The LED connectors can be installed in
any port of the harness.
6. Guide the fl aps, navigation lights, internal LED lights and aileron servo
connectors (
B
) into the top of the fuselage as shown.
7. Connect the fl aps, lights, and ailerons as shown to their respective receiver
port. Flaps slot 6, lights slot 5, and ailerons slot 2.
8. Align the wing with the fuselage and secure into position using the included 2
nylon wing bolts (
C
).
CAUTION:
DO NOT crush or otherwise damage the wiring when
attaching the wing to the fuselage.
Disassemble in reverse order.
A
B
C
B
Lights
Flaps
Ailerons
Wings
Internal LEDs
D
Propeller Installation
1. Remove the spinner screw (
A
) from the spinner (
B
).
2. Slide the propeller (
C
) propeller backplate (
D
) and collet (
E
) onto the
motor shaft.
3. Tighten the spinner nut (
F
) using an adjustable wrench.
4. Slide the spinner onto the shaft in front of the propeller.
5. Secure the spinner with the spinner screw.
Disassemble in reverse order.
A
E
D
C
B
F
7


