


EN
Carbon-Z Cub SS
4
Preflight
1
Remove and inspect contents.
2
Read this instruction manual thoroughly.
3
Charge the flight battery.
4
Fully assemble the aircraft.
5
Install the flight battery in the aircraft (once it has been fully charged).
6
Check the Center of Gravity (CG).
7
Bind the aircraft to your transmitter.
8
Make sure all linkages move freely.
9
Perform the control direction test with the transmitter.
10 Adjust the flight controls and transmitter as needed.
11 Perform a radio system range test.
12 Find a safe open area to fly.
13 Plan flight for flying field conditions.
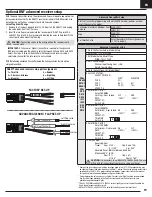
Transmitter Setup (BNF)
IMPORTANT:
After you set up your model, always rebind the transmitter and
receiver to set the desired failsafe positions.
If your transmitter allows it, enable the throttle cut feature. Always engage throttle
cut before approaching the aircraft.
Dual Rates
Low rate is recommended for the initial flights.
NOTICE:
To ensure AS3X
®
technology functions properly, do not lower rate
values below 50%. If lower rates are desired, manually adjust the position of the
pushrods on the servo arm.
NOTICE:
If oscillation occurs at high speed, refer to the Troubleshooting Guide for
more information.
Expo
After first flights, you may adjust expo in your transmitter.
Computerized Transmitter Setup
(DX6i, DX6e
‡
, DX6
‡
, DX7, DX7S, DX8, DX9, DX10t, DX18, DX20, iX12. iX20,
NX6, NX8 and NX10)
Start all transmitter programming with a blank ACRO model (do a model reset),
then name the model.
Set Aileron, Eleva-
tor and Rudder Dual
Rates to:
HIGH 100%
LOW 70%
Set Servo Travel to:
100%
Set Throttle Cut to
-130%
DX6i
1. Go to the SETUP LIST MENU
2. Set MODEL TYPE: ACRO
3. Go to ADJUST LIST MENU
4. Set FLAPS:
Norm
£
100 Flap
Elev 0
LAND
100 Flap
Elev 15
DX7S
DX8
1. Go to the SYSTEM SETUP
2. Set MODEL TYPE: AIRPLANE
3. Set WING TYPE: 1 AIL 1 FLAP
4. Go to the FUNCTION LIST
5. Set FLAP SYSTEM: Choose Flap
NORM:
0% FLAP*
MID:
50% FLAP*
6% Elevator
LAND:
100% FLAP*
15% Elevator
SPEED 2.0S: SWITCH = FLAP
DX6e
‡
DX6
(Gen2)
‡
DX7
(Gen2)
DX8
(Gen2)
DX9
DX10t
DX18
DX20
iX12
†
iX20
†
NX6
NX8
NX10
1. Go to the SYSTEM SETUP (Model Utilities)
†
2. Set MODEL TYPE: AIRPLANE
3. Set AIRCRAFT TYPE (Model Setup, Aircraft Type)
†
:
WING: 1 AIL 1 FLAP
4. Go to the FUNCTION LIST (Model Adjust)
†
5. Set FLAP SYSTEM:
SELECT SWITCH D:
POS 0: 0% FLAP*
POS 1: 40% FLAP*
6% Elevator
POS 2: 100% FLAP*
15% Elevator
SPEED 2.0
†
Some of the terminology and function locations used in the iX12, iX20
programming may be slightly different than other Spektrum AirWare™ radios.
The names given in parenthesis correspond to the iX12, iX20 programming
terminology. Consult your transmitter manual for specific information about
programming your transmitter.
* Flap programming values may vary slightly. For your initial flights use the
recommended flap travel settings provided in the Flaps section and adjust
the flap travel to your preference on subsequent flights.


