


BEFORE
YOU
BEGIN
18
INTRODUCTION
IMPORT
ANT
PRECAUTIONS
ASSEMBL
Y
BEFORE
YOU
BEGIN
ELLIPTICAL
OPERA
TION
LIMITED
W
ARRANTY
TROUBLESHOOTING
&
MAINTENANCE
CONDITIONING
GUIDELINES
ASSEMBL
Y
ELLIPTICAL
OPERA
TION
ASSEMBL
Y
19
INTRODUCTION
ELLIPTICAL OPERA
TION
CONDITIONING GUIDELINES
TROUBLESHOOTING &
MAINTENANCE
LIMITED WARRANTY
ELLIPTICAL OPERA
TION
BEFORE YOU
BEGIN
IMPORT
ANT
PRECAUTIONS
ASSEMBL
Y
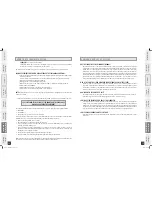
POWER
Your programmable elliptical is powered by a power supply. The power must be plugged into the power jack,
which is located in the front of the machine near the STABILIZER TUBE.
Do not operate the elliptical if the power cord or plug is damaged.
If the elliptical appears to not be working properly, do not use the elliptical.
MOVING
Your elliptical has a pair of transport wheels built
into the FRONT STABILIZER TUBE. To move, firmly
grasp the CONSOLE MAST, carefully tilt and roll.
Our ellipticals are well built and heavy, weighing up to 200 lbs! Use care and
additional help if necessary when moving.
FOOT POSITIONING
Your elliptical offers a variety of foot positions. Moving your foot to the forward most position of the foot pad
increases your step height, which will create a feel similar to a step machine. Placing your foot toward the
back of the foot pad decreases your step height and creates more of a gliding feel, similar to a smooth walk or
run.
Your elliptical also allows you to pedal both forward and backwards to offer a variation to your workout and to
focus on other major leg muscle groups such as your hamstrings and calves.
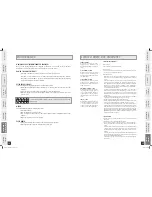
ELLIPTICAL OPERATION
WARNING
WARNING
Note: There is a thin protective sheet of clear plastic on the overlay of the console and should be removed.
A) MONITOR DISPLAY:
Speed, Time, Pulse, Distance, Level, Calories and Program Profiles.
B) START/STOP:
Press to start/pause/end your workout. Hold for 2 seconds to reset the elliptical.
C) ENTER:
Used to set your program.
D) PROGRAM SELECT:
Used to select your program.
E) UP/DOWN ARROW KEYS:
Used to adjust resistance.
F) BEEP ON/OFF:
Used to turn off resistance change indicator sound (Note: does not turn off speakers).
G) ONE-TOUCH RESISTANCE KEYS:
Used to reach desired resistance more quickly (CSE3.5: 5 keys, CSE4.5: 10 keys).
H) WORKOUT CHART:
Goal oriented program that tracks workout progress over 6 weeks (CSE4.5 only).
I) FAN BUTTON:
Used to adjust fan to 3 speed levels.
J) FAN:
Personal workout fan.
K) READING RACK/MUSIC PLAYER HOLDER:
Holds reading material or music player.
CONSOLE DISPLAY
� � � � � � � � � � � � � � � � � � � � � � � � � � � �
� � � � � � � � � �
����
��������
�
�
�
�
��
��
��
��
��
��
�����
�������
������
������������
������
�����
�����
�����
�
�
�
�
�
�
�������
�������
�����
�
�
�
�
�
�
�
�
�
�
�
CSE3.5-4.5 Elliptical Rev 0.4.indd 18-19
6/3/05 5:42:28 PM