background image

Honeywell


Unpack Everything 

 One 

Camera 


8-pin terminal block for alarm input/output 


One CD containing the software 

Prepare for Installation 

Select the lens to use with your camera. The VENTI 
series Network Camera supports the use of a manual iris 
or DC iris lens. When using a DC iris lens, it should be 
connected to the camera via the 4-pin square socket 
located at the side of the camera. 

Mount the Camera 

1.  Attach the camera to a pending mount. 

Insert the screws on the camera stand into either of 
the screw holes on the base. Then tighten them up. 

2.  Mount the camera onto the ceiling/wall and fasten it 

securely.  

Connect the Wiring 


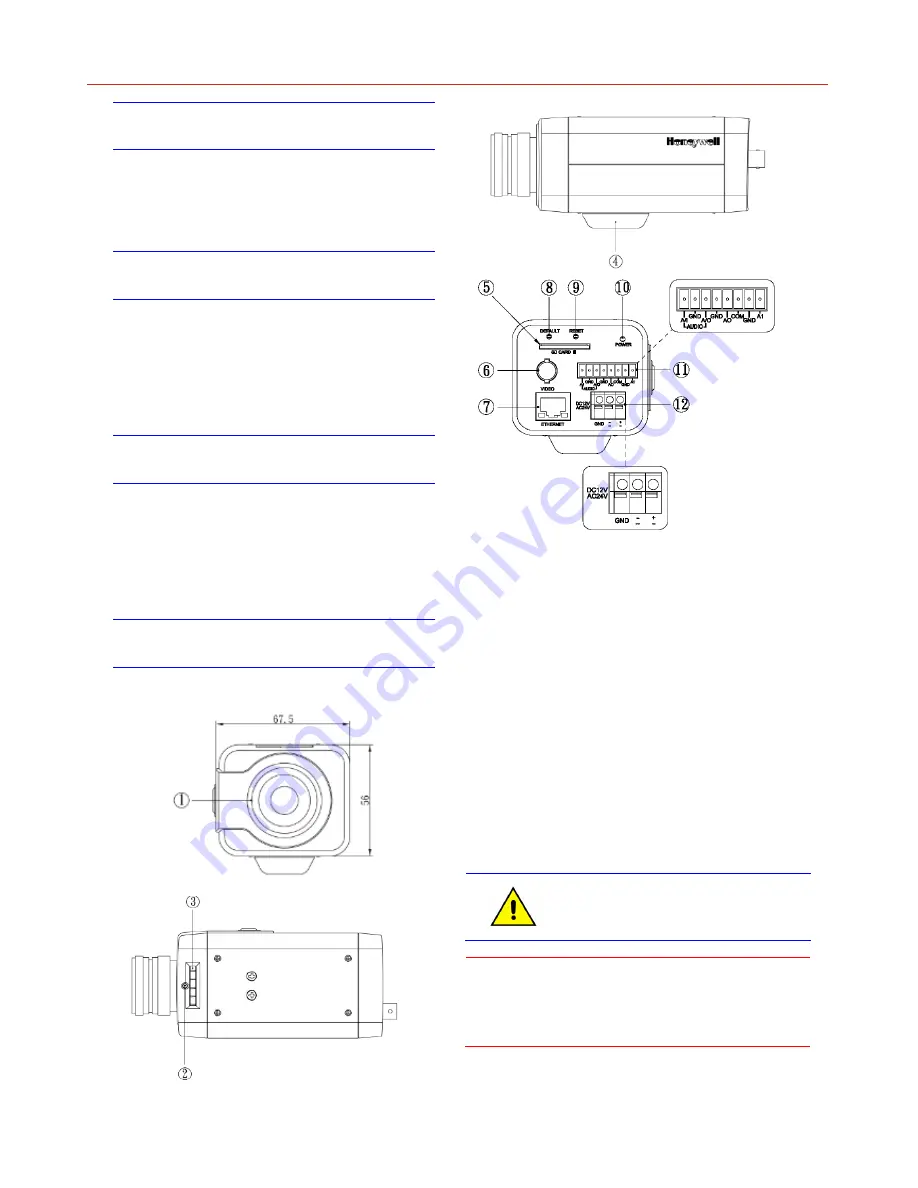
1.  CS mount: connect the lens with the camera 
2. Screw 
3. Back 

focus 

Adjustment 

4.  Base: connect the camera with the tripod 
5.  SD card slot: insert a SD card into this slot for 

recording and storage 

6.  Video: video output port 
7.  RJ45 Ethernet Connector/ PoE: insert the RJ45 cable 

for network connection. It also supports PoE (Power 
over Ethernet).   

8.  Default: reset all of the camera parameters to factory 

default.     

9.  Reset Button: restart the system.   
10.  Power Indicator: Red light indicates power connection. 
11.  I/O Connector: Input/ Output Connector 
12. Power Terminal: DC12V/AC24V, red port: power 

+/white port: power –/black port: GND. Make sure to 
connect the power connector to correct ports (+ and –) 
when the power supply is DC12V.   


For secure installations, protect surface 

mounted cables with plastic or metal 

cable covers.


Caution 

To avoid damage to the camera, never connect 

more than one type of power supply (PoE 

IEEE802.3 Ethernet or 12V DC or 24V AC 

power plug) at the same time


Содержание VENTI Series D1

Страница 1: ...en tested and found to comply with the limits for a Class B digital device Pursuant to Part 15 of the FCC Rules these limits are designed to provide reasonable protection against harmful interference in a residential installation This equipment generates uses and can radiate radio frequency energy and if not installed and used in accordance with the instruction manual may cause harmful interferenc...

Страница 2: ...k focus Adjustment 4 Base connect the camera with the tripod 5 SD card slot insert a SD card into this slot for recording and storage 6 Video video output port 7 RJ45 Ethernet Connector PoE insert the RJ45 cable for network connection It also supports PoE Power over Ethernet 8 Default reset all of the camera parameters to factory default 9 Reset Button restart the system 10 Power Indicator Red lig...

Страница 3: ...ories and choose Command Prompt Type Ping 192 168 0 30 If the message Reply from appears it means the connection is done 4 Start Internet Explorer and enter IP address 192 168 0 30 A login window will appear Enter the default user name admin and password 1234 to log in 5 Images of the camera can be viewed through Internet Explorer Before viewing follow these steps to enable the display a Enable Co...

Страница 4: ... run the program Follow the instructions to install 3 After successfully installing IP Finder double click the IP Finder icon which is displayed in your desktop An IP Finder window will pop out The window will display a list of IP cameras which you are using currently 4 Press Search to search cameras Honeywell Honeywell Security Asia Pacific 35F Tower A City Center 100 Zun Yi Road Shanghai 200051 ...

Отзывы: