


Rev. (a)
Connect Vehicle 10-60VDC
1. The Thor VM2C must not be mounted in the Quick Mount Smart Dock. The power switch on the Dock must be turned
Off
. The power cable must be UNPLUGGED from the Dock.
2. While observing the fuse requirements specified above, connect the power cable as close as possible to the actual
battery terminals of the vehicle (if using unswitched power).
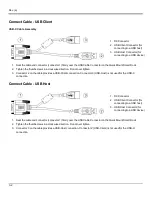
3. Wiring installation
l
Use proper electrical and mechanical fastening means for terminating the cable. Properly sized “crimp” type
electrical terminals are an accepted method of termination. Please select electrical connectors sized for use with
20AWG (0.81mm2) conductors.
l
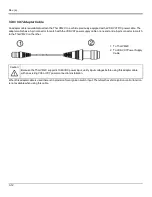
Refer to the diagrams following this section for wire colors and connections:
n
n
n
n
5. Route the power cable:
l
Route the power cable the shortest way possible removing any left-over cable
l
The cable is rated for a maximum temperature of 105°C (221°F). Therefore, routing this cable it should be
protected from physical damage and from surfaces that might exceed this temperature.
l
Cable should be protected from physical damage from moving parts
l
Do not expose the cable to chemicals or oil that may cause the wiring insulation to deteriorate
l
Always route the cable so that it does not interfere with safe operation and maintenance of the vehicle.
l
Provide mechanical support for the cable by securing it to the vehicle structure at approximately one foot
intervals, taking care not to over tighten and pinch conductors or penetrate outer cable jacket.
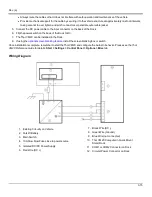
5. Connect the DC power cable to the input connector on the back of the Dock.
6. Flip the power switch on the back of the Dock to On.
7. The Thor VM2C can be installed in the Dock.
8. If using the
optional screen blanking feature
, install the screen blanking box or switch.
Once installation is complete, remember to start the Thor VM2C and configure the Power Mode. Please see the
Thor VM2C
Reference Guide
for details:
Start > Settings > Control Panel > Power Configuration Mode
.
3-8
Содержание Thor VM2C
Страница 1: ...Thor VM2C Vehicle Mount Computer Microsoft Windows Embedded CE 6 Operating System User s Guide ...
Страница 6: ...Rev 01 iv ...
Страница 8: ...Rev a Components Front View 1 Power Button 2 Speakers 3 Microphone 1 2 ...
Страница 18: ...Rev a LED Functions 1 System LEDs 2 Connection LEDs 3 Blue LED 4 Orange LED 5 Programmable LED 2 6 ...
Страница 38: ...Rev 01 2 26 ...
Страница 57: ...Rev a 3 19 ...
Страница 58: ...Rev 01 3 20 ...
Страница 66: ...Rev 01 4 8 ...
Страница 69: ...Rev a 5 3 ...


