background image

- 17

-

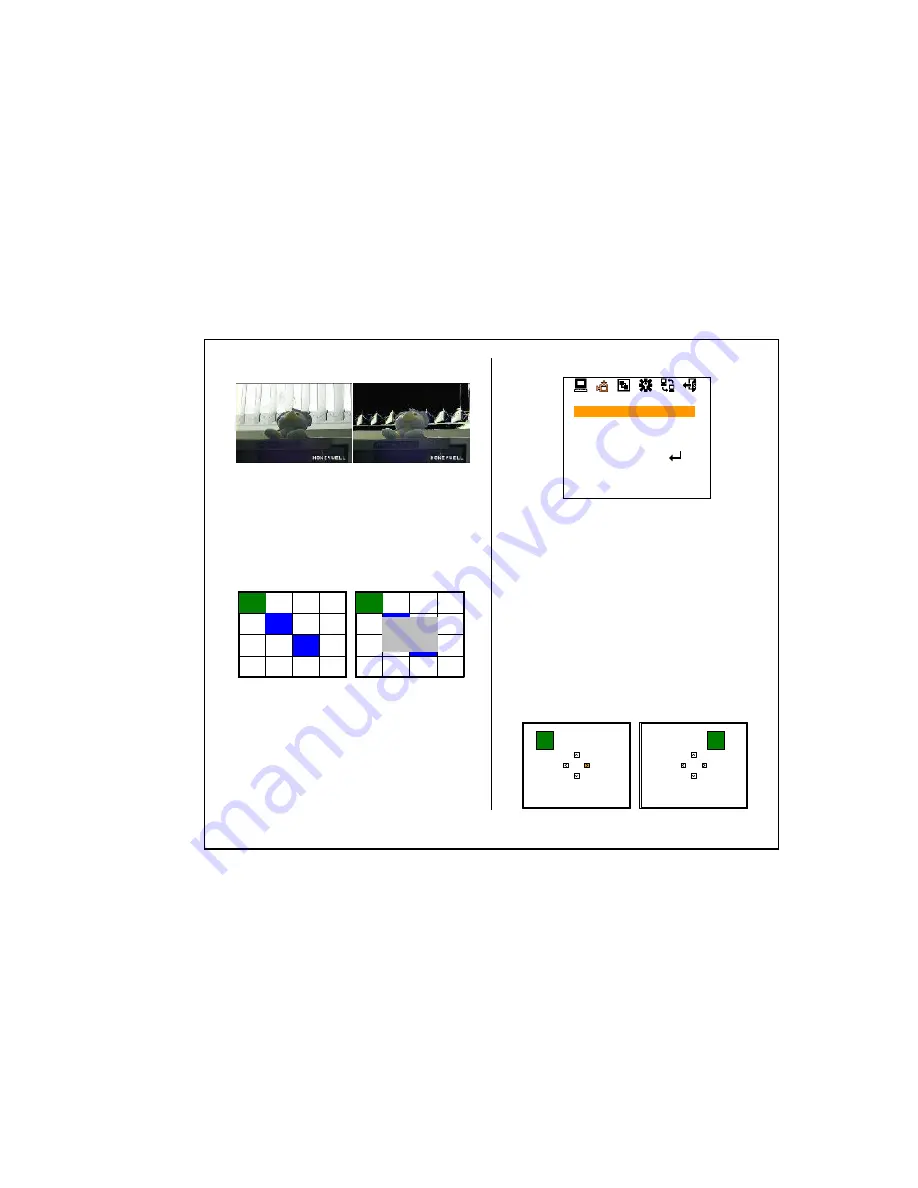
AREA SEL : User can select area for BMB.

If you press MENU at AREA SEL, you can configure the area 

of BMB. To exit area selection menu, press the MENU button 

for more than 2 seconds.

-. ALL SET : Select all area

-. ALL CLEAR : Clear all area

-. AREA SELECT : Back to area select mode

-. RETURN MENU : Exit AREA SEL, and return to BLC MODE

PZM display

Set ON/OFF for each PZM Zone.

CONTROL                 OFF 

ON

PZM Horizontal center starting point

: Set PZM for the starting point of Horizontal center.

H SIZE                      60 ~ 496  

PZM Vertical center starting point

: Set PZM for the starting point of vertical center. 

V SIZE                      24 ~ 198

Moving PZM area

: Configured PZM area can be moved by this menu.

If you press MENU button at MOVE CONTROL, below 

screen will appear. You can move PZM area by TELE, 

WIDE, NEAR, FAR buttons. To exit MOVE CONTROL menu, 

press MENU button for more than 2 seconds.

<Fig5-17. PZM position move >

<<  PZM MODE  >>

ZONE NUMBER
DISPLAY
H SIZE
V SIZE
MOVE CONTROL
COLOR
ALPHA
RETURN

1
ON
60
24

BLUE
1

5.10 PRIVACY ZONE

Set Privacy ZONE

: PZM(Privacy Zone Mask) is to hide the unwanted view to protect 

privacy invasion. It works with Zoom/PAN/TILT operation. Select
PZM zone upto 8 zones.

ZONE NUMBER         1 

.  

8

<Fig5-16. PZM MODE change >

<Fig5-15. BMB MODE areas setting >

ALL SET

ALL CLEAR

AREA SELECT

RETURN MENU

BMB Color selection: User can select masking color of BM

B

BMB MASKING       BLACK 

D.GRAY 

WHITE

<Fig5-14. WDR and BMB  >

Содержание HZC-363N Series

Страница 1: ...OPERATION MANUAL HZC 363N P Series Built in x36 Optical ZOOM High Resolution AUTO FOCUS CAMERA READ AND KEEP THIS OPERATION MANUAL ...

Страница 2: ...re designed to provide reasonable protection against such interference when operated in a commercial environment Warning TO PREVENT FIRE OR SHOCK HAZARD DO NOT EXPOSE THIS APPLIANCE TO RAIN OR MOISTURE CAUTION RISK OF ELECTRIC SHOCK DO NOT OPEN CAUTION TO REDUCE THE RISK OF ELECTRIC SHOCK DO NOT REMOVE COVER OR BACK NO USER SERVICEABLE PARTS INSIDE PREFER SERVICING TO QUALIFIED SERVICE PERSONNEL I...

Страница 3: ...ediately turn the power off then contact your supplier 9 Cleaning Turn the power off and wipe off the dirt with a dry soft cloth If it is extremely dirty use furniture cleaner to wipe it off To clean the lens use a blower or lens cleaning tissue available from any camera dealer 10 Do not shoot any source of bright light If the objects contain very bright areas bright vertical or horizontal lines m...

Страница 4: ...Dimensions 24 6 Specifications 23 3 Installation 7 Thank you for using our Auto Focus Zoom Color Camera To get the best efficiency read carefully all instructions in this manual before use and keep this manual for reference If you have any problems with this camera contact your supplier to service ...

Страница 5: ...effective surveillance under low light condition HZC 363N P less than 0 0001 lx DNR Digital Noise Reduction By using the iCORE ISP chip applied to the DNR technology the amount of low illuminance noise has been significantly reduced 1 Features Privacy Zone Masking HZC 363N P Series mask the unwanted view for privacy protection up to 8 zones Privacy Zone operates with zoom in out and it increases t...

Страница 6: ...ECTOR VIDEO OUTPUT S VIDEO OUTPUT POWER ON LAMP This is the output terminal for composite video signal This is the output terminal for separate Y C signal In power ON state this LED is ON This is the 14 pin connector for external camera controls Refer to 4 CAMERA CONTROL METHODS DC 12V Please use a specified adaptor SVIDEO VIDEO ...

Страница 7: ... COM 8 GND 10 R RD 12 T GND 14 GND RED GREEN WHITE BLACK BROWN VIOLET WHITE YELLOW BLUE ORANGE BLACK PINK GRAY BLACK 3 Installation 3 1 Check all accessories with enclosed package HZC 363N P Ser SET 14 PIN CONNECTION CABLE 150mm OPERATION MANUAL HZC 363N P Ser 14 PIN CABLE OPERATION MANUAL ...

Страница 8: ...Remote Control using for RS 232C connection Connector pin 10 11 12 Connect to Serial PORT COM1 or COM2 14P Cable 14P Cable 10 11 12 RD TxD TD RxD GND 14P Cable Serial Cable Serial Cable 9 Pin D Sub 2 RD 3 TD 5 SG 3 4 5 ZOOM FOCUS MENU 14P Cable Controller 6 COM Relay Relay Relay TELE WIDE NEAR FAR MENU ON ...

Страница 9: ...OPTION Connect to Serial PORT COM1 or COM2 14P Cable Serial Cable 10 11 12 RD TxD TD RxD GND 14P Cable Serial Cable 9 Pin D Sub 2 RD 3 TD 5 SG RS 422 485 Converter 9 10 11 R R T 14P Cable RS 485 Converter T T R 12 T R 422 9 10 11 R R T 14P Cable RS 485 Converter TRxD TRxD 12 T 485 ...

Страница 10: ...position of ID changes as following order Bottom Right Top Left Top Right Non display If display Operating OSD is not requested by special reason such as using external text overlay board it can be OFF mode at all times through external communication control as RS 232C Table5 1 Operating OSD description Motion Detection is ON Motion Detection is OFF Non display MD Mode DISPLAY set as TITLE TITLE I...

Страница 11: ...TO LOCK 0 255 0 255 MODE SHUTTER IRIS GAIN BRIGHTNESS MAX GAIN MAX FIELDS AUTO SHTFIX IRIS 1 60 50 1 100000 CLOSE OPEN OFF 36 dB 0 100 OFF 36 dB OFF 512 FLD MODE DETECT TIME DETECT MODE D N LEVEL N D LEVEL NIGHT COLOR OFF ON AUTO 1 10 BRT CDS ALL 1 2 3 3 4 5 COLOR BW ZONE NUM CONTROL H SIZE V SIZE COLOR ALPHA 1 8 ON OFF 60 496 24 198 BLUE RED WHITE 1 15 MODE OFF BLC ABLC CAMERA ID DISPLAY POSITION...

Страница 12: ...and press NEAR FAR key b In order to change from Sub MENU to SETUP MENU select RETURN MENU using TELE WIDE key and press NEAR FAR key Setup menu Sub menu AE MODE MODE SHUTTER IRIS GAIN BRIGHTNESS MAX AGC MAX FIELDS RETURN AUTO AUTO AUTO AUTO 50 OFF OFF CAMERA SETUP AE MODE WB MODE BLC MODE PZM SET NIGHTSHOT CAMERA ID RETURN LENS MODE EXIT SETUP SAVE AND EXIT EXIT RETURN Fig5 3 EXIT SETUP GENERAL S...

Страница 13: ...gion E Zoom Control ON means up to x576 OFF means only optical zoom region E ZOOM OFF ON Set Focus Mode Three modes are available AUTO It is used to focus automatically at all times MANUAL It is used to focus manually by pushing NEAR FAR key When MANUAL mode is selected it will focus for about 5 seconds after zoom in TELE out WIDE and return to MANUAL mode automatically This is useful to focus acc...

Страница 14: ...hutter Speed and iris MANUAL Shutter Speed Iris Gain is fixed as set value regardless of illuminance caution 1 There are menu items not to adjust and to skip according to mode 2 Field Integration is not operated in Shutter Fix Gain Fix Manual MODE AUTO SHT FIX IRIS FIX GAIN FIX MANUAL AE MODE MODE SHUTTER IRIS GAIN BRIGHTNESS MAX AGC MAX FIELDS RETURN AUTO AUTO AUTO AUTO 50 OFF OFF Fig5 9 AE MODE ...

Страница 15: ...e is 12 phases from OPEN full Open to CLOSE IRIS CLOSE F16 0 F11 0 OPEN GAIN In Gain Fix Manual Mode range is 16 phases from OFF to 36dB GAIN OFF 8dB 10dB 36dB Brightness Adjust level of Auto Iris The smaller brightness value indicates the darker it gets as iris is more closed On the contrary it gets brighter as the brightness value becomes bigger when iris is opened more BRIGHTNESS 0 100 MAX AGC ...

Страница 16: ...e is different on each Mode Adjust BLUE Gain and tune the sensitivity of white point ATW 20 19 19 20 MANUAL 0 1 254 255 AWC 30 Current BLUE gain display BLC MODE MODE LEVEL AREA SEL BMB COLOR RETURN BMB 5 BLACK Fig5 12 BLC MODE 5 9 BLC BMB Mode Backlight Compensation Mode It is for preventing the center object getting too dark when the excessive light is behind the central object Set BACKLIGHT ON ...

Страница 17: ...8 Moving PZM area Configured PZM area can be moved by this menu If you press MENU button at MOVE CONTROL below screen will appear You can move PZM area by TELE WIDE NEAR FAR buttons To exit MOVE CONTROL menu press MENU button for more than 2 seconds Fig5 17 PZM position move PZM MODE ZONE NUMBER DISPLAY H SIZE V SIZE MOVE CONTROL COLOR ALPHA RETURN 1 ON 60 24 BLUE 1 5 10 PRIVACY ZONE Set Privacy Z...

Страница 18: ... COLOR RETURN OFF 5 BRT 1 4 B W Fig5 18 NIGHTSHOT MODE DETECT MODE BRT CDS ALL caution BRT means shooting scene brightness CDS sensor s operation depends on circumstantial brightness Select to match with installation circumstance Turnover LEVEL from DAY TO NIGHT Set the LEVEL to turnover from Day to Night D N LEVEL 1 2 3 Turnover LEVEL from NIGHT TO DAY Set the LEVEL to turnover from Night to Day ...

Страница 19: ...Automatically the position will be forward to next position TITLE R If you want to edit specified character you shall use TELE Wide to move on the position and NEAR FAR to select on the character By using TELE WIDE to position the character to continue to edit Select character 1 using TELE WIDE NEAR FAR button and it will blink the cursor on the character 1 ABCDEFGHIJKLMNOPQRST UVWXYZabcdefghijklm...

Страница 20: ... OFF R TOP Fig5 21 PIP MODE 5 2 QUAD MODE QUAD Mode supports 4 split screen display There are two working mode of manual push or sequence switching for split screen change Display mode It makes QUAD mode ON OFF If it is selected as LIVE normal video will be displayed and if it is selected as QUAD screen will be split DISPLAY LIVE QUAD Video Capture When DISPLAY is set as QUAD if you push MENU butt...

Страница 21: ...e GAMMA 0 36 0 38 USER SPECIAL SETUP SHARPNESS GAMMA BAUDRATE PROTOCOL LANGUAGE MONO 8 3 9600 DEFAULT ENG RETURN OFF Fig5 24 SPECIAL SETUP BAUD RATE Use to communicate through RS232C RS485 RS232TTL BAUDRATE 2400 4800 57600 caution 1 If the Baud Rate does not match between Camera and external system it may occur the communication failure Please make sure a proper Baud Rate PROTOCOL Setting Setting ...

Страница 22: ... 22 DEFAULT SETUP FACTORY DEFAULT RETURN Fig5 25 DEFAULT SETUP ...

Страница 23: ...ended 5 50 20 60 Operation Storage Temp AUTO ATW AWC AWC LOCK Indoor Outdoor Manual White Balance ON 8 36dB OFF AGC ON Max 8 area OFF Privacy Zone 1 60 50 1 100 000 Shutter Speed 0 100 adjustable Brightness Auto Manual Oneshot Focus Mode 0 5 lx 50IRE 0 05 lx IR FILTER OFF 0 001 lx 512 fields 0 0001 lx 512 fields IR FILTER OFF Min illuminance More than 50 dB AGC OFF S N Ratio More than 520 TV Lines...

Страница 24: ... 24 7 Dimensions SVIDEO VIDEO ...

Страница 25: ... 25 MEMO ...

Страница 26: ... 100080 Honeywell Security Group Honeywell Co Ltd Address 5F Sangam IT Tower B4 4 block 1590 Sangam dong Mapo gu Seoul 121 835 Republic of Korea TEL 82 2 799 6020 6395 6006 FAX 82 2 792 9011 E mail info security honeywell com ...

Отзывы: