background image

14

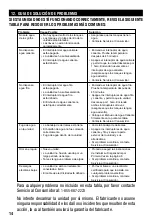
if THE uniT iS nOT WOrking PrOPErLy, PLEASE rEfEr TO THE TABLE BELOW 

TO SOLvE MOST COMMOn PrOBLEMS:

For any issue not shown on the table, please contact customer service. 
1-855-687-2223 
 
Do not attempt to disassemble the unit yourself. The manufacturer will 
not undertake any responsibility from damages or incidents resulting 
from it. This action will void the manufacturer’s warranty.

Issue

Possible Cause

No water

comes out

from the 

faucets

•  No water inside the tanks.

•  Tanks or tubes inside the unit are

   clogged.

•  Levers not working properly.

•  Make sure the tanks are filled with

    water.

•  Contact customer service.

No hot water

•  Hot switch is OFF.

•  The unit may have overheated.

•  Hot switch is damaged.

•  Turn ON the hot switch. Check the

    temperature 45 minutes later. 

•  Turn OFF the hot switch and allow 

    the unit to rest for 1 hour. Turn ON 

    the hot switch again (make sure 

    there is water inside the tank).

•  Contact customer service.

No cold water

•  Cold switch is OFF.

•  The unit may have overheated.

•  Cold switch is damaged.

•  Hot water funnel is not

   properly placed.

 •  Turn ON the cold switch. Check the

    temperature 45 minutes later. 

 •  Turn OFF the hot and cold switches

    and allow the unit to rest for 1 hour. 

    Turn ON both switches again (make 

    sure there is water inside the tank).

•   Place the Hot Water Funnel firmly

    on the metal prong.

 •  Contact customer service.

Water leaking

from the unit

•  Drip tray is full.

•  The water bottle was not properly

   loaded.

•  Water leakage inside of the unit.

•  Empty the drip tray.

•  Turn OFF the cold and hot water

   switches and dry the unit on the

   outside and its surroundings. 

•  If the problem continues, contact

   customer service.

Odor in the

water

•  New machine.

•  The unit has not been used for a

   long time.

•  There may be an algae issue.

•  Please proceed with First Time 

   Instructions on page 8.

•  If the problem continues, contact

   customer service.

Low Electric

shocks

•  The unit is not properly grounded.

•  The power cord is damaged. 

•  Please call a professional electrician

   to assist you with any electrical 

   problem.

•  If the problem continues, contact 

   customer service.

Solution

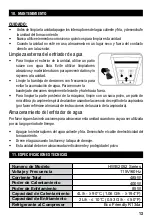
12. TrOuBLESHOOTing guidE

Содержание HWB2052 Series

Страница 1: ...UAL Read and save these instructions before use MANUAL DE INSTRUCCIONES Lea y guarde estas instrucciones antes de usar el producto Modelo HWB2052W S B Series For customer service please contact 1 855 687 2223 Paraservicioalconsumidorfavorcontactar 1 855 687 2223 ...

Страница 2: ...ion Buttons 6 5 Indicator Lights 7 6 Installation Guidelines 7 7 Installing Your Water Cooler For The First Time 8 8 Instructions For Loading The Water Bottle 10 10 Maintenance 13 11 Technical Specification 13 12 Troubleshooting Guide 14 contents 2 9 Cold Water Thermostat Adjustment 12 ...

Страница 3: ...proof of the original purchase date with this guide to establish the warranty period Keep a copy of the sales receipt Write down the model and serial numbers which can be found on a label located on the side of the water cooler Please write the information here Date of Purchase __________________________ Model Number HWB2052 Color White Silver Black Serial Number ____________________________ WARNI...

Страница 4: ...and Cold Power Switches 3 Indicator Lights 4 Rating Label 5 Cold Water Faucet Tap 6 Hot Water Faucet Tap 7 Safety Lock 8 Drip Tray 9 Power Cord 10 Drain Cap 11 Hot Tank Funnel No Name 7 11 2 PARTS AND FEATURES 4 12 Cold Water Thermostat Adjustment 12 ...

Страница 5: ...cal shock If the power cord is damaged have it replaced by an authorized service center DO NOT run power cord under carpeting or cover it with rugs or runners Keep the cord away from areas where it may be tripped over Always unplug the appliance from the power source before cleaning servicing or relocating the unit Make sure to turn OFF the unit when the hot and cold water tanks are empty Always h...

Страница 6: ...andy for future reference POWER Press on the hot or cold switches on the back of the unit to turn on the hot and cold functions DO NOT turn on both switches at the same time Please refer to INSTALLING YOUR WATER COOLER FOR THE FIRST TIME section WATER TAPS Push in the hot or cold water levers with a cup or container to dispense the desire water temperature To use the hot lever press the middle red...

Страница 7: ...l reduce the possibility of a malfunction in the cooling system from mishandling during delivery This unit is for indoor use only and must be installed in a cool ventilated area Place the unit on a level surface that is strong enough to support the dispenser Keep area around the unit free of dust and dirt Locate the unit away from direct sunlight and sources of heat stove heater radiator etc Direc...

Страница 8: ...usive properly installed grounded wall outlet Do not cut or remove the third ground prong from the power cord under any circumstances Any electrician ATTENTION If you do not plan to use the water heating function for more than three days we recommend that you turn off the hot water power switch 6 INSTALLATION GUIDELINES 8 IMPORTANT STEPS BEFORE USING YOUR WATER COOLER BEFORE CONNECTING THE APPLIAN...

Страница 9: ...approximately 45 minutes and the indicator lights will turn OFF Fig 4 7 Test the water temperatures by pushing once again on the water levers 8 Turn OFF both hot and cold water switches and unplug the unit from the electrical outlet 9 Proceed to drain the water from the faucets one at a time by pushing on the hot and cold levers until no more water remains 10 Move the unit towards the edge of a ta...

Страница 10: ...unit and gently let the neck of the bottle slide into the funnel making sure the spill proof cap slides down into the prong The prong will break the spill proof cap allowing the water from the bottle to go down into the funnel and into the main reservoir without any spills Allow the water to fill all tanks of the unit for approximately one minute Push in on all water levers to make sure water flow...

Страница 11: ...n on all water levers to make sure water flows from all faucets Plug the unit back into the electrical outlet Turn ON the hot water switch wait a couple of minutes and turn ON the cold water switch Allow the unit to reach the minimum cold and hot water temperatures This will take approximately 45 minutes and the indicator lights will turn OFF Test the water temperatures by pushing once again on th...

Страница 12: ... vary per unit Therefore starting turning point will differ per unit 45º TO ADJUST COLD WATER THERMOSTAT BREAK THE SEAL 45º 11 25º11 25º 11 25º 11 25º Use a flat screwdriver to adjust COLD WATER THERMOSTAT ADJUSTMENT WARNING Adjust the cold water thermostat if absolutely necessary Over adjustment may cause compressor failure and can temper with the energy efficiency of the unit Carefully read the ...

Страница 13: ...an the drip tray To clean the back of the machine clean with a duster such as a micro fiber cloth and or vacuum the coils using the duster attachment of the vacuum please refer to your vacuum cleaner owner s manual Storing your Water Cooler Please follow these instructions to store the water cooler when it will not be used for an extended period of time Turn OFF the hot and cold water switches Unp...

Страница 14: ... switch is OFF The unit may have overheated Cold switch is damaged Hot water funnel is not properly placed Turn ON the cold switch Check the temperature 45 minutes later Turn OFF the hot and cold switches and allow the unit to rest for 1 hour Turn ON both switches again make sure there is water inside the tank Place the Hot Water Funnel firmly on the metal prong Contact customer service Water leak...

Страница 15: ...y apply Or visit www honeywellwatercoolers com Imported and Distributed by SCA Imports LLC 18851 NE 29th Ave Suite 706 Aventura Fl 33180 Tel 1 855 687 2223 2015 Mitrana Group Inc All rights reserved IM02 HWB2052W S B 2015 06 The Honeywell Trademark is used under license from Honeywell International Inc Honeywell International Inc makes no representations or warranties with respect to this product ...

Страница 16: ...ANUAL Read and save these instructions before use MANUAL DE INSTRUCCIONES Lea y guarde estas instrucciones antes de usar el producto Modelo HWB2052W S B Series For customer service please contact 1 855 687 2223 Paraservicioalconsumidorfavorcontactar 1 855 687 2223 ...

Страница 17: ...rtantes de Seguridad 5 4 Botones de Funciones 6 5 Luces Indicadoras 7 6 Guía de Instalación 7 7 Instalar el Dispensador por Primera Vez 8 8 Instrucciones para Colocar el Botellón de Agua 10 10 Mantenimiento 13 11 13 12 Guía de Solución de Problemas 14 CONTENIDO 2 9 Ajuste del Termostato de Agua Fría 12 ...

Страница 18: ...inal de compra junto con esta guía para establecer el periodo de garantía Mantenga una copia del recibo de compra Escriba el número de serie y modelo los cuales pueden ser ubicados en la etiqueta que está ubicada a un lado del dispensador de agua Por favor escriba la información aquí Fecha de Compra __________________________ Número de Modelo HWB2052 Color Blanco Negro Plateado Número de Serial __...

Страница 19: ... Información Tecnica 5 Llave de Agua Fria 6 Llave de Agua Caliente 7 Botón de Seguridad 8 Bandeja Contra Derrames 9 Cable de Electricidad 10 Tapon de Drenaje 11 Embudo de Agua Caliente No Nombre 2 COMPONENTES Y CARACTERISTICAS 4 1 2 4 9 10 3 5 6 8 7 11 12 Ajuste del Termostato de Agua Fría 12 ...

Страница 20: ...r en el riesgo de una descarga eléctrica Si el cable de electricidad está dañado debe ser remplazado a través un centro de servicio autorizado NO pase el cable de electricidad por debajo de alfombras Mantenga el cable lejos de áreas donde pueda causar tropiezos Siempre desconecte el electrodoméstico de la fuente de poder antes de limpiarlo reubicarlo o darle mantenimiento Asegúrese de apagar la un...

Страница 21: ...Presione en los interruptores de agua caliente o fría ubicados en la parte posterior de la unidad para prender las funciones de agua fría y caliente respectivamente a la sección de INSTALAR EL DISPENSADOR POR PRIMERA VEZ LLAVES DE AGUA Presione en las llaves de agua caliente o fría para dispensar el agua a la temperatura deseada Para usar el agua caliente presione el botón de seguridad rojo en el ...

Страница 22: ...STE ELECTRODOMÉSTICO A LA FUENTE DE PODER permita que repose verticalmente por aproximadamente 24 horas Esto reducirá la posibilidad de alguna falla de la unidad de enfriamiento debido a movimientos bruscos durante el envío Esta unidad es solamente para uso en interiores y debe ser ubicada en un área fresca y ventilada electrodoméstico y botellón Mantenga el área alrededor de la unidad libre de po...

Страница 23: ...ador con esta unidad No use una extensión con esta unidad Si el cable de electricidad es muy corto contacte Conecte la unidad a un toma corriente con contacto a tierra que esté conectado apropiadamente No corte ni remueva el contacto a tierra del toma corriente bajo ninguna circunstancia Si tiene alguna pregunta relacionada a la electricidad y o toma a tierra debe ATENCIÓN Si no planea utilizar la...

Страница 24: ...ua caliente espere un par de minutos y luego prenda el interruptor de agua fría Permita que la unidad alcance las temperaturas mínimas del agua caliente y agua fría Esto tomará aproximadamente 45 minutos y las Luces Indicadoras se apagarán Fig 4 7 Pruebe la temperatura del agua presionando cada una de las llaves 8 Apague los interruptores de agua caliente y fría y desconecte la unidad del toma cor...

Страница 25: ... la unidad y cuidadosamente permita que el cuello del botellón se deslice dentro del embudo asegúrese que la tapa a prueba de derrames se deslice hacia la punta del embudo La punta del embudo romperá el sello de la tapa a prueba de derrames permitiendo que el agua fluya sin derrames desde el botellón hacia el embudo y los tanques de agua Permita que el agua llene todos los tanques por aproximadame...

Страница 26: ...n todos los grifos Conecte la unidad al toma corriente Prenda el interruptor de agua caliente espere unos minutos y prenda el interruptor de agua fría Permita que la unidad alcance las temperaturas mínimas del agua fría y caliente Esto tomará aproximadamente 45 minutos y las Luces Indicadoras se apagarán Pruebe la temperatura del agua presionando cada 8 INSTRUCCIONES PARA COLOCAR EL BOTELLON DE AG...

Страница 27: ... punto de inicio para dar vuelta será distinto en cada unidad 45º ROMPA EL SELLO PARA AJUSTAR EL TERMOSTATO 45º 11 25º11 25º 11 25º 11 25º Use un destornillador plano para hacer el ajuste AJUSTE DEL TERMOSTATO DE AGUA FRÍA La temperatura estándar de fábrica está establecida en 42 8 F 6 C Gire el tornillo del termostato de agua fría NO MÁS de 45 en el sentido de las agujas del reloj para llevar la ...

Страница 28: ...rior de la máquina limpie con un saca polvo un paño de microfibra y o aspire el espiral de alambre usando el accesorio de cepillo de la aspiradora por favor refiérase al manual de instrucciones del usuario de la aspiradora Almacenamiento del enfriador de agua Por favor siga estas instrucciones para almacenar esta unidad cuando no vaya a ser utilizada por un largo periodo de tiempo Apague los inter...

Страница 29: ...nidad se ha sobrecalentado El interruptor de agua fría está dañado El Embudo de Agua caliente no esta fijado correctamente Encienda el interruptor de agua fría Pruebe la temperatura después de 45 minutos Apague los interruptores de agua fría y caliente y permita que la unidad descanse por 1 hora Encienda ambos interruptores otra vez asegúrese que los tanques tengan agua adentro Coloque el Embudo d...

Страница 30: ...5 Mitrana Group Inc Derechos reservados IM01 HWB2052W S B 2015 06 La marca Honeywell es utilizada bajo licencia de Honeywell International Inc Honeywell International Inc no se hace responsable Este producto ha sido fabricado por Mitrana Group Inc Para consultas sobre Mitrana Group Inc o los Enfriadores de Agua Honeywell favor contactar al 1 855 HWHELP1 1 855 494 3571 www honeywellwatercoolers com...

Отзывы: