


CLEANING AND STORAGE
Fig. 8
Fig. 9
Fig. 10a
Fig. 10b
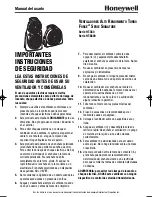
CONSUMER RELATIONS
Mail questions or comments to:
Kaz, Incorporated
Consumer Relations Dept.
250 Turnpike Road
Southborough, MA 01772
Call us toll-free at: 1-800-477-0457
E-mail: [email protected]
Or visit our website at:
www.kaz.com
Please be sure to specify a model number.
NOTE: IF YOU EXPERIENCE A PROBLEM, PLEASE CONTACT CONSUMER RELATIONS FIRST OR SEE
YOUR WARRANTY. DO NOT RETURN THE FAN TO THE ORIGINAL PLACE OF PURCHASE. DO NOT
ATTEMPT TO OPEN THE MOTOR HOUSING YOURSELF, DOING SO MAY VOID YOUR WARRANTY AND
CAUSE DAMAGE TO THE HEATER OR PERSONAL INJURY.
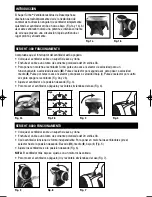
Unplug the fan before cleaning.
• These fans are equipped with a cord wrap feature. To store the product, wrap the cord around the two
prongs located on the bottom of the fan (Fig. 8).
• Use only a soft, damp cloth to gently wipe the fan clean.
• DO NOT immerse the fan in water and never allow water to drip into the motor housing.
• DO NOT use gasoline, paint thinner or other chemicals to clean the fan.
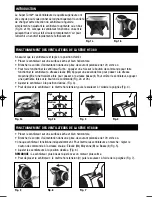
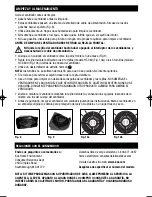
REMOVAL OF THE FRONT GRILLE FOR CLEANING
DO NOT remove the fan grille unless the fan’s power is turned off and the power cord is
unplugged.
• Gently lay the fan face down on a table (Fig. 9).
• Remove the front grille by unscrewing the 6 screws for model HT-380 (Fig. 10a) or 4 screws for model
HT-8800 (Fig. 10b) located on the back of the fan head.
• Unscrew the screws using a standard phillips head screw driver (
).
NOTE:
The screws will remain attached to the rear housing to ensure they are not lost. Do not try to force
the removal of the screws
• Lift the rear housing by the handle to separate from the front grille.
• Gently wipe the Fan Blade and grilles with a cloth. DO NOT IMMERSE THE FAN IN WATER AND NEVER
ALLOW WATER TO DRIP INTO THE MOTOR HOUSING. DO NOT USE GASOLINE, PAINT THINNER, OR
OTHER CHEMICALS TO CLEAN THE FAN.
• Re-assemble the fan by replacing the front grille and aligning the screw holes between the front grille
and the fan body. Gently tighten the screws.
• For storage, clean the fan carefully as instructed. Store the fan in the original packaging or cover the
product to protect it from dust. Store the fan in a cool, dry place.
HT-380_HT-8800_OM_Rev2.qxd 1/9/06 2:49 PM Page 3