Honeywell HT-380 Series Скачать руководство пользователя страница 11

LIMPIEZA Y ALMACENAMIENTO

RELACIONES CON EL CONSUMIDOR

Envie sus preguntas o comentarios a:

Kaz Home Environment
Consumer Relations Dept.
250 Turnpike Road
Southborough, MA 01772

Llámenos libre de cargo al teléfono 1-800-477-0457
Correo electrónico: [email protected]

O visite nuestro sitio web:

www.kaz.com

Asegúrese de especificar el número del modelo

NOTA: SI TIENE PROBLEMAS CON SU PURIFICADOR DE AIRE, LLAME PRIMERO AL SERVICIO A LA
CLIENTELA, LLEVE EL APARATO AL LUGAR DONDE LO COMPRÓ O CONSULTE LA GARANTÍA. NO
INTENTE ABRIR EL CAJETÍN DEL MOTOR, PODRÍA ANULAR LA GARANTÍA Y OCASIONAR DAÑOS O
DAÑARSE.

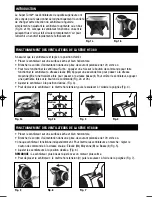
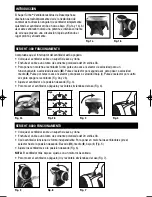
Quite el ventilador antes de limpiar.
•  Desenchufe el ventilador antes de limpiarlo.
•  Estos ventiladores poseen un sistema de enrollado de cable de alimentación. Sírvase de los dos

ganchos bajo el aparato (Fig. 8).

•  Utilice únicamente un trapo suave humedecido para limpiar el ventilador.
•  NO sumerja el ventilador en el agua, ni deje que se infiltre agua en el cajetín del motor.
•  NO use gasolina, disolvente para pintura ni ningún otro producto químico para limpiar el ventilador.

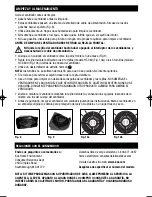
ANTES DE LIMPIAR EL VENTILADOR DEBE RETIRAR LA REJILLA FRONTAL:

NO quite la rejilla del ventilador hasta haber apagado el interruptor de los ventiladores y
desenchufado el cable de alimentación.

•  Vuelque con cuidado el ventilador sorbre la parte frontal en una mesa (Fig. 9).
•  Retire la rejilla delantera aflojando los 6 tornillos (modelo HT-380 (Fig. 10a)) o los 4 tornillos (modelo

HT-8800 (Fig. 10b)) detrás de la cabeza del ventilador.

•  Utilice un destornillador de estrella normal (

).

NOTA:

los tornillos no se soltarán del cajetín para que no se pierdan. No intente quitarlos.

•  Tire del asa para retirar el cajetín trasero de la rejilla delantera.
•  Use un trapo para limpiar con delicadeza las palas del ventilador y las rejillas. NO SUMERJA EL

VENTILADOR EN EL AGUA NI DEJE QUE SE INFILTRE AGUA EN EL CAJETÍN DEL MOTOR. NUNCA USE
GASOLINA, DISOLVENTE PARA PINTURA NI NINGÚN OTRO PRODUCTO QUÍMICO PARA LIMPIAR EL
VENTILADOR.

•  Vuelva a montar el ventilador colocando la rejilla delantera y alineando los agujeros roscados de la

misma con los del cuerpo del ventilador.

•  Antes de guardarlo, limpie el ventilador con cuidado siguiendo las instrucciones. Meta el ventilador en

su embalaje original o cúbralo para protegerlo del polvo. Guárdelo en un lugar fresco y seco.

Fig. 8

Fig. 9

Fig. 10b

Fig. 10a

HT-380_HT-8800_OM_Rev2.qxd  1/9/06  2:49 PM  Page 11

Содержание HT-380 Series

Страница 1: ...hen any appliance is used by or near children 6 Turn the fan to the OFF position and unplug the fan from the outlet when not in use when moving the fan from one location to another before cleaning and before removing the fan grille 7 To disconnect the fan first turn control to the OFF position grip the plug and pull it from the wall outlet Never pull by the cord 8 Do not operate the fan in the pre...

Страница 2: ...d time to change to medium speed II press a third time to change fan to the low speed I press a fourth time to turn the fan off Fig 2a 2b Adjust the fan to the desired position Fig 3 To move the fan turn the fan OFF and pick it up by the handle Fig 4 HT 380 SERIES OPERATION Place your fan on a dry level surface Plug the power cord into a polarized 120 volt AC wall outlet Each fan is independently ...

Страница 3: ...r or other chemicals to clean the fan REMOVAL OF THE FRONT GRILLE FOR CLEANING DO NOT remove the fan grille unless the fan s power is turned off and the power cord is unplugged Gently lay the fan face down on a table Fig 9 Remove the front grille by unscrewing the 6 screws for model HT 380 Fig 10a or 4 screws for model HT 8800 Fig 10b located on the back of the fan head Unscrew the screws using a ...

Страница 4: ...om jurisdiction to jurisdiction This warranty applies only to the original purchaser of this product from the original date of purchase B At its option Kaz will repair or replace this product if it is found to be defective in material or workmanship Defective product should be returned to the place of purchase in accordance with store policy Thereafter while within the warranty period defective pr...

Страница 5: ...t utilisé en présence d un enfant ou par un enfant 6 Régler le ventilateur à la position d arrêt et le débrancher quand il ne sert pas ou avant de le déplacer ou de le nettoyer 7 Pour débrancher le ventilateur régler d abord la commande à la position d arrêt saisir la fiche et la tirer pour la sortir de la prise de courant Ne jamais tirer sur le cordon d alimentation 8 Éviter de faire fonctionner ...

Страница 6: ... II et une troisième fois pour passer à la vitesse basse I Pour arrêter le ventilateur appuyer une quatrième fois sur le bouton de commande Fig 2a et 2b Ajuster le ventilateur à la position désirée Fig 3 Pour déplacer le ventilateur le mettre hors tension puis le soulever à l aidede la poignée Fig 4 FONCTIONNEMENT DES VENTILATEURS DE LA SÉRIE HT 380 Placer le ventilateur sur une surface sèche et b...

Страница 7: ...a grille avant Essuyer délicatement les pales du ventilateur et les grilles à l aide d un linge NE PAS IMMERGER LE VENTILATEUR DANS L EAU ET NE JAMAIS LAISSER D EAU PÉNÉTRER DANS LE BOÎTIER DU MOTEUR NE PAS UTILISER D ESSENCE DE DILUANT POUR PEINTURE NI TOUT AUTRE PRODUIT CHIMIQUE POUR NETTOYER LE VENTILATEUR Réassembler le ventilateur en replaçant la grille avant et en alignant les trous des vis ...

Страница 8: ...écis reconnus par la loi Ces droits diffèrent d une région à l autre et il est possible que vous en ayez d autres Cette garantie s applique uniquement à l acheteur initial de ce produit à compter de la date de l achat initial B À sa discrétion Kaz réparera ou remplacera ce produit si l on constate qu il comporte un vice de matière ou de main d oeuvre Tout produit défectueux devrait être retourné à...

Страница 9: ...un adulto cuando los aparatos sean usados en presencia de niños 6 Apague y desenchufe siempre el ventilador cuando no vaya a usarlo y antes de moverlo o limpiarlo 7 Para desconectar el ventilador primero debe apagarlo O y seguidamente desenchufarlo sujetando el enchufe y sacándolo de la toma Nunca tire del cable 8 No use el ventilador en presencia de vapores explosivos y o inflamables 9 No ponga e...

Страница 10: ...r segunda vez para pasar a velocidad media II Pulse por tercera vez el selector para pasar a velocidad baja I Pulse el selector por cuarta vez para apagar el ventilador Fig 2a y 2b Ajuste el ventilador a la posición deseada Fig 3 Para mover el ventilador apáguelo y levántelo sirviéndose del asa Fig 4 SERIE HT 380 FUNCIONAMIENTO Coloque el ventilador sobre un superficie seca y llana Enchufe el cabl...

Страница 11: ...ilador ANTES DE LIMPIAR EL VENTILADOR DEBE RETIRAR LA REJILLA FRONTAL NO quite la rejilla del ventilador hasta haber apagado el interruptor de los ventiladores y desenchufado el cable de alimentación Vuelque con cuidado el ventilador sorbre la parte frontal en una mesa Fig 9 Retire la rejilla delantera aflojando los 6 tornillos modelo HT 380 Fig 10a o los 4 tornillos modelo HT 8800 Fig 10b detrás ...

Страница 12: ... específicos Es posible que usted también tenga otros derechos legales los que varían según la jurisdicción La presente garantía sólo es válida para el comprador inicial del producto a partir de la fecha de compra B A su discreción KAZ reparará o remplazará el presente producto si se constata que presenta un defecto de fábrica o de mano de obra El producto defectuoso debe devolverse al lugar de co...

Отзывы: