background image

Using the LCD Display

Operation Of The Control Panel

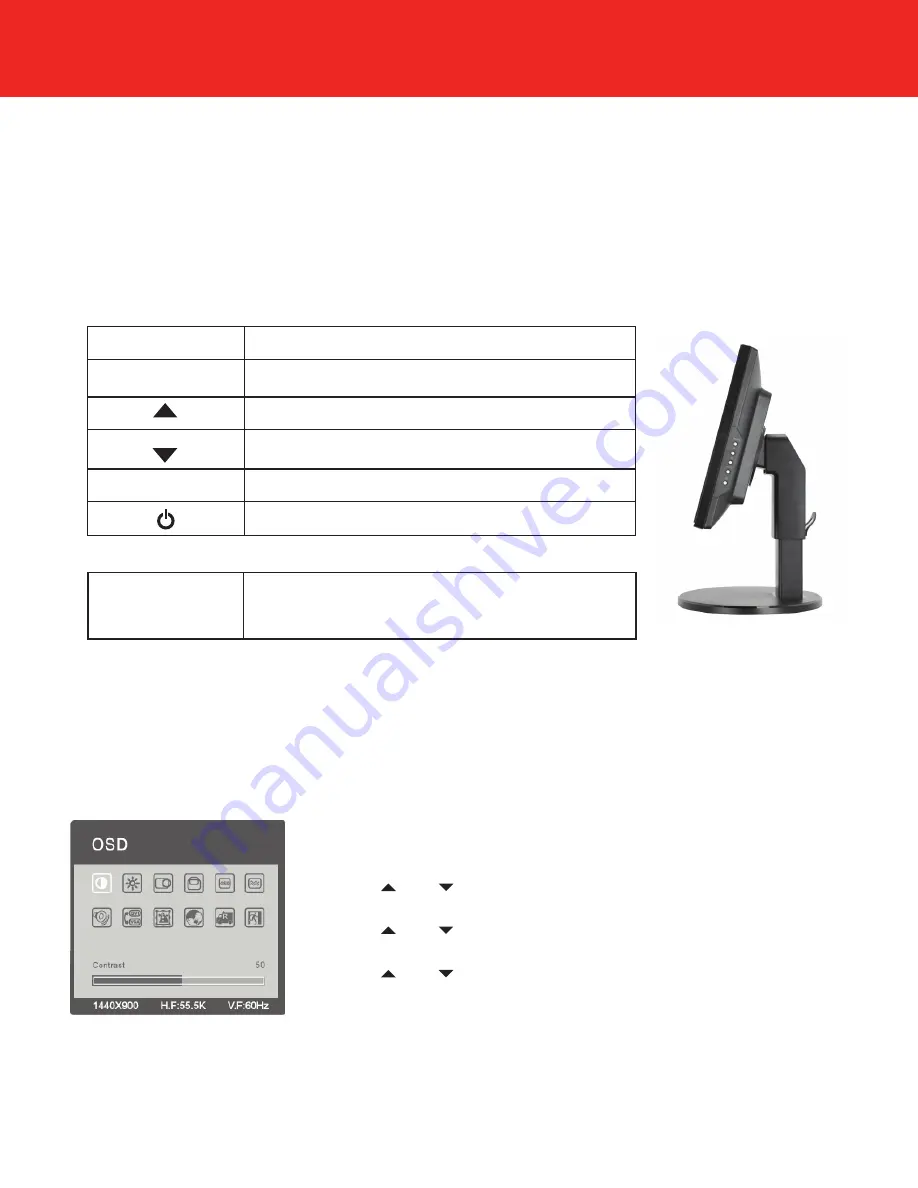
The control panel is designed to control the On Screen Display (OSD) menu.  Three are five 

function keys located on the side of the monitor used to navigate through the menu.

Using The On Screen Display (OSD) Menu

The user-friendly OSD menu will allow you to easily adjust your display to the desired visual 

settings.  At any time you can press the “AUTO” button to exit from the menu.

Operating Procedures

1. Press “MENU” to display the OSD Menu

2. Use “    ” or “    ” to navigate to the desired option

3. Press “MENU” to select the option

4. Use “    ” or “    ” to navigate to the desired setting

5. Press “MENU” to select the setting

6. Use “    ” or “    ” to change the setting

7. Press “AUTO” at any time to go back or exit from the OSD menu.

- 8 -

Function Key

Description of Function

Menu

Press to display OSD Menu or enter a sub-menu

Press to scroll through the OSD menu and to increase the value of OSD options.  

This key is also a default hot-key for increasing your volume level.

Press to scroll through the OSD menu and to decrease the value of OSD options.  

This key is also a default hot-key for decreasing your contrast level.

Auto

Press to automatically adjust the displayed content to full screen or exit the OSD 

menu.

Turn on or turn off the display power

Power LED

Serves as an indicator showing current status of the monitor.  The color code is 

described as follows: 

Standby Mode: Orange/Yellow/Red Flashing

Operating Mode: Green/Blue

Содержание Arius

Страница 1: ...ARIUS 19 Wide LCD Monitor Owner s Manual ...

Страница 2: ......

Страница 3: ...nts Quick Installation Adjusting The Visual Angle Using the LCD Display Operation Of The Control Panel Using The On Screen Display OSD Menu Adjusting The Screen Automatically OSD Options Other Information Specifications Troubleshooting Customer Support Cleaning the LCD Display Warranty Information Product Registration 2 3 4 5 5 9 7 8 8 9 9 10 11 12 13 14 15 16 1 ...

Страница 4: ...reception you may sense through the equipment Change the direction or the location of the receiving antenna Increase the distance between the equipment and the receiving antenna Connect the equipment and the receiving antenna to different socket To ask the experienced PA TV technical personnel for help Hint It is necessary for you to use the shielded signal cable and power cord provided with the e...

Страница 5: ...n result in person injury or property damage Do Not Tamper With The Monitor Do not dismantle the display or attempt to fix or replace any internal parts by yourself The display contains parts that store electricity even after the monitor is off Doing so may result in a fire hazard or sever personal injury or death Do Not Allow Any Foreign Objects Or Liquids To Get Into The Monitor The presence of ...

Страница 6: ...s document may be photocopied reproduced or translated into another publication We reserve the rights to make changes from time to time in the contents hereof without obligation to notify any person of such revision or changes SOYO also reserves the right to change the specification without notice and may therefore not coincide with the con tents of this document SOYO assumes no responsibilities w...

Страница 7: ...lectric shock 1 Prepare a stable balanced and clean surface near a wall outlet for the placement of your LCD Display 2 Remove all packaging and protective materials from the LCD monitor and place it on the prepared surface 3 Remove transport screw to activate the vertical adjustment Package Contents 1 x 19 LCD Monitor 1 x AC Power Cable 1 x D Sub VGA Cable 1 x DVI Video Cable 1 x USB 2 0 Cable 1 x...

Страница 8: ...able VGA or DVI to the corresponding port on the back of the LCD monitor and the other end to the corresponding port on the back of your PC Fasten each end of the video cable with the built in thumb screws to ensure a good connection 3 Connect one end of the AC Power Adaptor to the back of the monitor 4 Plug the other end of the AC Power Adaptor into the wall outlet NOTE It is recommended to plug ...

Страница 9: ...tilt the monitor to your viewing position Horizontal Swivel Press forward and pull back on the sides of the display to horizontally swivel the monitor to your viewing position Counter Clockwise Rotation Pull up and press down on the corners of the display to rotate the monitor counter clockwise to view your documents in either portrait or landscape mode 7 90 Counter Clockwise Rotation 180 Left or ...

Страница 10: ...ss MENU to select the setting 6 Use or to change the setting 7 Press AUTO at any time to go back or exit from the OSD menu 8 Function Key Description of Function Menu Press to display OSD Menu or enter a sub menu Press to scroll through the OSD menu and to increase the value of OSD options This key is also a default hot key for increasing your volume level Press to scroll through the OSD menu and ...

Страница 11: ...rkest black Brightness Adjust the overall brightness of the display Horizontal Position Horizontally adjust the screen s position Vertical Position Vertically adjust the screen s position OSD Horizontal Position Horizontally adjust the OSD Menu position OSD Vertical Position Vertically adjust the OSD Menu Position Phase Adjustment Adjust to correct vertical dark bands Clock Adjustment Adjust to co...

Страница 12: ...Net 17 45in x 16 59in x 8 12in Gross 19 98in x 18 11in x 12 80in Weight Net 6 74 kg 14 87 lbs Gross 8 48 kg 18 67 lbs Supported Resolutions and Refresh Rates Display Mode Analog Digital Horizontal Frequency Vertical Frequency PC VGA 640x480 31 5 KHz 60 Hz 37 5 KHz 75 Hz VGA TEXT 720x400 31 5 KHz 70 1 Hz SVGA 800x600 37 9 KHz 60 3 Hz 46 9 KHz 75 0 Hz XGA 1024x768 48 8 KHz 60 0 Hz 60 0 KHz 75 0 Hz S...

Страница 13: ...e specifications of the display The Power LED Is Orange or Red Press a key on the keyboard or move the mouse to see if the computer is in a power saving mode Make sure the power to the PC is turned on Make sure the signal cable is securely attached to the monitor and computer Make sure the computer s resolution is within the specifications of the display Display Is Too Dark or Bright Adjust the br...

Страница 14: ... right to make any changes without further notice to any products herein This document contains proprietary information which is protected by copyright All rights are re served No part of this document may be photocopied reproduced or translated into another publication We reserve the rights to make changes from time to time in the contents hereof without obligation to notify any person of such re...

Страница 15: ... this product Using the following compounds may result in damage to the monitor Thinning agents Spraying cleaning compounds Corrosive cleaning compounds Highly acidic or alkaline solvents Benzine wax Cleaning The Monitor Housing 1 Cleaning off dust or dirt For best results use a soft damp cloth to clean the housing Immediately after use a soft dry cloth to remove any remaining moisture Cleaning Th...

Страница 16: ...seller or retailer SOYO reserves the right to refuse and return freight collect Product s that are not covered by SOYO warranty or products delivered to SOYO with an expired RMA number SOYO will use its best efforts to service Products within thirty 30 days after receipt of the RMA Once the service is completed SOYO at its expense will ship via ground carrier and will retain all risk of loss until...

Страница 17: ... Vegetable Gardening Crafts Buying Prerecorded Videos Automotive Work Electronics Home Workshop Do It Yourself Recreation Vehicles RV s Listen to Records Tapes CDs Avid Book Reading Bible Devotional Reading Photography Cultural Arts Events Fashion Clothing Foreign Travel Cruise Ship Vacations Travel in USA Gourmet Cooking Fine Foods Wines Stamp Coin Collecting Collectibles Our Nation s Heritage Re...

Страница 18: ...er without proper postage If you have comments or suggestions about our product please write to SOYO INC MARKETING DEPARTMENT 1420 S VINTAGE AVE ONTARIO CALIFORNIA 91761 USA PRODUCT REGISTRATION DEPARTMENT 1420 S VINTAGE AVE ONTARIO CA 91761 3646 Visit our website at http www honeywellce com ...

Страница 19: ......

Страница 20: ...l performance may vary due to operating conditions We are not responsible for typo graphical and photographical errors All trademarks mentioned or listed herein are the property of their respective owners Information provided for reference purposes only All specifications and information are subject to change without notice All rights reserved The Honeywell trademark is used by SOYO Inc under lice...

Отзывы: