


Adjust the Brightness / Volume
Notes
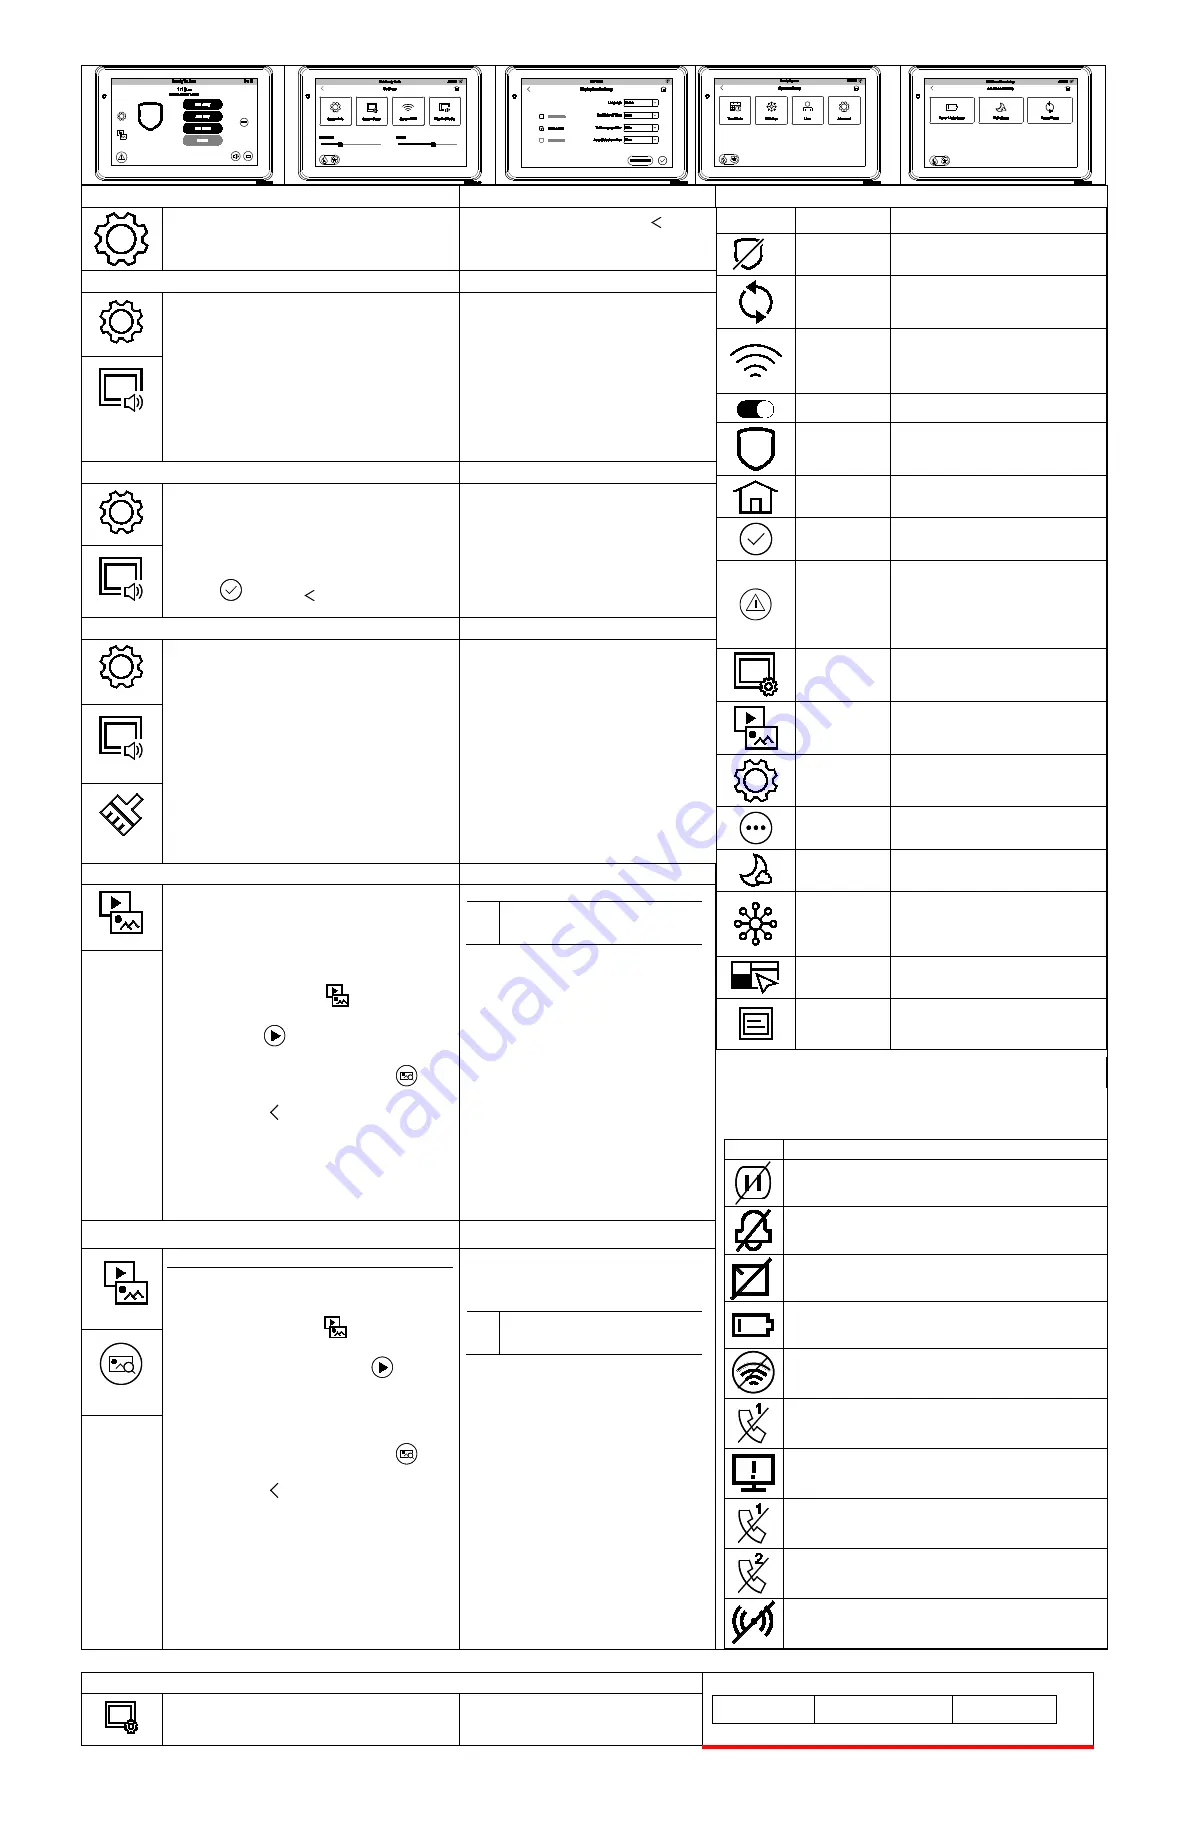
Navigation Icons
1. From the Home/Security screen, select the
Setup
icon.
2. Move the
Brightness/Volume
slide bar to
adjust the brightness/volume.
Changes are saved when you exit this
screen.
Panel Default Displays
The Security screen displays an Icon(s) if a panel fault occurs. The
following lists the Icons that are displayed to the left of the Panic
icon.
ICON
MEANING
AC Loss;
The system is not receiving AC power.
Bell Failure;
The system bell or siren has a problem.
Note:
This Icon
is displayed when interfacing with residential panels only.
Expander Failure;
The system has a failure in an expansion module.
Low Battery;
The system battery, that powers the system during an AC
power loss, is low.
LRR Supervision Failure;
The Communication Device used to communicate with
the central station has a supervision failure.
Max Attempts Exceeded;
The system has exceeded the maximum attempts to
communicate with the Central Station.
Pager Failure; The system cannot communicate with an
assigned pager.
Telco-1 Cut;
The system is not able to communicate with the central
monitoring station over the primary phone line.
Telco-2 Cut;
The system is not able to communicate with the central
monitoring station over the secondary phone line.
Wireless Failure;
The system is not able to communicate with its wireless
devices.
ICON
ICON TITLE
FUNCTION
Disarmed
System is Disarmed
Reset
Select to reset Touchscreen
WIFI
Accesses WIFI Setup screen. Used
to connect to WIFI networks. (if
installed and programmed by your
installer.)
WIFI ON
Select to turn WIFI On and OFF.
Security
Arm the system and access the three
arming modes.
Home
Returns you to the Home/Security
screen.
Apply
Select to accept changes.
Panic
Displays Emergency functions (as
programmed by the installer). See
Programming the Control Panel note.
Note:
This icon is displayed and
active on all screens except while in
the Clean Screen mode.
System Setup This icon alerts the user to a Control
Panel Message.
Multimedia
Accesses Image and Video files.
Setup
Allows access to Setup menus.
More Choices Allows access to Event Logs,
Console Mode and Show Zones
Night Setup
Allows user to Arm the system in
Night mode.
CS Setup
Provides access to ECP Address &
Options, Screen Security, Device
events, Code Authority, and Panel
Configuration.
ECP
Address
& Options
Allows user to enter the ECP address
to communicate with alarm panel.
Panel Config.
Provides access to the details of your
system and panel configuration
information.
Operating Modes / Language Selection
Notes
From the
Setup
screen;
1. Select the
Disp&Audio Setup
icon.
2. Enter your “Authorized Code" if required.
3. Select
Chime Mode
or
Voice Mode
to turn
the mode on or off.
4. To change the Touchscreen display
language, select the desired language from
the drop-down menu.
The touchpad will revert back to the
Home/Security screen with the selected language
applied.
If the Chime Mode and Voice Mode are both
selected, the Voice Chime is automatically
selected.
It may take a few seconds for the Chime
Mode to take effect.
When the Touchscreen exits the “Operating
Modes” screen, your selection is saved.
The Touchscreen allows you to select from
three languages, (English, French Canadian
and Latin American Spanish) with the default
being English.
Adjust the Screen Timeouts
Notes
From the
Setup
screen;
1. Select the
Disp&Audio Setup
icon.
2. Enter your “Authorized Code" if required.
3. Select the desired selection from the drop-
down list displaying the time period for each
option.
4. Select
to save or to go back to the
previous menu..
If changes are made, when you exit, a
message displays:
“
Information Settings Saved”
Settings include:
•
Backlight Off After
X time
•
Return
To Homepage After
X time
•
Auto Slideshow After
X time.
Clean Screen
Notes
1. From the Home/Security screen, select the
Setup
icon.
2. Select the
Disp&Audio Setup
icon.
3. Enter your “Authorized Code" if required.
4. Select the
CLEAN SCREEN
icon to disable
the Touchscreen for 26 seconds so you can
wipe the screen clean.
A pop-up window displays
"
Touch Screen will
be disabled so that you may wipe the screen
clean. Please use a damp, soft cloth. DO NOT
use any liquids, sprays, or ammonia-based
cleaners. Press CONTINUE to disable
touchscreen."
** Panics cannot be initiated during this process**
At the
"Screen Disabled for =30 Seconds"
screen, the touchscreen should be wiped
clean of fingerprints using a mild soap solution
and a soft cloth. When the counter reaches
zero, the window automatically closes and the
touchscreen is active.
IMPORTANT:
Do not use an abrasive
cleaning agent or abrasive cloth when
cleaning the Touchscreen or damage to the
touchscreen may occur.
NOTE:
The
Emergency
screen cannot be
accessed while running in the clean screen
mode.
Select
Cancel
to exit.
Multimedia:
Video Setup
Notes
NOTE:
Micro SD card max size is 64GB and must
be FAT32, SDXC format. Recommended is
Kingston or Samsung.
Insert a media card (Micro SD/ SDHC) with
stored (avi, .ts, .mpg, .mp4, .mov, .mkv, or .flv)
video files.
1. Select the
Multimedia
icon and then
select the
Video
folder to view.
2. Select
Play
to start the selected
video file.
3. Select the
Multimedia
information
icon
to view picture/video information.
4. Select
Back
to return to the previous
screen.
NOTE:
If the video file causes the keypad to lock,
press the reset button on the keypad to reset
the keypad.
UL
Multimedia functionality is
supplementary only and has not
been evaluated by UL.
Picture Setup
Notes
Insert a media card (Micro SD/SDHC) with
stored (jpg, .bmp, .png or .jpeg) photos.
1. Select the
Multimedia
icon and then
select the
Picture
folder to view.
2. Select a photo and select Play
to view
pictures in a slide show format.
3. To set a picture as wallpaper, select the
Default/Wallpaper
folder to activate the
wallpaper setting.
4. Select the
Multimedia
information
icon
to view picture/video information.
5. Select
Back
to return to the previous
screen.
The Picture feature allows you to set up and
view up to 1000 stored photos or select a
photo to set it as a wallpaper display.
UL
Multi-Media functionality is
supplementary only and has not
been evaluated by UL.
-2-
CS Setup
Notes
Compatibility Table
Panel Type
Panel Version
Max # of
touchscreens
1. Select the
Setup
→
System Setup
and
CS
Setup
icons.
When the Touchscreen cannot communicate
with the alarm panel, the message “ECP
Error” is displayed, check the following:


