18
ENGLISH
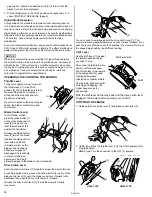
Blade Removal
1. HXEA: Put the throttle lever in the STOP position.
HMEA: Turn the key to the OFF position.
2. Turn the fuel valve OFF. Disconnect the spark plug cap, then tilt
the mower to the right side, so the air cleaner side is up. This will
help to prevent fuel leakage and hard starting due to carburetor
flooding.
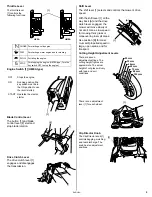
3. Use a 14 mm (6 point) socket wrench and remove the two blade
bolts [1] and special washers [2] from the blade control assembly
[5]. Use a wooden block to prevent the blades from turning when
removing the bolts.
4. Remove the upper [4] and lower blades [3].
Blade Installation
1. Clean dirt and grass from around the blade mounting area. Install
the blades [3] and [4] using the two blade bolts [1] and special
washers [2] as shown.
Be sure to install the special washers with the concave side toward
the blades and the convex side toward the head of the bolt.
The blade bolts are specially designed for this application and
must not be replaced with other bolts.
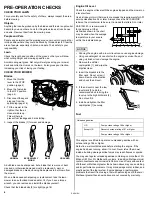
2. Tighten the blade bolts with a torque wrench [7]. Use a wooden
block [6] to prevent the blades from turning.
Blade bolt torque: 49 ~ 59 N·m
If you do not have a torque wrench, have an authorized Honda
dealer tighten the blade bolts before you use the mower. If the
blade bolts are overtightened, they could break. If the blade bolts
are not tightened enough, they could loosen or come out. In either
case, it would be possible for the blades to fly off while you are
operating the mower.
GRASS BAG CLEANING AND REPLACEMENT
Cleaning
Wash the bag with a garden hose, and allow it to dry completely
before use; a wet bag will clog quickly.
Replacement
Replace a worn or damaged bag with a Honda replacement bag or its
equivalent.
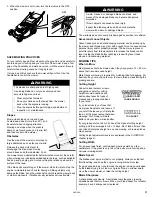
Removal
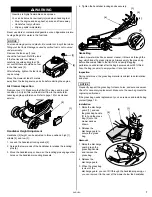
1. Unclip the plastic edges [1]
of the bag [2] from the
frame [3].
2. Remove the bag from the
frame.
Installation
1. Insert the bag frame [3] into the
bag [2], as shown above.
2. Clip the plastic edges [1] of the
bag onto the frame.
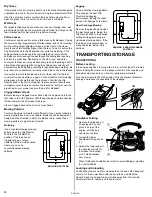
SPARK ARRESTER SERVICE
The spark arrester must be serviced every 100 hours to keep it
functioning as designed.
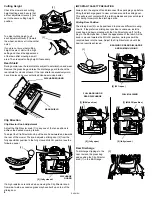
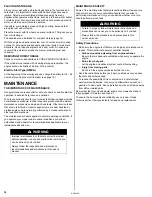
1. Allow the engine to cool, then remove the three bolts [1] from the
muffler shield [2] using a 10 mm socket wrench.
2. Remove the muffler shield [2].
3. Remove the screw [4].
4. Remove the spark arrester [3] from the muffler [5].
5. Check for carbon deposits on the spark arrester and the exhaust
port. Brush carbon deposits away. Be careful to avoid damaging
the spark arrester screen.
6. Install the spark arrester in the muffler.
7. Install the muffler components on the engine, and tighten the three
bolts securely.
[1]
[2]
[3]
[4]
[5]
[3] [4]
[1]
[2]
[7]
[6]
[1]
[3]
[2]
[1]
[5]
[4]
[2]
[3]
[1]
HXE.book Page 18 Monday, August 6, 2007 10:44 AM
Содержание HRX537HMEA
Страница 22: ...Printed on Recycled Paper ...


